
Search results for "Varied learning" in Home Design Ideas

 Northern Roof Tiles
Architect: Andre Tchelistcheff Architects New York. NY
Builder: Xhema of Greenwich CT
Installer: TRM Enterprises Bridgehampton NY
Back story.
Northern has worked with both Xhema and TRM many tiles. We have worked with Andre before he branched out on his own.
Originally Xhema’s contact was to replace the roof and repair the garage, which as some point had been made into an indoor swimming pool without adequate ventilation. The budget was about $8m and there were 20 drawings.
By the time the job was 6 months old the scope of work has expanded to over $30m and over 200 drawings had been produced.
Northern was contacted to visit the site and evaluate the existing roof. Although the house had been added to over the years the same tile was used but due to the location of the house the color of the tile varied considerably from the front to the back.
Northern identified a large number of custom details which would require us to:
1) Match the existing Field tile in size, thickness (it was actually thicker at the butt and reduced to ½” where the tile is overlapped) , surface texture and the color.
2) Make tiles that are curved in their length to suit the curved rafter on the gabled dormers.
3) Make the curved tiles to suit the low slope octagonal tower.
4) Make the curved tiles and Arris style hips to suit the hipped dormers with the curved rafters.
5) Make the segmented tiles to suit the round turret.
6) Make the custom arris style hip tiles for the octagonal tower.
7) Make the custom Arris style hip to suit the different roof pitches as well as the varying splays at the eaves.
8) Make the custom pieces to suit the swept valleys
Simon broke down each section of the roof. He indented all items for each section and agreed the measure etc with the installers. This ‘Project Bible’ became an invaluable tool for the installer, our tile makers and us.
We shipped some samples from the original roof to Sahtas who replicated tall the details. I was visiting factory and delayed my return to the Saturday so that the tiles coming out of the kiln late Friday night could be wrapped and packed into newly purchase suit cases. I arrived home late Saturday evening and Simon picked me up Sunday afternoon and drove us down to Greenwich for an 8 am meeting with the clients. When we unpacked the tiles they were still warm and Hilfiger signed off on the color, although his wife suggested we make them a bit darker a ‘as he has a dreadful sense of color!’
We took Vincent Liot, owner of TRM to the factory twice so that he could oversee the prototyping of all the myriad custom pieces. This was an invaluable move as he pre-approved all the pieces before they were shipped.
The installation was completed and everyone was very pleased with the final outcome.
The Hilfiger’s estate manager told me that a group of friends who were staying the weekend after all the work was completed were heard to ask Mr. Hilfiger ‘I thought you were having a new roof’…to which he responded ‘we did but you can’t tell, which as the plan” …perfect!
In refection this is probably the most complicated roof Northern has ever had the pleasure to supply. We learned a lot of very valuable lessons but in future when we are asked how did we do it we will answer ‘that is for us to know and for you to pay for!’
 Northern Roof Tiles
Architect: Andre Tchelistcheff Architects New York. NY
Builder: Xhema of Greenwich CT
Installer: TRM Enterprises Bridgehampton NY
Back story.
Northern has worked with both Xhema and TRM many tiles. We have worked with Andre before he branched out on his own.
Originally Xhema’s contact was to replace the roof and repair the garage, which as some point had been made into an indoor swimming pool without adequate ventilation. The budget was about $8m and there were 20 drawings.
By the time the job was 6 months old the scope of work has expanded to over $30m and over 200 drawings had been produced.
Northern was contacted to visit the site and evaluate the existing roof. Although the house had been added to over the years the same tile was used but due to the location of the house the color of the tile varied considerably from the front to the back.
Northern identified a large number of custom details which would require us to:
1) Match the existing Field tile in size, thickness (it was actually thicker at the butt and reduced to ½” where the tile is overlapped) , surface texture and the color.
2) Make tiles that are curved in their length to suit the curved rafter on the gabled dormers.
3) Make the curved tiles to suit the low slope octagonal tower.
4) Make the curved tiles and Arris style hips to suit the hipped dormers with the curved rafters.
5) Make the segmented tiles to suit the round turret.
6) Make the custom arris style hip tiles for the octagonal tower.
7) Make the custom Arris style hip to suit the different roof pitches as well as the varying splays at the eaves.
8) Make the custom pieces to suit the swept valleys
Simon broke down each section of the roof. He indented all items for each section and agreed the measure etc with the installers. This ‘Project Bible’ became an invaluable tool for the installer, our tile makers and us.
We shipped some samples from the original roof to Sahtas who replicated tall the details. I was visiting factory and delayed my return to the Saturday so that the tiles coming out of the kiln late Friday night could be wrapped and packed into newly purchase suit cases. I arrived home late Saturday evening and Simon picked me up Sunday afternoon and drove us down to Greenwich for an 8 am meeting with the clients. When we unpacked the tiles they were still warm and Hilfiger signed off on the color, although his wife suggested we make them a bit darker a ‘as he has a dreadful sense of color!’
We took Vincent Liot, owner of TRM to the factory twice so that he could oversee the prototyping of all the myriad custom pieces. This was an invaluable move as he pre-approved all the pieces before they were shipped.
The installation was completed and everyone was very pleased with the final outcome.
The Hilfiger’s estate manager told me that a group of friends who were staying the weekend after all the work was completed were heard to ask Mr. Hilfiger ‘I thought you were having a new roof’…to which he responded ‘we did but you can’t tell, which as the plan” …perfect!
In refection this is probably the most complicated roof Northern has ever had the pleasure to supply. We learned a lot of very valuable lessons but in future when we are asked how did we do it we will answer ‘that is for us to know and for you to pay for!’
 Northern Roof Tiles
Architect: Andre Tchelistcheff Architects New York. NY
Builder: Xhema of Greenwich CT
Installer: TRM Enterprises Bridgehampton NY
Back story.
Northern has worked with both Xhema and TRM many tiles. We have worked with Andre before he branched out on his own.
Originally Xhema’s contact was to replace the roof and repair the garage, which as some point had been made into an indoor swimming pool without adequate ventilation. The budget was about $8m and there were 20 drawings.
By the time the job was 6 months old the scope of work has expanded to over $30m and over 200 drawings had been produced.
Northern was contacted to visit the site and evaluate the existing roof. Although the house had been added to over the years the same tile was used but due to the location of the house the color of the tile varied considerably from the front to the back.
Northern identified a large number of custom details which would require us to:
1) Match the existing Field tile in size, thickness (it was actually thicker at the butt and reduced to ½” where the tile is overlapped) , surface texture and the color.
2) Make tiles that are curved in their length to suit the curved rafter on the gabled dormers.
3) Make the curved tiles to suit the low slope octagonal tower.
4) Make the curved tiles and Arris style hips to suit the hipped dormers with the curved rafters.
5) Make the segmented tiles to suit the round turret.
6) Make the custom arris style hip tiles for the octagonal tower.
7) Make the custom Arris style hip to suit the different roof pitches as well as the varying splays at the eaves.
8) Make the custom pieces to suit the swept valleys
Simon broke down each section of the roof. He indented all items for each section and agreed the measure etc with the installers. This ‘Project Bible’ became an invaluable tool for the installer, our tile makers and us.
We shipped some samples from the original roof to Sahtas who replicated tall the details. I was visiting factory and delayed my return to the Saturday so that the tiles coming out of the kiln late Friday night could be wrapped and packed into newly purchase suit cases. I arrived home late Saturday evening and Simon picked me up Sunday afternoon and drove us down to Greenwich for an 8 am meeting with the clients. When we unpacked the tiles they were still warm and Hilfiger signed off on the color, although his wife suggested we make them a bit darker a ‘as he has a dreadful sense of color!’
We took Vincent Liot, owner of TRM to the factory twice so that he could oversee the prototyping of all the myriad custom pieces. This was an invaluable move as he pre-approved all the pieces before they were shipped.
The installation was completed and everyone was very pleased with the final outcome.
The Hilfiger’s estate manager told me that a group of friends who were staying the weekend after all the work was completed were heard to ask Mr. Hilfiger ‘I thought you were having a new roof’…to which he responded ‘we did but you can’t tell, which as the plan” …perfect!
In refection this is probably the most complicated roof Northern has ever had the pleasure to supply. We learned a lot of very valuable lessons but in future when we are asked how did we do it we will answer ‘that is for us to know and for you to pay for!’
Find the right local pro for your project
 Northern Roof Tiles
Architect: Andre Tchelistcheff Architects New York. NY
Builder: Xhema of Greenwich CT
Installer: TRM Enterprises Bridgehampton NY
Back story.
Northern has worked with both Xhema and TRM many tiles. We have worked with Andre before he branched out on his own.
Originally Xhema’s contact was to replace the roof and repair the garage, which as some point had been made into an indoor swimming pool without adequate ventilation. The budget was about $8m and there were 20 drawings.
By the time the job was 6 months old the scope of work has expanded to over $30m and over 200 drawings had been produced.
Northern was contacted to visit the site and evaluate the existing roof. Although the house had been added to over the years the same tile was used but due to the location of the house the color of the tile varied considerably from the front to the back.
Northern identified a large number of custom details which would require us to:
1) Match the existing Field tile in size, thickness (it was actually thicker at the butt and reduced to ½” where the tile is overlapped) , surface texture and the color.
2) Make tiles that are curved in their length to suit the curved rafter on the gabled dormers.
3) Make the curved tiles to suit the low slope octagonal tower.
4) Make the curved tiles and Arris style hips to suit the hipped dormers with the curved rafters.
5) Make the segmented tiles to suit the round turret.
6) Make the custom arris style hip tiles for the octagonal tower.
7) Make the custom Arris style hip to suit the different roof pitches as well as the varying splays at the eaves.
8) Make the custom pieces to suit the swept valleys
Simon broke down each section of the roof. He indented all items for each section and agreed the measure etc with the installers. This ‘Project Bible’ became an invaluable tool for the installer, our tile makers and us.
We shipped some samples from the original roof to Sahtas who replicated tall the details. I was visiting factory and delayed my return to the Saturday so that the tiles coming out of the kiln late Friday night could be wrapped and packed into newly purchase suit cases. I arrived home late Saturday evening and Simon picked me up Sunday afternoon and drove us down to Greenwich for an 8 am meeting with the clients. When we unpacked the tiles they were still warm and Hilfiger signed off on the color, although his wife suggested we make them a bit darker a ‘as he has a dreadful sense of color!’
We took Vincent Liot, owner of TRM to the factory twice so that he could oversee the prototyping of all the myriad custom pieces. This was an invaluable move as he pre-approved all the pieces before they were shipped.
The installation was completed and everyone was very pleased with the final outcome.
The Hilfiger’s estate manager told me that a group of friends who were staying the weekend after all the work was completed were heard to ask Mr. Hilfiger ‘I thought you were having a new roof’…to which he responded ‘we did but you can’t tell, which as the plan” …perfect!
In refection this is probably the most complicated roof Northern has ever had the pleasure to supply. We learned a lot of very valuable lessons but in future when we are asked how did we do it we will answer ‘that is for us to know and for you to pay for!’
 Housing & Building Association of Colorado Springs
The Home
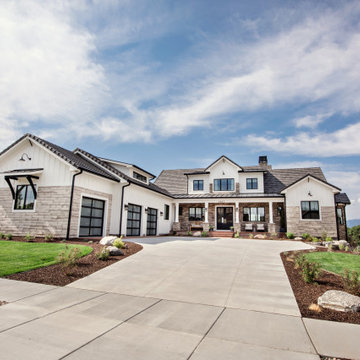
Inspired by a family’s desire for peace and serenity, this beautiful updated twist on the modern farmhouse is a dream come true for
this Texas family that now calls Colorado their home. Placed perfectly on a higher elevation of Flying Horse, this sanctuary takes its
queues from the restorative nature of the cooler hills and greener landscapes that surround it. “Unexpected” is the take on this home’s
indoor/outdoor living. The rooms flow seamlessly from gathering places, to cooking, dining and entertaining areas and out to decks
and patios where homeowners and guests alike find it irresistible to just relax. It is easy to understand why coming home here is the
best part of the day.
Throughout this beautiful retreat, traditional impressions meld with new sensibilities and creative ingenuity. Wide, white, oak plank
flooring, distressed brick, crisscross beams, ship-lap that climbs the walls, varied weights of white millwork and a meticulous mix of
painted and wood-stained cabinets and doors exude warmth and encourage friends to stay longer than they ever planned they would. Sophisticated living at its casual best.
Subtle but stylish, this family home is designed as a place where unforgettable memories will be made and family will stay connected
- a gracious lifestyle of thanksgiving and joy that is truly “All About Home”.
The Builder
Esteemed as a problem-solver, Scott Maynes delivers artistic living solutions that are both beautiful and practical for his clients. For over three decades he was an industry innovator in the commercial and home building industry in California and Nevada. After years of pleading for him to join with his sister’s interior design business in Colorado, he finally made the leap. With that move, a premiere home building and design company, All About Home Design/Build, was formed. Their first project in 2014 had the honor of winning CSHBA Best Overall Home and the People’s Choice Award and they have followed it up each year since.
With an uncompromising eye for detail, passion for quality and creativity, and striving for the most value for the dollar, Scott and his team have learned what it takes to turn a client’s vision into reality. If you are interested in building, please contact us at 719-559-1220 or scott@allabouthomedesign.com
The Interior Design
If there is something that never goes out of style, it’s listening to the client and understanding what they want. This gorgeous home speaks to its owner’s sense of class and curated style with muted hues that change subtly from room to room. Mixed metals, weathered materials, white painted trim, layers of tone and texture, and RH fabric colors hovering between driftwood and stone combine to form a quieter look, while industrial touches like black windows and metal stair railings give it an “edge”.
Design is like mixology: put in different ingredients and shake up something amazing. Mix styles - casual with formal, traditional with modern - to create a look that feels fresh and brand new. Designed as a place for fun family living, this home is a must see both inside and out.

 The Cabinet Store + Culina Design
The home, built in the mid ’90s, needed an update. However, the family wanted to keep the renovations neutral enough to accommodate future changes and transformations. They had several project goals, including:
* Eliminate the family’s dining room table
* Add additional storage
* Create the new kitchen design within the footprint of their existing floor plan
* Make the refrigerator more easily accessible
To accomplish this, we removed the clunky dining room table and integrated seating into the home’s kitchen island. To remedy their storage woes we installed three large pantry cabinets. We also relocated the fridge for easier access. To add some style to the space, the family upgraded their cabinets to Showplace cabinets featuring the freeport door style in lyptus wood with a truffle finish. They replaced their existing countertops with Cambria Canterbury and installed a complementary Elkay granite sink.

 JPStyles
Example of a mid-sized classic medium tone wood floor and brown floor home office design in Baltimore with brown walls and no fireplace
 The Cabinet Store + Culina Design
The home, built in the mid ’90s, needed an update. However, the family wanted to keep the renovations neutral enough to accommodate future changes and transformations. They had several project goals, including:
* Eliminate the family’s dining room table
* Add additional storage
* Create the new kitchen design within the footprint of their existing floor plan
* Make the refrigerator more easily accessible
To accomplish this, we removed the clunky dining room table and integrated seating into the home’s kitchen island. To remedy their storage woes we installed three large pantry cabinets. We also relocated the fridge for easier access. To add some style to the space, the family upgraded their cabinets to Showplace cabinets featuring the freeport door style in lyptus wood with a truffle finish. They replaced their existing countertops with Cambria Canterbury and installed a complementary Elkay granite sink.




 Sans Soucie Art Glass
GLASS LAUNDRY ROOM DOORS that YOU customize to suit your decor! Let a Pretty Glass Laundry Room Door Lighten Your Load! Glass Laundry Room Doors and laundry door inserts with custom etched glass, frosted glass designs! Spruce up your laundry room with a beautiful etched glass laundry room door by Sans Soucie! Creating the highest quality and largest selection of frosted glass laundry room doors available anywhere! Select from dozens of frosted glass designs, borders and letter styles! Sans Soucie creates their laundry door obscure glass designs thru sandblasting the glass in different ways which create not only different effects, but different levels in price. The "same design, done different" - with no limit to design, there's something for every decor, regardless of style. Inside our fun, easy to use online Glass and Door Designer at sanssoucie.com, you'll get instant pricing on everything as YOU customize your door and the glass, just the way YOU want it, to compliment and coordinate with your decor. When you're all finished designing, you can place your order right there online! Shipping starts at just $99! Custom packed and fully insured with a 1-4 day transit time. Available any size, as laundry door glass insert only or pre-installed in a door frame, with 8 wood types available. ETA for laundry doors will vary from 3-8 weeks depending on glass & door type. Glass and doors ship worldwide. Glass is sandblast frosted or etched and laundry room door designs are available in 3 effects: Solid frost, 2D surface etched or 3D carved. Visit our site to learn more!
 The Cabinet Store + Culina Design
The home, built in the mid ’90s, needed an update. However, the family wanted to keep the renovations neutral enough to accommodate future changes and transformations. They had several project goals, including:
* Eliminate the family’s dining room table
* Add additional storage
* Create the new kitchen design within the footprint of their existing floor plan
* Make the refrigerator more easily accessible
To accomplish this, we removed the clunky dining room table and integrated seating into the home’s kitchen island. To remedy their storage woes we installed three large pantry cabinets. We also relocated the fridge for easier access. To add some style to the space, the family upgraded their cabinets to Showplace cabinets featuring the freeport door style in lyptus wood with a truffle finish. They replaced their existing countertops with Cambria Canterbury and installed a complementary Elkay granite sink.
 The Cabinet Store + Culina Design
The home, built in the mid ’90s, needed an update. However, the family wanted to keep the renovations neutral enough to accommodate future changes and transformations. They had several project goals, including:
* Eliminate the family’s dining room table
* Add additional storage
* Create the new kitchen design within the footprint of their existing floor plan
* Make the refrigerator more easily accessible
To accomplish this, we removed the clunky dining room table and integrated seating into the home’s kitchen island. To remedy their storage woes we installed three large pantry cabinets. We also relocated the fridge for easier access. To add some style to the space, the family upgraded their cabinets to Showplace cabinets featuring the freeport door style in lyptus wood with a truffle finish. They replaced their existing countertops with Cambria Canterbury and installed a complementary Elkay granite sink.

 Rodwin Architecture & Skycastle Construction
Rodwin Architecture and Skycastle Homes
Location: Boulder, Colorado, United States
We helped the clients find a beautiful lot in North Boulder, then crafted this modern 3,300 s.f. house to be their dream home.
The clients asked for a warm modern style home, with an open floor plan that connected to the outdoors and took full advantage of the rare lot. We sited and engineered the house for optimal passive solar design, while simultaneously capturing unobstructed panoramic views of the Flatirons from both levels. The home’s simple, clean lines reflect their unpretentious, easy-going character. The gourmet kitchen, dining and Great room are flooded with sunshine from the 9ft high ceilings and walls of glass. A gracious covered west porch flows seamlessly out from the Great room through a giant bank of sliding doors, creating a fantastic opportunity for indoor/outdoor living. The porch has solid cedar columns and Beetle-kill wood on the ceiling to create a warm feeling.
On the ground floor, walk past the front hall to reach a guest suite and a rec room that is divided between a small media room for the boys and a north facing painting studio.
Follow the stair to the second floor where you’ll immediately be presented with a stunning view from the open study and balcony. All the bedrooms get a south facing Flatiron view and the master has its own private balcony.
The owners wanted the HERS 37 house to be as green as possible, and the house has tiny energy and water bills as well as a healthy indoor air environment. It features solar photovoltaic panels, Energy Star fiberglass windows, foam insulation, LED lights, Watersense plumbing fixtures, a 96% efficient furnace & zero-VOC finishes.
Learn more about it and its artistic owners in Boulder Home & Garden Magazine
Built by Skycastle Construction.

 Richmond Commercial Painting
There are many challenges in Milwaukee commercial exterior painting.
With such a wide variety of building fascia materials requiring different coatings, materials and application equipment, there are varying environmental and atmospheric conditions to deal with and elaborate equipment required to complete many of the jobs. Hi-rise buildings need staging, weatherproofing, special machinery and applicator lifts to reach all surfaces.
One of the toughest challenges is the requirement to complete the Milwaukee commercial exterior painting project while the business or government office is in continuous operation. All of this requires professionalism, experience, expertise and knowledge that can only be gained by years of work with the diverse coatings and equipment that is necessary to complete large exterior commercial painting projects.
Richmond Painting is regularly selected by facility owners and general contracting firms. For the right commercial exterior painting job, we’ll travel as far south as Libertyville, IL and as far north as Mequon, WI. From where we are centrally located in Racine, WI, Richmond Commercial Painting dispatches professional crews and equipment to paint commercial building exteriors throughout the area.
Commercial Exterior Painting ServicesAt Richmond Commercial Painting our professionals are available to assist with every aspect of the exterior commercial painting project, from planning, to design, to budgeting, to application and completion. With a solid record of projects completed on time and within budget, our expertise will make any job move like a well-oiled machine; smoothly and quietly.
Whether the job requirements are for using elastomeric coatings to weatherproof masonry exterior walls, applying two-part epoxies, spraying high-solids paint for protecting exposed metal, or any of the other specialty architectural coatings, we have the experience, equipment and highly trained personnel to satisfactorily complete the project. We can also tap a network of competent tuck-and- point subcontractors to repair any joints, corners or sprawls in brick or masonry.
Our experienced project managers provide their years of background in all types of exterior coatings jobs to make every commercial painting project a successful joint venture with the owner, architect-designer and/or general contractor. We effectively dovetail our portion of the project with those of the other trades, contributing to a smooth “critical flow” on the job.
Our portfolio of successfully completed projects includes all types of commercial exterior painting projects: hotels, hi-rise office buildings, factories, warehouses, industrial parks, schools, churches, apartment buildings and just about every other type of commercial facility you can find around Milwaukee.
Our clients have learned that with the professional, commercial exterior painting services provided by Richmond Painting, Inc., a job done right the first time saves money over one that requires a number of return visits to the job to touch-up or correct flaws. Keeping that in mind, we’ve found that it really costs no more in the long run to hire the very best.

 OKLAHOMA SHUTTERS
Benefits of Plantation Shutters
Plantation shutters offer advantages and benefits to homeowners over other window coverings including:
• A permanent addition to a house: While they don't add much to the sale price and don't guarantee a return on investment, the curb appeal helps the house sell faster. The permanency of plantation shutters allows them to be included in appraisals.
• Versatility: Many have the ability to open only halfway if desired. If you want to let in all the light, plantation shutters swing away from the window to grant an unobstructed view.
• Insulation: When all louvers are closed, a good insulating barrier is created, trapping unwanted temperatures and saving you money on your energy bill.
• Easy maintenance: With wide louvers, a simple wipe-down is often all that's needed. Vinyl shutters can be taken off their hinges and sprayed off for a major cleaning.
• Elegance: The classic, yet modern look conveys a permanency like no other window dressing can. Whether painted or natural wood, they all have a look that says; welcome home.
Wood vs. Faux Wood
It's not hard to argue that natural wood is more appealing than vinyl or PVC. However, "faux wood," as it's sometimes called, has some advantages:
• Price -- Faux wood shutters are often lower in price than real wood.
• Weight -- Because some shutters are made "hollow core" (as opposed to vinyl-wrapped medium density fiberboard, MDF), they can be significantly lighter.
• Moisture Resistance -- If you live in an area with high humidity, hollow faux wood or aluminum core will resist expanding and sagging. (MDF core louvers will tend to expand and crack as the material swells with moisture.)
Natural wood is the choice for those who have a very healthy budget or for whom a specific appearance is a must. Among the advantages are:
• Size -- Because wood plantation shutters are made of hardwood, they can be quite a bit larger than plastic or vinyl. Vinyl shutters larger than 29 inches may be prone to sag, so they need divider rails or other supports which can destroy the traditional look of a plantation shutter.
• Natural -- While vinyl or plastic shutters can be painted to match any color scheme, the natural shades and finishes of the various species of wood have something for every look.
• Classic -- While many plastic shutters can be made to look like real wood, the faux wood finishes can vary significantly depending on manufacturer and model. Up close, it can be easy to tell they're plastic. The warmth of natural wood is a classic feel that's impossible to beat.
Popular Plantation Shutter Brands
When you go to purchase your plantation shutters, brands names may offer a good representation of high-, mid-, and low-cost range of what's available. Which one you choose depends on your budget and your tastes. Hunter-Douglas and Norman Shutters produce three lines of plantation shutters in both real wood and faux wood styles. A higher-end product, Hunter-Douglas may be worth the cost for beauty and quality of workmanship. The Window Outfitters and Sunland produce a mid-cost line of shutters. The mid-range pricing may be for those who are balancing aesthetics with a budget. National franchise and or box stores may not offer an in-house expert or designer. Look to local companies that specialize in plantation shutters looking online may offer a low-cost brand for budget-minded DIYers. Available in both faux and real wood, the affordability combines with the visual appeal to make this a very popular choice for plantation shutters. Regardless of which line you go with, be sure to ask about frames. Generally all manufactures offer frame choices and may add to the cost, but they add an unsurpassed beauty and warmth to a room with plantation shutters.
Plantation shutters look like similar to wooden blinds, but there are significant differences. Blinds are often narrow, made of aluminum or vinyl, and the slats tilt based on a gear and pulley mechanism and they hang in the window with cords. By contrast, plantation shutters have wide compound louvers that fit into a frame and are controlled by way of a wooden rod running up the middle. When not needed, they can be manufactured to swing back onto the wall. Options to are available to build a more contemporary look with a larger view with a “hidden tilt” feature.
Cost of Plantation Shutters
Nationally, the cost of plantation shutters, depending on their size and the material, whether or not they are custom arches and colors or stains, may vary. Most manufacturers want their shutters to be professionally installed to keep the warranty intact which is a benefit to the customer in the long run. They will usually have a limited lifetime warranty.
Cost of Installation
Costs for having plantation shutters installed by a contractor are a bit more predictable. Contractors who have installed plantation shutters before can quickly get accurate measurements and suggest which materials would work best in different rooms. For example, while natural wood may look beautiful in your living room, it might not be so practical in a bathroom where moisture will cause the wood to warp. The size, material, and quality of the shutter will have a significant effect on the cost. Contractors usually go through a shutter supplier and can get various sizes that are not normally available at home improvement stores. Hiring a professional team of knowledgeable suppliers and installers is a good choice.
Here are some sample prices of the shutters most contractors use for standard-sized windows: In general, plantation shutters should cost approximately $20 to $26 per square foot. Labor costs depend on factors such as the contractor's workload, remoteness of the location, environment, and the contractor's overhead. Labor generally runs about $100 per hour and will be added to the shutter cost.
• 16x20 -- Faux wood $120. Real wood $156
• 24x50 -- Faux wood $160. Real wood $208
• 36x54 -- Faux wood $270. Real wood $351
• 36x60 -- Faux wood $300 Real wood $390
• 42x72 -- Faux wood $420. Real wood $546
• 48x82 -- Faux wood $550. Real wood $715
DIY
Plantation shutters can be purchased and installed by the homeowners. How much they cost will depend on size and material. Faux wood shutter’s cost depends on size and wooden shutter’s cost will depend on size and whether or not they are painted or stained.
• Natural wood is $90-$600 depending on size. Many companies offer standard stained selection but custom color matching may be available from $175 -$250.
• Faux wood will be from $120-$500.
• Additional tools include: Hang Strips $4-$15 and about $4 for mounting hardware. Locks or closures can cost up to $15 for each shutter.
Finally, if you order them online, you can expect to pay $30-$70 shipping per shutter or per set of shutters per window depending on the supplier. Keep in mind that even if you're handy with tools, installing shutters can be time-consuming if you've never done it before there is defiantly a learning curve.

 Ky-Kan Coatings
Concrete can be made to look like any substance. Tile, stone, wood, brick, etc. With unlimited color options, Ky-Kan Coatings can transform any room in your home or business using lightweight, beautiful concrete.

 Zelaya Properties LLC
We used: Custom cherry cabinetry in Arts & Crafts Shaker style by Kabinart in Boulder and Espresso stains. Liberty Hardware Venetian bronze 1-1/2" cabinet knobs. KitchenAid Architect II Series 22 CF counter-depth French door refrigerator. KitchenAid Architect Series II 27" convection single wall oven. KitchenAid 36" 6-burner dual fuel freestanding commercial-style range. KitchenAid Architect II Series 24" dishwasher. Sharp Insight Pro Series 24" built-in microwave drawer (Model #KB6524PS). Crystorama Solaris 12" wide pendant lights in English bronze. Granite countertops in Brown Fantasy. 3"x6" polished marble backsplash.
Paint colors:
Walls: Glidden Silver Cloud 30YY 63/024
Ceilings/Trims/Doors: Glidden Swan White GLC23
Robert B. Narod Photography

 Moderne Builders
Gorgeous master bath with dramatic retro "wave" tile. Peak Photography
Example of a 1950s bathroom design in Los Angeles
Example of a 1950s bathroom design in Los Angeles

 Moss Yaw Design studio
Engineered cedar siding creates beautiful gray-blue tones at the exterior of the home, while adding a textural element to activate the simple exterior design.
10