
Search results for "Videos typically" in Home Design Ideas

 Eldorado Stone
This new 2500 square foot, 4-bedroom, 3-bathroom home in Los Altos, California had been a typical 3-bedroom, 2-bathroom 1970s tract house. The old house was torn down to the studs, ceilings were vaulted, and a 500 square foot addition provided a new bedroom, bathroom, large laundry room, and mudroom. With gourmet appliances, custom cabinetry, and skylights as well as an integrated audio and video system, this home features amenities and fine finishes often found in more luxurious homes.
The homeowner selected Eldorado Stone's Mesquite Cliffstone wainscot as a prelude to the quality of materials and workmanship inside. Our client was particularly impressed by the natural look of Eldorado Stone with its variation in colors and stone shapes. This beautiful cultured stone easily harmonized with the natural stone walkway and the interlocking paver driveway.
Upon installation, the mason sorted through the stones and reserved the best-looking ones for the front of the home and the more visible of the two chimneys. To emphasize a country look, the stone was installed with wider grout lines than on a typical installation. Finally, a new custom mailbox on the curbside was enveloped with matching Eldorado Stone.
Eldorado Stone Profile Featured: Mesquite Cliffstone
Wm. H. Fry Construction Company
10351 San Fernando Avenue
Cupertino, CA 95014
Website: www.billfryconstruction.com

 C.E. Pontz Sons
Check out this amazing Certified Aquascape Contractor custom water feature installation for the New Jersey State Fairgrounds in Sussex County New Jersey. This pondless water feature installation was headed up by Garden State Koi and ran by Aquascapes Ed Beaulieu C.E. Pontz Sons was delighted to be part of this amazing build. The new water feature at the Sussex Farm and Horse Show Fairgrounds was built in 1.5 days by a group of dedicated CAC (certified aquascape contractors) water feature builders from across 5 different states! The pondless waterfall feature includes multiple stacked slate urns, spillway bowls, an various cascading natural stone waterfalls in one glorious water feature. The feature was finished off with new landscape beds. Drone footage of the pondless waterfall was captured throughout the installation. This video is the final result. Unfortunately it typically takes a few days for the water to clear up so in the footage the water is still not clear. Enjoy!!!
 C.E. Pontz Sons
Check out this amazing Certified Aquascape Contractor custom water feature installation for the New Jersey State Fairgrounds in Sussex County New Jersey. This pondless water feature installation was headed up by Garden State Koi and ran by Aquascapes Ed Beaulieu C.E. Pontz Sons was delighted to be part of this amazing build. The new water feature at the Sussex Farm and Horse Show Fairgrounds was built in 1.5 days by a group of dedicated CAC (certified aquascape contractors) water feature builders from across 5 different states! The pondless waterfall feature includes multiple stacked slate urns, spillway bowls, an various cascading natural stone waterfalls in one glorious water feature. The feature was finished off with new landscape beds. Drone footage of the pondless waterfall was captured throughout the installation. This video is the final result. Unfortunately it typically takes a few days for the water to clear up so in the footage the water is still not clear. Enjoy!!!
Find the right local pro for your project
 C.E. Pontz Sons
Check out this amazing Certified Aquascape Contractor custom water feature installation for the New Jersey State Fairgrounds in Sussex County New Jersey. This pondless water feature installation was headed up by Garden State Koi and ran by Aquascapes Ed Beaulieu C.E. Pontz Sons was delighted to be part of this amazing build. The new water feature at the Sussex Farm and Horse Show Fairgrounds was built in 1.5 days by a group of dedicated CAC (certified aquascape contractors) water feature builders from across 5 different states! The pondless waterfall feature includes multiple stacked slate urns, spillway bowls, an various cascading natural stone waterfalls in one glorious water feature. The feature was finished off with new landscape beds. Drone footage of the pondless waterfall was captured throughout the installation. This video is the final result. Unfortunately it typically takes a few days for the water to clear up so in the footage the water is still not clear. Enjoy!!!
 C.E. Pontz Sons
Check out this amazing Certified Aquascape Contractor custom water feature installation for the New Jersey State Fairgrounds in Sussex County New Jersey. This pondless water feature installation was headed up by Garden State Koi and ran by Aquascapes Ed Beaulieu C.E. Pontz Sons was delighted to be part of this amazing build. The new water feature at the Sussex Farm and Horse Show Fairgrounds was built in 1.5 days by a group of dedicated CAC (certified aquascape contractors) water feature builders from across 5 different states! The pondless waterfall feature includes multiple stacked slate urns, spillway bowls, an various cascading natural stone waterfalls in one glorious water feature. The feature was finished off with new landscape beds. Drone footage of the pondless waterfall was captured throughout the installation. This video is the final result. Unfortunately it typically takes a few days for the water to clear up so in the footage the water is still not clear. Enjoy!!!
 C.E. Pontz Sons
Check out this amazing Certified Aquascape Contractor custom water feature installation for the New Jersey State Fairgrounds in Sussex County New Jersey. This pondless water feature installation was headed up by Garden State Koi and ran by Aquascapes Ed Beaulieu C.E. Pontz Sons was delighted to be part of this amazing build. The new water feature at the Sussex Farm and Horse Show Fairgrounds was built in 1.5 days by a group of dedicated CAC (certified aquascape contractors) water feature builders from across 5 different states! The pondless waterfall feature includes multiple stacked slate urns, spillway bowls, an various cascading natural stone waterfalls in one glorious water feature. The feature was finished off with new landscape beds. Drone footage of the pondless waterfall was captured throughout the installation. This video is the final result. Unfortunately it typically takes a few days for the water to clear up so in the footage the water is still not clear. Enjoy!!!
 C.E. Pontz Sons
Check out this amazing Certified Aquascape Contractor custom water feature installation for the New Jersey State Fairgrounds in Sussex County New Jersey. This pondless water feature installation was headed up by Garden State Koi and ran by Aquascapes Ed Beaulieu C.E. Pontz Sons was delighted to be part of this amazing build. The new water feature at the Sussex Farm and Horse Show Fairgrounds was built in 1.5 days by a group of dedicated CAC (certified aquascape contractors) water feature builders from across 5 different states! The pondless waterfall feature includes multiple stacked slate urns, spillway bowls, an various cascading natural stone waterfalls in one glorious water feature. The feature was finished off with new landscape beds. Drone footage of the pondless waterfall was captured throughout the installation. This video is the final result. Unfortunately it typically takes a few days for the water to clear up so in the footage the water is still not clear. Enjoy!!!
 C.E. Pontz Sons
Check out this amazing Certified Aquascape Contractor custom water feature installation for the New Jersey State Fairgrounds in Sussex County New Jersey. This pondless water feature installation was headed up by Garden State Koi and ran by Aquascapes Ed Beaulieu C.E. Pontz Sons was delighted to be part of this amazing build. The new water feature at the Sussex Farm and Horse Show Fairgrounds was built in 1.5 days by a group of dedicated CAC (certified aquascape contractors) water feature builders from across 5 different states! The pondless waterfall feature includes multiple stacked slate urns, spillway bowls, an various cascading natural stone waterfalls in one glorious water feature. The feature was finished off with new landscape beds. Drone footage of the pondless waterfall was captured throughout the installation. This video is the final result. Unfortunately it typically takes a few days for the water to clear up so in the footage the water is still not clear. Enjoy!!!
 C.E. Pontz Sons
Check out this amazing Certified Aquascape Contractor custom water feature installation for the New Jersey State Fairgrounds in Sussex County New Jersey. This pondless water feature installation was headed up by Garden State Koi and ran by Aquascapes Ed Beaulieu C.E. Pontz Sons was delighted to be part of this amazing build. The new water feature at the Sussex Farm and Horse Show Fairgrounds was built in 1.5 days by a group of dedicated CAC (certified aquascape contractors) water feature builders from across 5 different states! The pondless waterfall feature includes multiple stacked slate urns, spillway bowls, an various cascading natural stone waterfalls in one glorious water feature. The feature was finished off with new landscape beds. Drone footage of the pondless waterfall was captured throughout the installation. This video is the final result. Unfortunately it typically takes a few days for the water to clear up so in the footage the water is still not clear. Enjoy!!!

 Soda Pop Design Inc.
Designed by: Soda Pop Design inc
Photography by: Stephani Buchman Photography
Construction by: Soda Pop Construction co.
Danish laundry room photo in Toronto
Danish laundry room photo in Toronto

 Greenhaven Landscapes Inc.
Hear what our clients, Allison & Rick, have to say about their project by clicking on the Facebook link and then the Videos tab.
Inspiration for a traditional full sun front yard formal garden in Chicago for fall.
Inspiration for a traditional full sun front yard formal garden in Chicago for fall.
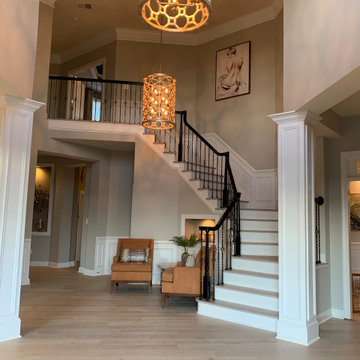
 Sandra Hambley
View our photos and video to see how new hardwood flooring transformed this beautiful home! We are still working on updates including new wallpaper and a runner for the foyer and a complete reno of the primary bath. Stay tuned to see those when we are finished.


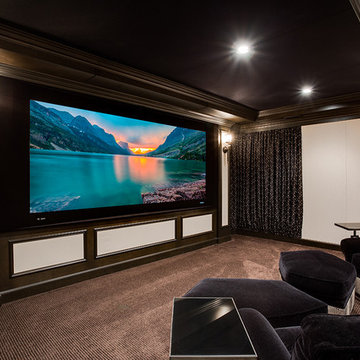
 Gramophone
 and its Design & Build team worked together to design and create this elegant but casual theater, inspired by and evolved from the aesthetics of the client's yacht. Black mohair and alligator leather textures along with vintage touches set this space apart from others considered off the shelf. To keep the space neat, the projector was hidden away in a projector room behind the theater, while components were nestled away in a rack tower. As well as that the video quality and in-wall Meridian sound system could rival that of any Baltimore home theater. Photography by Maryland Photography, Inc.

 Walbrandt Technologies
Alise O'Brien
Stuckenschneider Design
Accent On Cabinets
Walbrandt Technologies
Example of a large trendy dark wood floor home studio design in St Louis with gray walls
Example of a large trendy dark wood floor home studio design in St Louis with gray walls

 Logic Integration
Jen Gramling
Large mountain style open concept carpeted and gray floor home theater photo in Denver with a projector screen and gray walls
Large mountain style open concept carpeted and gray floor home theater photo in Denver with a projector screen and gray walls

 Global Wave Integration
Touch panel in multi-purpose room with lighting control
Inspiration for a 1960s family room remodel in Los Angeles
Inspiration for a 1960s family room remodel in Los Angeles

 RAJ Kitchen and Bath, LLC
“Full apartment design”.
IF you have not yet seen this apartment conversion before, we strongly urge you to go to the bottom left of this page and click on the short 2-minutes video. It would put a lot of things into perspective when you come back and continue reading this.
It is true we were literally handed the keys and told a list of things that they wanted to have happen and we were to go into the apartment, look at the space and come up with a design that would satisfy all of that need. UNTIL we showed up! The unit had really seen some better days but we knew we had to look past that and come up with a concept that would work for them.
The immediate challenges were centered around 3 big ideas:
1. Adding a second bedroom to the already small footprint
2. Figuring out a way to make the kitchen bigger, better and brighter
3. Creating a master room walk in closet
It’s always difficult to add new rooms into existing footprint without expanding out or up and not incurring any opportunity cost. In this case, that was exactly what we had to do. Item one and two above had to be tackled as one. We went ahead and switched out the location of the dining room and eliminating an area where there was a “nook” type eat-in area. By doing so, we were able to cut right into that footprint and change the layout of the kitchen.
That one move allowed us to dig into the kitchen design because it was now the main focal point in the apartment. It was no longer an option to keep it in that tiny hole where it was, so we had to ensure that this design was functional and aesthetically pleasing at the same time. By adding the table into the space where an Island typically would go, we were able to both cut cost and still provide a dining experience. The Table serves as an Island as well when cooking.
We then proceeded to block in the existing doorway to the dining room. By doing this, we were able to create a full room which allowed us to put a door on the other side and called that room Bedroom #2. This was easier to do because all of the mechanicals were already in that space (light, heater and windows). By shifting things around, we also achieved a huge wall to wall closet from inside. PERFECT!
Then we moved into the Single bedroom. We thought it was a big room with a small closet, so by creatively adding an L shaped wall and steal some footprint into the bedroom side, we were able to put a door on that new room and design it for the walk-in closet. Even after this, the bedroom still holds a queen size bed with 2 night stands, a TV on the wall, a sitting chair and plenty of room to walk around. This was done by rethinking the location for the bed and night stands.
The bathroom was gutted to make sure there was no leaks and rebuild from the ground up. We kept all of the plumbing where it was, added a new vanity, medicine cabinet, tiles and lighting and it was done.
From there, the rest of the unit had new flooring all throughout, paint, and lighting. After completion and walk through, this project was handed over back to the clients.
Execution and collaboration between all the trades were: Reggie and his team from Premier Interiors and Rohan from RD Mechanical Services.
p.s. Please see our website to see the video.
 RAJ Kitchen and Bath, LLC
“Full apartment design”.
IF you have not yet seen this apartment conversion before, we strongly urge you to go to the bottom left of this page and click on the short 2-minutes video. It would put a lot of things into perspective when you come back and continue reading this.
It is true we were literally handed the keys and told a list of things that they wanted to have happen and we were to go into the apartment, look at the space and come up with a design that would satisfy all of that need. UNTIL we showed up! The unit had really seen some better days but we knew we had to look past that and come up with a concept that would work for them.
The immediate challenges were centered around 3 big ideas:
1. Adding a second bedroom to the already small footprint
2. Figuring out a way to make the kitchen bigger, better and brighter
3. Creating a master room walk in closet
It’s always difficult to add new rooms into existing footprint without expanding out or up and not incurring any opportunity cost. In this case, that was exactly what we had to do. Item one and two above had to be tackled as one. We went ahead and switched out the location of the dining room and eliminating an area where there was a “nook” type eat-in area. By doing so, we were able to cut right into that footprint and change the layout of the kitchen.
That one move allowed us to dig into the kitchen design because it was now the main focal point in the apartment. It was no longer an option to keep it in that tiny hole where it was, so we had to ensure that this design was functional and aesthetically pleasing at the same time. By adding the table into the space where an Island typically would go, we were able to both cut cost and still provide a dining experience. The Table serves as an Island as well when cooking.
We then proceeded to block in the existing doorway to the dining room. By doing this, we were able to create a full room which allowed us to put a door on the other side and called that room Bedroom #2. This was easier to do because all of the mechanicals were already in that space (light, heater and windows). By shifting things around, we also achieved a huge wall to wall closet from inside. PERFECT!
Then we moved into the Single bedroom. We thought it was a big room with a small closet, so by creatively adding an L shaped wall and steal some footprint into the bedroom side, we were able to put a door on that new room and design it for the walk-in closet. Even after this, the bedroom still holds a queen size bed with 2 night stands, a TV on the wall, a sitting chair and plenty of room to walk around. This was done by rethinking the location for the bed and night stands.
The bathroom was gutted to make sure there was no leaks and rebuild from the ground up. We kept all of the plumbing where it was, added a new vanity, medicine cabinet, tiles and lighting and it was done.
From there, the rest of the unit had new flooring all throughout, paint, and lighting. After completion and walk through, this project was handed over back to the clients.
Execution and collaboration between all the trades were: Reggie and his team from Premier Interiors and Rohan from RD Mechanical Services.
p.s. Please see our website to see the video.
 RAJ Kitchen and Bath, LLC
“Full apartment design”.
IF you have not yet seen this apartment conversion before, we strongly urge you to go to the bottom left of this page and click on the short 2-minutes video. It would put a lot of things into perspective when you come back and continue reading this.
It is true we were literally handed the keys and told a list of things that they wanted to have happen and we were to go into the apartment, look at the space and come up with a design that would satisfy all of that need. UNTIL we showed up! The unit had really seen some better days but we knew we had to look past that and come up with a concept that would work for them.
The immediate challenges were centered around 3 big ideas:
1. Adding a second bedroom to the already small footprint
2. Figuring out a way to make the kitchen bigger, better and brighter
3. Creating a master room walk in closet
It’s always difficult to add new rooms into existing footprint without expanding out or up and not incurring any opportunity cost. In this case, that was exactly what we had to do. Item one and two above had to be tackled as one. We went ahead and switched out the location of the dining room and eliminating an area where there was a “nook” type eat-in area. By doing so, we were able to cut right into that footprint and change the layout of the kitchen.
That one move allowed us to dig into the kitchen design because it was now the main focal point in the apartment. It was no longer an option to keep it in that tiny hole where it was, so we had to ensure that this design was functional and aesthetically pleasing at the same time. By adding the table into the space where an Island typically would go, we were able to both cut cost and still provide a dining experience. The Table serves as an Island as well when cooking.
We then proceeded to block in the existing doorway to the dining room. By doing this, we were able to create a full room which allowed us to put a door on the other side and called that room Bedroom #2. This was easier to do because all of the mechanicals were already in that space (light, heater and windows). By shifting things around, we also achieved a huge wall to wall closet from inside. PERFECT!
Then we moved into the Single bedroom. We thought it was a big room with a small closet, so by creatively adding an L shaped wall and steal some footprint into the bedroom side, we were able to put a door on that new room and design it for the walk-in closet. Even after this, the bedroom still holds a queen size bed with 2 night stands, a TV on the wall, a sitting chair and plenty of room to walk around. This was done by rethinking the location for the bed and night stands.
The bathroom was gutted to make sure there was no leaks and rebuild from the ground up. We kept all of the plumbing where it was, added a new vanity, medicine cabinet, tiles and lighting and it was done.
From there, the rest of the unit had new flooring all throughout, paint, and lighting. After completion and walk through, this project was handed over back to the clients.
Execution and collaboration between all the trades were: Reggie and his team from Premier Interiors and Rohan from RD Mechanical Services.
p.s. Please see our website to see the video.
3