
Search results for "Vulnerabilities" in Home Design Ideas
 abarnai
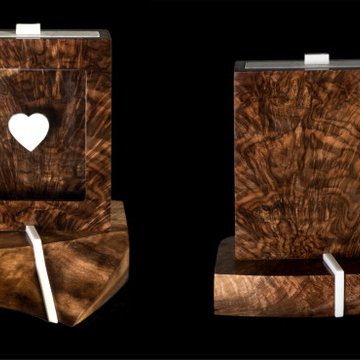
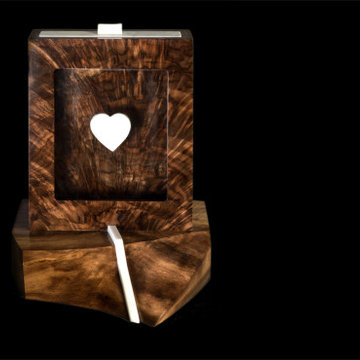
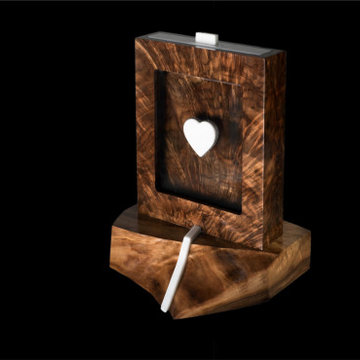
A Sand Ceremony is a symbol of the union of two individuals, their unique strength, vulnerabilities, histories and families. This sand ceremony box, named Homok Sabbia, was a very special wedding gift for a Hungarian woman and her Italian fiancé. It represents the uniting of their origins, cultures and languages as they combined sand (Homok) from her home garden in Hungary and sand (Sabbia) from the seaside in Italy, during their wedding ceremony.
The most beautiful and striking section of the heart wood was selected to create the box; an area with a grain structure that radiated up and out from the bottom, similar to a bouquet of vibrant flowers. The base was created with the natural edge of the walnut sap wood, or new growth, which has a different color and grain structure than the heart wood, the oldest growth. While cut from the same slap of Claro walnut, the two different sections, the base and the box, have their own unique beauty and striking features.
The richness of the dark wood and intricate grain patterns were balanced with the addition of pure and striking white Carrara marble from Italy. The central marble heart was hand cut, sanded, polished and then secured in the heart shaped space that had been gently carved out of the glass front. A marble vein was inserted in the base and the narrow lid was also carved out of marble to harmoniously bring the whole piece together.
When it arrived in Hungary, the bride to-be wrote us ““It’s sooooo beautiful! Perfect! I’m so happy, I like it more than I imagined!”
 abarnai
A Sand Ceremony is a symbol of the union of two individuals, their unique strength, vulnerabilities, histories and families. This sand ceremony box, named Homok Sabbia, was a very special wedding gift for a Hungarian woman and her Italian fiancé. It represents the uniting of their origins, cultures and languages as they combined sand (Homok) from her home garden in Hungary and sand (Sabbia) from the seaside in Italy, during their wedding ceremony.
The most beautiful and striking section of the heart wood was selected to create the box; an area with a grain structure that radiated up and out from the bottom, similar to a bouquet of vibrant flowers. The base was created with the natural edge of the walnut sap wood, or new growth, which has a different color and grain structure than the heart wood, the oldest growth. While cut from the same slap of Claro walnut, the two different sections, the base and the box, have their own unique beauty and striking features.
The richness of the dark wood and intricate grain patterns were balanced with the addition of pure and striking white Carrara marble from Italy. The central marble heart was hand cut, sanded, polished and then secured in the heart shaped space that had been gently carved out of the glass front. A marble vein was inserted in the base and the narrow lid was also carved out of marble to harmoniously bring the whole piece together.
When it arrived in Hungary, the bride to-be wrote us ““It’s sooooo beautiful! Perfect! I’m so happy, I like it more than I imagined!”
 abarnai
A Sand Ceremony is a symbol of the union of two individuals, their unique strength, vulnerabilities, histories and families. This sand ceremony box, named Homok Sabbia, was a very special wedding gift for a Hungarian woman and her Italian fiancé. It represents the uniting of their origins, cultures and languages as they combined sand (Homok) from her home garden in Hungary and sand (Sabbia) from the seaside in Italy, during their wedding ceremony.
The most beautiful and striking section of the heart wood was selected to create the box; an area with a grain structure that radiated up and out from the bottom, similar to a bouquet of vibrant flowers. The base was created with the natural edge of the walnut sap wood, or new growth, which has a different color and grain structure than the heart wood, the oldest growth. While cut from the same slap of Claro walnut, the two different sections, the base and the box, have their own unique beauty and striking features.
The richness of the dark wood and intricate grain patterns were balanced with the addition of pure and striking white Carrara marble from Italy. The central marble heart was hand cut, sanded, polished and then secured in the heart shaped space that had been gently carved out of the glass front. A marble vein was inserted in the base and the narrow lid was also carved out of marble to harmoniously bring the whole piece together.
When it arrived in Hungary, the bride to-be wrote us ““It’s sooooo beautiful! Perfect! I’m so happy, I like it more than I imagined!”
Find the right local pro for your project
 abarnai
A Sand Ceremony is a symbol of the union of two individuals, their unique strength, vulnerabilities, histories and families. This sand ceremony box, named Homok Sabbia, was a very special wedding gift for a Hungarian woman and her Italian fiancé. It represents the uniting of their origins, cultures and languages as they combined sand (Homok) from her home garden in Hungary and sand (Sabbia) from the seaside in Italy, during their wedding ceremony.
The most beautiful and striking section of the heart wood was selected to create the box; an area with a grain structure that radiated up and out from the bottom, similar to a bouquet of vibrant flowers. The base was created with the natural edge of the walnut sap wood, or new growth, which has a different color and grain structure than the heart wood, the oldest growth. While cut from the same slap of Claro walnut, the two different sections, the base and the box, have their own unique beauty and striking features.
The richness of the dark wood and intricate grain patterns were balanced with the addition of pure and striking white Carrara marble from Italy. The central marble heart was hand cut, sanded, polished and then secured in the heart shaped space that had been gently carved out of the glass front. A marble vein was inserted in the base and the narrow lid was also carved out of marble to harmoniously bring the whole piece together.
When it arrived in Hungary, the bride to-be wrote us ““It’s sooooo beautiful! Perfect! I’m so happy, I like it more than I imagined!”
 abarnai
A Sand Ceremony is a symbol of the union of two individuals, their unique strength, vulnerabilities, histories and families. This sand ceremony box, named Homok Sabbia, was a very special wedding gift for a Hungarian woman and her Italian fiancé. It represents the uniting of their origins, cultures and languages as they combined sand (Homok) from her home garden in Hungary and sand (Sabbia) from the seaside in Italy, during their wedding ceremony.
The most beautiful and striking section of the heart wood was selected to create the box; an area with a grain structure that radiated up and out from the bottom, similar to a bouquet of vibrant flowers. The base was created with the natural edge of the walnut sap wood, or new growth, which has a different color and grain structure than the heart wood, the oldest growth. While cut from the same slap of Claro walnut, the two different sections, the base and the box, have their own unique beauty and striking features.
The richness of the dark wood and intricate grain patterns were balanced with the addition of pure and striking white Carrara marble from Italy. The central marble heart was hand cut, sanded, polished and then secured in the heart shaped space that had been gently carved out of the glass front. A marble vein was inserted in the base and the narrow lid was also carved out of marble to harmoniously bring the whole piece together.
When it arrived in Hungary, the bride to-be wrote us ““It’s sooooo beautiful! Perfect! I’m so happy, I like it more than I imagined!”
 Otani Ninja Deterrent™
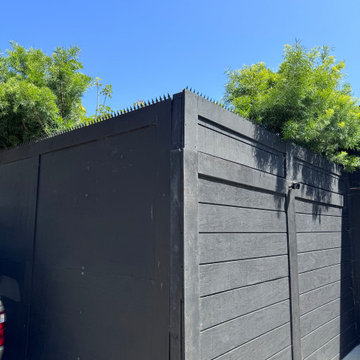
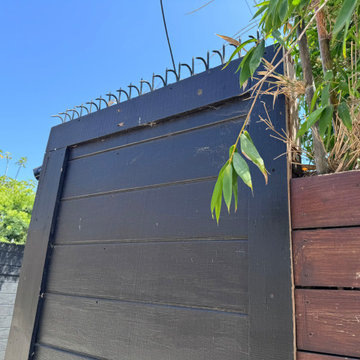
Tucked behind a quiet street in Venice, this home faced a vulnerable alley elevation with several potential footholds. The owner wanted to stop opportunistic access without changing the minimalist black façade. We capped the fence runs with two complementary profiles: the Ninja Deterrent™ GIZAGIZA Heart along the corner spans for a crisp, graphic silhouette, and Classic short Black Dual-bladed along the bamboo side to create secure continuity where foliage meets the wall. The result is a clean, continuous line that reads like a slim architectural cap from a distance—yet removes hand purchase up close. The homeowner loves that security improved without sacrificing curb appeal.
 Otani Ninja Deterrent™
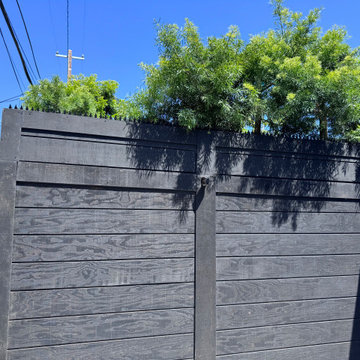
Tucked behind a quiet street in Venice, this home faced a vulnerable alley elevation with several potential footholds. The owner wanted to stop opportunistic access without changing the minimalist black façade. We capped the fence runs with two complementary profiles: the Ninja Deterrent™ GIZAGIZA Heart along the corner spans for a crisp, graphic silhouette, and Classic short Black Dual-bladed along the bamboo side to create secure continuity where foliage meets the wall. The result is a clean, continuous line that reads like a slim architectural cap from a distance—yet removes hand purchase up close. The homeowner loves that security improved without sacrificing curb appeal.
 Otani Ninja Deterrent™
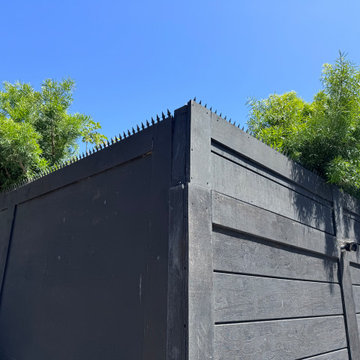
Tucked behind a quiet street in Venice, this home faced a vulnerable alley elevation with several potential footholds. The owner wanted to stop opportunistic access without changing the minimalist black façade. We capped the fence runs with two complementary profiles: the Ninja Deterrent™ GIZAGIZA Heart along the corner spans for a crisp, graphic silhouette, and Classic short Black Dual-bladed along the bamboo side to create secure continuity where foliage meets the wall. The result is a clean, continuous line that reads like a slim architectural cap from a distance—yet removes hand purchase up close. The homeowner loves that security improved without sacrificing curb appeal.
 Otani Ninja Deterrent™
Tucked behind a quiet street in Venice, this home faced a vulnerable alley elevation with several potential footholds. The owner wanted to stop opportunistic access without changing the minimalist black façade. We capped the fence runs with two complementary profiles: the Ninja Deterrent™ GIZAGIZA Heart along the corner spans for a crisp, graphic silhouette, and Classic short Black Dual-bladed along the bamboo side to create secure continuity where foliage meets the wall. The result is a clean, continuous line that reads like a slim architectural cap from a distance—yet removes hand purchase up close. The homeowner loves that security improved without sacrificing curb appeal.
 Fine Floorz
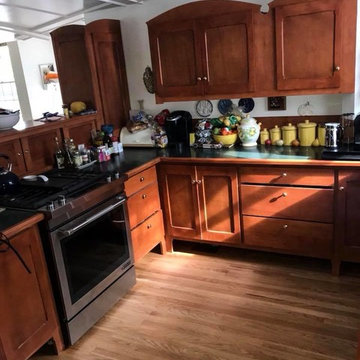
Has your hardwood floors finish worn off in many areas, especially high traffic areas of your home such as hallways, entry ways and kitchens;
These high traffic areas of your home are particularly important to keep maintained. If and when the finish has worn away in areas like entryways or kitchens where the impeding threat of water/moisture is present, the hardwood is then vulnerable to potential damage. You always want to keep a watchful eye on areas of your home that have a lot of foot traffic. If you notice that in your kitchen, where you stand to do dishes, or the entryway, where you first walk into your home, show signs of wear in the finish, this might be a good time to start thinking about refinishing. Even if you choose not to go through the entire sanding and refinishing process, a screening and recoating of polyurethane is a great option. Maintaining the integrity of the finish will ultimately give your hardwood floors the longest lifespan.

 Exteriors by Global Home
For this siding replacement in Langhorne, PA we replaced the existing wood siding. Wood tends to swell and crack when exposed to moisture, making it vulnerable to drafts and rot. Vinyl is a great replacement for wood for it's low maintenance and low cost. Vinyl only takes a quick installation and your home is all set with reliable, new siding. The Tuscan Clay finish pulls a bit from the brick color palette, giving off a gorgeous new look.
 Otani Ninja Deterrent™
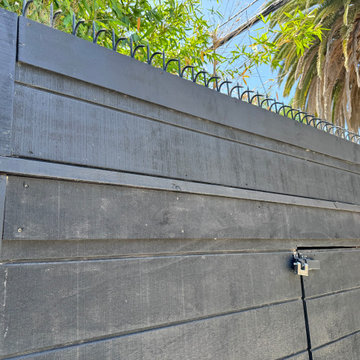
Tucked behind a quiet street in Venice, this home faced a vulnerable alley elevation with several potential footholds. The owner wanted to stop opportunistic access without changing the minimalist black façade. We capped the fence runs with two complementary profiles: the Ninja Deterrent™ GIZAGIZA Heart along the corner spans for a crisp, graphic silhouette, and Classic short Black Dual-bladed along the bamboo side to create secure continuity where foliage meets the wall. The result is a clean, continuous line that reads like a slim architectural cap from a distance—yet removes hand purchase up close. The homeowner loves that security improved without sacrificing curb appeal.
 Otani Ninja Deterrent™
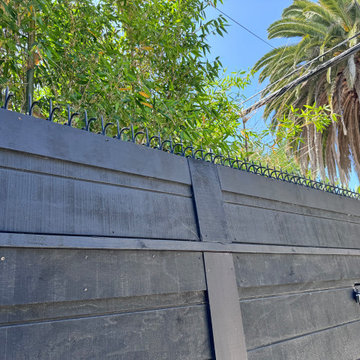
Tucked behind a quiet street in Venice, this home faced a vulnerable alley elevation with several potential footholds. The owner wanted to stop opportunistic access without changing the minimalist black façade. We capped the fence runs with two complementary profiles: the Ninja Deterrent™ GIZAGIZA Heart along the corner spans for a crisp, graphic silhouette, and Classic short Black Dual-bladed along the bamboo side to create secure continuity where foliage meets the wall. The result is a clean, continuous line that reads like a slim architectural cap from a distance—yet removes hand purchase up close. The homeowner loves that security improved without sacrificing curb appeal.

 Spray-Net Vancouver
Stains? Cracks? Our stucco painting service has got your home covered.
Our Liqua-Wrap paint for stucco delivers all the things that you would want from brand-new stucco: no more cracks or stains, protection against water and the elements and of course, an amazing new look. Oh, and without the price tag.
Hairline cracks don’t just make your stucco look old, they can leave your home vulnerable to water infiltration that can lead to mold and rot behind your stucco walls. Plan your defence with a coating that bridges hairline cracks and wraps your home in waterproofing colour coat.
Give us a call to book your free in-home consultation!
(604) 260-4525
 CosyCloset Ltd.
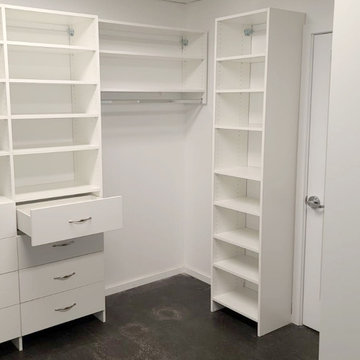
The Vancouver Downtown East Side Women's Centre required a proper space to store and offer clothing and accessories to vulnerable women in need. We were honoured to design and install this full walk-in closet for them.

 Tile Doctor Ltd
This job was for a repeat client in Toft near Cambridge who had aa stunning large hallway that was tiled in beautiful pale Limestone. My client had asked me back to work on the floor having previously completed the deep clean and seal of a Terracotta floor previously.
The Limestone tiling in the entrance hall had years of some type of topical sealer applied to it. This caused the stone to look slightly discoloured and from certain lights showed up hundreds of scratches and smudges embedded in the seal. I’ve tried to capture this problem in the photographs on this page, but it was very difficult.
A topical sealer sits on the surface of the tile where it is vulnerable to scratching, hallways are generally high traffic areas and so more likely to see this sort of problem. Ideally an impregnating sealer should have been applied, impregnators work by occupying the pores in the stone thus preventing soiling from becoming ingrained in the stone.
Before starting we protected the woodwork against splashing with blue film, I don’t usually make a great deal of mess, but you can never be too careful when working in someone’s property especially one as beautiful as this.
To strip off the old sealer I began by applying a strong dilution of Tile Doctor Remove and Go to the Limestone tiles. I split the floor into sections and used a 400-grit diamond burnishing pad to work the Tile Doctor Remove and Go into the tiles. The floor was then rinsed off using our high-pressure cleaning system that applies pressurised hot water to the floor whilst simultaneously extracting the soil with its built-in vacuum. The system is quite heavy, so it is built into my van, and I run a large flexible hose to a spinner tool that does the cleaning. It is an expensive tool, but it saves a lot of time and leaves the floor fairly dry afterwards.
The 400-grit pad had released a lot of the sealer but there were quite a few layers to get through, so I changed the burnishing pad to a coarse 200-grit pad and repeated the process. After another rinse and extract I would see it had the desired effect and I was able to carry on building up the finish on the Limestone by apply the 400-grit followed by the 800, 1500 grit pads. It was a large floor and so this took up much of the day so once complete I left for the day so it could dry off overnight.
The next day I finished the polishing process with the application of a 3000-grit burnishing pad which is applied with a little water sprayed onto the tile and really brings up the polish on the stone. This process has the added advantage of leaving the floor dry so not long afterwards I was able to move on to sealing.
For this floor two coats of Tile Doctor Ultra-Seal were applied, it is an impregnating sealer that won’t alter the colour of the tiles leaving a natural look.
My client was much happier with the new finish and has asked for another quotation on some more Terracotta flooring that needs attention. For aftercare I recommend using Tile Doctor stone soap, it’s a special formula that builds on the patina which will help maintain the polished appearance of the Limestone.
Tom Conlon
Cambridge Tile Doctor
 Tile Doctor Ltd
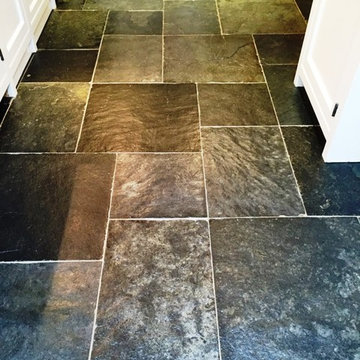
These photographs below are of a Slate Tiled Kitchen floor taken at a customer’s house in Henley-on-Thames which, as its name suggests, sits alongside the River Thames in Oxfordshire. My client’s Slate kitchen floor had recently been cleaned with unsuitable cleaning products which I suspect impacted the sealer leaving it looking dull. Sealers really to improve the look of a stone floor so unsurprisingly once the sealer had been damaged my client had been unable to find a cleaning product that could have any kind of positive effect on the tiles.
It’s fairly well known that many supermarket quality cleaners are only really designed for use on Ceramic or Porcelain tiled floors as they contain acids which strip away at sealers and acid sensitive stone floors, leaving the stone beneath vulnerable. So your select a cleaning product for your floor always read the small print on the back of the label and make sure you avoid anything that mentions not for use on acid sensitive stone; belter still Tile Doctor have a number of products for cleaning tiled floors including Neutral Cleaner and Stone Soap.
To clean the floor and remove any remaining sealer I first made a strong dilution of Tile Doctor Pro Clean which is a strong alkaline cleaner and then spread this over the floor, leaving it to dwell. This allows the cleaner to seep into the slate and get underneath, breakdown sealers and start to lift out ingrained dirt.
Following a dwelling period of roughly ten minutes, I agitated the floor periodically with a rotary machine fitted with a black scrubbing pad and scrubbed along the grout lines with a stiff grout brush. I then used a wet vacuum to extract the resultant slurry away and then followed up by rinsing the floor with clean water, and once again vacuumed up the residue.
Any stubborn areas were retreated until I was happy with the floor and then I left the floor to dry off completely overnight, in preparation for sealing the following day.
Upon my return to the house the following day, I ran some damp tests on different parts of the floor to check for any excess moisture which could potentially damage the performance of the sealer. Once I was satisfied that the floor was completely dry, I proceeded to seal the tiles using Tile Doctor Seal & Go. This will provide a robust surface seal for the future, along with an aesthetically pleasing low-sheen finish.
This sealer works particularly well on Slate tiles and, being a water-based sealant, additionally Seal & Go does not emit an unpleasant smell as it dries. Slate is quite a porous stone so I applied six coats of seal to provide long-lasting protection.
Barry Woodward
Oxfordshire Tile Doctor
 Tile Doctor Ltd
These pictures of a Victorian Tiled Hallway are from a property in Canterbury that was once a nursing home and was now being renovated to become a children’s home. The building was being gutted and extended at the same time and when the carpet was pulled up in the hallway, they were surprised to find a relatively intact Victorian tiled floor underneath.
Whilst they thought it bizarre that anyone would want to cover up such an attractive floor the carpet had protected it over the years. They realized it would make a marvellous feature at the entrance to the property, but professional restoration would be needed to do it justice. After a bit of research, they came across Tile Doctor and got in touch.
Canterbury comes under my North Kent designation, so I went to visit the property and survey the floor and quote for doing the restoration. There were a few missing and loose tiles that would need replacing and refixing also there was a lot of ingrained dirt so a deep clean and application of a new sealer would be required. I gave them a price for the work which they readily accepted, and we arranged a suitable time to carry out the work. Subject to the building schedule I had calculated the floor would take three days to restore.
On the first day I set about replacing and re-fixing the missing, broken, and loose tiles. This is delicate work as you need to extract the old tile without disturbing its neighbours and then clean up the area ready for its replacement. Being a Tile Doctor I keep a selection of stock tiles for repairs, some are reclaimed, and some are replica. Also, there are several companies still making Victorian style tiles so I can usually source what I need.
After the individual missing and broken tiles had been replaced and the adhesive had set, it was then a matter of renovating the floor as a whole. The tiles were covered in a thick layer of carpet adhesive which needed a combination of specialist tools and products to remove. First, a liberal layer of Tile Doctor Remove and Go was applied and left to dwell for thirty minutes. Next, Tile Doctor Pro-Clean was added and scrubbed in with a black pad.
This process softened the adhesive sufficiently in readiness for the next stage which involves using a set of diamond burnishing pads on a weighted buffing machine. Several applications were needed, each time with a successively finer grade of diamond pad and rinsing off the slurry in between. The tiles were first milled using a very coarse 50-grit pad, followed by 100, 200 and finally burnished with a 400-grit burnishing pads. This removed all the adhesive and dirt in the tiles, which was cleaned up using the wet vacuum.
Old Victorian floors like this do not have a damp proof membrane installed under the floor, and with a lot of water being used in the cleaning process I was concerned White efflorescence salts could appear later as the floor dried. To counter this, I gave the floor an acid wash using Tile Doctor Acid Gel to counter and dissolve the salts, it also gives the tiles another clean and will remove any old grout smears further improving the appearance of the tiles. Once done the floor was left to dry overnight.
On my return I tested the floor was dry by taking several moisture readings around the floor with a damp meter. Applying sealer to a damp floor is never advised and can lead to clouding and an unwanted finish.
Happy that the tiles were dry, a single coat of Tile Doctor Colour Grow sealer was applied. This is an impregnating sealer with a colour enhancing component to ‘lift’ the stronger colours of the floor. Colour Grow however does leave a matt appearance and as the client had asked for a shiny finish it was topped up with five coats of Tile Doctor Seal and Go. This is a compatible topical sealer which added a mid to high sheen.
By the end of the third day the Victorian floor looked brand new, and I received the following feedback from the client. Its rare to receive feedback from commercial customers so they were clearly overwhelmed with the transformation.
Did not think this glued covered bad old floor could look sooooo good Fabulous Fantastic job Looks Amazing Thank you
For aftercare I recommend the use of Tile Doctor Neutral Cleaner which isn’t as harsh as many of the products you find in supermarket. Stronger products can actually strip off the sealer over time leaving it vulnerable to dirt and detracting from its appearance.
Graham Davis
North Kent Tile Doctor
 Spray-Net Vancouver
Stains? Cracks? Our stucco painting service has got your home covered.
Our Liqua-Wrap paint for stucco delivers all the things that you would want from brand-new stucco: no more cracks or stains, protection against water and the elements and of course, an amazing new look. Oh, and without the price tag.
Hairline cracks don’t just make your stucco look old, they can leave your home vulnerable to water infiltration that can lead to mold and rot behind your stucco walls. Plan your defence with a coating that bridges hairline cracks and wraps your home in waterproofing colour coat.
Give us a call to book your free in-home consultation!
(604) 260-4525

 Five Star Tree Care
When the weather begins to get colder, this can be a dangerous time for trees. There are many reasons how the cold and other elements during winter can harm your trees and surrounding landscape. This also means that there are many ways in which you can help prevent any unfortunate accidents due to the weather.
Some of the most common reasons trees can get damaged from the cold weather are as follows:
-Root damage
-Extensive bark
-Core chewing from pests
We here at Five Star Tree Services want to provide you with the right information on how to help prevent winter tree damage.
Root Damage Prevention
Unlike the rest of the tree, which includes the stems, branches, and buds, the roots are the last part of the tree to go dormant for the winter. This means that they are more vulnerable when the weather takes a sharp cold turn. The reason this tends to happen is that the soil temperatures stay warmer than the air, hence why the branches go dormant first and the roots take longer.
There are also a number of different things that dictate soil temperatures. For instance, dry soil gets colder quicker than sodden soil. Making it so that there is more ice present in sandy or dry soils, which is how it gets colder in temperature.
If you want your soil temperatures to be higher, mulch and snow can help insulate the ground and keep it sheltered from the harsher elements. If you have recently planted a tree, the disturbed soil will now allow cold air to get at the roots, which will hinder any root development or even kill newly grown roots.
How To Prevent
For newly planted trees, you should cover the roots with 3-4 inches of wood mulch. The best thing to do is make a 6-inch circle surrounding the base of your tree but make sure to keep it away from the trunk. Doing this is going to help support the tree during the winter and help stop unusual roots from growing. Before you lay your mulch down, you should also be checking for holes or breaks in the soil and fill them in before laying your mulch down. In the fall and spring, the soil is continuously being defrosted and refreezing again. This makes the soil contract and expand and can hurt newly planted roots. It can also be enough to push them out of the ground completely! Making mulch even more important since it can provide more consistent temperatures in the soil.
If you are experiencing a dry fall with little to no rain happening, you need to give your tree a really good watering before the ground starts to freeze. Doing this is going to lower the risk of your tree getting infiltrated by ice or frost.
Pest Damage Prevention
There are plenty of things that can harm your trees when the weather turns cold. Some of these other things include:
-Sunscald
-Dieback
-Brown evergreen foliage
-Salt damage
But aside from weather related ailments, you also need to worry about the damage done by certain pests as well. This can include:
-Mice
-Hares
-Voles
-Deer
These seemingly harmless animals are known to do major damage to plants during the winter when they are foraging on things like twigs, bark, stems, and leaves. They have even been known to completely eat bushes, right to the ground, and kill trees when they destroy their bark. One of the only ways to prevent animals from chewing on the bark is by building barriers around your trees in order to keep the pests from getting at them. Luckily, making these barriers isn’t as hard as you might be thinking. There are numerous potions for you to choose from that are easy to assemble and disassemble that you can find at your local garden center or landscaping stores.
How Five Star Tree Services Can Help
Colder weather insights many potential negative things for your trees that can severely harm them, damage them, or even kill them if they are not properly protected. It is always important to make sure that your trees are properly prepared for the winter months ahead. This means utilizing preventative measures to alleviate the risks of things like root and animal damage. If you require help to prepare your trees for winter, our team at Five Star Tree Services is here to help you with our tree care services in Richmond Hill, don’t wait until it’s too late, give us a call today at (416) 990-3355!
8