Software
Houzz Logo Print
barb_roselover_in

Can you tell me if this will work?

11 years ago

Since I have been socked in for four days now, have been doing quite a bit of cooking. I am a sloppy cooker and would be the first one to admit it. I remember some time ago, there was a gardening apron or cooking apron that was just a straight piece of material with a hole for your head. It was not fastened together on the sides and was only held together at the waist on each side with ties. Can you get the picture? I need some cover-ups, not fancy,just to protect and easy to keep clean. How much material do you think something like this would take? Thanks for any imput. Barb

Comments (13)

  • 11 years ago

    Barb, I believe what you are talking about is a form of a "cobbler apron". Some do have armholes, but many are just as you describe. Measure from shoulder to shoulder and add a couple of inches to the measurement. Measure around your hips and divide that number in half. Determine how long you want the apron to be (I like mine about 30 inches long). Unless you are nice and slim, you will probably want to cut a trapezoid rather than a rectangle. For example, I measure 16 inches from shoulder to shoulder, but half my hip measurement is more like 22 inches. Using my measurements, I would need one and one-quarter yards of 42-44 inch material. You could leave the material folded just as it comes off the bolt - selvage to selvage, or you can fold it with cut end to cut end. It measures about the same. Fold this piece again in half in the same direction as the first fold. At one end, mark 8 inches from the second fold (remember, we are using my shoulder measurement of 16 inches). Measure along the fold to the length you want and at that point, mark a spot perpendicular to the second fold at 11 inches (half my hip measurement of 22 inches). Cut from your first mark (8 inches from the fold) down to the second mark (11 inches from the fold). Then cut the bottom straight out to the second fold. Sew the two pieces of material at the narrow end right sides together. Cut an opening for your head to fit through (be careful here, it never looks as big as it ends up being, so err on the side of too small. You can always make it bigger, but not smaller, LOL). You can hand or machine hem all around the raw edges, or use bias tape to close everything in and use the bias tape to make ties as well.

    Here is a link that might be useful: a cobbler's apron

  • 11 years ago

    Sounds like a chef's apron to me,which is one of the easiest aprons to make,and depending on your size,you can get one out of a yard of fabric.Google chefs apron.
    Kathi

  • 11 years ago

    I made what I called sandwich aprons a few years ago. I used about 1 1/2 yds. if I remember right. I fold my fabric in half length-wise and again folded fabric in half cross-wise. At the top of the folded side cut a 1/4 pie slice in that upper corner. When the fabric is opened up it becomes a full circle. If you like pockets I added another layer across the opened fabric at the bottom of the front. You will need to hem the top edge or add bias tape across the top edge of the pocket. Divide the pocket into 2 or 3 even pockets by seaming from the top of the pocket down to the bottom edge. Reinforce the stitches at the top of each pocket. If you like your aprons rounded at the bottom you can contour the corners. Before sewing the bias tape on I stitched a large running stitch around the area where the fabric is double for the pocket to keep it from slipping when the bias is applied. I used bias tape all around the unfinished edges. This includes the neck. Also using bias tape I added my side ties about waist high and stitched along the edges of the bias tape. I tied a hard knot at the ends of each tie to keep them from fraying. I did experiment a little with this apron. If you would like to make a reversible apron you can lay 2 layers of the main apron pieces face to face and stitch together as one piece, The ties can be inserted into the seams as you sew. (Mark your tie locations first) Make sure you leave an area large enough to turn it. If you want pockets be sure to add pockets BEFORE you sew both sides together. (You may only want patch pockets if you use this method. Good luck on whatever methoc you try.

  • 11 years ago

    We don't even have anyplace here where we can get bias tape. Is there someplace on line where it can be ordered?Barb

  • 11 years ago

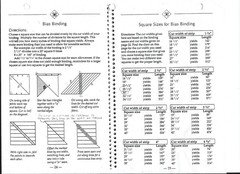
    There are dozens of places online to buy bias tape. Joann is one them. Just google bias tape and see what comes up. But it's easy to make your own and you aren't limited to just the solid colors available. And you don't have to cut individual strips and sew them together. You can follow instructions to sew a strange tube and then cut one long strip. You can get 4 yards of bias tape from one fat quarter, which makes it cheaper than buying it in a ready made pack, especially when you would be paying shipping. Even easier than folding and ironing the strip into "regular" bias tape is to just fold the strip in half lengthwise and iron and use it like quilt binding.

    Here is a link that might be useful: Making your own bias tape

  • 11 years ago

    Donna, are these instructions on paper or in a book somewhere ? I am having trouble with my printer and I need to see it in print. Thanks for answering. Barb

  • 11 years ago

    I've done that myself, more than a few times - here ya go:

    Here is a link that might be useful: {{gwi:2144439}}

  • 11 years ago

    Barb, the instructions that Carol posted are exactly what I am talking about. They can be found in many quilting books. If you would still like to have them in print, send me an email with your mailing address and I will happily print out the instructions and mail them to you.

  • 11 years ago

    Donna, I got it to print this out and had it enlarged to 200%. I can make it out, but some of it is not real clear. If you will give me your address or some safe place, I will send you a self-addressed envelope and anything else you might need. Thank you so much Barb

  • 11 years ago

    I posted this earlier, but it doesn't seem to have taken. Barb, you can go to my page and send me an email with your address. Don't worry about sending me an envelope. I'm happy to do it.

  • 11 years ago

    And, you don't always have to cut on the bias, but it does wear longer.

  • 11 years ago

    Carolb I like your instruction pages!