

Big shelving project part 2
This is a follow up to this thread:
http://ths.gardenweb.com/discussions/2604905/big-shelving-project
This project has taken quite a bit of time. I have cut 27 shelves. They vary from 42"->47" wide and 8"->25" deep. I discovered that the many of the bay walls were sometimes angled a bit and so I often had to cut each shelf like a trapezoid with very slight angles on the sides. Very difficult rips for my weak skillset.
To make them as sturdy as possible I used 3/4" Red Oak Plywood plywood.
I set up the cleats with 2"x1" wood.
To support the shelves, I cut 2"x2"s so they fit perfectly in the cleats and then drilled pocket holes in them and screwed them into the cleats. I hoping this will be enough once everything is glued and nailed. Here is a picture of the supports with no shelves on them.

Here is a picture of a shelf bay with shelves just sitting on them:
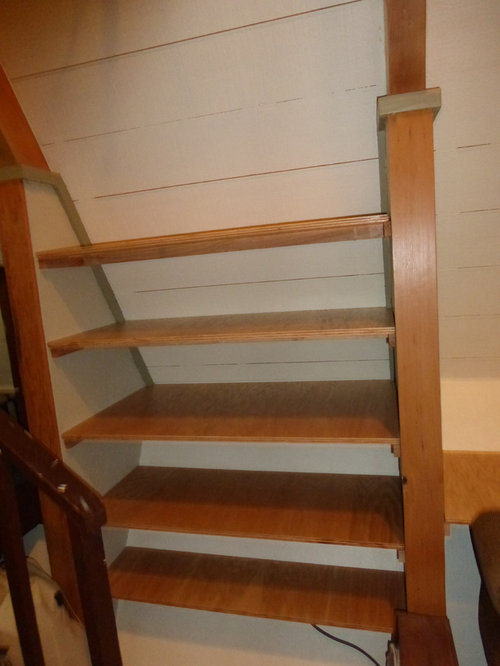
So now I need to do the final steps and QUESTIONS!
I plan to use 1 1/2" finish nails along with glue to secure the shelves on the cleats and supports.
Question #1
--------------------------
Next my plan is edge the front by putting a 3"x1" trim piece across the front. I would have to rip take a 1/4" off it so it perfectly covers the 3/4" shelf profile and 1 1/4" tall cleats. It seems a bit big though. Here is a picture of the profile of the front. Any other ideas?

Question/PROBLEM #2
-----------------------------------
This is the big problem. Despite might best attempts, often there is a gap sometimes even bigger than an 1/8" between the shelf edge and the wall. What the heck to a do to deal with that?
- Obviously I need to stay within my current design constraints.
- I think wood putty would look crappy.
- I could just ignore it, but it might drive me crazy with all the work I put in.
- I thought about putting some kind of trim piece on top, but then it will sit above the face piece.
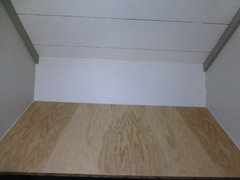
Here is a picture of a shelf with one of the bigger gaps. I would love to hear your genius suggestions?
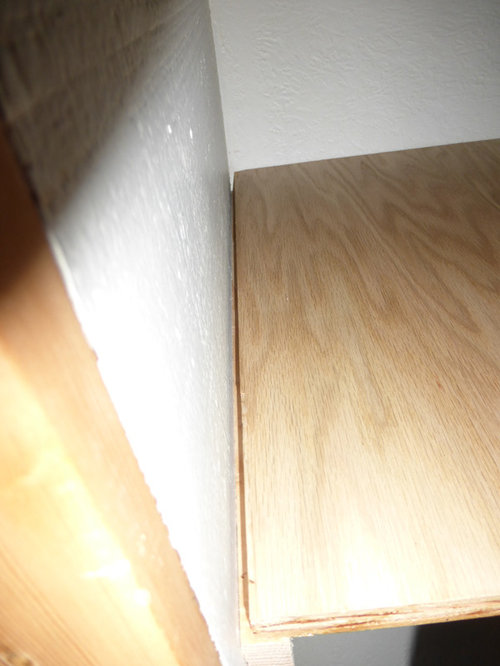
Thanks everyone!
Comments (47)
 11 years ago
Well, you dont have a lot of choices at this point.....
Everything looks pretty good so far....You could have angled the front end of your cleats so a narrower front strip would have hidden the shelf edge and the cleat end, but its too late for that..just
make your front strip wide enough to do the job and live with it...This will
also stiffen the front edge of the shelf and add some strength...should be just fine...and look good too..
As far as the gaps on the ends of the shelves.....
Since they're already cut and finished, I
would just get some colored caulk and fill the gaps up...They'll be fine....The only alternative is new shelves...not near worth the trouble to make new ones and scribe em in, not to mention the cost...
You'll still have a great looking set of shelves
- 11 years ago
The shelves look really great. As for the plywood edges, I think you can still buy veneer in a roll made from the same wood as the plywood. This has, or at least used to have, an adhesive on one side that can be adhered to the shelf edge with a warm iron. This method adds no strength, but you don't need it with 3/4 inch oak plywood. This won't do anything about the cleats, of course. If it's not too late, removing the cleats and cutting the front edge at a 45 degree angle with an overall length slightly less than the shelf width will make them much less visible. If that's not practical, I think I would just live with the cleats as they are. Once the shelves hold objects, the eye will be pretty well distracted from the cleats anyway. This would also be true of the gaps along the edges. If you really can't live with those edge gaps, I would avoid caulk because it will be pretty noticeable and the color will not be all that easy to match. Instead, you could install narrow molding stained to match the shelves. Really small moldings of various types - much smaller than anything you can buy at a lumber yard - are available from suppliers of materials for doll houses. Check online for what's available if you really, really can't live with it as it is.
Related Professionals
Springfield Home Remodeling · Austin Home Remodeling · Lansing Home Remodeling · Daytona Beach General Contractors · Tulsa General Contractors · Buffalo General Contractors · Lewiston General Contractors · Sheridan General Contractors · Effingham Bathroom Remodelers · Cambridge Bathroom Remodelers · Gulfport Bathroom Remodelers · Grand Rapids Bathroom Remodelers · Ithaca Bathroom Remodelers · Grand Junction Bathroom Remodelers · London Bathroom Remodelersspringcorn
Original Author11 years agoI agree with the stiffness concept. This was what everyone coached me in originally, however it seems kind of clunky.
akamainegrower-
I have looked at molding options, but it always leaves me with more questions. Where will the molding end? Won't it standout and look bad if it extends to the front of the shelf?
The other thing I have seen with molding is it can get pretty darn expensive considering I have 27 shelves. Screen molding was the only reasonable option. This is a full 1/2 thick though making it fairly obtrusive.- 11 years ago
As an alternative to the shoe molding suggested above, you might want to consider 1/2" quarter round molding. This is widely available at lumber yards and home centers and is relatively inexpensive especially when contrasted with real oak molding or specialty doll house size molding. You might also find quarter round molding in 1/4" size from an online retailer. At one time Rockler carried it, but I'm not sure if they still do. As for the end of any molding at the front of the shelves, it will be far less obtrusive and look more finished if you cut the end at an angle rather than at 90 degrees. In this case, the long end of the angle rests on the shelf. Try it with a short piece to see how you like it before committing to doing it for every shelf.
springcorn thanked akamainegrower - 11 years ago
springcorn: You have several options and which you choose is really a matter of personal taste and the tools you have available. If you have decided to face the shelves with oak rather than the veneer tape, you could rip the facing piece to the thickness of the plywood plus the thickness of the molding. That way you could cut the molding at 90 degrees and have it butt against the facing on the inside. Doing it this way would result in a lip on the front edge of each shelf. No need for any angle cuts on the molding, but you need a table saw to rip the oak to the proper width. If you would prefer no lip, rip to the exact thickness of the plywood and run the angled molding over the shelf edge and facing. With 1/4" inch molding, you could likely sand in the angle as easily as cutting it with a saw. Lowes, btw, sells oak in thicknesses less than 3/4". You could angle both ends of the facing piece, but this would require the use of a chop saw/miter saw. I don't see any real reason for doing this, however. I did check, and Rockler Woodworking still sells 1/4" quarter round molding in real oak. The cost for 80 linerar feet of it is around $85. Pricey, but maybe worth it. They can ship or if they have a store near you, it can be ordered and picked up there with no shipping charges.
BTW, I have not read the first part of this thread, but are you planning to nail and/or glue the shelves to the cleats? If there is a good, necessary reason for doing so, fine. Allowing the shelves to simply rest on the cleats, however, would allow you to much more easily make changes in the future. Often changing the shelf spacing or removing one entirely becomes desirable as the use for the shelves changes.
springcorn thanked akamainegrower - 11 years ago
You've gotten a number of interesting suggestions, but some of them seem like a lot of work for the result. For example, the glue-on veneer is a good product, but it is slightly wider than standard plywood, so you have to trim it with a razor blade after it is applied and then carefully sand both edges flush, and then apply finish. I like the idea of applying a trim strip to the front edge of each shelf that covers the raw plywood edge and the shelf supports, and will eliminate any sag. As for those gaps, the most I would do is cleanly caulk with white latex caulk and then paint. This is not a hack approach: if you are good at caulking you will have an almost unnoticeable fix to this problem, and it will be much more esthetic than trim pieces, etc. Competent caulking and use of a moist paper towel to tool the caulk right after you lay down the bead will make a clean line and remove any caulk that gets onto the wood. If the gap is really big, you can run an initial bead and then a second, finish one a couple of hours later.
springcorn thanked kudzu9 - 11 years ago
You have done well if you are only useing a hand held powersaw. i like suggestions so far and can only add another option or two. As a stiffner,the 2x2s don't need to be cut to fit between and fastened to cleats. In the future,cut stiffner slightly short and fasten to shelf bottom with 3 or 4 screws before laying shelf on cleats. That's much easier and reinforces better. Useing pocket holes on back side of a 1x is also good. +1 on how kuduz handled gaps and front edge. A simple 1x covering cleat ends and stiffining shelf works well. If the piece is routered on one or both sides it can dress it up. If you are staining the plywood,substituting ash for trim saves money and is easier to find. I used pine,oak and ash in mine and my son's homes and noone can ever tell the difference unless pointed out. OT but relevent. For aspiring woodworkers,a table saw not only boosts your capibilities,it very well might prevent serious injury while ripping or beveling with hand held powersaws.
springcorn thanked klem1 springcorn
Original Author11 years agolast modified: 11 years agoSetting up so there is a lip is a good option in terms of less work/cutting involved. Since my cleats are 1x2 = a real 1.5" tall and my plywood is 3/4" thick I need 2.25" to make it flush. If you add 1/4" molding it is 2.5" even...which equals 1x3 no cutting.
I like this idea in terms of general outcome although I am not thrilled with a 1/4" lip. The shelves are already tall, now they are even taller. But this is definitely under consideration, it means no more rips, no more angle cuts.
I am planning to nail the shelves into the cleats. I recently bought myself a nail gun which i have yet to use so I am excited to get this out. The way I see it is that if I wanted movable shelves I should have set up some kind of track system. These are going to be part of the house. Plus, moving these cleats with supports would be kind of a pain in the butt and messy. I might put glue down as well before I put the nails in. 1 1/4-1 1/2" nails?
I must say I am a little nervous about nailing the face piece into the plywood. I hope I don't jack up the plywood.
Caulk? Well it sure would save me having to create a lip or angle cuts and all the molding. However, I stink at caulking. I would hate to mangle it. I can't imagine how you caulk and then paint with out getting the paint on the shelf, yet actually cover the caulk. The side walls are a light grayish greenish color.
Yeah I don't have a table saw and did all the rips with a circular saw. I could borrow one for a day though.
Maybe I can route out the front or something. Everything is square in my house, I wonder what router bit to use. This is another tool I just purchased but have yet to use. (first time home owner=first time tool buyer)
THANKS FOR ALL THE INPUT!- 11 years ago
I remember your original post. You've done a great job building new shelves for that challenging space!
I think I'd use a trip piece to cover the shelf and the cleat, as akamainegrower suggested. Looking at your second photo - the top shelf is high enough that you can see the support 2x2. A trim piece that covered the cleat would hide the support piece behind it - which doesn't necessarily need hiding.
If I was doing this project, I would seriously consider taking each shelf apart and angle cutting the cleats. Borrow that table saw and go to town. Yep, it would be a lot of work, and you might find you can't live a day longer without a table saw, so it could get expensive! But I don't think you'd ever look at those shelves and say "Gee, I wish I hadn't wasted half a day cutting back those cleats."
Once you do that, all you have to cover is the plywood edge. You can get 3/4", or even an inch (I don't know what is readily available), no angle cuts. If you can get the trim pieces cut flush to the wall, I don't think you'll even notice any gaps along the walls.
As fussy as I would be about the cleats, I wouldn't worry about the gaps. Presumably, in the photo you showed, the shelf was flush against the other wall? Centering the shelf gives you a gap half that size (and half as noticeable) on each side. Once you secure the shelves and put things on them, I don't think you or anyone else will notice.springcorn thanked annkh_nd - 11 years ago
springcorn-
If you've had trouble with caulking in the past, it's probably because you: 1) used silicone caulking, and 2) you didn't tool the caulk line after you laid it down. You've done much harder things with this project than caulking. Trust me, you can caulk like a professional if you use latex caulk, because it is completely removable in the first couple of minutes since it's water soluble until it sets up, and it is very easy to tool, using either a moist paper towel or just your moist forefinger. Take a look at the last 30 seconds of the short video link below and you'll see what I mean. And as for not getting paint on the wood, all you have to do is caulk the gap and, later in the day, when the caulk has set up, lay down painters masking tape along the line, press it in place firmly to prevent paint creeping under it, and paint over the caulking with a small brush. You can even immediately pull the tape back up if you want.
How to caulk
One other thing, if you're talking about routing out something that is already in place, a router is generally not going to work, because the router base will prevent you from making a complete cut when you have adjacent obstructions -- like sidewalls -- that don't allow a straight start-to-finish runspringcorn thanked kudzu9 springcorn
Original Author11 years agoannkh_nd-Thanks for your encouragement. Taking apart those cleats would really be painful because I would have to pull the supports too. But I am considering it. However, I am really confused as to what you mean by angle cuts. When you say that I imagine just cutting the front at a 45, but you mention a table saw which makes me think you are speaking of something else entirely.
I guess the disadvantage to just putting a thin strip of trim instead of the big old 2.5" piece is I might not gain that added rigidity.springcorn
Original Author11 years ago-I have learned to hate caulk. But I might give it a go with one shelf and see how it goes and then make a decision. I guess if I blow it, I could just put molding on top.
Since I haven't put the face (trap?) piece up yet, I can route it beforehand.- 11 years ago
If you blow it, you take a wet paper towel, remove any excess, and try it again. It's one of the few homeowner DIY projects where you get more than one chance to do it right without damaging anything, or wasting valuable materials.
- 11 years ago
I agree that it's too late to pull cleats just so they can be mitered. Sanding the end smooth and painting same color as wall will work if you decide against 1x accross front. An important step with caulking it is having some orig wall paint color for touch up or repainting wall after caulking. Here's my contribution to making you a pro caulker. Apply tape on shelf as close to edge as possible without covering gap. Before opening caulk.wring out a wet cloth for cleaning hands and smears. Cut caulk tube tip 45 degrees to expose only a tiny hole in tip. Too large hole in tip is a very common mistake. Fill the crack and let caulk dry enough to stiffen before laying final bead which is emediatly smooted with wet finger tip. After caulk drys and paint applied over it,pull tape. PRESTO,perfect edge on caulk and paint. No rule against trial run on scrape material to build confidence before doing the real thing. Remember,only a tiny hole in tube tip.
There are too many people cheering for you to overlook pics of finished job.
springcorn thanked klem1 - 11 years ago
Kudzu9 is point on...
Cut your front strips wide enough to cover the shelves AND the cleats and caulk up the cracks and be done with it...This was my original suggestion as well...If you look around, you can find caulking in lots of colors other than white..You'll be able to find one close to your stain color
..If you can do what you've done so far, you can surely caulk up a crack...Follow the suggestions in the previous posts and you'll be caulking like a pro...
Personally, I would ignore the cracks.......
springcorn thanked jwstowe - 11 years ago
springcorn: Are you really intending to paint your shelves and cover up that attractive oak plywood? If so, caulking the gaps along the sides would be an option if you are really determined to eliminate them. I would not recommend it, though. Unless you're far more skilled at caulking than I am and/or are willing to mask along the vertical walls and horizontal shelf edges with tape, it will be difficult to do a neat job. Also, despite manufacturers' assurances, caulk does not last all that long without showing cracks and gaps, especially in gaps as wide as 1/8". This tendency is exacerbated in any situation where one or more of the surfaces being caulked. There is bound to be movement with natural moisture and temperature variation, but shelves will also move with the weight of whatever is placed on them and through incidental contact. This is a far different situation than using caulk to disguise gaps in interior molding, for example.
Given all you've done so far and your tool limitation, I'd suggest using the adhesive veneer tape (it's easy to trim and there's a neat little inexpensive tool designed for exactly that purpose) or an oak strip with the same thickness as the plywood across the front of the shelves. Were it me, I'd stop with that. At this stage in any shelving project, all of the "problems" leap out. Once the shelves are actually in use, they tend to recede into the background and disappear. If you really want to cover up the gaps along the shelf edges, molding remains, imho, the best option.springcorn thanked akamainegrower - 11 years ago
akamainegrower-
You're entitled to your opinion. My opinion and experience is that an interior application of latex caulk in a 1/8" gap shouldn't be a problem. A modern caulk, particularly siliconized latex, should last a long time as long as the crack is adequately filled. However, the larger cracks will benefit from being done in two or even three successive applications: the first deep into the crack and subsequent ones to bring it level. I also don't think that there is issue of seasonal movement in this particular situation as the shelves are not very long and are of plywood. I'm not saying that there couldn't be a hairline crack or two 10 years from now, but I think the caulking approach is pretty reliable and much simpler for this job.  11 years agolast modified: 11 years ago
Your shelves look great! Although I didn't comment on the original thread, I remember it.
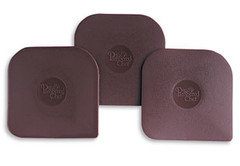
Hope you don't mind my jumping in, but I recently did some remodeling in an older house, so I can attest that kudzu9's and klem1's caulking methods work well--with the addition of one invaluable piece of equipment. I use the scrapers that came with some of my baking equipment, to give a nice clean edge to the caulk. The 90 degree point is sharp enough to get into corners where a finger can't reach, and can be angled--I'm thinking of the very back of your shelves, under the trim piece. Keep a damp rag handy to wipe off the excess. If you want an eased edge, there are three different curves on the scrapers. (I don't sell the equipment, but they're fairly popular--someone you know might have an extra one.)
If you decide not to caulk, and you can borrow that table saw, you could rip thin pieces off of your 1x boards, to fill the gaps between the wall and the shelf edge, then paint or stain to match shelves. Very cheap and easy solution, provided the saw is available. Just a couple of suggestions from a DIY novice.springcorn
Original Author11 years agoGood feedback, although I wish everyone had the same exact advice. First off, I am absolutely not going to paint those shelves. The stained oak matches the beams in the house too nicely.
Good points about the shelves moving slightly with use. The maintenance issue is one I seem to forget with a lot of my DIY projects. I figure that one day if the shelves get banged up...10 years later...I
could paint them, but I love that wood look and think it will be muted
once there is stuff on it.So if I paint, it will only be the caulk line and not the shelf itself.
I am going to cut some trim pieces this weekend for the front, then maybe I will try caulking one shelf and see what it looks like. I need to make this decision so I can finish. I think once I cut a couple pieces and line them up it might be telling.
I want to try some molding options too. Maybe I will set it up and take some pictures and share. I need to check out Rockler as suggested. I did get some pieces of screen molding, simply because it is super cheap. I thought I could cut some and line them up on a shelf to see what that would look like.
http://www.homedepot.com/p/Kelleher-1-4-in-x-3-4-in-Pine-Flat-Screen-Moulding-P340/202071687
Thanks for feedback and the tips.
- 11 years ago
Keep in mind that pine doesn't take stain the way oak does. Use the pine as a test piece, but I'd use oak trim to get the color to match.
- 11 years ago
Springcorn said "Good feedback, although I wish everyone had the same exact advice. "
On closer examination,that statment actually cuts right to the core of these diy advise forums. First and foremost,there are usually more than a single correct way of doing a task. Even pros take different approaches to identical tasks. Moe nails,screws and glues everthing togeather with the idea that nothing short of a 10 megaton nuclar blast will pull it apart. Problem with that is that repair or alteration is impossible in the future. Larry uses whats on hand refusing to take time to locate correct material. Larry also slaps it togeather because he's short on time and we have all seen Larry's work. (Actually,there are people on GW everyday that paid Larry for a job they are unhappy with). Curly will fiddle with a playhouse,changing and adding onto until his baby girl is getting married and needs a real house. Then there is Klem. He usually has a plan B at every phase,sometimes plan C & D just incase. The list of different personailities just gos on and on. Judging by some comments in this thread,you will see Larry's brothers who never take time to read previous posts before taking a whack at a problem. Same as larry,they also never read the instructions either. Can you amagine hireing all these guys to remodel your house? At best they would waste a lot of time aurgueing. At worst they may come to blows requiring you call the cops to through the whole bunch out of your house and a lawyer to protest their invoice. So yes,I feel your pain springcorn but it's up to you in choosing a method you are comfortable with. Speaking for my self,I not only offer suggestions but try to present oppertunity to expand your knowledge. With that in mind I offer farture thoughts about caulking i feel are applical to your project. One of the many ways caulk can be used is in tricking the eye. In older building it's common to find wave where wall meets ceiling. After wall is complete,the painter applys tape on wall as straight and close to ceiling as possible. The area of wall showing above tape is painted same as ceiling. I have a dedicated chalk box with white non-bleeding chalk I use to pop a line instead. You must try it to believe it but the ceiling and wall look straight and the ceiling paint on wall is not detectable. Point is this to reason for caulk around your shelves,not to exclude water or simply fill cracks. The bonus is that the eye isn't drawn like it is where molding covers the crack. Some times "less is better".
annkh_nd, Never say never. I have to throw the bs flag regarding your assertation "Keep in mind that pine doesn't take stain the way oak does". I thought i made it clear above that pine,oak and ash appear to be a single species in my son's and my homes.
- 11 years ago
springcorn: Your plan to try both caulk and molding on a trial basis is surely the best way to go. Please let us know what you decide. Finally, a last congratulations on your very well-done project.
kudzu9, klem1 and other caulk advocates. With all due respect to your opinions and experience, I still have a very hard time seeing how caulk is the best option in this particular case. No matter how well it is done, it will render all the shelves unmovable without damaging the caulk. This alone would disqualify it in my view. The depth of the area being caulked is also important even when the width is only 1/8". Any caulk manufacturers I'm aware of recommend backer rod for any depth greater than 1/2". Adhesion to the unsealed edge of the plywood is another potential problem. Taping all these shelves to keep paint off them and to assist in keeping the top surface of the caulk in the same exact flat horizontal plane as the shelf surface - a difficult task in itself - is a tedious task prone to inadvertent errors. Molding seems to me far simpler and much more likely to produce a pleasing result. BTW, I have never ever seen a professional painter use masking tape to cut in the junction between wall and ceiling. In a similar vein, skilled finish carpenters pride themselves on their joinery and do not leave gaps in their work to be filled with caulk except in very unusual circumstances. Of course when they are working with trim intended to be stained rather than painted caulking is not possible.
- 11 years ago
Klem, in my experience, if I use the same stain on oak and pine, and leave it on for the same amount of time before wiping off, the pine will come out lighter. Certainly they can be made to match, but it may not be as simple as just slapping the same stain on the trim.
springcorn
Original Author11 years agoklem1-
My comment was probably ill placed about wanting synonymous opinions. It is the divergent points of views that really help.
akamainegrower-
You are absolutely right regarding the backing. There is a 3/4 tall gap that then flows into empty space. The width of the gaps averages < 1/8". Of course there are exceptions. I think the molding will look better but I also think in order to look better it requires me leaving that 1/4" lip which I am not thrilled about.
Anyways, I will take pics of my staged options.
I stained the shelves with crystal clear varathane. This is the same stain I used on the pine beams and trim pieces adjacent. While the grain looks considerably different, the color is quite similar. So I might be able to get away with pine. The oak I looked at was somewhat expensive considering I need 100'. There were also more options in pine. But I need to go shop around.- 11 years ago
Holy moly,speaking of teachable moments. I posted about Larry and his brothers not reading all the information presented then what happens in the very next post? akamainegrower Says, "I still have a very hard time seeing how caulk is the best option in this particular case. No matter how well it is done, it will render all the shelves unmovable without damaging the caulk ". Didn't springcorn say he/she was glueing the shelves togeather? To be unattentive is simply some people's nature and can be tolerated. On the other hand,to chide springcorn over his/her inability or unawarness in scribeing the shelves is a low blow. My apologies for chasing rabbits but is it any wonder people become confused?
springcorn
Original Author11 years agoI mocked up a couple examples. Some stipulations/excuses:
-While the shelf is stained this stuff isn't.
-Also,
this is pine. It is a 1x3 trim piece and that pine screen molding. I
am going to try to head down to the hardware store this weekend and get
some other options.
-I didn't nail/glue the molding so it doesn't sit perfect.
-This is a shelf which is very tight as compared to the others
-Also, please ignore the paint chip, touch ups are still needed on the paint job and taking shelves in and out isn't helping.
Here is just the trim in there with no molding. The trim is sitting flush with the shelf top.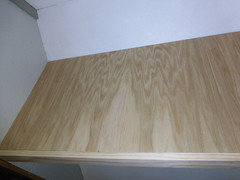
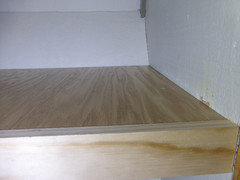
(Remember, this shelf is probably the tightest in terms of wall gap)
This
is with the molding but it is sitting on top of the face trim. Kind of
weird but I am not sure how I feel about the lip so I was trying to
think how else I could do it.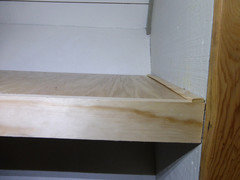
Now I have moved the face trim up 1/4" inch so the molding lines up.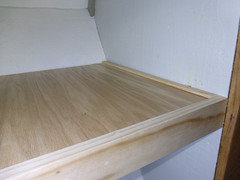
I
do like the last one. But I really wish that face piece wasn't so darn
tall. It is fine on the bays where I just have one shelf, but I don't
like how klunky it looks where there are 4-5 shelves.- 11 years ago
My view is that you are causing yourself a lot of work, and making the shelves less functional, by having lips around the edges for stuff to catch on. One last time and then I'll shut up: use caulk!
If I were there to help you, this job would take me 5 minutes to tape, 10 minutes to caulk, and, when the caulk had set up, 5 minutes to do touch-up paint. Maybe 1/2 hour total, including cleanup.
springcorn thanked kudzu9 - 11 years ago
The bottom photo looks good to me. Why not do the same thing, but reduce the width of the facing piece to 3/4"? You would see more of the cleats at each side, but the klunkiness would be greatly reduced.
Even with my alleged inattentiveness, I'd pay actual money to see someone tape, caulk and paint 54 shelf edges in 30 minutes. One minute per shelf, 30 seconds per edge. Wow.
springcorn thanked akamainegrower springcorn
Original Author11 years agokudzu9-
I am still going to try caulking one, but despite watching videos, etc, I have proven over and over to be slow and generate a horrible result at caulking.
akamainegrower-
That size would look great I think except for the cleats appearing. I am thinking about painting all the cleats this weekend to match the wall and then maybe I can do this.- 11 years ago
springcorn-
Even if you can't lay a uniform bead of caulk, it doesn't matter as long as you have a moist forefinger or paper towel to tool it... - 11 years ago
I'm with kudzu9...with the screen molding and the front strips raised above the shelf top you'll take what was a near pro looking project right down to a pure amateur looking level...
CAULK UP THE GAPS!!...simple, quick, and done right....
- 11 years ago
Aaahhaa,I woke with a new idea in a drunken stuper with indisgestion from to much Tex-Mex and beer last night. If the cleats aren't glued to wall,how bout this? Pry front of cleat 1/8th" from wall and slide a 6" wideX 2'long formica sheet underneath to protect wall from saw. Use a small back saw to miter end of cleat then knock it back tight to wall. Problem solved,front trim can be 1" wide. BTW,is that trim plywood ? I don't think that's a good idea.
springcorn
Original Author11 years agoThe caulk test shelf turned out pretty reasonable. One side looks near perfect, the other does have a bit of an uneven line. Pre-taping the shelf along the caulk line seemed to help it turn out clean, that was a good tip. I taped, caulked, waited until dry, painted, waited until nearly dry, pulled tape.
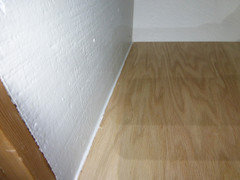
I think the caulk is a passable look. I do think the molding looks better, but is less functional because of that big lip.
If I went with the caulk then I line up the front trim flush (no lip). The problem with this is the seam really draws the eyes. It is hard to show an image of this, but I am sure you get it. Also, a handful of shelves have some little nicks on the edge.
Absurd as it is, I am still struggling with the decision. Obviously, I am obsessing. As soon as I make it, I am finishing the job. I am looking forward to your input. THANKS EVERONE
Secondary question...I already nailed the first layer down, what would you guys do about the nail holes?
a)Woody Putty and leave it (I worry it will pop out if I do this)
b)Wood putty stain over top
c)wood filler and stain
d)?
Thanks for your idea. It is probably doable, but those puppies aren't moving now because I nailed down the first layer. I still think you might see it anyways on the higher shelves. I might bust the router out for the front trim to make it look a little "slimmer".
- 11 years ago
springcorn-
That caulk job looks quite good! I'm pleased that you finally had the courage to try it. As for the nail holes, use something like Elmer's Stainable Wood Filler. It is water based, so you can wipe around it immediately with a moist paper towel and clean off any residue that you don't want to worry about later. Put a small bit onto a putty knife and force it into the hole, then wipe immediately. It will set up pretty quickly and you can always top off the hole with a second application if it's not quite flush. You will only have a problem with popping if the nail heads aren't set far enough below the surface (say, less than a 1/16"). If you do a good job of filling the nail holes, you won't have to sand (or maybe just a swipe or two). Given how light the plywood is, I wouldn't bother to try to stain the wood filler: it might just make the holes more obvious because filler often absorbs stain differently than the wood around it.springcorn thanked kudzu9 - 11 years ago
Don't let it fruster you,you should see some corners I've put myself in. One upside to all this is what all of us learned from one another. Part of what's happening is you are your own harshest critic and that's fine. Bottom line is almost everyone says they like it and it looks good.
springcorn
Original Author11 years agoFor some reason I didn't see some of these responses until now.
I am hoping to make it to the hardware store to get final supplies tonight. What I am thinking about doing is a hybrid. I will use the molding on the bays with single shelves. But on the stacks of shelves like the book case, I will caulk.Originally I wanted to do everything exactly the same for consistency, but I think this is a practical solution and likely no one will notice the difference as most of the shelf elements are identical.
I think the molding gives it more of a finished look and looks great on a the single shelf bays where the eye really can see the entire shelf because nothing is above it.
On the other hand, the caulk would be nice for the book case type shelves because you could put books all the way to the wall. I also don't think you will not be able to see or appreciate the molding where there are 4+ shelves loaded with books or other stuff.
I plan to do a lip on everything, but only a 1/16" on the non molding shelves while the molding shelves will have a 1/4" to match the molding height. This is nice from a practical stand point of pulling books in and out. I think from an appearance standpoint you won't be able to tell the difference as long as there is still a little lip.
If you guys have any thumbs up on this plan or objections speak up, I am going to the store tonight!- 11 years ago
Try one of the shelves intended for books without either caulk or molding. Fill it with books all the way across for a trial and see if filling in the gap is really necessary at all.
- 11 years ago
" Problem is that I have become too obsessive to do nothing :)\"
My granddad would say it's like a sore (fill in body pert) ,the more you play with it,the sorer it becomes.
- 11 years ago
I didn't see all the updates on my houzz page until today. I'll mention something that I thought about before, pertaining to the front trim, because I see that you still don't like the width. I think it looks better when it's wide enough to obscure the support piece underneath the shelf, but with a jigsaw, you could cut the trim pieces in this shape, to make them more narrow for most of the length, but still cover the cleats:
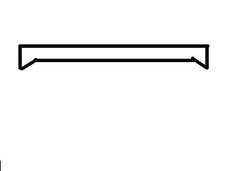
You could consider it a design feature, repeating the angle of the walls--no one has to know that the cleats are there.
BTW, I think the caulk experiments look good--I prefer that look to the added molding, but you're the one who will be seeing the shelves every day. Will the molding cause a gap between the first/last book on the shelf and the wall, or will it look OK if a book sits on top of the molding? Or is that a non-issue? Good luck!
springcorn thanked mama goose_gw zn6OH springcorn
Original Author11 years agomama goose_gw zn6OH-
That is a very good idea but the problem with that is the supports are the same height as the cleats so it would make them more visible.
The concern you raise in regards to books being able to sit against the molding is valid. That is why I decided on the hybrid in the end. Use the molding on the single shelf bays and caulking on the book case shelf bays.
springcorn
Original Author11 years agoThe GOOD:
First off, everything is going together beautifully. The finish nailing is going smooth as it comes. I haven't even made a big mess with all the glue. I had the brilliant idea to use the chamfer bit on my never used router to make give the front trim a slimming effect. I did so by running it over both sides of the trim so the angles run away from the center like so:
\
|
/
Looks beautiful and makes it look much smaller height wise while still hiding the cleats.
Currently, all the shelves are nailed and glued, all the front trim is nailed and glued and I have been finishing up filling nail holes. I still need to do the molding.
The BAD:Alright let me start by saying I am an idiot. So as the story goes...I got ready to finish the trim out and after looking at a final mocked up shelf, I decided, I am going to be different. I liked the look of contrasting light pine against the oak. So instead of using my stain to color match the pine, I just varathaned it. I realize you guys will probably contact a moderator to revoke my gardenweb login for accepting so much good advice and then doing something so stupid.
It does look pretty good on the single shelf bays, but where there are 4+, not so good. On those, all you see is trim. Is there any way to darken while in place, after I already varathaned?
-I read about polyshade, but that sounds like a dangerous product if you aren't a pro.
-Sanding them will be hard in place especially without messing up how I routed it.
-Anything else?
springcorn
Original Author11 years agoSorry for the delay in pics. I ended up sticking with the light pine look. I do like the contrast. The real negative I have found about the pine is that the wood is softer and so if you are moving stuff in and out you can dent the trim.
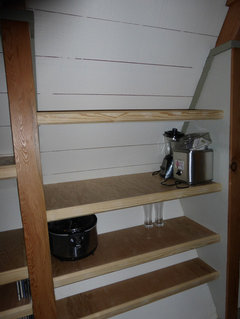
Here is one bay that will serve as the pantry. I would like to put closet doors in front of it. Not sure how to do that. I am thinking I will put a header above and then put in sliding doors. Not sure where to get custom size ones or if the way to do this is to build them.
Here is a pic from above so you can see a bunch of shelf bays at once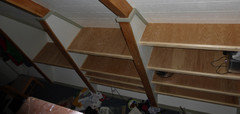
Finally here is a picture of the routing I did to give the shelf trim pieces a slimming effect. I am very happy with this. I used a champfer bit on both sides of the trim.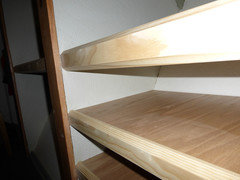
Thanks again for all your tips over the project. Now I got to figure out those closet doors. It never ends...- 11 years ago
Nice work! I'll bet you're thrilled to use those shelves after all this time and effort!










jwstowe