Software
Houzz Logo Print
mathteachr

Mid-way construction update

11 years ago

I thought I'd post a kitchen update for everyone who was so helpful generating ideas for our kitchen (whether in response to a post or just when I read through your other posts!).

So far we have:

- demo'd the kitchen, including tearing out ceramic floors and the underlayment the mortar was laid on (not a fun job!), and laid new underlayment in the kitchen and dining room.

- sold the cabinets, sink, old dishwasher and china cabinet on craigslist, which gave the budget a bit of a lift.

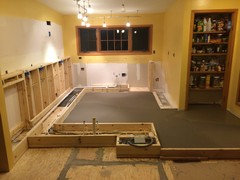
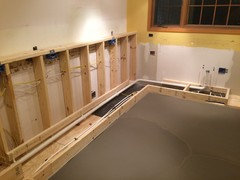
- I did the rough carpentry to build the toekick bases for the ikea cabinets and a half wall that will form a ledge ~6" above the counter on the cooktop wall. I built the toekicks ~2" taller than normal to raise the counters up, since we are taller.

- had the plumbers out to run plumbing for the main sink under the window and a prep/bar sink very close to where the old sink was. They were able to run all the plumbing in the toekick space, which made it very fast and cheap (they are doing the vents with something that doesn't require tying in to the old vent, sluter/schluter/sutter vents, I think).

- had the electrician out to rerun both outlet circuits, move the power for oven, dishwasher and disposer, and add power for under cabinet lights. He was able to extend all the existing power, and also run everything in the toekick and half wall areas, so this was pretty straightforward/quick, requiring no work at the circuit box.

- used self leveling underlayment to pour a level floor in the kitchen (it was about 1.5" out of level!).

- patched drywall and painted

Comments (12)

  • 11 years ago

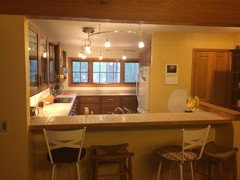
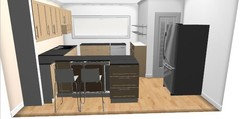
    So here are the pics for the project so far:

    Before:

    Today:


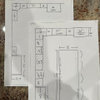
    Ikea kitchen plan:

    I
    hope this might be helpful to someone, someday - I have gained so much
    knowledge about kitchens from GW, and I think this kitchen will be so
    much more functional because of you all. I can't wait to do a final
    reveal (hopefully before school starts!).

  • 11 years ago

    Wow. Look at all you've accomplished! If anyone asks you in 20 years what you did the summer of '15 you won't have to hesitate to answer.

    I'm fascinated by the plumbing solution to get a sink below that cool window. Where there's a will there's a way.

    Thank you for taking the time to post this update. I've wondered how your kitchen plans were coming along. Seeing things come together for you is a great encouragement to me as I spend the day battling the Ikea Kitchen Planner.

    Onward!

    mathteachr thanked sheloveslayouts
  • 11 years ago

    Oh, I remember your layout planning thread and am thrilled to see you making progress. And I love the way the new plan really opens up the window for better views and light.

    mathteachr thanked funkycamper
  • 11 years ago

    Looks like it will be a great kitchen. It is really fun to see your progress.

    mathteachr thanked Karenseb
  • 11 years ago

    Nice! Thank you for sharing.

    mathteachr thanked Nothing Left to Say
  • 11 years ago

    Thanks for posting. Very fun to see the progress.

    mathteachr thanked AvatarWalt
  • 11 years ago

    Wow. People who DIY always have my admiration. The talent , the will to learn and to do is just so cool. Will you continue to post progress pictures? thanks

    mathteachr thanked blfenton
  • PRO
    11 years ago
    last modified: 11 years ago

    mathteachr:

    I hope you ran that PVC in 2" because the plumbing inspector is probably going to want that and to check for pitch before he approves the loop vent you'll need in your sink base cabinet. Loop vents are at his discretion; he may make you vent through the window wall.

    Don't blow this off, please. An unvented trap can allow poison sewer gas into your living space. This kills several people, usually infants, every year.

    I can see why you wanted the 2x4 base as a chase now, but you're screwing yourself out of one of the greatest features of IKEA cabinets, the adjustable feet. Leveling cabinets doesn't get any easier than reaching under a cabinet and twisting a foot.

    mathteachr thanked Joseph Corlett, LLC
  • 11 years ago

    Joseph:

    The inspector has already come and passed our rough plumbing inspection, including the vent plan. The licensed plumbers will be back to do the finish traps at the end. Thanks for the concern, always good to double check!

    I also wanted to construct the base because we are doing 38" high counters, rather than the standard 36, and the ikea legs won't go that high. But if that was my only need, I would have just screwed a 2x4 into the floor under each leg set. I totally agree, leveling the lumber (it's actually a 2x6 stacked on a 2x4 on it's side, so 7" before we did the underlayment) was not as easy as twisting legs would have been, given the 3/4" out of level floors at that point.

    The peninsula needed to be hard attached to a base, since it's not supported by a wall. It's also easier to attach the plinths to the lumber base.

    Can you tell I've been thinking about what way to do this waaay too much? :-)

  • 11 years ago

    MT we did the base builds as well. I actually found it easier to level the cabinets this way. Amazing progress. Have you thought about enclosing the fridge? I am still tossing up what to do with mine. Mine is in a similar location but has a few cabinets to one side.

    mathteachr thanked bundy123
  • 11 years ago

    bundy:

    I'm not sure what we'll do long term with the fridge - maybe enclose it, or put narrow pantry cabinets opening to the sides, or build in a big pantry including in front of the window next to the fridge. I figured we'd live with it just freestanding for a while and see. We're hitting our budget right now, so I figure it would be good to wait. I'd love to see yours or hear about any approaches you're considering.

    I'm on a break checking GW while the glue dries before we lay down cork tile, I hope this next part goes well!