Software
Houzz Logo Print
matt1032

EZ Level - Good, Bad, or Ugly

10 years ago

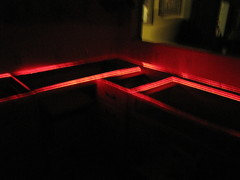
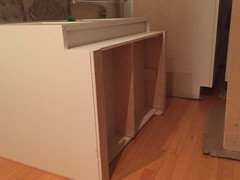
Did not come up with any good info on this system. Sounds neat, but any experiences with using them? I took some photos from their website. They had some detailed videos showing how to use them. You drill a hole in the toe kick and they have rods that connect to adjustable level devices. They discuss how shims are tucked under the cabinet and overtime them move out or get compressed.

www.ez-level.com

Comments (20)

  • 10 years ago
    last modified: 10 years ago

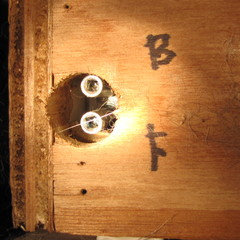
    I used them. Worth every penny - in simplifying a job, making it MUCH more adjustable on the fly, making particleboard cabinets MUCH safer from possible water damage, and overall a sanity saver. The one caveat is if your cabinets have blocking in the corners in the bases that would get into the way of mounting the units - it's more complicated then, but still do-able. (Then you have to mount them onto the inside edge of the blocking in front, and glue/screw in blocking to match at the rear mounting box, and drill your hole over so it's next to the block, not going into the block! Remember your blocking is now holding the weight so it must be screwed to the sidewall not just glued or lightly tacked. If you have to add screws to your blocking, then make sure you place them so they aren't in the way of where you need to put the EZ-level box mounting screws.) Install the EZ-level box units snug, but do not overtighten the mounting screws as it will distort the box and make the movement restricted for adjustement. Just a firm snug mounting but not over-torqued! Also it's much more convenient if your cabinets have a removable toe kick finish plate so you can cover the holes back up. And a good laser level on tripod (mine cost $75 - skil MT 8201). Definitively spring for the hole boring bit, too. I think most people who try these will never go back to the horrid shim method. Another tip, label the holes under the kick plate so if you ever have to adjust anything you know which screw does front and which does back. See pic, F = front= bottom adjuster, B= top = back adjuster. The levelers do not move once installed. But if you had an earthquake or flood and your floor went buckled and you needed to change your settings, then you could! I took out all my cabinets, screwed them together as needed (box to box into multi-box units), then installed sets of these per instructions, laser leveled per instructions, and got the split line just like they said.


  • 10 years ago
    last modified: 10 years ago

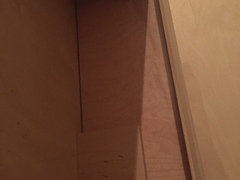
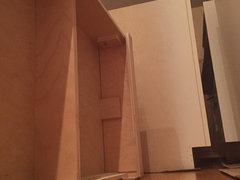
    Thanks for the note about blocking. My be a royal pain. I have blocking to support the toe kick smack dab where that hole needs to go. And I have support blocking along the run where those long adjusters go (support shelf? Only tacked on it appears with staples). There is 2 inches of room there, are the bars within that height? Here is a photo of one cabinet on its side.

  • 10 years ago

    Give me a picture from farther out, so I can get the orientation of these close-up photos.

  • 10 years ago

    I just tried prying off a bock. The ones on the sides (front to back), are not glued, just stapled. They came right off. I guess if the bar needs more room, I can trim it some and use gorilla glue to reattach. It attaches to the 1/2 ply sides so glue may be best so nails or screws do not pop through the sides. Not sure what these actually support being the cabinet floor is in a groove.

  • 10 years ago
    last modified: 10 years ago

    The top is the front. There is a packing strip along the bottom edge that gets removed. There are 2 blocks...one in the front for the toe kick, and one along the side supporting the floor?

  • 10 years ago
    last modified: 10 years ago

    mathewstephanie - I'm excited to see that your cabinets are going in. Did you stick with your original layout? Please post pictures when it comes together.

  • 10 years ago

    I guess using these will eliminate any possibility of tie kick drawers.

  • 10 years ago
    last modified: 10 years ago

    OK. No problem.

    The idea is that if you have blocking, then you make sure you have blocking under each EZ level mounting box - front and back - (i.e., build the sidewall out with blocking under the EZ level box locations to the same thickness for front and back box locations), and that THAT blocking is screwed to the sidewall as it will be weight bearing. Make sure blocking bottom is flush with sidewall bottom or close to it, whenever possible. You CAN adjust out for this using the EZ level box levelers, but will lose some range if you have elevated blocking bottoms.

    Then, you bore your access holes in to adjust for the depth of your blocking. You want the hole to land just inside the blocking as in my (F and B) picture, above, shows hole location. Although, in that picture, there is no blocking, so you have to imagine the sidewall is the blocking, and the hole lands just next to the "blocking" edge. You also need to place the hole at the right height from the bottom surface, the drilling template helps you measure for that.

    On blind sidewalls (where you will not see the sidewall from outside the cabinet, such as when that cabinet is screwed to the next box, or when that cabinet's sidewall is up against a wall or has a finish plate attached over it, I'd screw the blocking to the sidewall from the OUTSIDE of the sidewall (countersink screw heads). This way, your blocking is supported by outside screws on the blocking, and then by INSIDE screws once you mount the EZ level box. This is most important on particle board sidewalls that are thin. If you have thicker walls or ply walls, then it's less important. Make sure none of your blocking screws will penetrate out the other side, length-wise. All blocking screws must be countersunk so the heads are not proud of the surface. (Uh, yeah, add a countersink bit to your shopping list.)

    On sidewalls where you will see the sidewall, you will want to use countersunk, appropriate length screws from INSIDE the sidewall, but not placed such that those screws will be in the way of where the EZ level box mounting screws will need to go. Sounds complicated but it's not once you get the idea and pre-mark your mounting box screw holes.

    I found the EZ level boxes to be great quality, and especially liked the quality of the boring bit and self-drilling screws provided with the units. I had no problems, and didn't have to do any do-overs, the instructions are fairly easy if you can visualize the geometry and not place screws in the way of future screws.

    The five corrections I had to teach myself were:

    1) What to do if there is blocking "in the way" - build out under the front and back EZ level boxes by adding your own blocking as needed. Glue and screw all blocking under EZ level boxes.

    2) Move over the boring hole to adjust for the additional thickness of blocking, but drill at the prescribed height from the floor surface, as directed by the template.

    3) Make sure no blocking screws are in the same locations you will need for the EZ level box mounting screws - pre-mark the box mounting screw locations BEFORE you screw the blocking screws.

    4) Don't over-tighten the box mounting screws or they squeeze the box narrower and impinge its internal mechanism movement. Most of the weight will be borne on the LIP of the box at the bottom of the boxes, but the screws are secondary for weight bearing support and still important for stability, holding the boxes and lips in position properly.

    5) Don't let your blocking screws penetrate the other side or the protruding tips will be in the way of placing the EZ level box up flush against the blocking to mount it (if the screws originate from outside wall), or they are sticking outside the cabinet with sharp tips (if the screws originate from inside wall).

    And two more caveats:

    Use the longest screws you can, that won't penetrate the other side. Both for blocking and for mounting the boxes.

    Check your subfloor in the locations the EZ leveler feet will land, that they don't happen to land on a plywood void or boggy spot. The EZ levelers will hold the weight just fine, but if your subfloor is boggy, that is not their fault! The great thing is you can ALWAYS go back and adjust them, without tearing apart your install!!

    =====

    Using EZ levelers shouldn't preclude toe kick drawers but may reduce the drawer box width an inch or two each side, to allow for the units. And it may require drawer slide adjustment, using bottom drawer slides instead of side drawer slides, etc.

    ====

    Now, to address the particular picture the OP has shown: In this case the blocking is actually adding depth to the FRONT wall (toe kick wall) instead of the SIDE wall. It appears this blocking will still be in the way of the EZ leveler box (front edge), so you can still do the install simply mounting the entire unit back, offset the distance of the front blocking depth. The result of this is that your adjustment screws will be inset a bit more and harder to see if you ever need to adjust them, but still do-able. If the EZ leveler unit will mount and clear the CENTER piece of blocking, then no sidewall blocking need be added, and the units simply mounted BACK a bit to clear the front blocking, and the boring hole has to go through the front wall and the bit of front blocking. If the EZ leveler unit impinges on the CENTER piece of blocking, then you will have to add front and back sidewall blocking under the mounting boxes AND THEN still mount the whole unit back the depth of the FRONT blocking.

    It looks to me like the EZ level unit will clear the center blocking, so the install is pretty easy, actually, just mounted back a bit.

    But send these same pictures to the EZ level proprietor with measurements and they can tell you if the unit will clear the center blocking. In that case, you may need to adjust the LENGTH you order, because your effective cabinet depth has been reduced due to the thickness of the FRONT blocking.

  • 10 years ago

    @speakto thanks for giving me details about the leveler and the toekick. It sounds great but my toe kick drawers are IKEA so I need the sides for the slides attachment. Darn.

  • 10 years ago

    Awesome info

  • 10 years ago

    DH used them to re-set our exisiting cabinets during our kitchen facelift. The original install was not level, which didn't matter much because the countertop was ceramic tile set in a concrete bed (which leveled itself). We replaced the tile with stone countertops, so the cabinets needed to be level. I don't know any of the installation details, but as far as I know, he was very happy with the EZ levels.

  • 10 years ago

    Benjesbeide...essentially same layout, we are moving a door over some in order to get the stove out of the corner.. Making a better layout got too expensive. The house did not seem to justify a major cost investment.

  • PRO
    10 years ago

    I've used them on several projects now- found them thanks to Joe (Trebuchet) noting them on here. We've been happy with them and the installers love em- particularly when I have the factory install them first.

  • 6 years ago

    I realize this is an old thread, but this product is still available and seems to be a good solution for DIY installations where experience with traditional shimming isn't readily available in our skills set. My one concern is a blind corner unit where we will screw two cabinets together creating the corner and then try to level these as a unit. i have no idea how we're going to access the back corner EZ-Level devices for that far back corner.

  • 6 years ago
    last modified: 6 years ago

    Silverlined- Well, you will not be able to assemble the BCC and adjoining cabinet as a single unit..You probably already figured this out. The BCC will have a pair of levelers and the adjacent cabinet will have a pair. Level the BCC run of cabinets then level the adjacent run. Fasten the stile resulting in a base cabinet set that isn't going to shift out of position over time. BTW, this system isn't only used by DIYers. Pros use this system because it is fast and the cabinet assembly will remain level which is good for the installer's rep and margins and the homeowner's expensive countertop! Hope this helps. All the best.

  • 6 years ago

    Thanks! That is a super helpful tip. We are still waiting on cabinet completion.

  • 4 years ago


    I was ready to buy a dozen of your cabinet levelers, but, I had a question about placing the Lazy Susan in the corner.


    My Lazy Susan has a diagonal rear panel, your example shows a square unit, and my concern was if I needed one or two EZ-Levelers to square it up. I was prepared to purchase the additional item if your Customer Service folks said I should.


    I called the 800-726-5500 number listed for your company. I was greeted with a pleasant voice recording, and was told to press 1 for specials for folks my age. It took me to a medical alert sales team.


    When the high-pressure salesperson would not shut up, I hung up, and called back.


    I by-passed the special for 50+ folks, and was bombarded with options for items totally unrelated to EZ-Levelers.


    After the third "special offer" I disconnected my call to your company.


    I am writing to let you know I will not be buying your products, no matter how well they function, since your company appears to be more interested in selling everything except the EZ-Levelers.

  • 4 years ago
    last modified: 4 years ago

    @Frank Gusto You turned one of the 5s into a zero and called the wrong number. Wait until they open again on Monday and call 800-726-5550. If you can put EZ-Levels on both sides of the diagonal support, I would use two to help bear the weight of that large cabinet. You may need to stagger them to put them on the same board but opposite sides. Since I commented earlier on this thread, my cabinets arrived and were installed with EZ-Levelers, and the whole process couldn't have been easier. The countertop installer was highly impressed with how level the cabinets were all around. Another benefit is that EZ-Levels lift the cabinets about 1/8 inch above the floor, so if there is ever any moisture on the floor, the cabinets won't absorb it unless it is a veritable flood. That also means that you need to take into account the final height of your cabinetry minus about a half inch for the EZ-Levelers and their leveling requirements if you are doing custom countertop heights like I did. It is probably mentioned earlier in this thread another great benefit of EZ-Levels, that they will keep the cabinets stable for longer than regular shims which can tend to work their way out over time, jeopardizing the stability of the countertop if it is a stone countertop. EZ-Level is really the way to go. The units are obviously more expensive than regular shims, so people with flip homes or trying to do things on the cheap are not going to order them, but if you really want to do a great job, get EZ-Levels.

  • PRO
    4 years ago

    Thank you for jumping in Aglitter... Gosh, we post our phone numbers, emails, Facebook, and Instagram everywhere. Doing our best to let people reach out. Thanks for your help !

Sponsored
Mary Shipley Interiors
Average rating: 4.8 out of 5 stars34 Reviews
Columbus OH Premier Interior Designer 10x Best of Houzz