

Why are my shower tiles becoming discolored?
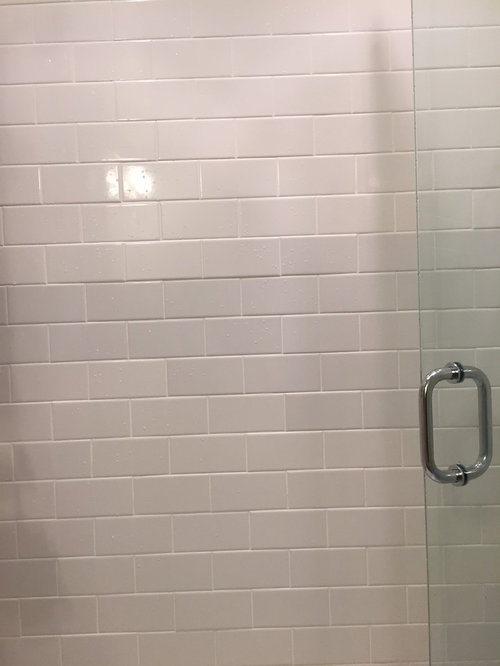
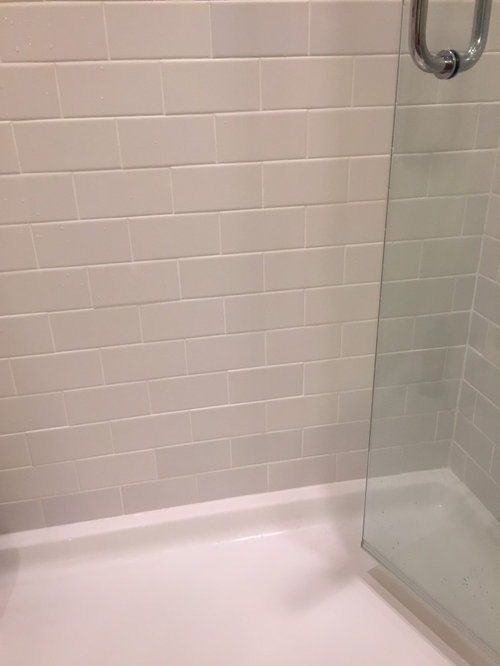
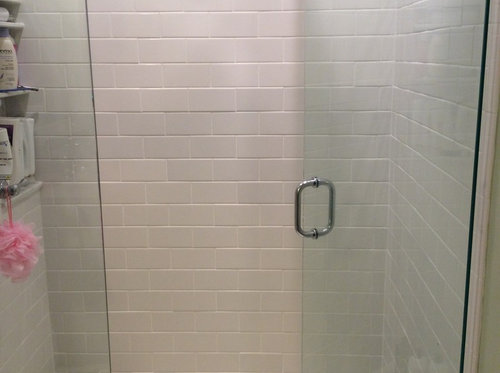
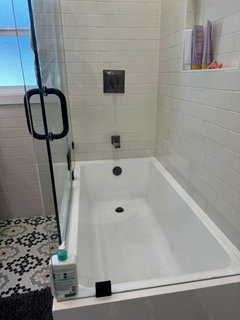
We had a complete bathroom renovation done about a year ago including new subway ceramic tile shower with fiberglass pan. Not too long after the install I noticed some of the tiles appeared darker but chalked it up to the fact that maybe there was slight color variation between our boxes of tile. Recently I've been paying more attention and it appears as though more and more tiles are turning this darker shade.
Ive been researching like crazy to try and figure out what the heck might be the problem and believe water may be seeping through small grout cracks causing this? Can anyone confirm this might be the case and more importantly how the heck do I go about fixing it? Is it simply a matter of allowing things to dry out and applying some silicone in the grout cracks? Help! I love my new shower but don't want to be unknowingly causing water damage behind the walls.
Comments (75)

ahickenboth422
Original Author9 years agoHey Jim Rocci and titus36... I know it has been awhile since this post and sorry for not following up (had a baby, got distracted by other things, tried to get this topic off my mind) but I wanted to update- my contractor finally made it back out removed a bunch of grout near the problem areas and turns out he didn't do a thorough grout job and missed a ton of spots... Some of the grout lines were paper thin and not pushed deep enough in between tiles... The fix seemed to have kept the problem at bay for at least a little while, but now I'm either losing my mind and being overly paranoid or else the problem is coming back in the original problem area... I'm going to give it a couple more weeks before I call the contractor back but if it really is the problem returning, this is an absolute nightmare!!
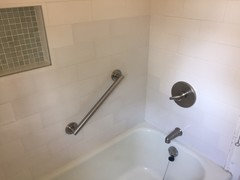
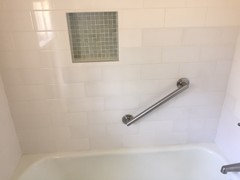
I wanted to see- 1) did you guys ever fix your problem? And 2) if you can spot my gray tile then I'll know I still have a problem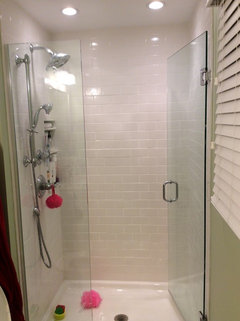
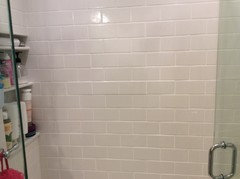
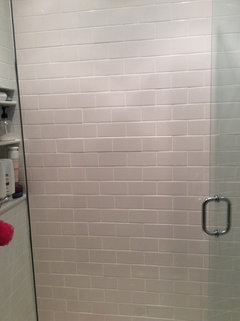
Related Professionals
Clarksdale Kitchen & Bathroom Designers · Cookeville Kitchen & Bathroom Designers · Waterbury Kitchen & Bathroom Designers · Harrisburg Kitchen & Bathroom Designers · Decatur Bathroom Remodelers · Johnson City Bathroom Remodelers · McAllen Bathroom Remodelers · Sacramento Bathroom Remodelers · Mesquite Bathroom Remodelers · Pullman Bathroom Remodelers · London Bathroom Remodelers · Little Rock Tile and Stone Contractors · Keene Tile and Stone Contractors · Rutland Tile and Stone Contractors · Amarillo Tile and Stone Contractors- 9 years ago
Congratulations on the new addition to your family!
I know the feeling of what you're going through, just want it to be right to stop worrying about it... Peace of mind to know the contractor did a good job and you can stop worrying if you got ripped off and two years from now youll be dealing with rot and he'll be nowhere to be seen.
I too have meant to circle back. I get a lot if great info from people who post this stuff and felt I should cap off my resolution so thanks for asking and keeping my karma in balance.
First... I don't see the gray tile (I thought I did but it was shadow from the glass door). If you think you see one...trust yourself, get him back there. It's probable that he didn't inspect and fix everything thoroughly.
Forgive me for saying this... I'm a perfectionist and I don't know if you paid top dollar or shopped around for a lower quote. If the latter, this comment should be accepted as the tradeoff/ if the former... Make him fix it: I do see a couple rows off plane accentuated by the light over head. Its Possible to pop those tiles and use less mortar or move the lights further from the wall. I know they're recessed. don't let any contractor tell you that either of those solutions will take more than half a day. (especially with 90min plaster).
To fix my issue: i tried recaulking twice with no luck... Only slight improvements after drying out but the water found its way back. So I went a little nuts and removed all the glass and caulked all the holes shower enclosure mounting holes. Regrouted the corner near the shower pan, Popped a tile off that I had cracked by over-tightening the shower brackets to the wall.
With that done I removed the baseboard on the opposite side of the wet wall cut a hole in the drywall and poured a viscous mixture of concrete under the shower pan using a sort of funnel made from plywood to distribute the mixture and prevent a mess on my new hardwood. finally after cure... I recaulked the seam between the shower pan and the tile.
Any advice I read about wheep holes debunked. Don't do it!
Not only does the shower pan feel fantastically strong under foot. I have had no signs of water seepage in two months.
I hope you are able to get some peace of mind. It's my opinion thats what you pay someone for. I can't bring myself to hire anyone because I've seem such horrendous work around my house and frankly, I can't afford to pay for top notch work.
Good luck!
- 9 years ago
Cabot and row. Capillary action is not possible if the water doesn't get back there in the first place. Proper grouting will prevent water from seeping behind the tiles and is the answer to her problem.
ahickenboth422
Original Author9 years agoWow thanks for the thorough explanation and I'm glad your problem is now solved! I really hoped the regrouting would solve my issues but instead it highlighted that "off plane" row even worse and I think it actually acts like a little ledge trapping water on top and allowing it to seep more than other locations? (Just another hypothesis I've formed as I lay awake at night worrying over this). It's the only thing I see when I walk in that darn bathroom now.
This contractor was actually in the middle of the four quotes we got, so not the highest end nor the lowest either... and I felt comfortable with him because of the personal recommendation. These problems are making me doubt the quality and sustainability of the entire bathroom.
When you say the tiles can be popped off and redone- does this not damage the cement board underneath? Is this a doable activity?- 9 years ago
"Proper grouting will prevent water from seeping behind the tiles and is the answer to her problem."
Um, no. Grout is not waterproof. Neither is tile. The contractor did not "fix" it by regrouting.
- 9 years ago
ahickenboth422-
Someone who is competent should be able to carefully remove those tiles without damage to the cement board underneath. But it could be a challenge to perfectly restore the integrity of the waterproofing membrane that will be disturbed around the perimeter. I'm not saying it can't be done; just something to be aware of.
- 9 years ago
Catbuilder would you care to elaborate? You just blew my mind.
What is your experience with tiling showers & can you add some credibility to your statement? I'm not really interested in having a pedantic or theoretical conversation about waterproof vs water resistant but my problem "evaporated" when I created a barrier that prevented water from getting behind the tiles and getting trapped.
So, I tend to want to disagree with you and support her contractors assessment and my own that poor grouting resulted in water penetration... - 9 years ago
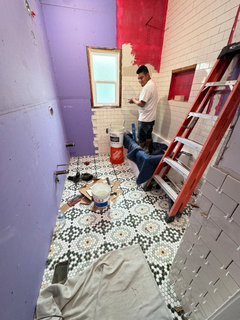
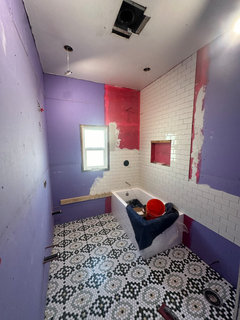
Lastly, regretfully, looking at the pics from construction, the out of plane tiles may be due to the concrete board seams misaligned (not on plane) and possibly not excessive mortar, so it may not be something that can be fixed. Zoom in on the original photo and make an assessment if the redguard is bumped out?
 PRO9 years ago
Every grout manufacturer will tell you their grout is NOT waterproof. Tile is not waterproof. Sealer adds some measure of stain protection but is not waterproof either. Waterproofing is achieved by a variety of approved methods which fall into 2 categories; 1- Surface applied membranes such as kerdi, Hydroban, AquaDefense, Hydrobarrier, Nobleseal, Dalseal, Kerdi board and its competitor foam board from USG. 2- Subsurface membranes such as the classic vinyl liner WITH a moisture barrier behind cement board such as tar paper or sheet plastic.
As a member of the National Tile Contractors Association, I can easily attest to the above information. But it's your shower and your money and you get to decide what you want to do.
- 9 years ago
You're missing something. You seem to suggest no tile job is ever meant for a shower. How is the water getting behind the tile and trapped behind any one of the list of substrate products you described (let's pick redguard for example)? Why did it stop when I stabilized my shower pan and regrouted / recaulked?
Again, not interested in debating "water resistant" and "water proof*. It's obvious grout will dissolve over time if submerged in water.
The point of me laboring this is to highlight the importance of WORKMANSHIP on the end result. Not the standard materials used in all shower tile jobs.
 PRO9 years agolast modified: 9 years ago
It's obvious grout will dissolve over time if submerged in water.
Swimming pools and cementious grouts have been the norm for sometime, they are installed as well with submersable grade thinset mortars. both of which unaffected by submersion 24-7.... cement based grout meant to breathe in and out...
- PRO9 years ago
In thin bed installations such as tile>thinset>red guard>backer, there isn't much room for water to mass behind the tiles. As with every shower they dry out between uses. However, when there is no redguard, the cement board behind the tiles allows for much more water to amass. That moisture then tries to dry out going in all directions, including the studs, insulation if any, and drywall on the other side of the wall assembly.
- 9 years ago
Again, how does the water get behind the tile? A few people are suggesting proper grout and workmanship/ attention to detail will suffice as barrier. And in my initial case that's exactly what the problem was. I have had no sign of water seepage in two months.
- 9 years ago
Water gets behind tiles by capillary action through cracks, and pinholes in the grout....and by absorption through the grout and to a lesser extent through the tile. If you are using natural stone tile the penetration will be greater than with a vitrous tile like porcelain (highly fired) which is pretty much impervious to water.
What I wonder is how much a preslope helps water to travel to a drain through a mud bed when absorption is fighting against gravity. Some channels or a mat similar to those used on foundations to allow water to drain between the liner and the bottom of the mortar would might be an improvement ...of course with good waterproofing it's probably a moot point.
- PRO9 years ago
Water gets behind the tiles with every shower, right through the grout, past the tile. Of course this happens at higher concentrations along the floor and the bottom of the walls. Its not uncommon for the liner to fill with water, then find its way out by going over the liner. In the picture below, the water had risen between the liner and the cement board, about a foot high where you can see the water line and crust of accumulated salts. The board below my hand is a 2x6 on edge
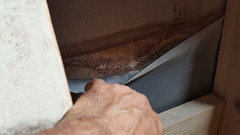
- 9 years ago
So does a preslop on an unwaterproofed mud bed actually result in much drainage out through the drain's weep holes?.....or would both a presloped and flat bed retain most of any water that soaks into the mud bed?
- PRO9 years ago
I have conducted tests where water drains through a proper mud bed through the weep holes as fast as the shower head will let the water flow. This is how the system is designed. I have demolished too many flat bottomed liners (which reek to high heaven) to easily say they hold water.
- 9 years agolast modified: 9 years ago
So the absorption of the mud bed is minimal? or does the water flow out only once an equilibrium is reached between absorption and drainage?
Have you compared the flow rate to that of a flat bottomed pan with a proper mud job and correctly installed drain?
- PRO9 years ago
Properly mixed drypack is 4 to 5 parts sand mixed with 1 part portland cement. Nothing else. The portland holds the sand together but allows for drainage. A lot of people use pre bagged sidewalk cement (quikcrete) which doesn't have the drainage capacity of well mixed drypack.
- 9 years agolast modified: 9 years ago
Hopefully most showers now have a waterproof membrane between the tile and the substrate so if a liner is used it's relegated to insurance against leaks and as a form for the mud job.
If water does get into the mud it will flow down vertically until it hits the pan and then should flow to the drain (assuming no absorption) if it is sloped and would sit in a flat pan until it's level is higher than the drain's weep holes when it would drain. I just wonder exactly how much wetter the mud in a flat liner would be in reality? Also if the compacted mud is so porous why put pebbles around the weep holes?
- 9 years agolast modified: 9 years ago
If mud is so porous....even when packed down...,why will it block weep holes? If it's a hinderance to drainage through weep holes why not in the bulk too. Is the assumption that it's more densely packed at the weep holes for some reason?
- PRO9 years agolast modified: 9 years ago
Flat liners by default will have water setting around between the liner and the mud. That water will collect skin cells, hair bits, and wee beasties which will start to decompose and form a nice little septic system on its own. There will be some measure of slimy, stinky, ooze over the liner.
The pea gravel or tile bits around the drain help slow the clogging of the weep holes. In areas of high limescale in the water supply (like my fair city) the weep holes clog rather rapidly, usually in the 7 year anniversary of a liner built shower. This is another reason we abandoned the liner method 25 years ago.
- 9 years agolast modified: 9 years ago
If a mud bed drains as well as is claimed then a flat liner won't hold much water as it will drain as soon as the water level is as high as the weep holes in the drain.
I think the bottomline is that water should never see a mudbed and that a liner...either flat or sloped......is only needed because the installer is not yet 100% comfortable with the waterproof membrane that will be installed under the tiles and still needs the psychological reassurance of a liner.
- 9 years ago
In my opinion the photo posted yesterday at 2:30pm would be considered a failure and should NOT be considered acceptable. Any tile on the front would be soaked and discolored. The whole point of this thread is to prevent what is shown through proper grouting and caulking. The liner should be a failsafe to protect the structure when the cladding has failed not a daily flood feature.
- 9 years agolast modified: 9 years ago
I let my shower surround dry almost all summer using outdoor shower. Tiles went almost completely back to the original color. I then followed Jim´s advice above. Replacing the caulk where tile meets bath. Now after a month or so other tiles are starting to do the same thing. Others no where near the caulk line.
I am wondering if using Kerdi Board with unmodified thinset as is recommended by Schluter means that water is being absorbed into grout and allowing moisture to affect tile color from moisture between Kerdi board and tile. If I had used tile that was designed for a shower or was a color that slight variations would not show perhaps I would not have the problem. Or if I had used the same tile but used cement board and modified thinset or an adhesive. Maybe then there would be no way that moisture could get behind the tile.
At this point I am resigned to living with it or redoing it. Neither of which feels ideal.
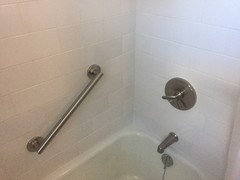
- 9 years ago
Looks like the grab bar might be the culprit. A little caulk in the screw holes will seal them and the caulk around the upper half to 3/4s of the cover plates.
- 9 years agolast modified: 9 years ago
Titus, I had some iterations too until I just took the whole damn glass enclosure off and recaulked everything.
Here's what worked for me. Its not fun and I learned that I CANNOT take any shortcuts or take anything for granted with this process.
1. Remove all hardware, (grab handle, tub spigot, valve cover)
2. Do yourself a favor and redo the caulk along the wet wall tile to tub interface. The other wall looks good. So remove the caulk here and it may help speed the dry time....
3. Dry the tiles with a high power fan for a week, this should be easier than air dry all summer. Recommend Lasko 4900 blower fan (kicks butt and speeds the dry time). If time is money it's well spent to speed up the process. (https://www.amazon.com/Lasko-Pro-Performance-Blower-4900/dp/B001DNGSCM)
4. CLEAN METICULOUSLY with mineral spirits.
5. Get yourself the best caulk available. Recommend Dap silicone max (http://www.dap.com/dap-products-ph/silicone-max-101-oz-clear-100-premium-kitchen-and-bath-silicone-sealant/). Other seasoned recommendations welcome.
6. Caulk everything. Fill the holes. Water is sneaker than you would think! For some great process tips read this: (http://www.naturalhandyman.com/iip/infxtra/infcau.html)
7. When I reinstalled screws into the holes after the caulk dried I put caulk on the threads and on the hardware interface (backing).
BackgroundWhen the tiles discolor, they are really wet (I tried the experiment where I took a spare tile and dunked it in water a long time but only waited a day or two, it wasn't enough to soak the porcelain - chickenbroth really figured it out after I believe she said she ran her experiment 9-10 days before it grayed). Anyway, they're wet so when I tried something and it didn't work and I ripped the caulk out it would reek of mold. so I'd definitely recommend drying them out first before you just caulk.
- 9 years ago
I did take off the grab bar and put lots of caulk in there. I didn't unscrew and add more caulk in the holes though. I will tackle it again following Jim's advice. Thx Jim btw.
- 9 years ago
It's not the amount of silicone.....it's where you put it. Put silicone into the screw holes just before you put the screws in. Then put a bead of caulk on the top of cover plate leaving the bottom half un-caulked to let any water that does get in drain out.
- 9 years ago
I hope it works for you, all I know is that it worked for me.
Maybe take a cue from chickenbroth and do a thorough visual inspection of the grout in the trouble areas to ensure no pinholes, fissures, cracks, and/or enough coverage over the baked on enamel.
Best of luck sir
- 9 years ago
FYI I keep a sponge in the shower and wipe down the walls after each shower and then go over them with a towel so they are dry. That might help a bit.
 PRO9 years ago
It's also possible that there is a problem or defect with the glazing on the porcelain. We have installed thousands of showers in 17 years and we always, hot mop, vapor paper, lathe, scratch, float, thin set and use Mapei products. We also use a Kevlar grout by laticrete. I believe sometimes the glazing on the material can be defective. There are "through body" tile and glazed. Think carrot vs. radish. I see this problem with glazed products and never with through body products. I know this is a very late post on this thread. I hope things have worked out with your showers as it can be very frustrating.
- 8 years ago
Even later in this post and my problems continue. My question relates back to grout not being waterproof and it is expected that moisture will inevitably be behind the tile but not going past the kerdi.
Above
"Every grout manufacturer will tell you their grout is NOT waterproof. Tile is not waterproof. Sealer adds some measure of stain protection but is not waterproof either. Waterproofing is achieved by a variety of approved methods which fall into 2 categories; 1- Surface applied membranes such as kerdi, Hydroban, AquaDefense, Hydrobarrier, Nobleseal, Dalseal, Kerdi board and its competitor foam board from USG. 2- Subsurface membranes such as the classic vinyl liner WITH a moisture barrier behind cement board such as tar paper or sheet plastic.
As a member of the National Tile Contractors Association, I can easily attest to the above information. But it's your shower and your money and you get to decide what you want to do."
I have Kerdi board behind the tile so it is waterproof but the tiles continue to gray.
I may need to redo the shower surround with different tile.
- 8 years agoWho installed your tub?... How secure is it underneath Do you have access to the underside of the tub from another room? I filled under my shower with concrete. I realized it was flexing a very small amount when I stepped in it... Barely perceptible. Removed the baseboard in adjacent hallway, funneled thinly mixed concrete underneath. Redid the caulk. No problems since. Maybe a strong visual inspection of that corner.... Looks suspicious. Sorry Titus, what a pain in the butt
- PRO8 years ago
Since you have a kerdi shower, new tile is in order. Porcelain tile has the lowest possible absorption rate of any tile.
- 4 years ago
I know this thread is very old, but just wondering if anyone got their problems resolved? I have exactly the same problem with exactly the same tiles with a brand new bathroom refirb. The discoluring started after only a few weeks weeks, we stopped using the shower for 3 months and they tiles reverted to their original colour but there is no obvious sign of cracking etc on the grouting. Any update would be hugely grateful
- PRO4 years ago
HU - your tiles are picking up water, then getting darker. When they dry out they get lighter again. Depending on your tiles and how your shower was waterproofed there may be nothing that can be done. If you want this to stop you will need new tiles which are less absorptive, such as porcelain, and thus will need a whole new shower as you will destroy any waterproofing in process of removing the tiles. I recommend porcelain tile and a surface applied waterproofing method to reduce the thickness of the tile assembly.
- 4 years ago
I just ended up living with it sadly. It comes and goes but those tiles are grayish permanently. Redoing it was not going to happen.
- 2 years ago
I see the color changing tile discussion was years ago. i would like to add that perhaps there is no water and its just a matter of lighting. We got new samples of our tile and held them in the same spot and they looked dark too! weird but true
- last yearlast modified: last year
Hi everyone- This same thing is happening to me with tiles changing around the tub and its driving me nuts - I’ve been obsessing over this trying to find a solution for the last 6 months and so glad i found this thread!
We used a ceramic tile that same thing as others mentioned seems to absorb and change color easily (i did my own test as well). I recently just recaulked along the tub hoping that would help, but given my installation photos is there something that is causing this situation? please help!!
- last year
I posed the question about the darker looking tiles in my shower and found the answer after talking to my tile guy, general contractor and Arizona tile. i was able to prove what was causing some tiles to look darker!!!!! It is because of LIGHTING and shadows!!!!! i got a new tile and held it in different spots in my shower abd it too changed colors! It is strange for sure, but thats all it was!!!!!!!
- last year
All of you talking about water and tearing out your remodels, mine turned out to be caused by a weird effect of shadows and lighting!!!!! Its not water behind tiles at all! Lighting can be very strange!!!! Hold new tiles in diffferent spots and you will see that when held in some places, they look darker!
- last year
You might be surprised. If you have a new extra tile, try holding it up in different places in your shower.
- last yearlast modified: last year
HU - I have the same thing happening in my shower. I too had my shower installed with REDGAURD water barrier and white ceramic tile. I don't think the tile was rated for prolonged wetness even though it said okay for shower walls. The bottom tiles are turning gray due to the tile absorbing water and having nowhere to escape. Unfortunately, I think this is something I'll have to accept. I've tried drying the tiles with a powerful fan and it barely helps. My guess/fear is even once the tiles have dried (which may take months) and I reseal the grout, they'll end up absorbing moisture again anyway. Futile, that's what I think. Live and learn. Next time I'll use porcelain tile.
- PROlast year
Any homeowners reading along.......
I hate to say this but in the tile industry theres an epidemic of failed tile projects especially showers and tubs. Its ALWAYS unqualified labor. cheap fast prices and strangely its almost ALWAYS redgaurd , drywall and a mix of skipped steps in the process usually reflected in the price. So many folks buy nice tile and then find good deals on the install end of the project, or they skip permits and dont get a contract w a wrrty. and insist on TCNA standards be met and followed (get that in writing folks)
Hire wisely America there are qualified tile pros in nearly every city. TCNA, NTCA and reputable tile vendors can help you find one. Try and stay away from home depot based contractors is my advice.
in the previous 4 yrs weve had a LOT of cheap desperate labor come in thru the backdoor, being in a sanctuary city ive noticed a lot MORE of these type issues here in mpls.







Errant_gw