Software
Houzz Logo Print
rosaceae

Successfully air layered my Midnight Blue!!!

10 years ago
Hi! I'm sure many of you are familiar with air layering, but if not, it basically means going to the stem you would take as a cutting and getting it to make roots while it is still attached to the mother plant.

I wish I had taken the date when I started it, but I'd say it stayed on for about 3 months, maybe less?

Basically I did everything you would do to a cutting, and then made a hole in a plastic disposable shot glass, thick enough to get the cutting through it.

Next I glued the cut neck of a water balloon with UHU glue (I recommend it since it's waterproof and very mess-free, and forgiving if you get it on your fingers) this will guarantee the water doesn't drain off.

Now, I slipped the gizmo into a could-be-cutting, for this I striped most of the leaves (a few I could bend through and so they were kept), the glass was sitting in at a height where I would get nice root development from the terminal bud scar, that is, the TBS was at about 3/4 the height of the glass, from bottom to top.

I secured it from below with insulating tape, then I filled it tight with only peat moss, moistened, and added a piece of cling/food wrap around the whole thing, and again secured well top, bottom, and across the edge of the wrap with more insulating tape.

It sounds like I used a lot of tape, but this was all small, so not really.

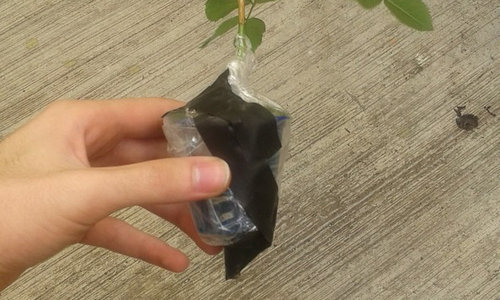
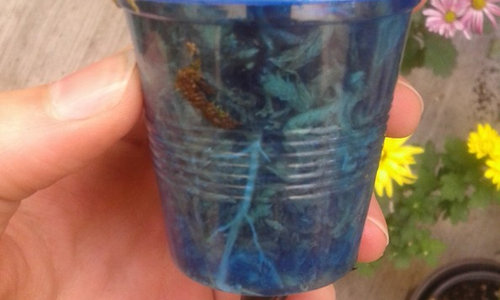
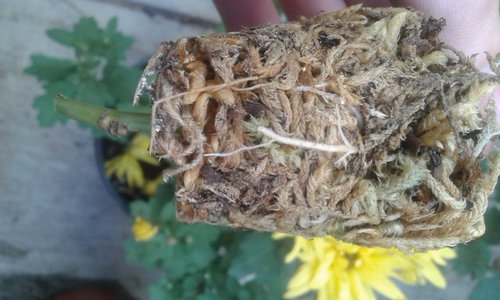
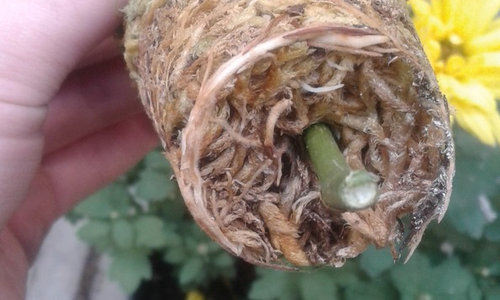
Here are the pics:

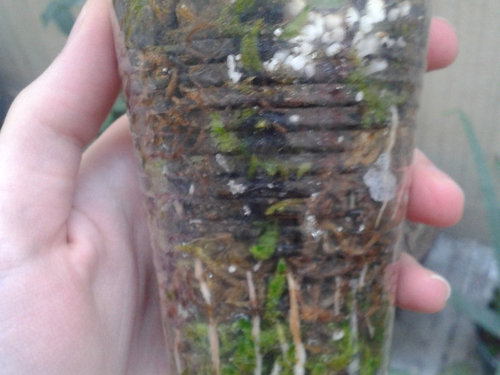
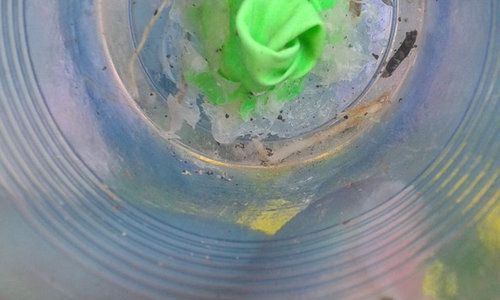
This is the glass, with the balloon tail and some roots that actually got sicked and broke, I think it was lack of moisture that did this? It was definitely moist, but maybe not enough? Either way, I wound up with and excellent root system so this did not matter in the end.

Here's the whole thing, freshly cut, after I noticed very beautiful roots through the see-through glass, for that I think it's important you get something semi-clear, something entirely clear may damage the roots with sunlight absorption, this is just right.

Without the cup, hope you can distinguish the roots and the peat

Here you can see how they wound up circling through the bottom!

I was grinning like an idiot taking all of these pics, really

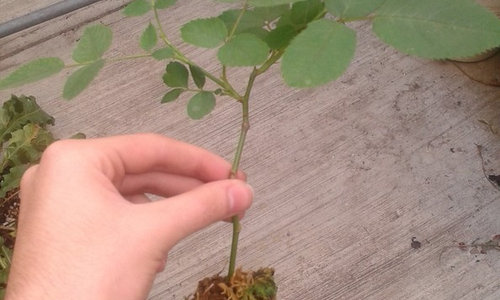
Here's the cutting, it is a bit taller than a brand new pencil, the perspective makes the clump of peat look smaller than it is:

Here I'm holding it where it was attached to the plant:


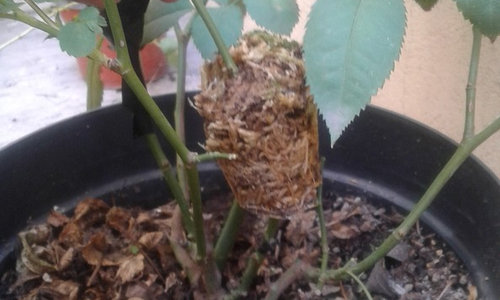
Here's a cropped picture in which it can be seen in action by chance, I can't find the pictures I actually took of it! but this should do:

It's the one on the right, the other one, which was done the same but without the cup and just wrap, was successful too, but less so, with fewer roots, it did manage to survive and is looking good too now, however.

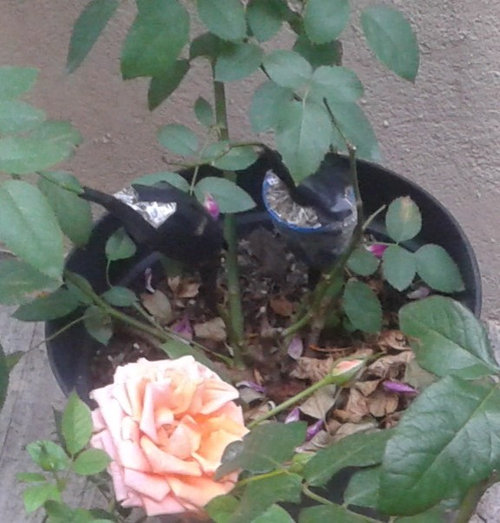
Here's how the cup one looked two weeks ago, on an 8 oz. disposable cup that I'll need to replace soon:

Happy and independent! The original roots were at the height of half the cup.

Midnight Blue has been cited as difficult to root or bad performing on it's own roots, though there are contrasting accounts too, so far, mine seem happy to be alive and very active with their root systems.

I had taken several cuttings of MB that did not work, even though I've gotten quite good at rooting cuttings, with many plants that I do not have room for to prove it!

Hope this can help out anyone who's struggling to propagate something that is not easy to do with conventional cuttings.

Some varieties are just like that, so I hope to help you out there with this. Another thing to note! The cuttings were actively growing upwards when attached to the plant too! so you could defoliate it or prune it to get the cup in place, and then , when it grows both ways, snip it!

Oh, and I know I've rambled a lot, but one final thing, MB is patented, as such I do not plan on selling none of these plants, they're all for my personal garden, you should take that status in consideration too when propagating your plants if you plan on making a profit off them!

Happy multiplying! See ya!

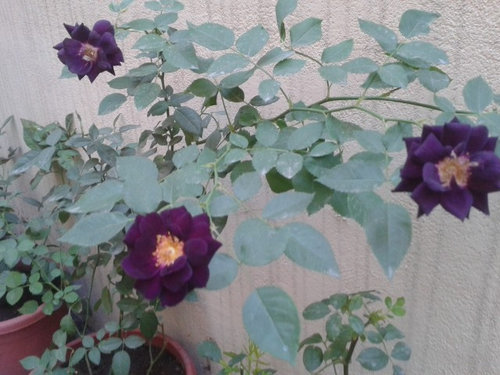
(The mother plant)

Comments (13)

  • 10 years ago

    Ugh, the edit button seems to be gone for the main post, there are some redaction errors, please bear with them, when (if) the edit button decides to come back, I'll fix them. If you have questions, be welcome to express them.

  • 10 years ago

    Thank you for the very clear description and the link to the rose anatomy. So, the purpose of the balloon is to create a tight seal?

  • 10 years ago

    Wow Aaron, that's really cool. Great presentation. I should try that with some of my rarer roses before I lose any more of them!

  • 10 years ago

    Jasmine, exactly!, it is also easier to handle and secure the balloon tail to the cane than to try and cover the bare hole, perpendicular with the cane with the tape. It also prevents there being direct contact of moisture with the tape, which would dull the stickiness and may thus detach.

    Beth, yes, it is quite easy and inexpensive! if you're having a hard time with traditional cuttings of some negligent variety, this is something worth a shot!

  • 10 years ago
    last modified: 10 years ago

    Thanks and congrats :) Love that color of Midnight Blue.

  • 10 years ago

    yes thanks for sharing, I also really like the dark purple of Midnight Blue.

  • 10 years ago

    Hello!

    This is really something! Just to see if I understand ... you got the plant to grow roots from the end of the stem? TBS is the same as just the end of a stem after one cuts off a bud? Is that right? (Previously I had mostly heard of air layering in which people wound the stem somewhere in the middle, and wrap the wounded part in moss, and so on. This new to me.)

    And what a beautiful flower!! I'd never heard of that rose.

  • 10 years ago

    Hi, Need2SeeGreen!

    At first I did not understand your question, but I've realized now that I may have used a confusing term to refer to the part of the plant I meant.

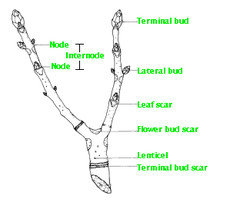
    As I understand it, a Terminal Bud Scar is a scar left by side buds that have fallen after the main one continues to form a branch. After this, what you end up with should look like the diagram.

    Please notice that a terminal bud is different to a terminal bud scar, you want to find a Terminal Bud Scar.

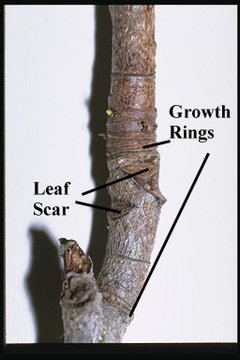
    Other terms that I found for this are "growth rings" or "annular rings" but looking this up brings up mostly results of the rings formed by a tree's bark and from which you can tell it's age... which we do not care for much at the moment.

    There doesn't seem to be much of a solid term to refer to it, so I found TBS the most appliable.

    TBS can be appreciated as several "stripes" or "bands" that ,in roses, are usually located where an older cane branches out into newer stems, usually, every one of those has their own set of growth rings/TBS right where it is attached to the older cane.

    The way you describe air-layering has possibilities of working, but when you do it like that you're just getting the peat to make contact with maybe two or tree nodes, a TBS is actually a lot of nodes squirmed together, every node anywhere in the plant is capable of developing "callus" which is the undifferentiated tissue that can turn to roots if the surrounding environment is in fact, appropriate for roots (damp, dark, and not too cold nor too hot). By using a TBS instead of a single or a couple nodes, you have more chances of getting a node to form callus, since there are many more nodes in that area.

    I hope to have answered your question, if not, please rephrase it and I'd be happy to help you.

    And yes! Midnight Blue is not only pretty to the eyes, the scent is really something! It is usually described as clove, but I and several other people I have shown it to think it is a lot like agua de jamaica, (which in some recipes actually has clove in it, but well, there's more to it).

    Seeingreen, I really wish it was like that year round, on the hotter months it will open to a more reddish, wine color, but at least the great scent is still there.

  • 9 years ago

    Hi this is very interesting .. could you take pictures of what these growth rings look like? I don't remember seeing that.


    And I guess you're saying to wound at this 'growth ring' area or not wound?


    What peat moss did you use? MG is the one commonly found here on Oahu.


    I don't understand where the balloon comes into place either?


    I've had 2 out of 10 attempts in air layering with a an IBA gel and traditional wounding of the internode section.


    Any insight would be awesome !


  • 9 years ago

    Roseace thank you so much for describing detailing your process so well! This is so fascinating! I'm going to have to try it later in the fall or winter once it gets cooler here. What an amazing process!

  • 2 years ago

    Thank you, @Vaporvac Z6-OhioRiverValley. Can you believe in the 7 years since i did this i haven't done it again? I got such stellar results and yet i didn't wind up revisiting it, crazy how that is. And the two vigorous plants i got from it wound up dying when summer came, they charred, cause i hadn't moved them from the 8oz cups. I cursed the sun the entire summer lol.


    I have a Hot Cocoa currently that has been reduced to just 1 spindly cane. I think i should give this method a go to try and salvage it. I still have the very same bag of water baloons sitting in a drawer in my room lol.


    In those 7 years i also managed to get me some of the specifically made propagation pods they talked about in the other thread, they did not yield as good results when i used them, perhaps i didn't do it properly.


    I hope you had a better Christmas than i, not to be a sob story, but i got laid off in Novemeber and i'm struggling a little, besides the fact that Christams doesn't really feel that special nowadays either way.

    Oh well, part of it all. I wish you a wonderful new year too and if you would like to try this and have questions let me know. It's prime season to do it. I could even try to make a video.

  • 2 years ago

    Hope you are doing better In the new year And we're able to find Work. I hope you consider making a video of this method also.

Sponsored
Industry Leading Landscape Contractors in Franklin County, Ohio