

Spray foam insulation
I am researching to find the best way to insulate an attic in a southern climate. I spoke to a contractor today that recommended open cell foam insulation to encapsulate the attic. this would not provide any radiant barrier but he said it would not be necessary. Other info I have fead seems to imply closed cell foam would be a better choice. I am doing this specifically to have all of the HVAC in the attic space. any expert advice?
Comments (22)
 PRO10 years agolast modified: 10 years ago
Welcome to the chaotic world of roof science, insulation performance and an industry in transition. Most importantly, meet local building code prescriptive roof insulation minimums and it might be better to reach for current international minimum levels. Don't let spray foam dealers talk you into less than what codes require, even though it seems to be common practice in the South.
Most local codes should be enforcing at least R38 in building climate zones up to CZ4. Long term ownership may benefit from an R49 upgrade or better, especially in colder climates or roofs with full sun exposure on black shingles. Open Cell foam needs around 11" thickness to achieve R38. Closed cell would need 6-7".
Framing can complicate the continuousness of spray foam under roof deck and some feel that open cell is a little risky for holding moisture depending on the conditions. Many experts recommend installing insulation board exterior of roof deck or sticking with traditional vented attics with raised heels and thick layer of loose fill on meticulously air-sealed attic floor.
HVAC equipment in attics is why industry in the South has shifted to unvented attics (rightfully so) but many design options exist as alternatives to the spray foam attic show. If it's too late or you just can't find a way to get HVAC outa there, I think open cell spray foam tends to be the most cost-effective path for that, just be sure to install at least 11 inches, or try to exceed the poorest performance allowed by law. Be sure to provide a certain amount of HVAC ventilation to the attic, which should address most of the moisture concerns.
Thank you for putting effort into building a better home. Please meet blower door test minimums too, the most important performance value when building a home.
Related Professionals
Muskogee Architects & Building Designers · Petersburg Architects & Building Designers · Sheboygan Architects & Building Designers · Pierre Architects & Building Designers · Southaven Design-Build Firms · Toms River Design-Build Firms · Bangor Design-Build Firms · Omaha Design-Build Firms · Marietta Home Builders · Elmira Home Builders · Watertown Home Builders · Green Bay Home Builders · Janesville Home Builders · Show Low Home Builders · Pocatello Home Builders 10 years ago
We used the open cell in the attic and closed cell in the rest of the home. The attic area was a pleasure to work in during the summer. We were amazed. Our HVAC bills were very low. The home was located in central Georgia in a field with no trees nearby for shade.
Our contractor did say that he would be nervous if it were a house that had a lot of ridges and valleys in the roof line. It would be hard to detect leaks. But, our home was a southern colonial with a plain pitched roof and no dormers. He said he was far more comfortable with our set up.
We were very satisfied and will use this set up in our next home which will be a custom build.
 10 years agolast modified: 10 years ago
As you are planning HVAC in the attic, there's little choice but to consider the entire attic "conditioned" space. (The alternative is to build an airtight structure around the HVAC equipment.) So that means moving the insulation to the roof and any gable walls.
I've found that open cell foam pulls away from the substrate when it's sprayed in cold climate construction. So I always use ccspf in our cold climate.
One set of considerations in using any spray foam are the local requirements for an ignition or thermal barrier. See here for an exhaustive review.
The pros and cons of open cell vs. closed cell include the contention that roof leaks are easier to trace with open cell, as the water will come through easier. A longer term consideration is that when the roof deck needs replacement, spray foam insulation will have to be replaced too. But that could be 40 years down the line and likely not your problem.
- 10 years ago
Seems that most here in Oklahoma say 5.5 inches is pleanty,I told the contractor I also wanted to put 2 inch polyiso nailboard under the metal roof as well for more r value,it's about 1800 in material cost plus what ever labor will cost,I don't think he really liked te idea,we haven't heard back on our bid yet.
- PRO10 years agolast modified: 10 years ago
5.5"x3.5 R per inch OC foam = 19.25". This doesn't meet roof minimums anywhere in the country. It might be common, but it's not the code's intent and eventually inspectors and lawyers will catch on. Do you really want to build that far below the minimum performance required by law? R38 is what should be enforced in most of OK, as a bare minimum.
Adding foam to exterior of roof deck is typically done without spray foam underneath. Doing both puts the roof sheathing at risk of moisture damage.
Buried and encapsulated ducts are a design solution for not spraying roof deck containing HVAC equipment but it's a rare bird and should be handled carefully.
+1 to energyrater. Spray foam dealers are using the argument of better airsealing characteristics and usually the house isn't even blower door tested to prove it! Even so, code has separate minimums for blower door tests which are not allowed to be used to derate wall or roof insulation minimums. R19.25 is not R38.
- 10 years agoThat's not how I read it on green building advisor,putting polyiso above the roof sheathing and under the metal roof is recommended if using open cell spray foam on the underside of a cathedral,I have asked several ? on that site and they seem to know what there taking about.
- 10 years agoHere's a good article off of green building advisor,this stuff is kind of complicated .
A roof over a vented, unconditioned attic does not need to include any insulation. However, most cathedral ceilings and low-slope (flat) roofs are insulated roof assemblies: with this kind of roof, the insulation follows the slope of the roof.
Insulated roof assemblies can be vented or unvented. There are lots of different ways to insulate this type of roof, but one of the best methods calls for the installation of rigid foam insulation above the roof sheathing.
There are at least two good reasons why this approach makes more sense than installing the insulation under the roof sheathing:
Rigid foam above the roof sheathing interrupts thermal bridging through the rafters.
Rigid foam above the roof sheathing keeps the sheathing warmer and drier than it would be if all the insulation were on the interior side of the roof sheathing.
How much foam do I need?
If you plan to install rigid foam above your roof sheathing, you have two choices:
Option 1: You can install all of the insulation above the roof sheathing (in which case the rigid foam has to meet minimum code requirements for ceiling R-value); or
Option 2: You can install some of the insulation above the roof sheathing, and the rest of the insulation underneath the roof sheathing (and in direct contact with the roof sheathing).
If you choose Option 1, your rigid foam will be fairly thick:
In Climate Zone 1, you’ll need R-30 of rigid foam (about 8 or 8.5 inches of EPS, 6 inches of XPS, or 5 inches of polyiso);
In Climate Zones 2 and 3, you’ll need R-38 of rigid foam (about 10 or 11 inches of EPS, 8 inches of XPS, or 7 inches of polyiso); and
In Climate Zones 4 through 8, you’ll need R-49 of rigid foam (about 12.5 or 14 inches of EPS, 10 inches of XPS, or about 9 inches of polyiso).
If you choose Option 2, the code dictates the minimum thickness of your rigid foam layer. According to section R806.4 of the 2009 IRC, this approach requires that “rigid board or sheet insulation shall be installed directly above the structural roof sheathing as specified in Table R806.4 for condensation control.” (In the 2012 IRC, the comparable code requirements can be found in Section R806.5.)
RELATED ARTICLES
How to Build an Insulated Cathedral Ceiling
Combining Exterior Rigid Foam With Fluffy Insulation
Insulating Low-Slope Residential Roofs
Getting Insulation Out of Your Walls and Ceilings
Video: How to Install Foam On a Roof
In Cold Climates, R-5 Foam Beats R-6
Calculating the Minimum Thickness of Rigid Foam Sheathing
An Old House Gets a Superinsulation Retrofit
GBA Detail Library: Exterior Roof Insulation Retrofit
Fastening Furring Strips to a Foam-Sheathed Wall
Lstiburek: “Mea Culpa Roofs”
According to the relevant code table:
In Climate Zones 1 through 3, you’ll need at least R-5 of rigid foam (about 1.5 inch of EPS, 1 inch of XPS, or 1 inch of polyiso);
In Climate Zone 4C, you’ll need at least R-10 of rigid foam (about 2.5 or 3 inches of EPS, 2 inches of XPS, or 2 inches of polyiso);
In Climate Zones 4A and 4B, you’ll need at least R-15 of rigid foam (about 4 or 4.5 inches of EPS, 3 inches of XPS, or 3 inches of polyiso);
In Climate Zone 5, you’ll need at least R-20 of rigid foam (about 5 or 6 inches of EPS, 4 inches of XPS, or 4 inches of polyiso);
In Climate Zone 6, you’ll need at least R-25 of rigid foam (about 6.5 or 7.5 inches of EPS, 5 inches of XPS, or 5 inches of polyiso);
In Climate Zone 7, you’ll need at least R-30 of rigid foam (about 7.5 to 9 inches of EPS, 6 inches of XPS, or 6 inches of polyiso);
In Climate Zone 8, you’ll need at least R-35 of rigid foam (about 9 or 10 inches of EPS, 7 inches of XPS, or 7 inches of polyiso).
The purpose of the requirement that rigid foam installed above roof sheathing meet certain minimum R-values is to ensure that the roof sheathing stays warm enough during the winter to avoid moisture accumulation and possible sheathing rot. (If the rigid foam layer is too thin and the sheathing is too cold, the sheathing can absorb moisture from the home's interior. Although this process is often referred to as condensation, it is more accurately referred to as sorption.)
Note that if you follow this path (Option 2), the minimum R-values for the rigid foam layer don’t satisfy the full insulation requirement of the building code. You’ll still have to install some type of insulation under (and in direct contact with) the roof sheathing to make sure that the R-value of the assembly meets the R-30 requirement (in zone 1), the R-38 requirement (in zones 2 and 3), or the R-49 requirement (in zones 4 through 8).
If you follow Option 2, a wide variety of insulation materials can be installed under the roof sheathing. Among the possibilities: fiberglass batts, mineral wool, cellulose, or open-cell spray foam. (Closed-cell spray foam is not recommended for this purpose, since closed-cell spray foam prevents the roof sheathing from drying toward the interior if it ever gets damp. For the same reason, this type of roof assembly should never include an interior polyethylene vapor barrier.)
What if the R-value of your roof exceeds minimum code requirements?
One more caveat: If you are planning to thicken the insulation installed under the sheathing in order to achieve a total R-value that exceeds code-minimum requirements, you'll need to also thicken your above-sheathing foam layer to keep the ratio of above-sheathing insulation to below-sheathing insulation in the proper proportion.
For roofs with above-code levels of insulation, use the table reproduced as Image #4, below, to determine the minimum thickness of the rigid foam layer. For more information on this issue, see Combining Exterior Rigid Foam With Fluffy Insulation.
Cold-weather performance of polyisocyanurate
While polyiso insulation has an R-value of about R-6 or R-6.5 per inch, this value only holds for temperatures above about 40°F. In lower temperatures, especially temperatures below 25°F, the effective R-value of polyiso drops noticeably, to a value that is closer to R-4.5 or R-4.0 per inch. (For more information on this topic, see In Cold Climates, R-5 Foam Beats R-6.)
Because of this fact, the use of polyiso to insulate roofs is best restricted to hot climates (for example, Florida or Texas). Cold-climate builders would be better off installing EPS or XPS rather than polyiso. (Note that most green builders try to avoid using XPS because the blowing agents used to manufacture XPS have a high global warming potential.)
If you are a cold-climate builder who wants to use polyiso, one possible approach is to create a foam sandwich, with polyiso on the bottom and EPS on the top. The EPS will keep the polyiso warm, so that the performance of the polyiso won’t be as affected by cold temperatures as it would if the polyiso were on the top of the sandwich.
For a more detailed discussion of the ramifications of the drop in performance of polyiso at cold temperatures, see Dana Dorsett's advice in Comment #3, below.
You need an air barrier at the bottom of the assembly
Before installing the rigid foam, make sure that the roof sheathing is airtight (or that you install an air barrier immediately above the roof sheathing).
There are at least two ways to do this:
If your roof has board sheathing, install an airtight membrane (for example, Solitex Mento, a product available from 475 High Performance Building Supply), a layer of synthetic roofing underlayment, or a peel-and-stick membrane.
If your roof has OSB or plywood sheathing, the panel seams can be taped (for example, with Zip System tape or Siga Wigluv tape); after taping the panel seams, install the roofing underlayment of your choice (for example, asphalt felt).
Multiple layers with staggered seams
The best way to install rigid foam above roof sheathing is to include at least two layers of foam with staggered seams. Staggering the seams improves airtightness and reduces the chance that heat will leak through the foam seams, causing embarrassing stripe marks (melt patterns) through thin layers of frost.
The first layer of rigid foam can be installed with cap nails. The second layer of rigid foam will probably need to be secured with a few long screws equipped with washers or roofing buttons. When the foam is first installed, it only needs to be held in place with a few fasteners. The layer above the rigid foam (either a series of 2x4s or an upper layer of roof sheathing) will hold the foam in place permanently.
To improve the airtightness of the insulation layer, it’s a good idea to tape the seams of the upper layer of rigid foam. Foil-faced polyiso seams can be taped with housewrap tape, while EPS or XPS seams are best taped with Siga Wigluv.
Some builders wonder whether there will be any problems if two or more layers of rigid foam have multiple vapor barriers (as happens when several layers of foil-faced polyiso are stacked on top of each other). The answer is no — this won’t cause any problems.
Once your final layer of rigid foam has been installed, it’s time to install either a second layer of roof sheathing (plywood or OSB) or 2x4s that establish a ventilation gap.
Do I need ventilation channels above the foam?
If you live in a snowy climate where ice dams are fairly common, you probably want to install ventilation channels above your rigid foam. During the winter, when the wind is blowing, air will exit the ventilation channels at the ridge vent, causing cold outdoor air to enter the ventilation channels through the soffit vents. This cold outdoor air lowers the temperature of the upper layer of roof sheathing, reducing the chance that there will be melting at the bottom of the layer of snow sitting on the roof. That reduces the chance of ice dams.
The usual way to ventilate this type of roof is to install 2x4s on the flat (creating a 1.5-inch-deep ventilation gap), with a 2x4 located above each rafter, extending from the eaves to the ridge. Depending on your rafter spacing, you’ll end up with 2x4s that are 16 inches or 24 inches on center. (Lstiburek calls this a “vented over-roof.” However, this approach doesn’t really create an over-roof; all it creates is ventilation channels.)
The 2x4s are fastened to the rafters below with long screws extending through the rigid foam.
How closely should I space the screws?
According to building scientist Joe Lstiburek, you don’t need as many screws to hold down these 2x4s as you would need to fasten furring strips to a wall. (For information on wall screws, see Fastening Furring Strips to a Foam-Sheathed Wall.)
Here’s what Lstiburek has to say: “How many [screws] and how far apart? The good news is that this is less complicated than installing continuous insulation on walls. … Less gravity, better friction. Uplift is the problem, not slippage and bending moment of the fasteners. The folks who do commercial flat roofs have this uplift thing dialed in. The same fastening requirements for uplift for flat roofs will work for these roofs while simultaneously handling the slippage issue. Except where it snows a lot. Snow likes to stick to sloping roofs. With lots of snow things get very complicated. The good news is that structural engineers have a good handle on this — especially ones who work in ski resorts — particularly Swiss and Austrian engineers.”
To summarize: if you don’t expect a lot of snow, you can install the same number of screws that are recommended for furring strips installed on walls — basically, one screw every 24 inches along each rafter, with a minimum penetration into solid wood of 1½ inch — and you’ll have more than enough screws. If you expect a lot of snow, however, you should consult an engineer.
What if I don’t need ventilation channels?
If you don’t need ventilation channels, you’ll probably need to install a layer of OSB or plywood roof sheathing on top of your rigid foam. The upper layer of rigid foam is secured to the rafters below with long screws through the foam.
If you plan to install through-fastened steel roofing, you may be able to skip the upper layer of roof sheathing. Instead, install 1x4 or 2x4 purlins, 24 inches on center, parallel to the ridge. Then fasten the roofing to the purlins.
Read more: http://www.greenbuildingadvisor.com/articles/dept/musings/how-install-rigid-foam-top-roof-sheathing#ixzz4D5sKBfbb
Follow us: @gbadvisor on Twitter | GreenBuildingAdvisor on Facebook - PRO10 years ago
Post a link if you can. Both foams are more permeable compared to closed cell spray foam and XPS, foams you absolutely wouldn't want to sandwich wood products between. Sounds like a better fit for existing construction with limited rafter cavity depth. I'm sure you wouldn't want to go too deep with the OC or use polyiso with integrated vapor barrier. Either or might be fine but would love to read more about it, especially some successful case studies.
As to the strictness of OC foam depth, you don't necessarily need to adhere to prescriptive code minimums, but you need to have a Rescheck or approved performance based modeling to comply with minimum building codes.
- 10 years agolast modified: 10 years ago
Dr. Joe Lstiburek of Building Science Corp. fame originally insulated the un-vented attic roof on his own heritage home with ccspf. However, this did nothing for thermal bridging in his cold climate. So when it came time for re-shingling, he added three layers of polyiso board above the sheathing to achieve a total of about R70.
****
Still amazed to hear all the stories that spray foam is so efficient you don't need to meet Code. Maybe it's to do with the quality of home inspectors in some places. I've had to deal with P. Eng.s as inspectors.
- 10 years agoI have talked to most spray foam company's around and they all have the same story,I wonder why they don't just say it's going to cost this much more to do it right,is it because most people would say the heck with foam and that price and just use cellulose etc,I think they found a depth that works with most construction and is in a salable price range to be able to sale the product.
Wonder if there will be any repercussions down the road if people's roof deck rot. - 10 years agolast modified: 10 years ago
How do you post a link?
Highlight the word or phrase you want to use as the link, then click the "link" at the bottom of the page and insert the URL. Then press Submit.

- 10 years ago
most spray foam companies goal is to install the leas amount of product
for the most cost.
to find a company who understands the basic R-value per inch,
correct install technique, and a bit of building science takes time.
if the ho does not educate themselves to be discerning when
picking a foam company...it can snowball into a huge mess.
and to whomever commented on rotting roof decking...thisis the reason hot humid climates use open cell.
- 10 years agolast modified: 10 years ago
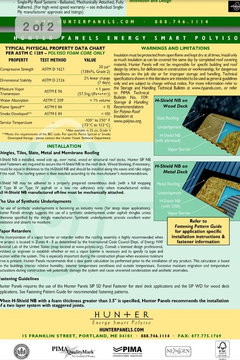
This is the nailbase we are thinking of using over the first layer of 5/8 roof sheathing,open cell foam under the roof deck.
https://www.hunterpanels.com/product-documents/hpanels/speciality-products/108-h-shield-nb
- 10 years agolast modified: 10 years ago
According to Building Science Corp., "Closed cell spray polyurethane foam can be used to create an unvented roof assembly that works in all climate zones. The design approach is the same for all climate zones." *
The key distinction between hot and cold climates is that "in cold climates insulating sheathing must be added exterior to the roof sheathing to prevent condensation on the underside of the roof sheathing."**
See RR-108 Unvented Roof Systems for details in all North American climate zones.
Unless you are in a "hot dry" or "hot humid" climate, surface temperature control is advised, according to Building Science Corp.
If the nailbase and the insulation R Value fits into the Building Science Corp. guidelines it would seem acceptable. Your designer or local building inspection office should be able to advise you. (I build where every such detail is vetted, but I know that's not the case everywhere.) - PRO10 years agolast modified: 10 years ago
Worthy, thanks for the BSC links. Love their stuff. Do you ever install foam board on exterior of roof deck that has been sprayed underneath with closed cell and if so what kind of foam? I didn't realize Joe was recommending applications so far from his proposed perfect wall (and roof and slab) assemblies.
In How to install rigid foam on top of roof sheathing, Martin suggests closed cell is not recommended against the underside of roof sheathing (with thick layers of foam above sheathing). I'm guessing that with proper water management layers topside, things would be fine, but it's the darn penetrations and transitions that get us all in trouble, even for Dr Joe and his fun with the ants.
- 10 years agolast modified: 10 years ago
The GBA article is Members only. However, you can still reach it free by just googling the title: How to install rigid foam on top of roof sheathing.
In any case, Holladay's contention is that "Closed-cell spray foam is not recommended for this purpose, since closed-cell spray foam prevents the roof sheathing from drying toward the interior if it ever gets damp." (The last time I recall him questioning Dr. Joe, Dr. Joe reconsidered and agreed.)
I've always backed off unvented attics. It's an extreme rarity to see HVAC in an attic here. So the advantage boils down to better air sealing--especially in the high end homes I've built with 50-100 second floor ceiling pot lights--and long-term energy savings. Either the clients don't want the upcharge, or I don't see a profit in doing it. So I've limited foam use to rims, garage ceilings, basement walls and miscellaneous transitions. Nothing wrong with vented attics absent HVAC.
fun with the ants
Yes, an issue of concern!
- PRO10 years agolast modified: 10 years ago
Gotcha thanks, will try to tweak to free link. I think well built vented attics are safer, but hard with the popular looks of cathedral ceilings and steeper interior vaults. So most of the higher end market you see uses vented attics? I think ours is almost completely unvented now, even without HVAC up there. Almost all these high end homes are installing substantially less roof insulation than what codes are supposed to require.
Us southerners use the excuse of HVAC equipment for spray foamed attics but good design can keep forced-air systems completely out of the attic when it's a goal. Of course putting HVAC into dreaded vented crawlspaces might be worse. The old-timers may have gotten the vented attic thing mostly right, but not vented crawlspaces, a terrible building strategy for most humid climates.
qbryant, nice panels. We've installed a lot of SIPS, so good so far. The main concern is to seal the seams as best as possible. Some may point out that you don't get the overlapping effect of multiple foam layers with nailbase but I like it's reduced labor potential. As long as you don't have moist air flowing through the gaps, the thermal efficiency hits you might end up with, are balanced by the additional insulation under your roof sheathing, should you go that route which some seem to consider risky.
- 10 years agolast modified: 10 years ago
So most of the higher end market you see uses vented attics?
I may be out of date on this!
Infill luxury homes in the Toronto GTA are usually subject to restrictive height limits, so as not to overshadow the outdated bungalows that originally occupied the lots. However, buyers demand high ceilings--12'-14' if you can squeeze it in for the first floor. The recently-built infill home from a cachet architect below is typical in that it has high ceilings on both floors. Notice how close to grade it sits. (Full vertical geo-thermal, btw.)
Luxury infill: Thornhill, Ontario
The flat roof behind the "false front" doesn't dictate a non-vented approach. But good building sense should, according to Martin Holladay.
Here's the roof view. Are those black squares behind the parapets vents?
Ditto another high-end custom.
10 Fiddlers Circle, Vaughan, Ontario . 12,000 sf. $9,995,000
High-end subdivisions may be another matter though. As long as it passes inspection and doesn't fail while under warranty, good enough.(As long as we've got lots of granite and glass tile backsplashes.)
So I guess I'm not venting on the next build!










energy_rater_la