Software
Houzz Logo Print
zmat

Streaking with General Finishes Antique Walnut stain

10 years ago
Hi, all;

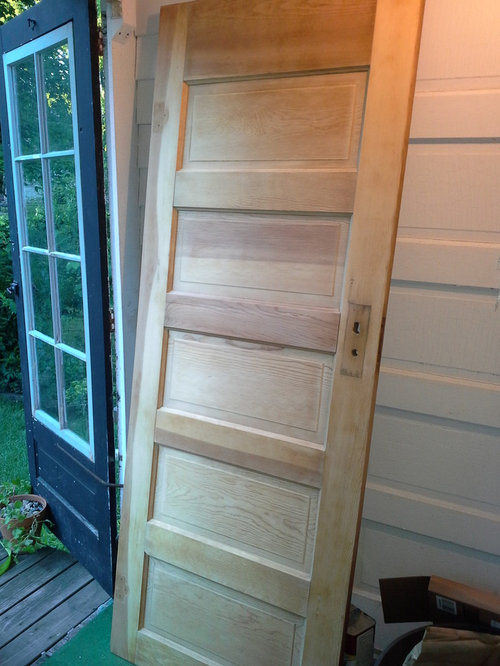
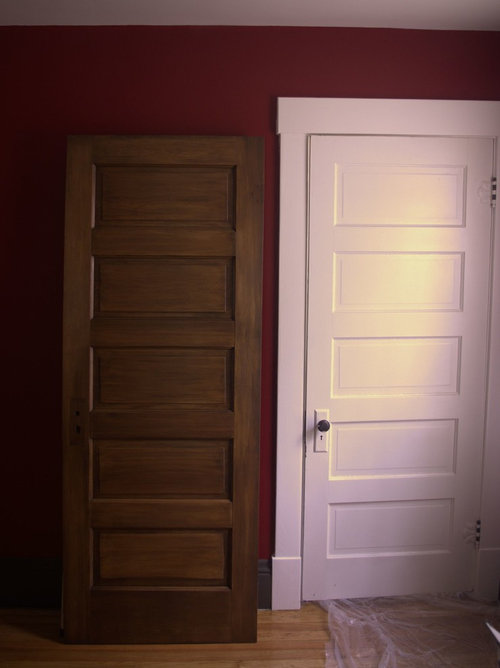
I started stripping paint from our interior doors (not sure what type of wood but suspecting maple) and decided to go with General finishes gel stain for two reasons - I wasn't able to remove old paint in all the cracks between panels and was terrified of blotching issues because of soft wood and original shellac finish. So it seemed like this gel stain would help with both coverage and blotching since it doesn't penetrate.

There was some blotching in the end along the panels and there was, indeed, a good coverage along the cracks to cover paint (I intentionally let the stain pool along the panels) and I don't see the old paint anymore (yay!).

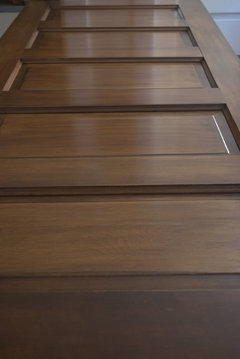
I've applied two coats so far and my second coat was a nightmare. It was difficult to prevent overlapping marks and if you go over some mistakes, the brush or paper towel will lift off the previous coat. To tell the truth, I was working in less than perfect conditions (outside, with some breeze, 80F), so the stain was drying and getting tacky way too fast. My third swipe with paper towel was always tacky. This is a large door and while I do work in sections, it's difficult to keep stain out of adjacent sections.

What's the best way to prevent overlapping marks and streaks? Do I need to strip the previous coats and start over or I can correct streaks with the third coat? I don't want to "paint" the door with gel stain since I'd like to see wood pattern. I'm hoping the third coat will even things out but it could also make things much worse.

I am going to move this project to the basement so there is no breeze. I will probably also thin the stain with mineral spirits.

My application tools are the same as suggested by General Finishes in their tutorial video: foam brush and paper towels. Is there a better way to apply the stain for uniform coverage? Do I have to get all of the stain in the first swipe (with more pressure)?

I have many more doors to go and I'd like to make things right next time.

******************************************************************************************

If anyone is wondering, my stripping process was as follows:


1) Speed heater to strip paint in flat sections and heat gun for curved sections

2) Citristrip paint stripper for remaining paint

3) Denatured alcohol to remove shellac (I used old toothbrushes for cracks and crevices)

4) Sand, sand, sand (started with 120 grit)

5) Wiped clean with a rag dampened with mineral spirits to remove sanding dust

6) Let dry overnight and applied SealCoat shellac thinned 50/50 with denatured alcohol (I used an old t-shirt and applied two very thin coats)

7) Stain (and this is where issues begin).

Comments (24)

  • 10 years ago

    @lazy_gardens Thank you so much for the tips! The stain would dry so fast, I couldn't really go over thick streaks without lifting off the previous coats. I tried a t-shirt rag and a brush moistened with mineral spirits and this would significantly lighten the color.

    I'm going to try the t-shirt rag method to wipe on the third coat and see if it looks better (maybe the streaks will even out).

    Do you recommend wiping the entire door with mineral spirits first or doing it section by section right before applying the stain?

    Thank you!

  • 10 years ago

    "Try this - wet a green 3M scrubby pad or fine steel wool in mineral spirits and scrub heck out of the door."

    Those doors look to be either hemlock or doug fir. Both very soft woods prone to splintering. Splintering is one thing, it's terrible. However I'm concerned with bits of srub pad or steel wool getting embedded into the grain. And oops, you don't know until the first coat of varnish is put on.

    It's happened to me.

    zmat thanked sambah006
  • 10 years ago
    last modified: 10 years ago

    Good point, sambah006. Ha, I did use steel wool when I was stripping the paint. And yes indeed, there are steel wool bits embedded in the wood. I know that because I tried to bleach the door and then rinsed it with vinegar solution. Vinegar showed every single steel wool bit but I'm just going to live with it.

    Oh, fir was my other suspicion. The doors are at least 88 years old and there is no sign of splintering yet. They are in excellent shape.

  • 10 years ago

    Have you tried to use just the Citri-strip sans heat?

    You should sand the steel wool bits out. If you have a good finish sander it will be really easy.

    An alternative to the gel stain is artist pigment mixed with linseed oil. It might have a better open time.


    zmat thanked sambah006
  • 10 years ago

    I tried sanding them out, but the stains wouldn't budge and they looked like they became part of wood. I can no longer see them after applying gel stain.

  • PRO
    10 years ago

    Definitely work in a cool location without wind. Apply to the panels first. If you need to, use a cloth to remove any overage from the frames. (with paint thinner if necessary) Then do the short rails. Clean up any overages onto the verticals in the same manner. Then do the verticals (stiles). Use care not to get any fresh stain onto the previously-completed zones.

    I would not use paper for the wiping rag. I use pieces of old t-shirts. The other secret is to not use a dry cloth; it's a lot better for uniformity if there is some stain on the cloth.

    Let dry for a full day before attempting a second coat.

    Casey

    zmat thanked Sombreuil
  • 10 years ago

    @Sombreuil THANK YOU for such detailed instructions on the sequence of application! I am going to try this method and will report back.

  • PRO
    10 years ago

    Be sure to keep the stain well stirred. Once you have used the can for a while, you may need to thin it with mineral spirits so it will be easier to spread.

    I like to use pieces of old bedsheets for cleaning and staining but they have to be tightly woven, 100% cotton. T-shirts also need to be all cotton; synthetic materials just don't work the same way.

    zmat thanked Linda
  • 10 years ago

    @Linda I always use a separate bowl for the amount I'm going to need and keep the can sealed tightly.

    Going to try the method suggested here with cotton t-shirt rugs, thanks!

  • 10 years ago

    So, I just put a third coat on and it made no difference on streaks or even color. :( I think I let the second coat of stain cure for too long or I just wiped off too much. However, I got a better, no-streak technique with t-shirt rags instead of paper towels. It helped to wipe with a rag moistened with mineral spirits and I didn't flood the surface like General Finishes suggest in their tutorial. Saved so much stain!

    I'll consider this a "practice door" since I have many more doors to go.

    Thank you all!

  • PRO
    10 years ago

    Another step you may wish to consider is applying a coat of dye to the doors before the stain. You can add some dye to the shellac or put it on over a very dilute coat of shellac, before the stain is applied.

    I'm currently working on a set of french doors in my dining room. They have a very grimy old shellac finish that I'm trying to clean up without removing completely. it is very difficult to get a perfectly even coat of stain regardless of the method so I just hope for good with a touch of "character" showing through the final finish.

    You may wish to finish one door from start to finish before continuing on the project so you can decide which factors most influence the final result. Some flaws are masked by further steps while others which appear to be minor at first, turn out to be major issues at the end. I have found out the hard way that issues are better addressed after one item than after proceeding further on all the doors and then having to reconsider the process on all the doors.

    zmat thanked Linda
  • 10 years ago

    @Linda What does the dye do when used under stain? Does it modify the stain color? Have you tried it yourself? Do you use the powder dye or alcohol-based dye? I read that alcohol-based one can streak when you apply shellac or poly on it.

    Is there any guide you're following to refinish your doors?

    We have shellac on all our trim and doors which really helps with paint removal. I used denatured alcohol and lots of sanding to remove it. I wasn't able to completely remove it based on gummy sandpaper but I figured that anything that's left should help with blotchiness.

    Sorry for many questions - just trying to figure out the process. There are so many ways to stain, my head is spinning. I read about glazing or toning to conceal stain streaks. Not sure if I should look into this or just go ahead with varnish already. It's a bathroom door and we really need a door there. :)


  • PRO
    10 years ago

    @zmat Dye is different from stain in a couple different ways. The particles are much finer so it soaks into the wood instead of staying on the surface. Dye is transparent; it won't hide the grain. Dye under stain gives a more even color base and a deeper, richer color than stain by itself. Stain, especially gel stain, tends to get muddy looking when multiple coats are applied. Dye with shellac is a beautiful clear finish that avoids the plastic surface coating look of some poly finishes but doors need a more durable finish

    I tried wood conditioner before the stain and found that it made very little difference to the amount of blotchiness. I ended up using a wash coat of shellac to control the stain absorption.

    I have used transtint liquid dye for my projects, mixed in denatured alcohol. I'm working on a 1933 tudor with wood trim and I dyed, stained and then put on shellac on pine cove trim for the bedrooms and hallway and maple crown. I did the pine first and found a good process which was easy and looked great.

    Then, I started in on the maple crown and had a devil of a time getting that right as maple is a difficult wood to stain. I probably had virtually every piece of crown finished on the back side by the time I had gotten the materials, steps and application process figured out. It turned out great but there was lots of headaches along the way.

    I use dollar store scrubby pads for removing shellac, rather than sandpaper or steel wool. For final removal, old cotton rags leave a nice even surface

    My best advice is practice on the inside of the closet doors to check out your process before moving on to the more visible surfaces

    zmat thanked Linda
  • 10 years ago

    Linda, thank you so much for taking time to describe your process. What a great idea to use a closet door to practice!

    I'm going to try a dye under stain. It makes sense to use a dye since the stain doesn't absorb well on top of shellac.

    I used two coats of 50/50 diluted SealCoat shellac and, despite this, notice the blotching on the bottom frame and the edges of panels. I'll probably use more shellac on the bottom and less on the panels and top frames where the stain color is lighter. Just started stripping the second bathroom door...


  • PRO
    10 years ago

    Some uneven color spots are likely going to be present regardless of your process. You are dealing with a natural material which has been in use for decades. It isn't going to be perfect and, if it was, it wouldn't look right. Too perfect looks fake.

    Is this house from 1890 - 1910 era? Five panel doors are pretty but there's a ton of work involved in getting them stripped and stained.

    I think you have done well, despite the results that may not be exactly what you were hoping for. Areas which have had heavy wear over the years may not work quite the same as areas that weren't touched. Dings, dents and scratches will absorb stain differently than surrounding wood.

    Are you planning to apply poly over the stain?

    zmat thanked Linda
  • 10 years ago

    Linda, thank you for your encouraging words! I've lost sleep over this door in the past three weeks. I know I've screwed up with the second coat of stain but husband keeps telling me that it gives a character (and I call it a bad job).

    I put a fourth and last coat of Arm-R-Seal in semi-gloss on it last night.

    A carpenter built this house for himself in 1928. The woodwork is pretty straightforward, nothing intricate, but I love the doors and baseboards. It's a shame to have them covered in thick layers of paint. Thankfully, the second floor trim and doors have not been painted and have an aged and darkened original shellac.


    I'm going to order the Transtint dye in dark walnut to use under stain on the second door. I'm hoping there won't be a drastic difference in these two doors since they are both in one bathroom. We'll see how this goes.


  • PRO
    10 years ago

    Looks like an interesting project. Are you going to be stripping and staining all the trimwork or just the doors? It is amazing how much work is involved in something which sounds so simple up front.

  • 10 years ago

    I have so much more respect for people who strip and refinish their wood trim. It requires a lot of patience and time.

    We did strip the trimwork but decided to paint it to just be done quickly. It's our first house and it was a hot mess when we moved in. We were living in a tiny hallway nook upstairs while trying to finish the first floor.

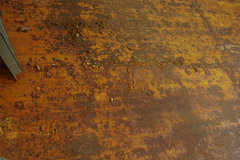
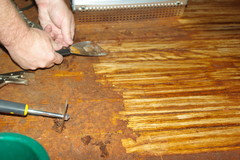
    Here is the oak floor we found under the carpet. The foam padding melted in the wood and it took us many days to get it ready for sanding.


    While it was painful to paint the trim after stripping, we love the end result. It is sharp and crisp now after removing many layers of cracking and chipping old paint.

    Now, I just can't wait to have the doors all done. It probably will take a few years at the rate it goes. :)

    Sorry for pouring this all on you. I really appreciate your assistance and will report back after my dyeing/staining adventure.

  • 10 years ago

    @ ZMAT!

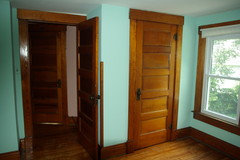
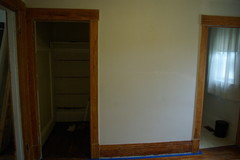
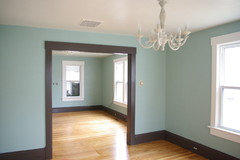
    What is that color of green in the first picture you posted??? And while we are at it, what's the color of the walls in the last picture?

  • 10 years ago

    @sambah006 That's not green but a very misleading lighting and no adjusted white balance in the camera! The first picture shows old paint from the previous owners and it's a creamy white color. Similar to this on cabinets: http://www.homebunch.com/white-kitchen-4/

    The last picture shows BM's wythe blue in pearl finish: http://www.benjaminmoore.com/en-us/paint-color/wytheblue

    Wythe blue changes throughout the day - sometimes it has more green in it and sometimes more gray. We love it.

  • PRO
    10 years ago

    Looks like quite a nice house...glad it found an old house lover to take good care of it. There is an incredible amount of labor in redoing an old house. I tell people that you have to really love an old house otherwise you will hate it. Trust me, right now I'm in the hate it phase of redoing endless amounts of trim...Who said french doors and 6 over 6 windows were such a nice feature?

    I like your wall color; it is similar to my new house project. I mix mine from white paint and miscellaneous tints but aim for something around that color. I have found that light blue/green/gray is an excellent choice in houses with a mix of stained trim and white. To my eye, many colors of beige just don't show off well against wood trim

    Ambiguous is a good description...depends on the lighting. From the vantage point of the dining room, looking through the hallway into the back bedroom, the paint appears to be two different shades. Just like my floor where the exact same stain is used on both sides of the line where living room meets dining room...looks like a totally different floor color depending on the viewpoint.

  • 10 years ago

    Wow ... that's a BIG project.

    Here's a tip: get one room DONE so you can retreat into it, shut the door and pretend the whole house is done.

  • 10 years ago

    Just wanted to quickly update that I finished the second door and it was no better than the first but without streaking this time (I stained in the basement). I confirm that it is douglas fir and extremely difficult to get an even color. I skipped the dye because of blotching but used a thinner cut of shellac. One of the panels completely rejected the stain twice and I had to redo it completely and then lightly dab on poly to seal the stain to prevent lift-off. I'll make sure to have SealCoat in a spray can on hand next time. It's been a nightmare but the end result looks great and the flaws are not as noticeable as I expected.