Software
Houzz Logo Print
schreibdave

Replace the head on an HDMI cable?

9 years ago

I tore the connector off of an HDMI cable. The cable was installed while my house was being built and is run behind my sheetrock. Replacing the whole cable is not an option.

I see HDMI repair kits on line. There seems to be two kinds - a crimp on type and a soldering type. The crimping tool is about $120. The solder type is cheaper but I have never soldered anything.

Anybody do this? Any suggestions?

Comments (20)

  • PRO
    9 years ago

    Unfortunately there are no easy options to fix a broken HDMI cable connector. Do you happen to have Cat 5e or Cat 6 in the wall as well? If so you can use an HDMI balun for video.

  • 9 years ago

    Any room in the wall for the repair. Here is a website that offers solder-less connection but needs a bit of room for the connector. http://www.l-com.com/audio-video-female-field-termination-connector-for-hdmi-applications

  • PRO
    9 years ago

    That is an option Mike C but notice the max resolution of 720p. Also that assumes you land all raw wires on the right terminals which can be difficult.

  • 9 years ago

    Technospeak - no cat 5 or 6 in the wall.

    Mike C - that could work.

    Technospeak - is there a color coded wiring diagram that tells me which wire goes to which terminal? Or could I replace both ends and decide for myself that the white wire goes to one, red wire goes to 2, etc?

    I'm not sure that the 720p makes too much difference. My current TV is an 8 year old Panasonic Viera. And I am not much of a videophile so I probably wouldnt notice the difference. But I will notice the wire running along the fireplace mantle - which appears to be my only other option right now.

  • 9 years ago

    What do u guys think of this idea of cutting both ends off in order to make it easier to match the color to the terminal?

  • PRO
    9 years ago

    No there's not a diagram for the wiring. You are also assuming it is a straight through pin out which it's typically not as their is send and receive information that is send over the HDMI cable in a loop. Honestly that's why we never bury HDMI cables. We either do conduit or Cat 5e/Cat6 and an HDMI balun. It is the more expensive way to go during construction until this happens and then it becomes cheaper. How many stud bays do you have to go through to replace the wire?

  • 9 years ago

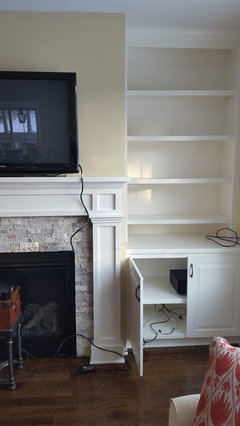
    I've decided to run a new cable. The distance is short - maybe 8ft. I can hide some of the carnage behind the tv and in teh cabinet where the cable box goes. I was just hoping to avoid that. This is a new house and I have not even made my first mortgage payment. I put the cable in the wall during construction to avoid this exact problem. Oh well. Here is a picture of what I am dealing with. Cable needs to go from right side of TV into the bottom shelf of the cabinet. The cabinet wall is 3/4 plywood so will need to jig saw or saw zall that out - which sucks. But I can do it.

  • PRO
    9 years ago

    Hi schreibdave - sorry but yea that's why we don't do that. I have been many builders do this and always discourage it for this exact reason. Since you have decided to pull new wire-- PLEASE pull in at least 2x Cat 6 or Cat 5e bulk cables at the same time so you won't face this issue again. You can actually install the cable fairly cleanly. (1) Pull off the TV-- open up the hole where the HDMI comes out on the TV side to a standard double gang size. Use one of the Arlington drywall rings for later installation of a brush plate. That should give you plenty of room to fish new wires and will finish off fine and have the TV on top of it anyway. Inside the fireplace wall you will see a cavity and the flue for the fireplace. Check out the general location you want to go to make sure there is no piping, electrical wire and such that you might hit. If there is nothing, go to the cabinet, drill a small hole where you want to pull out the other end of the wire and stick something bright in the hole like a glow stick or similar. Go back to your double gang whole on the TV side and located the glow stick or similar for your exact location. If you are clear, trace out a single gang hole in the cabinet. Use a small drill bit to drill the 4 corners of the trace. Then use a router to connect the holes you just drilled and cut our your single gang hole in the cabinet. Install a single gang arlington ring from home depot at this location and angle a flashlight inside this hole. Get some fish sticks or similar and tape a new HDMI cable plus some bulk Cat 6 or Cat 5e cable to the fish stick. Stick it in the wall at the TV location and aim for the single gang hole with the light in it that you should now see in the cabinet. Pull the wire through on the cabinet side, cover with brush plates and you are done. If and when you need it, go on to Amazon and search for an "HDMI balun."

    schreibdave thanked Technospeak Corporation
  • 9 years ago

    That's a great step by step guide. Thank you.

  • PRO
    9 years ago

    Sure thing. Good luck!!

  • PRO
    9 years ago

    Hi schreibdave - So how did it go?


  • 9 years ago

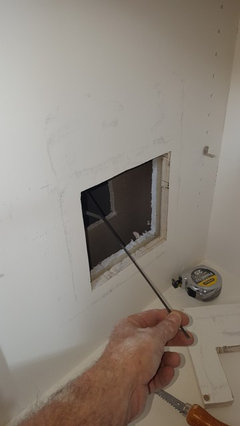
    Pretty well I think. My buddy is coming over tomorrow morning to help me lift the TV into place. It took me a few hrs but I was able to pull a new HDMI cable. This picture is inside the lower cabinet. Had to cut through 3/4 plywood, then sheetrock, then fire rated (??) sheetrock.

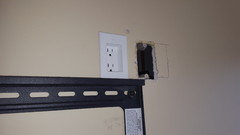
    Behind the TV I broke up the box that held the previous cable. That allowed me to fish down and over. I was going to make that hole bigger and put in a 2 gang old work box but that wasnt necessary.

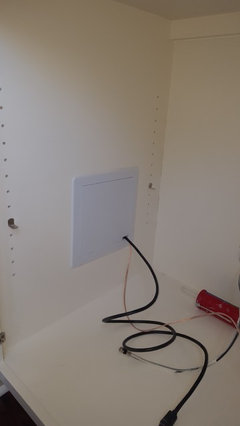
    Finished product inside the cabinet

    Thanks for all the advice.

  • PRO
    9 years ago

    Nice job!! Decide against the Cat 5e/Cat 6 wiring? Could come in handy for later HDMI baluns if and when that HDMI cable breaks or gets out of date. You can also use for control if you want to put in a DIY universal remote.

  • 9 years ago

    Tell me about the diy universal remote. I am using an 8 yr old logitech remote that operares tv, cable box and tuner. Its getting finicky. What would the cat cable allow me to do?

  • 9 years ago

    LOL. Those uses are all beyond my comprehension. I thought that I was pretty fancy turning my tv, cable box and tuner all on/off with one button!

    The good news is that it wouldnt be hard to run more cable of any sort. The only unfortunate part would be that I did patch up the fire rated sheetrock nearest the fire place. That would have to be opened again, but even that wouldnt be too bad. Thanks for all your help.

  • 9 years ago

    Most "Professional" entertainment system installers want no part of Logitech... their services are not required and they make no $$$.

    I've been using Logitech (Harmony) Remotes for over a decade and have never felt the need for professional help.

    They're really easy to set up and very flexible and are easily used by technophobes.

  • PRO
    9 years ago

    Most entertainment system "hobbyists" often think that when dealing with 1 room AV systems with a couple of lamp dimmers and a shade or two. Trying using a Logitech remote to control a 16 zone audio matrix, 8 zone HD-baseT HDMI matrix, automated doors systems, Somfy/Lutron/Forrester Shading Systems, Vantage Panelized Lighting systems, front projector lifts and projector screens etc., etc all in one project. We did support Harmony for 1 room systems until the 890 but not after as the reliability wasn't that great for the price compared to URC so we dropped it.

    Professional entertainment system installers do charge for their services and if you do it yourself you do save all that cash. However, that is assuming your time is worth nothing. If it isn't, then you have to weigh the cost /benefit of doing it yourself vs having someone else do it for you.


    schreibdave thanked Technospeak Corporation
  • 9 years ago

    Spoken like a "professional." lol

  • 7 years ago

    Hello Friends, compliment of the season. Please can anyone help out on this. I have a 50 meters cable with an in-built booster, the connector is bad and I have tried to solder it with a new connector as I have done to other ones that worked though not with the booster in them. Please My question is, Is there anything extra i needed to do because of the booster. because the system detects it when connected to laptop but does not display. please help me. Thanks

Sponsored
More Discussions