Software
Houzz Logo Print
steffen63lattitude

Anybody tried this?

9 years ago

I've got an itch to test things. Everything has been soooo boreingen all winter with dormancy.

I have a seedling from may 2016 that has been a real runt. Barely any growth - even tiny next to my other seedlings.


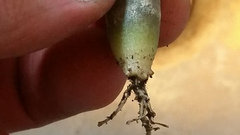
I decided to take a look. It had only shriveled roots, hardly any to speak of. Looks like it got some rot that it was healing from.


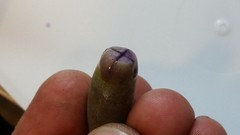
Any way, I remember someone shared info on octopus style roots. This was done with a branch cut in the bottom in 4 parts, like an X.


A thought to myself I had nothing to loose so I cut the caudex in the same fasion, dipped it in some rooting hormone and put it back in the pot. Oh, after sliceing the caudex I superglued the bottom before cutting the X. THEN the root hormone. Thought it good to minimize too much open wound. I guess this guy has alot against him not being strong and all but lets see how things go.


Any of you tried this? Maybe I'll give it a go on s healthier speciemen too.

Comments (16)

  • 9 years ago

  • 9 years ago

    Nope, haven't tried this before but I have read about grafting on new roots. Or cutting off the bottom and just starting all new roots from scratch. Hadn't tried it yet, but plan to. Good luck!

  • 9 years ago

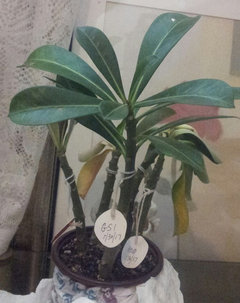
    Hi Steffan, I too saw the same post you are talking about & thought I'd give it a try. I love a good experiment, I think many of us have a little mad scientist hiding inside us. I had a plant that i pruned a long thick stem off of & decided to give this a try instead of throwing it away. I cut a X shape into the bottom & let it dry out for a couple of days & then applied rooting hormone powder to it & planted it. I don't want to unpot it now as it's our Autumn here & I don't want to disturb it till Spring.

    I can tell you that the cutting seems to be doing alright & has grown new leaves, so I assume it has grown roots. In Spring (September here) I will unpot it & have a look at its roots to see how it's grown. It will be interesting to see if it's worked. Good luck with your experiment too. Rachel :)

  • 9 years ago

    Rachel, lets compare notes in september. Good luck to you too!

  • 9 years ago
    last modified: 9 years ago

    Hi, there!

    I'm so happy to read this thread! I, too, saw the Octopus Roots thread but can't find it now. Can someone add the link here?

    I pruned 6 large seedlings exactly 2 months ago and planted the cuttings in a community pot, using the X for Octopus Roots. One rotted, three have new growth, 2 are struggling w/droopy leaves. I do not want to uproot them until they all show new growth.

    Maria Elena

  • 9 years ago

    I have had great luck rooting cuttings during warm weather, but recommend clipping the leaves to reduce water loss while rooting.

  • 9 years ago

    Maria Elena, good luck with your experiment too.

    I find that thicker stem cuttings usually do better at rooting then thinner cuttings. Have you found this to be the case too??? Rachel :)

  • 9 years ago

    Jedoba, we sometimes cut our leaves in half & they have rooted well that way. We also find that we can leave about 3 leaves at the top & cut all the others off and that works to. Rachel :)

  • 9 years ago

    Rachel: Yes, rooting the thicker, woody cuttings is much easier and doesn't require as much care. The ones above are from yearlings, so require more care or they will rot.

    Jerry: I cut off all the leaves close to the stem except 2-3 sets of leaves at the very top top. These help me determine how they are doing.

    Maria Elena

  • 9 years ago

    Maria Elena & Steffen, I just came across the other post discussing 'Octopus type roots'. I cant seem to do a link from my iPad, so here is the information for anyone that wants to read the other thread. It was originally posted by Rick - If you do a search for (Adenium Cutting: "Octopus" type roots.) you should find it.

    Additionally, here is a photo of a 14yr old cutting of 'Crimson Star' by Mark Dimmitt to show just what a cutting can end up like. You can read more from Mark Dimmitt at this website - adenium.tucsoncactus.org

    Photo by Mark Dimmitt.

  • 9 years ago

    Thank you so much, Rachel ... Yes, that's the exact post I was referring to. Here it is for anyone who wants a pictorial:

    http://forums.gardenweb.com/discussions/4231760/adenium-cutting-octopus-type-roots?n=21

    Great stuff. I'll be sure to bookmark it this time.

    Maria Elena

  • 9 years ago

    I'm pretty sure my test pilot kicked the bucket - or is pretty close to kicking it. It had some rot so in a last desperate effort to save it I cut away the rot and put it back in its pot.


    Anyone out there succeeding with their octopus roots?

  • 9 years ago
    last modified: 9 years ago

    Of the ones I have shown above, 3 have rooted, 2 have rotted, and 1 is out to lunch. I believe the ones that rotted did so because I bottom watered the community pot when I saw new growth on the 3 that did root. Next time, I'll separate them out before watering.

    It's still too early to tell whether I'll get octopus roots. The rooted ones just have 3" long, thin roots. Maybe those will fatten up eventually.

  • 9 years ago

    I don't have luck for cuttings, because I water them too soon.

    No patient for me. Only 1% cutting roots for me and they never live thru the winter.

    So, I normally let go.

    Marie

  • 9 years ago

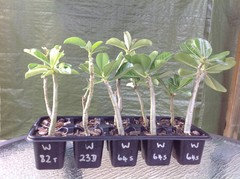
    Hi Steffen, here's an update on mine. I planted 10 cuttings - but did just one with the X cut to see how it went. Most of my cuttings have done well, but I do have a couple of thinner ones that are wrinkling. Hmmm, I think those couple are high maintenance. :D Will keep my fingers crossed.

    Most of mine have roots trying to escape at the bottom of the pots, but they have stopped growing new leaves. It is Autumn here & cooling down. I will have to leave these in their pot/cells until Spring as I only grow outdoors. I think it would be too risky to repot them now.

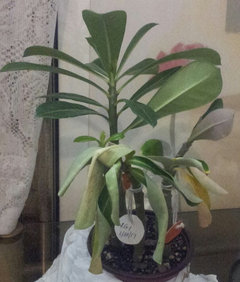
    Btw - when I water, I tend to use a seaweed solution to try & help them cope with the cold. Here's a photo - the one in the front row/far right corner, is the one that has the X cut in the bottom. It was a thicker cutting & so has done better. Rachel :)