

DIY Soapstone Counters - Tips?
We were sick over the price that a local fabricator quoted us for soapstone counters (Just over $4.6k for 43 sqft). While doing online soapstone research we came across M. Teixeira's website. They offer DIY "Kitchen to Go Kits" that we are seriously considering.
We're pretty savvy DIYers and feel we're up to the task. We've found a lot of into about the generalities of working with soapstone, but haven't come across too many diy experiences (and all of those valuable lessons learned).
I'd love to hear all about (and see!) your DIY soapstone projects!
Tips and advice are *greatly* appreciated!
Thanks!
- K
Comments (51)
 8 years agolast modified: 8 years ago
What is experience working with wood do you have? Table saw? Panel saw? Router? How comfortable are you with managing kickback from your tools? Do you still have all of your fingers? Do you want to keep them?
Related Professionals
Magnolia Home Remodeling · New Orleans Home Remodeling · Aurora Home Remodeling · Juneau Home Remodeling · Columbia Bathroom Remodelers · Hartford Bathroom Remodelers · South Bend Bathroom Remodelers · Starkville Furniture & Accessories · Providence Kitchen & Bathroom Designers · Casper Kitchen & Bathroom Designers · Florence Kitchen Remodelers · Cape Coral Kitchen Remodelers · Columbia Kitchen Remodelers · Augusta Kitchen Remodelers · Calgary Kitchen Remodelers- 8 years ago
I have seen soapstone cut in old houses (basement sinks ironically). You need decent power tools with good blades. Cutting stone generates a ton of dust so respirator masks and goggles are a must. Its best done outside if possible. Just realize these slabs are not lightweight and can easily weight 200lbs+.
Sincerely Kristen thanked TJ Smith  PRO8 years ago
K:
Savvy DIYers shouldn't have many problems fabricating and installing soapstone. Don't be afraid of investing in proper tools, blades, and abrasives.
My Festool rail saw (the small one) will cut through the toughest granite dust free with a pass or two and estone with little trouble, so it would cut soapstone like plywood, I imagine.Sincerely Kristen thanked Joseph Corlett, LLC- 8 years ago
This is absolutely an outside power saw job; the dust was heavy and flew for quite a distance when our installer cut outside yrs ago. IF you're EXTREMELY exp/confident with power saws and have all the proper equipment, then it might be in your wheelhouse. Soapstone is easy to cut as it's soft but again, it's all about your power saw exp. My SO is highly exp but even he'd prob hesitate given the cost of the slab. Templating has to be dead on...no second chances.
- PRO8 years ago
There is virtually no dust when cutting stone with a Festool rail saw and vacuum.
- 8 years ago
I am planning on doing this exact thing in my next kitchen reno (whenever I list and sell my current house). Soapstone is pretty easy to cut but you do need a degree of comfort with the tools used though. There are videos on youtube to help you out. I am planning to minimize the more difficult aspects of it by using an apron front sink and probably not having any seams (small kitchen). I am always sanding my current soapstone counters to minimize scratches and sanding the edges down a little. It's like a living finish because it is always changing. And just slap some oil over it all and it's back to normal again. Great stuff.
I will say however, that having a professional do the seams has its benefits. My 2 seams in my current kitchen are absolutely invisible. They are the thickness of a sharpened pencil line and they used stone dust in the epoxy so the seams cannot be seen. I used Bucks County Soapstone if you are near Pennsylvania.
This site has become much less DIY friendly over the years since HOUZZ took over but there were a number of people in the old days who did this exact thing so just do your research and use all safety precautions.
Sincerely Kristen thanked User  8 years ago
As long as you have the basic tools it's pretty simple. The hardest part is lifting the slabs out of the truck, then after cutting, into position. At about 22 lbs. sq/ft they are pretty heavy.
Sincerely Kristen thanked ksc36Sincerely Kristen
Original Author8 years ago@skmom - That’s awesome! We did consider honed and leathered granite, but my heart is on SS. Your kitchen is gorgeous! Cabinetry is on point!
@cleo07 - You’ll have to come back here and show me your photos! And I totally agree - We’re definitely not the first ones to do this, but it’s hard to find newer DIY experiences online.
Thanks all! These comments are helpful and (mostly) encouraging. Ha! ;)
Of course our first choice would be to hire a pro. We went to local fabricator and they quoted us $3.5k for the one and only slab they had in stock. We were ok with the price, but hated the slab they had in stock. So they referred us to an importer in town and we were thrilled to find a slab we absolutely *loved*. We took the slab info back to our fabricator and they quoted us just over $1k *more* for this other slab, bringing the total to over $4.5k for 43 sqft.
Also, they have been very slow to reply to our inquiries, they suggested we drive 2 hours to check out another slab in their inventory at their other location (which we were going to do!)… and good thing I called ahead because it had sold and been allocated for a specific job… but oh wait, after that weekend had passed, it was magically available again. Smh.
So our experience with the pros has sucked the joy out of this whole experience and I had pretty much written off SS as an option. Then I discovered there are DIY options that would be a fraction of the cost (~$1500 for stone and shipping + tools & other supplies) and obviously I’m interested again!
We definitely won’t work with a full slab. There is no way on earth we can manage that task. But we can order standard size, pre-cut slabs (48” x 25-1/2” & ~200lbs each). We’d need to fabricate them to fit our counter lengths, cut the sink hole, install, and finish.
Of course when going this route we will have a couple extra seams, but we’ve sketched it out and we will be able to hide the seams fairly well thanks to layout of our countertop. We will be installing a high back cast iron sink that installs similar to a drop-in sink, so no under mount business to worry about. It will only be one cut for the sink as the plumbing comes out of the wall and through the cast iron high back. Though you can bet we will be reinforcing the heck out of the base cabinet so it can support the weight of both SS and cast iron sink!
In our previous home we did our own concrete counters (pour in place) and *loved* it. Everyone loved it! We were tempted to do it again (this time in black), but I really love soapstone and now that we’re in a house that we will occupy for some time, we want to upgrade a bit. We know the end result of this SS project won’t be perfect as if we hired a pro, but we’re not looking for perfection (otherwise we wouldn’t be choosing SS), and we really like $AVING.
It helps that we will likely get a practice piece for cutting! Worst case scenario, we practice on the extra piece, decide it ain’t for us, and we can find someone local here to finish the fabricating and install.
I can use all our power tools, but my hubby will be the one working with the saw(s) for this one. In theory we will be making about 6 straight cuts plus the sink cutout. He’s very strong and can manage kick back just fine - though I hover a lot and pester him to death about safety. I’m the worry-wort, safety-nut, so I make a lean, mean project managing machine. ;)
We definitely plan to do all cuts outside and not in our workshop. Don’t want dust, even if we do hook up to vacuum. We will invest in proper tools, cutting blades, etc. and are taking these costs into account for the entire project. We love it when we DIY a project, get to buy new tools, and *still* save money in the end. Oh yes.
I anticipate the hardest parts will be (1) lifting/maneuvering the ~200lb slabs (we’ve moved some pretty heavy stuff together, but we might call in some friends to help with this task). And (2) making clean seams. I love the suggestion (and I’ve seen in some youtube videos) of using some of the ground SS dust in the mix to help blend the seams.
We learned a TON with our DIY concrete counters at our old place. I researched for weeks prior to doing the project and we STILL learned some lessons the hard way. Maybe because there were sooo many different facets (all of the different materials, all the steps, a TON of prep, etc.), when doing a pour in place concrete counters. Soapstone might prove to be much quicker and more straight forward of a project! …with less room for error.- 8 years agolast modified: 8 years ago
Just remember that stone slabs are transported on the edge, not the flat, and you won’t have to deal with breakage of Stone or feet. Most fabricators use a wheeled trolly A frame to do the majority transport into the home and save the really heavy lifting for getting it on and off the worktables and counters. Be sure you have something sturdy enough to handle the weight of the stone and your tooling efforts.
Edging is harder than you think. Much harder. The differential hardness mix of the slabs can send you for a spin and tear out a chunk. It’s similar to hitting a knothole in wood. But there are lots of knotholes all folded over into each other. That is different than most stones which have more homogeneous hardness and density throughout.
So practice.
Sincerely Kristen thanked User - 8 years ago
https://www.gardenweb.com/discussions/2700456/finally-the-plans-for-soapstone-sink-taking-shape?n=72
Here is a link to someone who built a soapstone sink for her bathroom. If you scroll to the bottom of the post she reposted her photos.
- 8 years ago
Well have you ever done other DIY?
I looked - it was $1700 for a slab + $700 freight = $2,400 then also you will need tools - say $500 = $2,900. The fabricator wants $4,600 - $2,900 = $1,700 savings. Is it worth it? Is the hassle worth it?
- 8 years ago
The 24 lf (48 sq/ft)package is $1500 shipped. If you can get a hold of a track saw it would be well worth it. We went up to M Teixeira in NJ and picked up our "slabs". We ended up buying remnants because we found nicer pieces than in the pre-cut diy bins. Call them, they had lots of deals not listed on their website.
Sincerely Kristen thanked ksc36  8 years agolast modified: 8 years ago
Go back to the Remodeling page and click on the Kitchens forum link at the top of the page, then do a search on DIY soapstone. There is an extensive thread from several years ago.
eta, GW Kitchens search on DIY soapstone
Sorry, I'd forgotten that thanks to damn-photobucket, many of the old GW pics have disappeared. Maybe the comments can help.
Sincerely Kristen thanked mama goose_gw zn6OH 8 years agolast modified: 8 years agoSincerely Kristen thanked THOR, Son of ODIN
- 8 years ago
The Festool rail saw is a beautiful (and pricey at $600+) saw. I am jealous! I have played with them at wood working shows, as you said there is absolutely no dust with their vacuum. You cant beat that. I have no doubt it would cut through soapstone like nothing.
I think you are right, if you are a wood worker or a DIY'er with some chops with power tools you could pull it off. I am not sure that someone without the power tools experience could do it. You could make lots of mistakes just like with Corian.
Experience costs $$.
- 8 years agolast modified: 8 years ago
"Well have you ever done other DIY?
I looked - it was $1700 for a slab + $700 freight = $2,400 then also you will need tools - say $500 = $2,900. The fabricator wants $4,600 - $2,900 = $1,700 savings. Is it worth it? Is the hassle worth it?"
I have gone similar financial analysis with things I have done. You dont always save that much $ by DIY when you factor in your time + the aggravation factor. I will do a lot of things but at times its just not worth the hassle. I think $500 in tools is being modest unless you are buying tools from Harbor Freight.
- 8 years ago
$500 in tools is way light unless you can rent that track saw and already have a wet rated router. That isn’t cheap.
Sincerely Kristen
Original Author8 years ago@ksc36 I wish we were able to pick up the slab ourselves. We are in AL so not an option. Darn. But thanks for the heads up! Maybe I'll ask if they have photos of remnants. I am a little worried about buying SS without having seen it in person. But we ordered the samples (I know, I know... those are only so good as the slabs are al vastly different) and will reach out to M.Tex to see how else they can assist us in selecting. Did you already install yours!? I'd love to see photos and hear about any lessons learned/tips!
Thank you @mamagoose! I did see that thread and it was wonderful! Of course I looove to see photos so yeah, photobucket stinks!
@geoffrey I'm not sure where you got those numbers. We can get 24ft run (51 sq ft) from M.Tex (shipped) for about $1500 (total pre sales tax). We already have all of the necessary power tools, but we will need to invest in the proper blades. So assuming we will spend roughly $500 on other supplies, we should end up saving about $2.5-2.6K! But even so... if we did "only" save $1700 I say yes, tis worth it! You're right, it isn't always worth the time and effort but for us a $2k counter is much easier to digest than a $4.6k counter - for nearly the same results. Especially when we have a lot more renovating to do with a limited budget. I WISH we had the funds to hire everything out.Sincerely Kristen
Original Author8 years ago@sophie We already own a track saw. I don't suspect we will need a router. I've seen SOME tutorials and I don't see anyone polishing there SS. Everyone is sanding (either by hand or with palm sander) to get the desired finish.
Sincerely Kristen
Original Author8 years agolast modified: 8 years agoAnyway! Back to the original question. If anyone has done DIY SS counters I'd love for y'all to show off your photos and any helpful quick tips would be great! I'm 99% sure we are going to do this project. If so, I'll be taking photos and write about our experience. I'm *sure* we will learn some lessons along the way (as with e.v.e.r.y. DIY project).
- 8 years agolast modified: 8 years ago
So how do you plan to edge without routing it? And then polishing the cut edges?
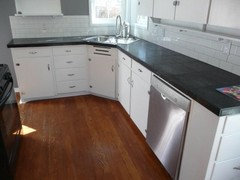
- 8 years agoWe DIYed our own out of the tiles, not slab. Was for a rental property so we wanted cost effective... total cost was around $200. The worst part was the epoxy we used instead of grout. The tape tip on the seam in the This Old House link above was super helpful.
Sincerely Kristen
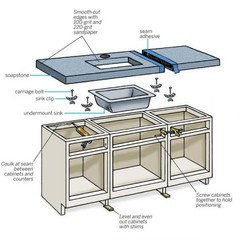
Original Author8 years agolast modified: 8 years ago@Sophie Ah! gotcha! We do have an angle grinder and I wonder if we can buy an attachment that will polish (if we even need to do this). All of our cuts will end up being seams - the (pre-cut) slabs will arrive already cut to the correct depth for the counters. I assumed the edges would just need sanding to finish. I'll be sure to ask the SS company before purchasing. TOH mentions "You can shape the edge of your stone by rounding it over or just taking ofd the sharpness using a sander with a rough-grit paper. If you have a router, you can even create a fancier roundover or ogee edge." I prefer the simpler eased edges anyway.
@Briana thanks for sharing your photo!! I've read several comments about how the epoxy can be hard to work with. I will definitely need to do my homework and practice before doing this on our counter!
- 8 years ago
Your tile counter looks very nice!
How did you handle the edge? I can't tell from the picture. Are these floor soapstone tiles?
Any other pics would be great! I have tiled counters and floors before so I know whats involved.
- 8 years agoThanks! We just cut down smaller pieces of tile and applied them to the edge (these went down directly over Plywood on the counter). We live in Denver near the M Texeira warehouse so we just went and picked a bunch out, they were the 12x12 tiles so they probably do call them “floor” tiles!
- 8 years ago
Your counter came out great! Its sounds very similar to porcelain I have done. What did you do about the space between the tiles - You used epoxy instead of grout?
- 8 years ago
I haven't done counters, but I did buy a remnant and cut it down to make a fireplace hearth. Originally, I did it as sort of a test thinking that I would DIY my counters with the kit from Texiera as well. The hearth cuts didn't have to be as dead on and didn't have seams, so it was an easier process. I just made some jigs and used a diamond blade in a circular saw to make the cuts and sanded the edges. It worked just fine and I am happy with the results. The biggest issues I had were mostly related to the weight of the material.
After DIYing the rest of my kitchen, I decided to use a fabricator for the counter tops. Part of me was a little concerned about the fact that I am not the most meticulous person in the world and I needed to be for this particular task, but most of me was tired and behind schedule and just wanted it to be done.
It sounds like you know yourselves and you know your stuff. You are willing to ask questions and learn. I think that this is well within your abilities to get this done. Agree with the statement that DIY is not as common here as it once was and I think that it's a shame. It's not for everyone, but it can be very rewarding and the savings are awesome! Good luck!
Sincerely Kristen thanked Laura - 8 years agoYes Tj, we epoxy glued them together and butted then up so there ended ho rings minimal space. It’s really more of a seam. We practiced this with some extra tiles before trying the countertop. I think it took us around 4 hours to do the whole thing...
Sincerely Kristen
Original Author8 years agoUpdate: WE ARE DOING IT!
We decided to go for it and tackle the DIY soapstone project. So far we have everything cut and dry fitted. Next step is to epoxy seams, sand/finish the tops/edges, and finally oil!
---
We ordered the DIY "kitchen to go" kit from M.Teixeira. After shipping we ended up paying about $1500. We salvaged as much of the soapstone as possible while fabricating our kitchen counter tops and we had enough left for a new fireplace surround and we STILL have left over for some (small) future projects!
A couple of the backsplash pieces arrived broken and customer service at M.Teixera happily sent us replacements at no charge. A+ customer service!
I purchased the DEWALT DWC860W 4-3/8-Inch Wet/Dry Masonry Saw ($136) on Amazon and it cut through the soapstone with NO problems. We went very slow, and allowed the saw to do it's work. There seemed to be a few areas where the stone was a bit denser, so we slowed the cut even more and had no problems. We made at least 10 cuts with it and the blade it came with is still going strong. FYI, we made full-thickness/one-pass cuts. We also used two of my husbands large metal carpenters squares with several small clamps to create a cutting guide/edge. This particular saw sits very low, so we needed a super low-profile cutting guide, which is why we opted to use the metal carpenters squares.
---
My biggest concern for the project was moving the slabs around. But we worked smarter, not harder! We used a hand-truck (padded with a moving blanket) to move the slabs around. My husband was able to maneuver the hand truck just fine, though each slab weighs appx. 200lbs. I held the hand truck with the weight of a slab briefly, but don't think I could've safely moved them for any distance by myself.
We parked the hand truck and lowered each slab onto several scrap 2x4's (as to not crush our fingers!) on our front porch until it was time to cut them. Together we lifted each slab up onto the workbench. No problem! We installed two full slabs in the kitchen, the rest were fabricated to a smaller size to fit the counters. We used the hand-truck to bring in the two full size slabs, and hand carried the rest of the cut-to-size slabs. Once we lifted the slabs up onto the counter they easily slid into place! We got these amazing "Mad Grip" gardening gloves at Lowes to be sure we had a good hold on these smooth slabs. I felt like spider man with super grip! Lol
---
For cutting we used scrap 1x1 pieces to raise the slabs up off the table and fully support each side of the cut. There was NO dust with the wet saw, but of course there was lots of sediment in the runoff water from the cuts. Not a big deal, but I will have to hose off the floor of my front porch! There was minimal splashing/spraying with the wet saw, though we did wear our rain boots because of all of the runoff water from the work table. We used painters tape and an ink pen to measure and mark the cuts and also to protect the surface of the slabs while we cut.
---
That's it so far. And we didn't even break a sweat!! Our yard work is more physically strenuous than this! Ha! I'm so glad I didn't talk ourselves out of this. So far we've spent a grand total of appx. $1662. I still have to purchase the epoxy and related supplies, plus sandpaper and finishing wax/oil. But we're saving ourselves ~$2000-$2500 - AND - we got a new power tool - AND - we got a new fireplace surround - AND - we still have some left over to do something fun with - AND some bragging rights when all our friends and family come over. ;)
---
I'll update again once it is finished and maybe start a new thread with the whole project details and photos. :D Thanks to all who chimed in here. Your advice and photos were so appreciated!
- PRO8 years ago
Kristen:
Sounds good!
Make sure the pieces you are joining are on plane to each other and level. When you set a straightedge over the joint before gluing, it should have no dips and it should not rock. You'll probably have to shim a bit to get it right.
I'd tint the epoxy to match the stone; stop by the local art supply house. Run two layers of masking tape down each side of each seam, pull the stone apart, mix the epoxy in a plastic bag, tint it, pull (not cut) the baggie end off and dispense the epoxy fully onto the edge. Make sure you have plenty of squeeze-out. You can screed off the excess, but you want the joint overfilled because the adhesive shrinks as it cures. When it hardens, remove the tape and scrape the adhesive flush with a razor blade. You'll probably scratch your top, but you may as well get used to refinishing anyway.Sincerely Kristen thanked Joseph Corlett, LLC Sincerely Kristen
Original Author8 years agoThanks Joseph for the tips! I've already started shimming to make sure the countertop is flush. But I didn't know that the epoxy can shrink as it dries! I will be sure to overfill each seam. I plan to sand the entire surface before oiling/waxing, so I'm not too worried about scratching it with the razor blade. Thanks so much! I love all things old and utilitarian so I can't wait for this countertop to earn that "lived in" feel.
Sincerely Kristen
Original Author8 years agoWe have the pieces all in place, epoxy/seams done, and just finished sanding the counters down and I'm in love! We used Instant Install 29 epoxy colored with a couple drops of black dye and a seam setter (a contraption with two suction cups and a crank to pull and hold the two slabs together at the seam until epoxy sets). Used razor to remove excess hardened epoxy, and then sanded with 80 grit sand paper on my random orbital palm sander. I used the palm sander to blunt the sharp top edge of the counters the whole way around the kitchen, and then hand finished to an eased edge.
@Joseph - Well we did it! You were right!!! The epoxy shrunk down significantly. There were a couple of areas where the epoxy didn't overflow the seam like I wanted and I ended up backfilling the gaps.
I have some mineral oil I can apply, but I'm wondering what your favorites are? I'm kind of tempted to just enjoy it "as is" for a little while and then play around with oils and waxes. Anyone make their own ss wax?!
Sincerely Kristen
Original Author8 years agolast modified: 8 years ago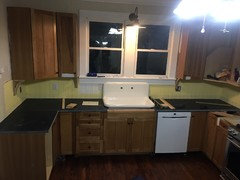
Dry fitted, minus the piece in front of the sink and to the left and right of the cooking range. And please forgive the yellow paint (previous owner's color choice... eh!) and cabinets... we are mid-renovation and there is still MUCH to do.
Sincerely Kristen
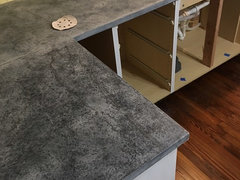
Original Author8 years agoThis is a scrap piece that I test sanded. Started with 80 - 120 - 220, regular sandpaper on my random orbital palm sander. Then I used some oil to see what it would look like. I intentionally held it so the window light would reflect off of it to show the texture. It was almost glass smooth when the slabs arrived from M. Teixeira. It felt nice, no doubt... but I really wanted the lived in, not perfect, soft, soapstone feel. I've read that the leathered texture will go away if using diamond grit sand paper that is mounted onto a stiff/foam pad? I might just leave it like this for now. See how I like it. I can always sand it again with something else if I tire of the leathered look!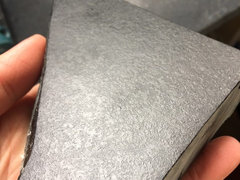
Sincerely Kristen
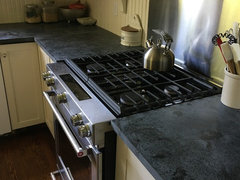
Original Author8 years agoKitchen is still under construction (need to: replace ceiling fan with pendant lights, build permanent island with marble top, build custom range hood cover, finish installing cabinet doors, etc.) but the soapstone counters are in!!!
We decided to leave them bare (no oil/wax) for awhile. Figured it would be fun to just enjoy them as they are, and then oil/wax them when we want to change it up.
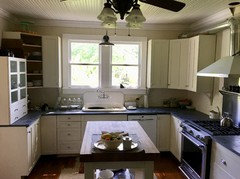
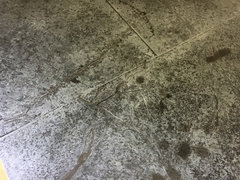
Some spots on the counter from cooking oils.
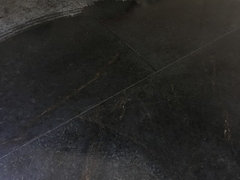
I could stand to sand the seams just a bit more to diminish the epoxy lines, but eh... a job for another day. I was more anxious to have my kitchen back in working order! And besides, when wetted down the epoxy in the seams disappears, so maybe I'll just leave as-is since we ultimately plan to wax/oil the countertops.
Here is what it looks like wetted down with water. We ordered the "Stormy Black" from M.Teixeira.
---
We've (finally!) been cooking in our kitchen for about a week and I love the counters. Super low maintenance, easy to wipe down, etc. I love that it's a "living surface" and I know it will only continue to get better (IMO) with age and use.
---
We do plan to oil/wax the counters, but aren't really in a hurry. Does anyone here have a favorite brand? Or make your own? Thanks!
Sincerely Kristen
Original Author8 years agoJust for grins, this is what the kitchen looked like when we bought the (1930's) house back in December. Still a work in progress!
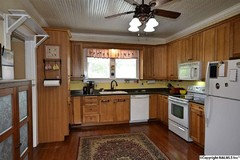
Sincerely Kristen
Original Author8 years ago@ingridtm - Thanks! I actually got the sink used on Craigslist. It's an old cast iron sink that was refinished/resurfaced. I got a heck of a deal on it - CL and Facebook marketplace are my favorite places to shop, lol!
I've signed up to be an Amazon affiliate (I figure I give them enough of my money, I might as well join them and earn a little bit back! lol) and so I've created my "favorites" list, and the exact faucet I have in my kitchen is on this list: https://www.amazon.com/hz/wishlist/ls/YWWJN8JYK918?&sort=default. Again, I do get a small commission for items purchased through that link. If you end up with a cast iron, or any sink that has "back mount" faucets, you'll need to make sure the faucet can fit the holes in the sink. The one I bough has some adjustability which made it much less stressful and I was glad I didn't have to find a faucet with *exact* spacing. And in general, I've found Kingston Brass to be a good quality, yet affordable brand.
Sincerely Kristen
Original Author7 years agoIf anyone is interested here is my blog post about how we did our DIY soapstone counters. Hope it's helpful!
http://sincerelykristen.net/2018/09/07/diy_soapstone_counters/
Sincerely Kristen
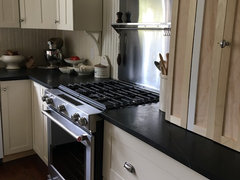
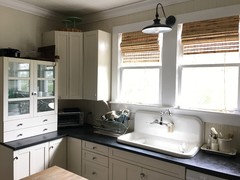
Original Author7 years agoSorry, I've been terrible at updating... These photos are from a couple months ago, we've done even more work in the kitchen since then (see our unfinished DIY appliance garage, sigh). But at least you can see our counters with the Beekeeper's Gold wax applied! :)
- 7 years agoThis is just gorgeous-exactly the look I’m going for in my 1940s house. I’m inspired!




skmom