

Full foundation or cantilevered?
Comments (70)
 8 years agolast modified: 8 years ago
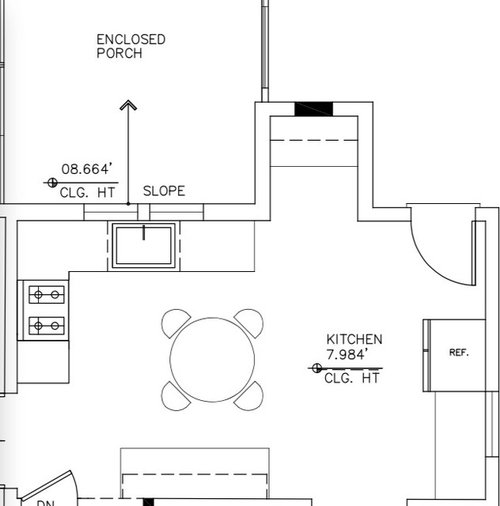
I did a slight tweak to the galley kitchen plan.
I changed the seating slightly. You still have 3 seats but I didn't put any on the top side. It would be similar to this:
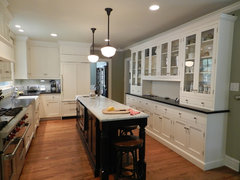 Classic Modern · More Info
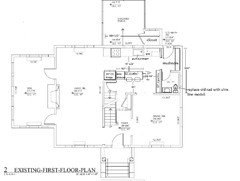
I removed the LR doors, leaving the cases opening. I removed the DR doors, widened the openings to match the width of the LR entry to create 2 additional cased openings. This is a good way to marry today's desire for open floor plans while also paying homage to your home's architecture. It's also less expensive than removing the walls completely and installing glue lams.
 Traditional Entry · More Info
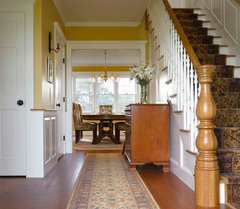
The other thing you could do for the DR is to remove more of the wall and replace it with strategically placed column like this:
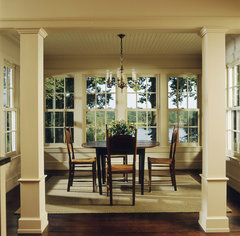 Glenn Gissler Design · More Info
This would give you more room in front of the coat closet so that it isn't a log jam area.

M L
Original Author8 years agoHi Lisa, thanks. I didn’t have a chance to go up to the house yesterday for the measurements. I was going to get back to you today. Thanks for your thinking on this is sparked an idea. I’m thinking we leave the bathroom where it is, just change the door. This would require us to square off and cantilever where the existing back door is, but by doing so we’d have a dedicated mud room space. And I think it will give my husband everything he needs without a huge demo. We would still knock down a wall near the existing back door and create a banquette space on the right near the radiator and window. We would also have plenty of room for a pantry. And maybe a cabinet? Also by closing off the door to the existing bathroom and reorienting it, it would increase the cabinet and counter space. And lastly put the refrigerator on the wall of the living room. I had to use pen, paper and white out. But what do you think?
Yes the bathroom was added in 1950, so not original to the house.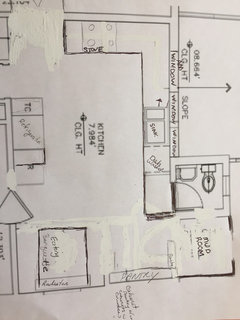
Related Professionals
Eureka Home Remodeling · West Palm Beach Kitchen Remodelers · Lake City Bathroom Remodelers · Sedalia Bathroom Remodelers · Platteville Bathroom Remodelers · Superior Bathroom Remodelers · Mesquite Architects & Building Designers · Dallas Design-Build Firms · Webster Design-Build Firms · Vancouver Design-Build Firms · Gulfport Home Builders · Morgan City Kitchen & Bathroom Designers · Helena Kitchen & Bathroom Designers · Lagrange Kitchen & Bathroom Designers · Jacksonville Kitchen RemodelersM L
Original Author8 years agoI also added a window so there are 3 windows near the sink. I don’t know how to handle the pantry area that’s below the mud room. Is there a cabinet or 1/2 wall there to separate the space?- 8 years ago
Great minds, M Lowe! I was thinking along the same lines. Let me play with it a bit and post shortly.
Quick question. It looks like you're proposing to eliminate the basement stairway landing. Is that correct? If so, I recommend that you swing the door into the kitchen, not into the stairwell, for safety.
If you haven't already, you should talk to a heating contractor about options to replace the radiator. I believe they can be converted to radiant floor heat, baseboard heat or a toe kick heater but I've no idea how that works or what it will cost.
- 8 years agolast modified: 8 years ago
Okay, here's what I came up with.
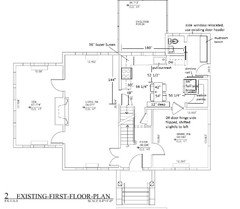
I bumped out the mudroom wall to be even with the powder room, as you suggested, and moved the exterior door to the side so that it's a straight shot from car to kitchen with groceries. It will also make moving large appliances in to the kitchen or to the basement stairs much easier.A side door also gives you more room for mudroom benches and eliminates congestion in this area because you won't have to deal with a door swing and thru traffic. I relocated the side window to the old door header.
I think a swing door will be a tight squeeze so I opted for a pocket door for the powder room.
I swapped out the rad for a slim line rad and placed it against the mudroom wall (this is the existing wall, less demo saves you money). This is a suggestion only. You definitely need to talk with a heating contractor to see what makes the most sense. While this move may be possible, you may also need to add a toe kick heater under a base cabinet to provide additional heat to the kitchen. Or add radiant floor heat under tile floors. We have that in our master bath; love it!
I turned the old alcove into a walk-in pantry and recessed a full size fridge into it. It will be similar to this but with a swing door, not a pocket door:
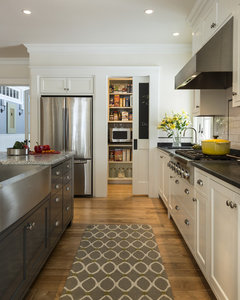 Stonewall Farmhouse · More Info
I flipped the DR door hinges to the right side. It may need to shift slightly to the left. Looks like that will be necessary but that's a guess since I don't have dimensions yet.
I shifted the sink to the right, under one window to give you as long a stretch between sink and corner as possible. That said, you may not need to do this; it may be possible to leave it in its current spot, centered between 2 windows and still have enough counter between sink and counter.
I added a 3rd window to the sink run to make up for the natural light you'll lose when you remove the side window
I eliminated the basement stair landing, turned doorway 90 degrees and made it an out-swing door. I left a generous aisle of 48" so that you can move large items, like a washer and dryer (guessing your laundry is in the basement), into the basement more easily.
That still leaves room for a 36" Super Susan in the corner
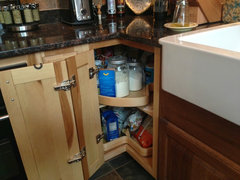 A Kitchen in the Woods · More Info
and a 30" cabinet to the left of the range. Oops, just realized I forgot to take the counter overhang into account so the aisle will be 46 1/2" or 47" depending on whether you do a 1" or 1 1/2" overhang on the side of the cabinet (1 1/2" is the usual counter overhang along cabinet fronts).
Your seating area will be like this but with a larger table so you can seat 4 in your kitchen.
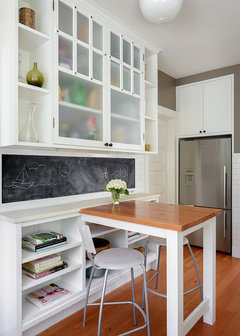 Central District Kitchen Remodel · More Info
This gives you additional storage and, if you go with a counter height table as shown, a great place to set out appies and drinks for parties or a buffet for dinner parties/holiday dinners. It can also serve as additional prep space when you have multiple cooks in the kitchen (as happens at my house for holiday dinners).
There is still ample room to move around the table/peninsula plus it makes good use of the center of your kitchen, something your plan does not.
You have a few options for MW placement. You can go with a Microhood. That's not my personal favorite since it's less than ideal venting but sometimes that's the only or the best option.
The 2nd option is a MW drawer either to the left of the range or to the right of the DW, depending on whether you use it during meal prep or to reheat items.
 Robert Miano · More Info
The 3rd option is to place a counter top MW on a shelf in the pantry, as shown in the fridge/pantry photo above.
The last option is to purchase a GE Spacermaker II MW and place it on a shelf above the seating area.
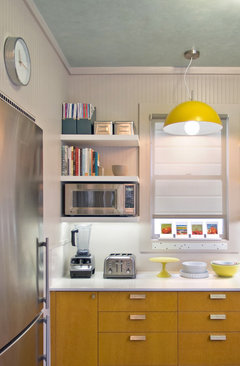 San Francisco Kitchen Redux · More Info
FYI, if you prefer to keep the seating area where you placed it in your latest plan, I recommend that you consider a booth similar to what jm_seattle did in their bungalow kitchen.
Here are the bench diagrams:You'd need a minimum of 74" to accommodate the benches and a 36" table with a table overhang of 2 1/2" over the benches. You can go with a narrower table - they did - but keep in mind that a narrower table means less room beneath the table for legs and feet.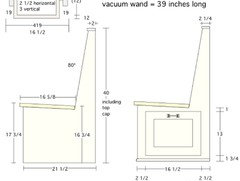
- 8 years ago
Meant to show you my narrow (42" wide) walk-in pantry with a 24" swing door to give you a sense of how your walk-in pantry might work. Mine is under the stairs (no basement) so it's small but it holds a helluva lot of stuff.
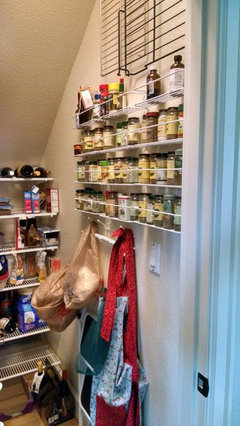
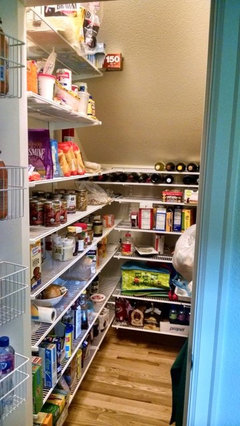
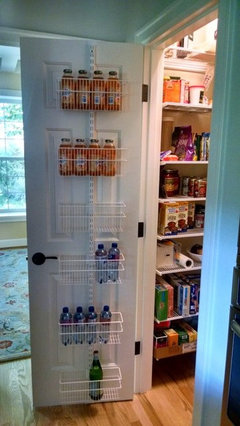
We installed Elfa shelving (Container Store) in place of the builder installed fixed shelving. Our pantry holds about 50% more than it used to. Love that and the flexibility of the Elfa system. - 8 years ago
My in-laws have a kitchen layout like what lisa_a drew and it works great. Their space is a little smaller I think, so they only have 2 seats at the island and their micro is on an upper shelf to the right of the DW.
M L
Original Author8 years agoHi Lisa! So much to think about. I like the peninsula but was thinking about the distance to the fridge, which is why I moved the fridge directly across from the sink, it might save a step or two. I like the table height pennisula idea, I had not thought of that. But was concerned about the height of an island with a toddler who loves to climb.
Would it be terrible to keep the door to the outside in the existing orientation? Straight out the back versus the side? That door is truly a back door to solely go to the back yard. The garage is closer to the front door so I don’t envision we would be going all the way around the house to use that door for groceries etc.
Yes we are getting rid of the landing to the basement in order to have more room for the opening to the living room and install double doors similar to the other opening from the hallway to the LR at the front of the house. We don’t have a landing in our current home and it works just fine. I’m also getting rid of that swing door to the dining room and ideally would open that up a bit more but not necessary.
I’ve got to run now. But I am going over to the house this morning and will come back with measurements. Thanks!M L
Original Author8 years agoHi Lisa,
Here are the measurements all in inches
A. 58.5
B. 79
C. 32
D. 39.2
E. 20
F. 100
G. 59
H. 170.5
I. 55
J. 36
K. 74
L. 76
M. 30
N. 61
O. 21.5
P. 32
Q. 21.5
R. 139 (which I added)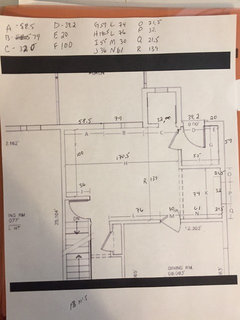
- 8 years ago
I'll amend the plan to match the correct dimensions and post it later today.
"I like the peninsula but was thinking about the distance to the fridge,
which is why I moved the fridge directly across from the sink, it might
save a step or two."The distance between fridge and sink in your plan is about 74" for a full size fridge (33" deep including door) and 86 1/2" for a counter depth model.
The distance between fridge and sink in my plan is 62". The fridge is closer to the sink in my plan.
The above measurements are using the correct dimensions.
"Would it be terrible to keep the door to the outside in the existing orientation?"
Nope. =) The upside is it would give you a straighter shot to the backyard. The downside is that your mudroom becomes a hallway, too. My laundry room is the hallway between garage and house. There is always a traffic jam when we're trying to get out the door. I'll amend the plan to give you as wide an aisle as possible to avoid that.
Gotta run. More later.
- 8 years ago
Quick question on two of the dimensions. I think what you gave me are the dimensions for the blue, not the red lines on the drawing. That's fine but I want to make sure I understand you correctly.
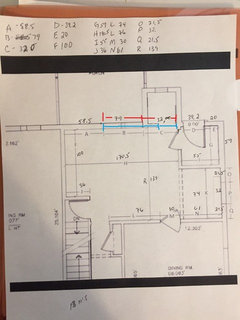
If the dimensions are for the red lines, I think you'll have some code problems with the bathroom if you include it in the remodel. I believe code requires 21" in front of the toilet, which you don't have if the powder room really is only 32" side to side. If that's the case, you might be able to make a configuration like this work:
 Powder Room Renewal - · More Info
This bathroom's size if 3' 2 1/2" x 4 4 1/2" so very close to what you have. Fingers crossed your bathroom is wider than 32" so that you don't have to move the right wall to get it up to code.
- 8 years ago
A couple of the dimensions don't add up correctly.
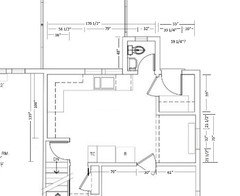
You gave the side to side measurement of the current mudroom as 55" but the individual measurements for the door and the wall between corner and door as 39 1/4" (rounded up slightly) and 20", respectively, which equals 59 1/4" not 55". Which is correct?
I also found a discrepancy for the alcove below the mudroom. You gave the dimensions for the walls above and below the window as 21 1/2" and the window as 32". That adds up to 75" but you gave the dimension as 74". I'm inclined to believe the individual measurements but I don't want to include an inch that isn't there. Inches matter in small spaces.
I plugged the dimensions in to the drawing:
M L
Original Author8 years agoYou’re right. I didn’t measure the inside of the bathroom. I misunderstood.
So it may be an inch or two off based on the molding and wall. The measurements wall to wall are accurate, so I’d go with that number, if that makes sense?M L
Original Author8 years agoSo H, R and I are accurate. Does that help? I can measure the inside of the bathroom tomorrow. I think it’s actually 4x4.M L
Original Author8 years agoIn which plan is the fridge closer? The Sunday plan with the walk in pantry? So many good ideas, just want to be sure I’m looking at the right one ;-)M L
Original Author8 years agoRe: the 39.5 and 20 measurement that included measurement across the door threshold (is that the proper term?) so that 39.5 is a little long.M L
Original Author8 years agoI was wishing I could text you today as I was measuring. I figured I got it wrong. And good point about the mudroom as a hallway thought!- 8 years agolast modified: 8 years ago
Yes, that helps, thanks! No worries about the small discrepancies. This is just the conception stage. You'll want to hire a kitchen designer to measure and make sure that there aren't any hidden issues that will impact the potential plans, things that I can not see or know because I'm not physically in the place, before you move forward with the remodel. You can expect surprises, given the age of your home, especially if its been years since it was remodeled. A knowledgeable KD and experienced contractor will be your best friends through it all. =)
Remodeling a kitchen is a process, from the design phase to finish selections; you don't want to rush this because mistakes can be costly. You want to have any many details nailed down as you possibly can before you start so that the remodel goes as smoothly as possible.
Did you check out the link to the "New to Kitchens, Read me First" thread that I posted above. Lots of good information to help you with kitchen design and to plan your remodel. The more homework you do in advance, the most cost efficient your time with a KD will be.
A 4 x 4 powder room, wow, that's small! Is the existing toilet compact? Code requires 21" in front of the toilet so if it's not, you'll likely need to replace it to meet code. You might need a 10" rough-in, not the standard 12". Or you do a configuration like the one shown in the above photo. Either way, you'll incur some plumbing costs but it will still be less expensive than moving the powder room.Sorry for not being clear. I was talking about the distance between sink and fridge in your latest plan and in my latest plan, posted yesterday at 12:08pm. I was off slightly on my estimate. It's 62" to the fridge's left side. It will be slightly more than that to the center of the fridge (I was calculating center of sink to center of fridge). Even so, it will only be a few inches more, so still less than the distance between fridge and sink in your latest plan. Not by much, but still less.
Haven't had a chance to tweak the latest plan yet. The day got away from me!
M L
Original Author8 years agoHi, I did start reading the blog. It made me wonder if I should put the fridge on the same side of the wall as the sink. So from right to left we’d have fridge, DW, sink and then range (range on the same wall as Living room where it is now). Might be awkward to have the fridge near the dishwasher, but it could free up the wall on the right for cabinets pantry and we can get rid of the cabinets on the opposite wall of the sink and perhaps fit in a 3 ft wide island.- 8 years ago
There you go, having great ideas again. =) I was playing with the same idea.
It will mean removing the wall between existing mudroom and alcove in order to have enough room in front of it at the kitchen entry but I suspect that wall isn't load bearing so that should be doable without too much cost. You'll need to do ceiling repair, which may mean floating the whole ceiling not just patching. But still, cheaper than adding a larger addition as you'd originally intended.
M L
Original Author8 years agoOh I can’t wait to see what you have in mind! The load bearing wall is the one that runs along the dining room and the one that runs along the living room....- 8 years agolast modified: 8 years ago
Okay, here's the update of the plan I posted most recently above, now labeled Plan A. I'll work on another idea later today.
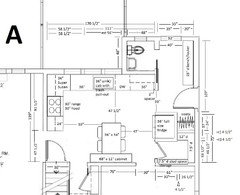
I was able to fit a coat closet into the mudroom so you might be able to eliminate the shallow closet in the hallway. I did not put a door on it since it's right next to the back door and a closet door could be a nuisance.The peninsula table is narrower since the kitchen is narrower than you originally stated but it's still a decent depth for seating.
Is your toddler your youngest or only child? I can understand your concern about table height versus counter height but durn kids have a way of growing up. What you can do in the meantime is purchase an inexpensive or used table about the same size and butt it up against the wall cabs. You can replace it with a counter height table in a few years. Just be sure to let you cab people know that you intend to attach a peninsula in a few years' time so that they build the cabinet accordingly. If you copy the peninsula I posted above (wood top), you should be able to do this at a later date without a problem.
Or you can build the peninsula now and abut a small kid table at the end of it for now.
The 7 1/2" stud space storage will be like this but without the door. It will be recessed about 3 1/2" into the wall and jut out into the pantry 4".
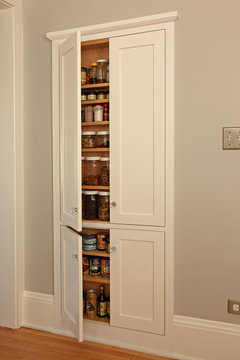 100 Square Foot Kitchen Remodel · More Info
Are you handy? If so, you can do the other shelving yourselves, using metal brackets and 2x8s and 2x12 boards. My DH and I built pantry shelves for a dear friend with this method in her narrow but deep pantry closet, using 2x8 boards and brackets from Lowe's. We sanded the boards and coated them with poly. It's small but mighty!
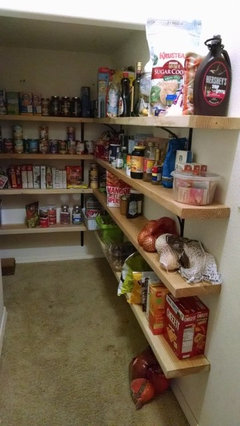
- 8 years ago
Plan B with fridge on sink wall and 4' cantilever addition to right of powder room and exterior door to back yard.
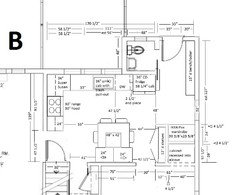
The powder room and mudroom area is essentially the same as in Plan A except that instead of a window, there's an exterior door to your backyard. You'll need to get a new door since this is hinged on the left, not the right as your current exterior door is. That said, you could re-use the existing door and have it swing open facing the powder room, not facing the bench (opposite of what I've drawn above).
I moved the window to the end of the mudroom benches. Don't think I posted pics to give you ideas about how to set up 15" deep mudroom bench/locker so here you go:
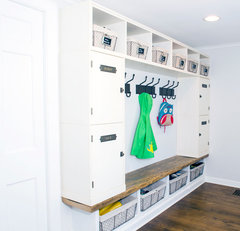 The Kent Road Kitchen, Upper Arlington · More Info
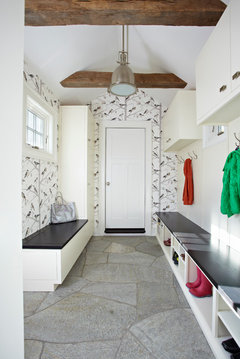 Mudrooms · More Info
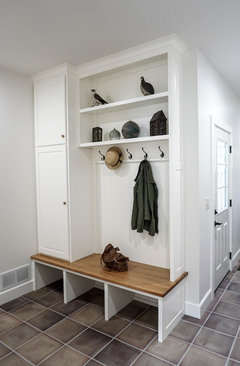 Potter's Kitchen & more · More Info
I placed a counter depth (CD) fridge on the sink run at the entry. I allowed 29" for fridge depth; actual depth is about 27" but it's pulled forward so that the adjacent counter dead-ends in to the side of the cab box.
There's a decently sized cabinet end piece to support the counter above the DW. That will give it a nice finished look and a little more counter above the DW to the right of the sink.
The drawer base to the left of the sink is sized down from a 36" cab in Plan A to a 33" cab to accommodate the fridge cabinet.
Range wall remains as it was in Plan A.
On to the bottom right corner.
The existing wall between mudroom and alcove has been removed for new configuration of this space.
I added an IKEA Pax wardrobe at the end of the mudroom for coat storage. Below it, accessible from the DR is a cabinet recessed into the alcove. You'll need to install a header to do this but unless there are pipes or other surprises in the walls, this should be doable. This gives you additional storage. It can be floor to ceiling closed storage (drawers below, 12" deep cabinet above) or you can do a mix of drawers and glass fronted cabinets above.
We did something very similar in our DR, recessing a deep cabinet (28" deep drawer guides) into the dead space below our stairs with stud space depth plate display cabinet above the drawers. Our cabinet is only 24" wide (the space to the right, behind the wall is our walk-in pantry) but it holds an amazing amount of items.
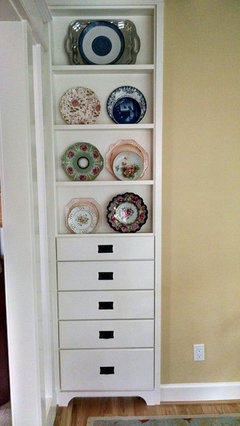
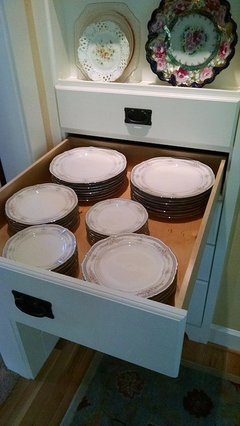
You'll be able to store even more since your cabinet will be more than half again as wide as mine.
The last part of this T shaped set-up holds a 12" deep pantry facing the kitchen. It will be similar to this but not as deep:
 New York Transformation · More Info
I changed the peninsula's shape a bit to give you an alternative to the one in Plan A and to give you a wider stretch of counter across from the sink to make up for the loss of counter to the right of the sink.
It will be similar to this one:
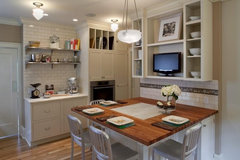 1920 Colonial Kitchen · More Info
Here's another view of it:
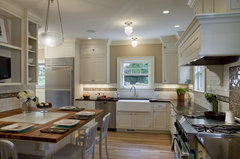 1920 Colonial Kitchen · More Info
There are 2 - 24" wide cabinet back to back against the wall for more storage. Oops, I might have forgotten to account for molding at the entries so the cabs may end up being 21" wide instead 24" but that's a minor change.
You'll likely want to do backless stools for the portion across from the sink so that you can use the counter without hindrance.
Here's one more option for peninsula shape and seating: Plan C
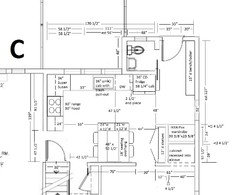
I added the storage to the top end of the island. The aisle between stairway wall and peninsula counter is just slightly less than the recommended minimum of 44" but on slightly and doable IMO.
I don't think I said above but all aisle measurements are counter to counter or counter to fridge door.
If another potential lay-out comes to me, I'll draw it up and post it.
Oops, I forgot to mention that I did not include a rad in any of the drawings. Depending on what you learn from an HVAC contractor, you'll need to make the necessary modifications to accommodate the replacement heat source on all plans. I did leave some blank wall space in the mudrooms on all plans but you may need to add additional heat source somewhere in the kitchen. Hopefully, a toe kick heater will do the job.
- 8 years agoHave you checked your local building codes be sure the cantilever will be compliant? If not, put on the brakes and verify before you go any farther. In our municipality, the building code only allows one 3 ft cantilever for a maximum span of 16 feet!
M L
Original Author8 years agoHi Lisa, I started to respond this morning and then had to run, so my response didn't go through. I think what you're suggesting above would actually be less expensive that what we are planning :-) I have a great space on the second floor - essentially an enclosed porch that the previous owners enclosed, but without heat, AC, or insulation. So the plan is to use that space to create an office and a closet. That said, I feel like you're reading my mind, I've been thinking that perhaps we open up the space into the DR. Lots of homes in our neighborhood have a similar footprint, our neighbors did open up the LV and sunroom area, but did away with their fireplace, which I'm not crazy about doing. One could certainly keep the fireplace and have it open on both sides.
To your point, I don't want to go crazy with the renovations, but we intend to be where we are for a very long time. We live in a pretty hot market in the Northeast, more people than there are homes, so I'm not terribly worried about the resale, especially as we plan to live here awhile. Although, you never know what live throws at you.
What I was going to say this morning is that I really like Plan B and C. My husband likes them as well. He's trying to get over the lack of prep space, right now in our current kitchen he has 70 inches of uninterrupted prep space. And if we don't bump out the kitchen it's hard to get that amount of space. So I'm even thinking about a long skinny island, so he can turn around from the sink and prep. I love the look of the peninsula (especially the wood table top, as I've been wanting to draw in wood), but my husband, I think would prefer an island. And since he's the cook...
Also love the do it yourself shelving, what you did for your friend looks great and super functional.
As always Lisa, thank you! I feel like I've received far more information from you in the last week than any "professional" I've talked to! :-)
RE: mle about the cantilever. I think I've been using the wrong term, we would use footings, but not a full foundation. There are certain requirements here especially with the heavy snow. But good point, and I called the town today to confirm.
- 8 years ago
I was just about to post what might be possible if you reconfigured the rooms that you have. Keep in mind that was operating on the assumption that your laundry is in your basement and that you didn't have room upstairs for an office, etc.
Anyhoo, here's what I came up with.
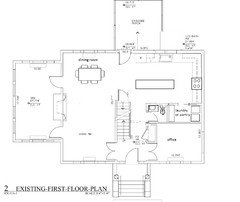
It gives your DH a long, skinny island. =) The downside is that I didn't come up with a way to add a mudroom, which it's always a nice thing to have when you live in snow country (I grew up in that kind of climate). But it does give you direct access to the screened in porch that may or may not end up as a deck.I did remove the half bath tacked on to the back of the house. It's location really screws with lay-outs unless you add a small addition. And as I wrote above, if it's touched at all in the remodel, you'll need to bring it up to current code if it isn't.
Ask in the decorating forum for advice in how to arrange living room furniture when the fireplace isn't centered on the space. I've seen photos with similar situations, I just can't find any to post for you.
Is your laundry in the basement? If so, you could consider moving it to the unheated space on your second floor instead of putting an office in that space. Most laundry is generated in the bedrooms so it would mean less lugging around with laundry baskets.
Given your DH's wishes, let me see if I can figure another alternative that would give him an island for prepping. That said, there is a good stretch of counter - 45" in Plans B and C, 48" in Plan A - between sink and range, which is the prime spot for prepping.
You're welcome!
 PRO8 years ago
A very quick scan of this thread appears that everyone is in the weeds on kitchen design, and not addressing the issue of the foundation type and particularly a cantilever. If I've missed something, forgive me.
Have you talked with a structural engineer about your options and the consequences?
The old rule of thumb for cantilevers is that they not exceed 1/3 of the total framing length. That means for a 4' cantilever you need a continuous backspan of a minimum of 12'. This is a simple rule of thumb and shouldn't be taken to be a specific solution to your situation. And it doesn't address the issues of insulation and energy efficiency.
If you haven't resolved the foundation issue, it may be premature to get into the details of kitchen design.
Good luck!
M L
Original Author8 years agoThanks Virgil. We have had an engineer out so all is good on that front. Fundamentally we have not landed on the bump out or no bump out decision. My husband and I are of two different minds, surprise, surprise. I’m trying to get the no bump out option good enough for him to agree ;-) appreciate your perspective!- 8 years ago
"...(it) appears that everyone is in the weeds on kitchen design..."
While I do have a few extra pounds I'd like to shed, I'd like to think that I'm not so large as to be considered "everyone" =) but I am the only one working on lay-out ideas.
M Lowe (now M L) did state in her OP that a cantilever addition was one of 2 options, the other being a full foundation. Does that address your concern? It sounds like M Lowe is doing her due diligence.
M L
Original Author8 years agolast modified: 8 years agoLisa, I hadn’t seen your post from 6:47pm earlier when I was on. I just replied via my app and the screen froze. So it didn’t take. In summary, love the thinking behind the repurposed plan for lots of reasons. My husband really really likes it. He mentioned that I should bake you a pie :-) That said, he’s still asking for the 4 foot bump out! Ugh! More tomorrow!
- 8 years ago
A pie? Cool! I love apple. =)
When we were planning our kitchen remodel, I really thought we needed to add 2' on to the back of the house. I thought the only way to get a great kitchen was to have more space. Turns out that all I really needed was a better lay-out and well planned storage. I love my kitchen! I'm so glad we didn't go to the expense of an addition.
IMO, an addition only makes sense if it improves function and, honestly, the plan you initially posted was not great. It might be possible to improve upon it but I also think that you can get a great kitchen without going to that expense. Tell him that he can spend that money on really great appliances instead. And a vacation to recover from remodeling stress. =)
Since my latest idea is a hit, I'll work on the details and post a plan once I've plugged all the numbers in. They're forecasting fabulous weather for the next week and my garden is calling me so it might be a couple days before I do.
- 8 years ago
ML, I've been doing layouts on this thread for a few years now. There's a consistent handful of people who frequent this forum and do terrific layouts and suggestions, and there's always a lot of creativity/experience/wisdom to be gleaned from the general crowd. But if I could have only one person help me with a future kitchen remodel, lisa_a is THE one. She is superb.
I am not surprised you are finding her more helpful than all the professionals. I'd be astonished if you could find a professional who was better or, really, a single person of any sort who puts more or better thought into these things. - 8 years ago
Wow, Jillius, I'm speechless (so it's a good thing my fingers work, lol). Thank you for your kind words, especially since you've got some pretty mean lay-out chops, too.
M L
Original Author8 years agoJillius, you are right! Lisa is so thoughtful. She’s not only coming up with terrific layouts, she’s also really positive and energetic. And she has sparked some new ways of thinking in me which I really appreciate. And this has all be a wonderful gift for which I am thankful!M L
Original Author8 years agoLisa, I forgot to ask, what are the dimensions of the bathroom in your open floor plan layout?- 8 years ago
Quick answer and a couple thoughts for now.
The powder room is 5 x 5.
I understand why the master bath is placed where it is - cheaper to tie in to existing plumbing - but I'm toying with the idea of swapping bathroom and office so that the bathroom and closet are connected. If you install double French doors, either pocket or swing to the den, you would get to enjoy the view from your bedroom as well as the office. But it would cost more to move the plumbing.
I'll play with that later and see how it shakes out.
It's a good thing that you're willing to wait until you've settled on a plan. It will also give you a chance to live in the home and figure out what works and what doesn't. You don't have to move forward on all the remodeling at once (incredibly stressful, we did our whole house in 3 phases) but having a big picture plan makes the whole process go more smoothly.
A 3rd floor guest bedroom is great for your parents for now but as they age, walking up 2 flights of stairs will be less desirable; it's a safety issue. So maybe the first floor office should double as a guest bedroom. I'd want to figure out how to add a shower, though, so that they don't have to go up any stairs. That may or may not be possible. Let me noodle on this for a bit.
btw, I love your positive outlook. IMO, that's half the battle to dealing with whatever challenges, good and bad, come our way. Even during dark times, if I could still find something to laugh about, I knew I'd be okay.
- 8 years ago
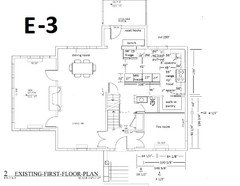
Plan E - reconfiguration of existing footprint.
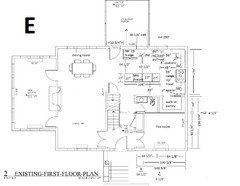
As I proposed above, I moved the DR to the back of the house, splitting the large LR into a shared DR/LR. I removed the wall between kitchen and new DR and placed the exterior door between them. This will allow you and your family to access the backyard without walking through the kitchen.
As placed, the door can swing all the way open against the rear wall but you can also flip it so that the door opens against the side of the fridge. I allowed ample room around it so that it will open more than 90 degrees.
The old coat closet is removed, the old DR becomes a flex room and a new coat closet recessed into it. I added a powder room and a walk-in pantry to the top end. All of this fits inside the existing DR walls. You'll need to add headers but the wall isn't moving or being removed so that helps keep costs down.
Now you can use the entire upper right corner for a kitchen and it's a generous size with lots of storage, lots of counter space, a long island, multiple places to prep for multiple cooks/bakers and a 36" professional style range for your DH. =)
Here's approximately what your island will be like, but without the stool. The aisle isn't wide enough to accommodate seating.
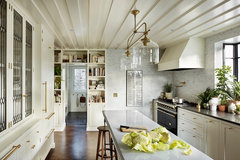 Portland Heights Neely House · More Info
Oh, wait, you could add one stool to the end of the island (back to DR).
Depending on your storage needs, you may be able to add more windows and eliminate some of the upper cabinets. The rest of your home has lots of natural light so it would be nice if you were able to add more windows to the kitchen.
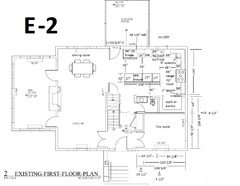
I drew 2 variations of the above.
Plan E-2 has a slightly deeper island and slightly reduced aisles.
You can either add a false back to the island or you can add shallow storage (5" deep) to the backside, similar to this:
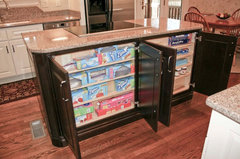 Clean & Classic Kitchen · More Info
The last variation is really Phase 2 (or 3, depending on how you break the remodel down), which adds a mudroom to the back of the house. Depending on how large you make it, you could also make it a combo mudroom/laundry room.
As I stated above (or think/hope I did), you'll need to consult a HVAC contractor to find the best way to heat the kitchen and bathroom. You could take some of the money you were considering spending on an addition and update the first floor's HVAC so that you can add A/C.
I'll work up a lay-out for a 4' addition for your DH and see how it shakes out. I'm off to play in my garden for now, yay! (my DH thinks I'm crazy that I consider spreading mulch "playing." lol)
Oh, one last thing. In a pinch, I think you can fit a queen bed in the flex room. I encourage you to go with a Murphy bed for flexibility. It will be tight at the foot of the bed, especially if you keep the existing rad but at least that way your parents only have to go up one flight of stairs to use a shower or tub. I'm sure this isn't a concern now (I'm betting they are in their late 50s or in their 60s) but it will be at some point.
My DH and I remodeled with the plan to stay in our home for as long as we can still manage the stairs safely. We hope that's at least 15 years, preferably 20 (that might be pushing it) from now because we love our home and our neighborhood (we have the best neighbors, we're very fortunate).
M L thanked lisa_a - 8 years ago
Economic feasibility of a 100K+ remodel will rear its head here sooner or later. It really should do it sooner or you are spinning your wheels in details that will never happen.
M L
Original Author8 years ago@Sophie, I am well aware of the cost implications depending on which route we take for our project. Details matter when I’m sorting out plans, decisions and cost.
M L
Original Author8 years agoLisa, thank you. I hope you’ve had a nice weekend in your garden! The E plans look terrific. And the E3 plan with the mudroom, would work really well. We’ve been over to the house to try and envision the combo living room and dining room. We have a rectangular table and chairs over there now and placed it where the dining room would be. That looked fine, but to your point earlier the placement of the living room furniture would be strange, especially because of the 2 doors to the den/sunroom. Thr flow is potentially awkward if one is coming from the front of the house thru the living room to the den. Although I suppose we could close up one of the sunroom entrances.
- 8 years ago
I did! I also had a blast shopping at a huge, annual plant sale (100+ vendors) with one of my best friends. I've got lots of planting to do!
I think closing off one of the doors to the den is a good idea. Here's an option.
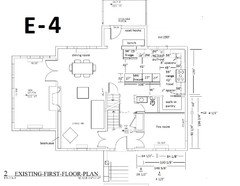
I eliminated the den door at the front of the house and enlarged the rear entry to a double door, mimicking the entires into the LR and flex room.
I added a bookcase from the fireplace to the front wall. You can treat the fireplace and bookcase as one unit and center furniture on the middle of it. I added furniture to show you what I mean.
I offer the above with a caveat. Furniture arrangement is not my forte so it would be a good idea to post in the [Home Decorating [(https://www.houzz.com/discussions/home-decorating-and-design-discussions-dsbr0-bd~t_28578)forum to ask for help.
Do you have a design savvy friend who could come help you? I have a neighbor with a great eye who helped me arrange items on my bookcases on either side of my family room fireplace and the furniture in my living room (it's a rectangular room with a corner chopped off so I had a hard time figuring out how to place the furniture).
If not, consider hiring an interior designer or home redesigner (they work with what you own) for assistance.
In the meantime, I found a few living room photos with off-center fireplaces and bookcases.
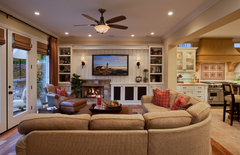
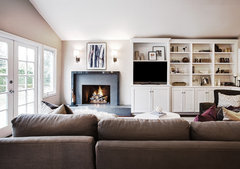 Contemporary Family Room · More InfoThe above has a very similar set-up to what I drew: double doors to den, off center fireplace and book case in living room.
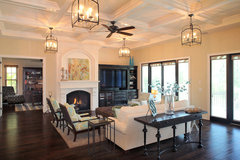 Bayshore Estates Custom Home · More Info
 Mediterranean Haven · More Info
In the room above, I would have spec'd that the top of the base cabinets
lined up with the top of the mantle for a continuous line across the
room. I think that would be a better visual, IMHO. In fact, I'd choose finishes and details in the above rooms to tie the fireplace in to the
bookcase more and vice versa for design cohesiveness, like this: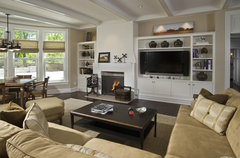 Cottage in the Woods family room · More Info
Here's an arrangement not centered on the fireplace and without a bookcase next to it.
Another view of the room: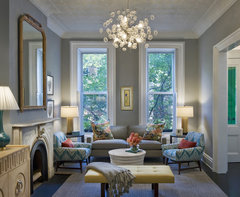 Bergen Street Residence · More Info
 Bergen Street Residence · More Info
Another option is to reface the fireplace, making it wider on one side, shifting the visual center of the fireplace over. Here's one way that would work:
 Contemporary Living Room · More Info
The above has a contemporary flair but I'll bet a good designer can suggest a more traditional or transitional treatment if that's your style preference (also likely would tie in better with your home's architecture).You may still end up deciding against Plan E but I hope the above photos show you that there are ways to make the living room arrangement not just work but work well.
M L
Original Author8 years agoLisa! I’ve tried to respond this week, like 4 times but my app didn’t take the comments. And I haven’t been at my PC. On a business trip all week. I’ll respond tomorrow or Monday. Hope all is well.
M L
Original Author8 years agoHi Lisa! So I've been thinking quite a bit about your options E. You've given me and my DH so much to think about this past few weeks, and I can't thank you enough. Your vision is incredible.
I've been having such a hard time envisioning the space, I've even tried to find someone to draw up some 3D renderings. I've been back and forth with the decision and direction. If you would have talked to me last week I would have had a different answer each day of the week of what we planned to do with the space. I've been so uneasy and I've realized it's because I can't "see it" and I don't know how we will live in the space. My husband has the spatial awareness to see all of this, but has finally agreed that we can move in without doing the kitchen reno first.
We'll get everything else done that we need to do, to move in (second floor bath gut, paint, floors, etc.) and then hold off on the kitchen and first floor until we've lived in the space and can better understand how it feels. This decision has just massively reduced my stress! I hope to move in by July 1. I may regret living thru a reno down the line, but I think I'll be happier feeling good about the design decision, and perhaps we'll move out for the worst of the demo, so my toddler isn't inhaling all the particles.
So that's the update for now... :-)
- 8 years ago
"...hold off on the kitchen and first floor until we've lived in the space and can better understand how it feels."
Very smart decision! And obviously the right one since you feel less stressed now.
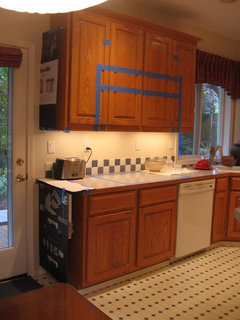
Cardboard and blue tape are great tools for helping you get a sense of how things might look and feel. I crafted a counter extension and an island hood using cardboard.
The former helped me see that I could extend the counter 5" towards the back door without a problem. I was worried I'd bang my hip on the new counter so I mocked it up with cardboard; 2 weeks later, not a single bump.
The latter told me that moving the cook top off the island was the right decision. An island hood felt oppressive and out of scale with our small-sized island and I refused to live with inadequate venting any longer.
For grins and giggles, here are my craft projects. =)
One of DS1's friends tried to talk me into covering the hood with foil and making it a permanent art installation, lol.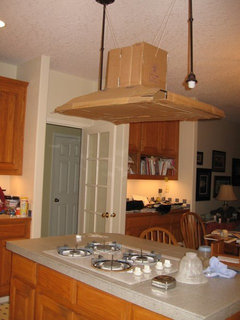 The blue tape marks out the new location of the hood and cook top (DW moved to other side of sink).
Good luck with your move!
M L
Original Author8 years agoYour vent was awesomely constructed! And I fully understand proper venting. That’s one of my must-haves.
My DH isn’t as supportive of the moving in idea with the kitchen as-is. The kitchen is about 30+ years old and the cabinets are in horrible condition. In fact, I think there may be mold under the kitchen sink :/ we will have to see about the mold and how we can remediate it. Other than that I think a fresh coat of paint and then living with it should be manageable for several months.
Thanks again and I’ll be in touch!- 8 years ago
Thanks! I was ridiculously proud of my cardboard hood. I put up with a great deal of ribbing from my family and friends about it, too, lol.
Living through a kitchen reno isn't fun but the end result, especially when you've given yourself time to properly plan it so that there are no regrets, is well worth it!
You're welcome!




lisa_a