

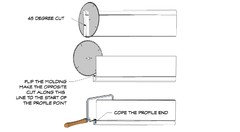
Coping baseboard molding
7 years ago
Featured Answer
Sort by:Oldest
Comments (11)
Related Professionals
New Orleans General Contractors · Gaithersburg General Contractors · Norfolk Bathroom Remodelers · Ogden Bathroom Remodelers · Aberdeen Interior Designers & Decorators · Casper Interior Designers & Decorators · Seattle Architects & Building Designers · Vincennes Kitchen & Bathroom Designers · Lawton Kitchen & Bathroom Designers · Lawrenceburg Interior Designers & Decorators · Vidalia Furniture & Accessories · Trenton Furniture & Accessories · Sioux Falls Furniture & Accessories · Middlesboro Custom Closet Designers · Kearney Custom Closet Designers 7 years ago
- 7 years ago
- PRO7 years ago
- 7 years ago
- PRO7 years ago

Related Stories
REMODELING GUIDESCrown Molding: Is It Right for Your Home?
See how to find the right trim for the height of your ceilings and style of your room
Full Story
MOST POPULARHow to Get Rid of Household Mold
Find out how to work with a pro to stop mold from damaging your house and health — and how to prevent it from forming
Full Story
KITCHEN DESIGN9 Molding Types to Raise the Bar on Your Kitchen Cabinetry
Customize your kitchen cabinets the affordable way with crown, edge or other kinds of molding
Full Story
REMODELING GUIDESDesign Details: Moldings — or Not?
16 new and unusual ways to trim your doors, floors and ceilings
Full Story
REMODELING GUIDESFrame Your Views With Great Moldings and Casings
How to Work With Trim to Give Your Space Depth and Interest
Full Story
DESIGN DICTIONARYBaseboard
This simple wood adornment serves as a protector where walls meet floors
Full Story
DESIGN DETAILS9 Eye-Catching Baseboard Designs
Baseboards can be modern and minimal or tall and dramatic. Here's how to find one that completes the style of your home
Full Story
GREAT HOME PROJECTSHow to Bring Out Your Home’s Character With Trim
New project for a new year: Add moldings and baseboards to enhance architectural style and create visual interest
Full Story
WALL TREATMENTSPack a Punch by Pairing Your Wallpaper and Trim
Get the most out of your wallcovering by choosing the right color for your baseboards, crown moldings and window trim
Full Story
COLONIAL DESIGNRoots of Style: The Origins and Meaning of Colonial Revival Trim
See how today’s traditional crown molding, window trim and baseboard relate to features of ancient architecture
Full Story


tatts