

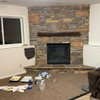
How to fix baseboards myself?
7 years ago
last modified: 7 years ago
Featured Answer
Sort by:Oldest
Comments (6)
- 7 years ago
Related Professionals
Clarksdale Interior Designers & Decorators · Spring Interior Designers & Decorators · Saint Cloud Interior Designers & Decorators · Monroe Interior Designers & Decorators · Terre Haute Bathroom Remodelers · Winston-Salem Bathroom Remodelers · Jackson Bathroom Remodelers · Rutland Bathroom Remodelers · Manhattan Kitchen & Bathroom Designers · Cleveland Kitchen & Bathroom Designers · McAlester Home Remodeling · Brooklyn General Contractors · Washington Bathroom Remodelers · Greensboro Bathroom Remodelers · Vineland Bathroom Remodelers 7 years ago
- 7 years ago
- 7 years ago
- 7 years ago

Related Stories
LIFEHouzz Call: Show Us Your Nutty Home Fixes
If you've masterminded a solution — silly or ingenious — to a home issue, we want to know
Full Story
SELLING YOUR HOUSEFix It or Not? What to Know When Prepping Your Home for Sale
Find out whether a repair is worth making before you put your house on the market
Full Story
DECORATING GUIDES10 Easy Fixes for That Nearly Perfect House You Want to Buy
Find out the common flaws that shouldn’t be deal-breakers — and a few that should give you pause
Full Story
DECORATING GUIDES10 Common Decorating Mistakes and How to Fix Them
Turn your styling errors into successes with these solutions — and the help of a good designer
Full Story
BEFORE AND AFTERSKitchen Rehab: Don’t Nix It, Fix It
A small makeover makes a big impact in a traditional kitchen in Atlanta with great bones
Full Story
SELLING YOUR HOUSE5 Savvy Fixes to Help Your Home Sell
Get the maximum return on your spruce-up dollars by putting your money in the areas buyers care most about
Full Story
DECORATING PROJECTSQuick Fix: Reupholster a Chair Seat
Take a chair from drab to fab, no sewing or special skills required, in just a few simple steps
Full Story
KITCHEN DESIGN15 Quick Kitchen Fixes
Little Changes Will Help You Love Your Kitchen All Over Again
Full Story
LIFEYou Showed Us: 20 Nutty Home Fixes
We made the call for your Band-Aid solutions around the house, and you delivered. Here's how you are making what's broken work again
Full Story
BATHROOM TILEQuick Fix: Repair Cracked Bathroom Grout
Banish an eyesore and safeguard your bathroom from water damage in 30 minutes or less with this DIY repair
Full Story
cat_ky