Software
Houzz Logo Print
haneefa_imtiaz

Installing Kitchen Backsplash. Gap between counter and Dry wall.

6 years ago
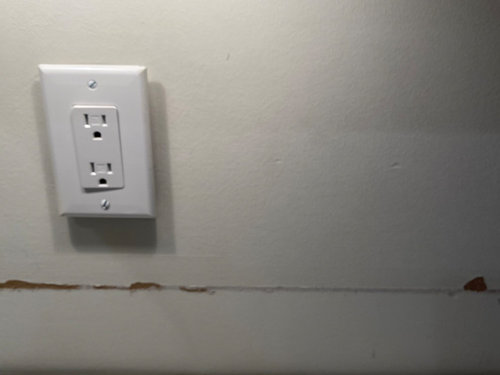
  • Need Suggestions, I am planning on installing my Kitchen Backsplash all by myself.
  • My new backsplash is a large tile, 18X47 in size.
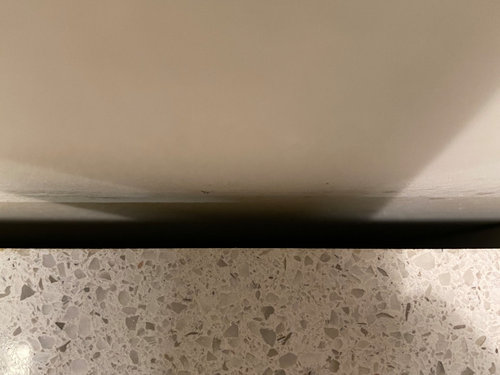
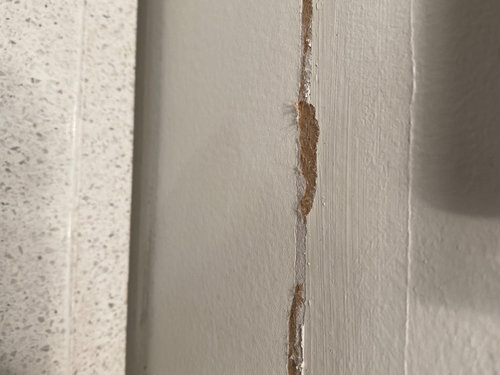
  • I did remove the existing shoulder and found a large gap between the quartz countertop and the drywall.
  • The new backsplash is not as thick as the gap, I am worried how to fill in the gap.
  • Planning on using thin set mortar as the tile is big.


Comments (19)

  • PRO
    6 years ago

    Yikes! Whoever installed the counter should be called back to fix the issue. They would need to replace them.

  • PRO
    6 years ago

    So if I understand your situation this is an existing counter top, when you removed the 4" backsplash you discovered this large gap between the deck and wall - if that is the case you're screwed. If this is a new counter top it needs to be replaced as it should have gone all the way back to the wall. If the first scenario is correct then I'd suggest you put back the 4" backsplash and tile above it. There is no other way to fill in such a large gap....

  • 6 years ago

    "If this is a new counter top it needs to be replaced as it should have gone all the way back to the wall."


    Unless the wall is extremely out of square. We only have a very short stretch to look at.

  • 6 years ago

    A different tile choice is needed. A thicker handmade one. Large format tiles like that are challenging even to experienced pros. Doing a plunge cut in the middle for an outlet will result in a cracked tile 9/10 for an experienced tile pro who hasn’t dealt with very large format tile. The wall also requires extensive flattening. Thats going to be a big enough challenge when using smaller tile.

  • 6 years ago
    last modified: 6 years ago

    ^^this is what I was thinking too. A No on the large format (18x47) tile. At that 47” length, there’d be pros who might hesitate to install it. And, how big is your backsplash area? Can it support that size aesthetically?

  • PRO
    6 years ago

    Bring the wall to the top and return any exposed end.

  • PRO
    6 years ago

    There is no way a DIYer will be installing those tiles this takes a very experienced tile setter to do so . Take a picture from further back so we can see the issue my guess is not matter what tile you use you will have to build out the wall to cover the gap and that will open up a whole can of worms since all the electrical will need to move forward or you replace the piece that was there and just use that as your backsplash since the new tile will not cover the space left without ruining the whole proprtion of the tile Nitty gritty a poor choice for tiling a backsplash IMO

  • 6 years ago

    I’ve done similar backsplashes using a quarter round or similar trim to cover gaps is common. If the gap is too larger you could also float the tile more with a larger tooth notch on your trowel and a good mastic or thinset. Would not go larger than half inch v or square notch. The combination of thicker tile, more mastic and a quarterback round might work out for you.

  • PRO
    6 years ago

    Really if you used quarter round on any of my backsplasges you would not be paid .

  • 6 years ago

    It all boils down to cost vs need, not everyone has the budget to redo the counters... probably why you miss a lot of contracts

  • PRO
    6 years ago

    Don’t do it by yourself
    You will not be pleased with results
    Better leave the old backsplash

  • 6 years ago

    1/4 round is cheesy hack work. Who can’t float a wall?

  • 6 years ago

    Wow, tile 18" x 47": 18" is bad enough; 47" is crazy. As others noted, most certainly, do not try installing by yourself. Best to choose a smaller tile.


    As far as closing the gap, sure, quarter-round [or some other moulding] may be cheesy [unacceptable] for a professional on the job trying to cover a mistake, but as a fix, short of replacing the countertop, it is an acceptable solution. No reason it couldn't look attractive and do the job of covering the gap.


    Get new countertops or use a nice piece of trim...and choose a smaller tile.

  • PRO
    6 years ago

    My husband is a tile pro. Depending on the thickness of your tile, you should be able to add a layer of Hardiebacker (probably 1/2 inch). It’s hard to tell from the pics. By the time you add your thinset and tile, you should makeup the gap. It’s hard to say what thickness of Hardiebacker you should use without knowing the size of the gap and the thickness of the tile. You will have to use a Slueter strip or pencil trim on the end of your tile on either side to cover the thickness. Most likely a pencil trim will work best. You will have to offset your electrical boxes. I am a designer and would strongly recommend you using a smaller tile for the backsplash. Large format tiles are heavy and hard to work with. They are better suited for larger areas.

  • 6 years ago

    Excellent idea by SimplySouthern to layer Hardiebacker on the wall for thickness.

    If there's still a gap after Hardie, then the same tile pencil trim to edge the Hardie, might be used to cover the remaining gap.

  • PRO
    6 years ago
    last modified: 6 years ago
  • 6 years ago

    We had a similar problem as our walls slope back away from the floor to ceiling (old french house built of stone). My husband put in a framed long 'box' structure along the whole space, using wood and thin plywood, giving you something to tile over. it goes up from bench level about 4 inches. Once it was tiled it became the place we put our salt and pepper shakers/ thin vase for a single or couple of flowers, teaspoon holder and a few knick knacks. It frees the bench space a little and makes it easier to keep it clean.


  • 4 years ago

    I had a similar problem, but on a much smaller scale. Not sure if this would help for you, but here is how I solved it in my bathroom.


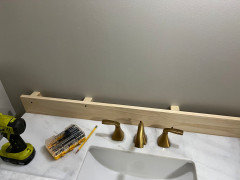
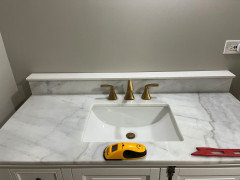
    I had about a 2" deep gap to fill because the vanity top I bought was not as deep as the freestanding, furniture style vanity. In my case, the vanity went to the wall, but the vanity top did not, so I could "rest" wood for my solution on the vanity. However, I did also screw it into the wall.


    I measured from the top of the vanity to the top of the backsplash when it was sitting on top of the vanity top (hope that makes sense). It was 5 1/8" tall. So, I bought a 1x6 and ripped it down length-wise to to 5 1/8" wide and set it on the vanity behind the backsplash and lined them up. Then I used a stud-finder and found studs behind the wall and screwed wood "spacers" I cut to fill the rest. I did each one individually since the wall was not perfect. Then, I glued the spacers to the wall and screwed them to the studs using construction adhesive, being very careful not to split the wood. Then, I used more construction adhesive and shorter scews to screw the long board to those spacers. Then, I glued the backsplash to the wood and added a small "shelf" on top using a piece of pine casing cut to size. My wife is thrilled because now she can put little plants on the shelf. A happy accident. Not sure if this will work in the kitchen with the wood trim, maybe longer pieces of backsplash cut to be the "shelf" over the wood fill so it is more resistant. Not sure of your kitchen design, but it could be used for spices, little plants, etc.


Sponsored
SK Interiors
Average rating: 5 out of 5 stars55 Reviews
Loudoun County's Top Kitchen & Bath Designer I Best of Houzz 2014-2026