Software
Houzz Logo Print
sweeny121

Roller marks after painting

6 years ago
Hi folks!

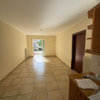
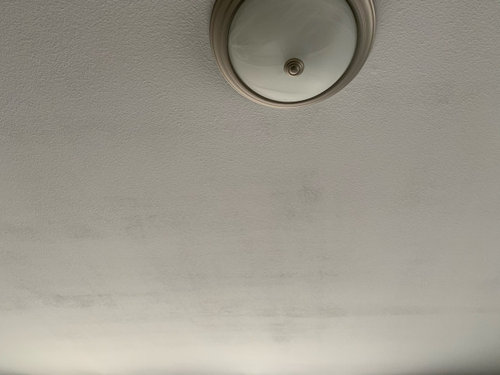
I started painting some rooms in my house (first time painting). I did 2 small rooms, which went fine. once I did the ceiling of the master bedroom, I noticed roller marks on the ceiling.

To solve this issue, I repainted again and again, so in the end I’ve done 3 coats of paint now and this is what it looks like.

I am using pure white sherwin williams super paint in flat finish.

Does anyone know what I could be doing wrong and how I can fix it?

Thanks!

Comments (9)

  • 6 years ago

    It is fine. Nobody will notice the ceiling. But in the future, paint fast. It always looks like it needs another pass; don’t submit to temptation! It’s just the paint drying. When you go over with the roller too many times, it creates a stippling effect.

  • 6 years ago
    last modified: 6 years ago

    Also make sure you are not pressing too hard on the roller. Its tempting to press hard to squeeze the paint out and transfer more to the wall, but it creates more definite lines at the end of the roller. You want to use a light touch and enough paint on the roller so that paint transfers easily.

    Bruce

  • 6 years ago
    last modified: 6 years ago

    Since you are a first time painter, you are probably painting slower than an experienced painter would. The newer paints that we buy now, dry much faster than the paints did a few years ago. There is a product you can add to your paint, that will give it a longer drying time, and that gives the paint more time to flow out, so you dont see all those roller marks and streaks. The product is floetrol. Buy some and do one more coat, and you should be a lot happier, and remember the floetrol for the rest of your painting, it should help so you dont have to keep applying additional coats. Remember you do need two coats of paint though, to get the best look.

  • 6 years ago

    I also like the ceiling paint that changes color when it dries, so you can see what was painted easier.

  • 6 years ago
    last modified: 6 years ago

    One other thing that I learned when I was painting some Shaker style doors with Breakthrough paint and some others with Cabinet Coat paint. Was brushing & rolling...both of those paints dry insanely fast (even with added extender). No way am I competent enough/ fast enough to brush the detail of large doors & drawer fronts before the paint was tacking up. Those paints almost have to be sprayed but I didn't have a sprayer.

    What I ended up doing is misting the paint with a very, very fine mist of water to keep a wet edge. Probably isn't kosher; a real painter would probably cringe at the idea. But it worked and, so far as I can tell, a year later, the finish wasn't compromised. The project was for bedroom built-ins & a door for a cabinet in the laundry, i.e, don't see heavy usage like a kitchen. For a ceiling, you should be totally OK using a mist.....a very, very fine mist, mind you.

    Second other thing--I find it helpful when I'm painting to think of it as 'laying' the paint on. With this mindset, it will help to keep you from over-working the application. Lay the paint on lightly and then lightly roll it to cover X amount of area and level the roller edge gobs.

    Speaking of rollers, or roller covers...some covers are just junk & that could be part of the problem. Pays to invest in quality covers.

  • 6 years ago

    Most DIY painters just don't put enough paint on. You should be using at least a 1/2" nap roller cover.

  • PRO
    6 years ago

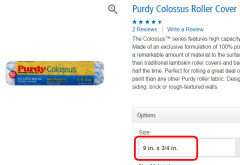
    This is my go to cover for many tasks and available at Sherwin-Williams. I agree with paintguy22, looks like you are not applying enough paint.


    Also a good idea to apply each coat 90 degrees to the previous one on ceilings.


  • 6 years ago

    Yeah.....there ISN'T NEAR ENOUGH Paint on that ceiling!

    * First- Get a top-notch roller-cover. The above is fine. My fave is the 1/2" nap Wooster Jumbo-Koter Super-Fab.

    * Think of a rectangle up their, about 5-6' x 2-3'.

    * From far corner with a fully-loaded roller, roll AT AN ANGLE towards you, to the opposite corner. Don't press hard...let THE ROLLER apply the paint, not your pressure! Now push away from you, against long side of rect. Come back, at an angle, to the untouched corner.

    *On this 3rd angled stroke/roll, you'll be crossing your "Original" unloading path. There will be a slight "reload" effect here, as you cross this, because there'll naturally be a little more paint in that first line.

    * Lastly, push away from you, along the other uncoated "long side" of this rectangle.

    * You'll now have an "X", with the 2 long sides painted as well.

    * Now just fill in the X, rolling at slight angles, from one short side to the other.

    * As mentioned, you'll always be rolling across that initial angled roll. Again....you'll gain a SLIGHT REFILL when crossing this. This subtle action helps assure an even application in the rectangle.

    * Reload, & repeat these angled-rolling patterns!

    * You can obviously adjust the size of your application area. A 6' "side" may be too long for some. If you adjust too small, you'll be doing many more "reversals"...potentially making your neck/shoulders more sore.

    >>>> I'm serious here....take a couple of your fave NSAID's a 1/2-hr before you start! ;-)

    Faron