Software
Houzz Logo Print
ljsalkin

Poor Craftsmanship on Floating Staircase?

6 years ago

Hello,


The central floating staircase was recently installed in our new house and it seems the contractor botched the installation. The holes are large and not smooth, there are dents from the tool used, and there is significant splintering of the wood around the holes. The stair treads are made out of white oak and the stringers are a standard (not architectural grade) glulam.


Does anyone have photos of what an installation of a similar staircase SHOULD look like (e.g., in terms of visible screw holes in the stringers)? Is there any hope of repairing the damage? Our contractor insists that the painters can fix the appearance with stainable putty...we are dubious and want to ensure that it's not a "fix" that will look ok now, but will fail years down the road. Photos and additional commentary follow.


This is a what the staircase looks like.


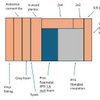
These are the instructions provided by the engineering noting that the screws should go in a pre-bored hole.


Some of the visible damage to the glulam is shown in the photos below.


Our understanding is that if a proper technique had been used that the holes shouldn't have been any larger than the diameter of the screw. There are also dents below each screw hole.


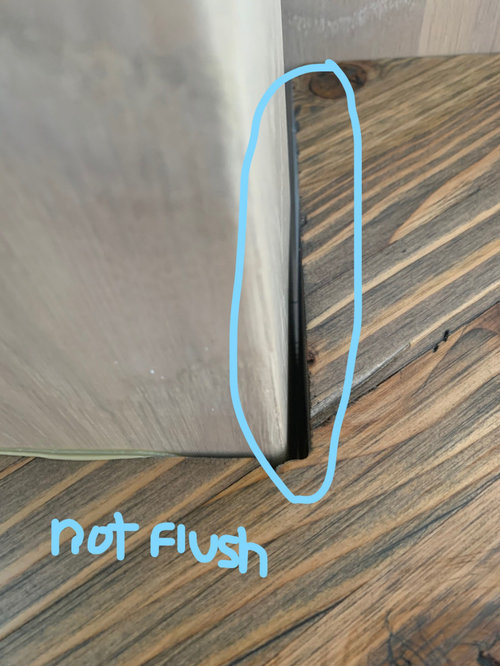
In addition to the issue with the holes, one of the stair treads does not sit flush with the stringer. And in another case, a saw made a cut too long.


Thank you in advance for your comments. As noted, photos of a proper installation would be especially helpful!


Lynne

Comments (41)

  • PRO
    6 years ago

    If, they used a Kreg jig. Their drill bill is dull. And the holes should have been bored deeper to accept a plug.


    The gap in the second photo, can easily be fixed with a re-cut or a little sanding. The issue is that the mounting holes will not line up afterwards.


    To prevent over-cuts, They need to stop short and finish with a hand tool, like a Japanese cut off saw. The over-cut in the third photo doesn't look too bad. It be can filled with a little putty and finish to match.


    These flaws are all on the inside of the stringers. It will be tough to notice by a passerby.


  • 6 years ago
    last modified: 6 years ago

    Putty is going to camouflage the flaws well, if done right but not make them disappear completely. The grain pattern of your stringer isn’t particularly regular so I personally would be ok with putty.

    Are the holes part of the design (did you want three visible dots)? If so, then again, putty (or rework this with a plug) would be ok to me. I personally would have asked the engineer to come up with an invisible attachment system.

    About the quality: It doesn’t strike me as awful but also not as very good. It looks ok-ish to me based on the pictures. Something massive like these stairs, custom hand made out of wood is going to have flaws. If I expected great quality for a HUGE piece of carpentry, I’d have looked for something factory made (with computer controlled machinery) and discussed this with the GC beforehand.

  • 6 years ago

    the holes shouldn't have been any larger than the diameter of the screw.


    The specified screws are 1/4" diameter with "3/8" hex head with 0.48" integrated washer". So the drilled hole has to be at least 1/2" diameter.


    As mentioned, the holes could have been drilled deeper & plugs used. As is, the screws are installed exactly as specified by the drawing.


    The installer probably started the project with a brand new sharp drill bit and it dulled as the day wore on. Oak is hard stuff and there are a lot of wide & deep holes (5" screws) in that project. And, the material is solid rustic timber where it would be unrealistic to expect furniture quality fit.


    These are all cosmetic issues on the underside of the staircase. Precisely where you want them to be. And I can't imagine anyone wanting to hang out underneath an open staircase long enough to even notice them.

  • PRO
    6 years ago

    Where are you located? Does your building code require handrail(s)?

  • 6 years ago
    last modified: 6 years ago

    @Virgil Carter Fine Art...there will be a cable railing.

  • PRO
    6 years ago

    Virgil Carter Fine Art , I was thinking the same thing! :-)

  • 6 years ago

    Who even uses a Kreg on a project like this? An amateur, that’s who. Wood moves. You have to have some expansion gaps, or it cracks.

  • 6 years ago

    @live_wire_oak they didn't use any kind of jig. They were using hand tools.

  • 6 years ago

    The angled holes are a hallmark of a Kreg.

  • PRO
    6 years ago

    they should have used metal plates, recessed into the underside of the treads.

  • 6 years ago
    last modified: 6 years ago

    For the prices I'm looking at for open modern stairs, it would be unacceptable. A "finger full of putty and no one will notice" doesn't work for me or my buyers in the multi-milion dollar range.


  • 6 years ago

    @worthy...yes, that's what we're feeling! Too much money spent to settle for something that was poorly constructed. It's in the middle of the house and although the holes are under the stairs, they are still very visible because the whole staircase is open and they are right at eye level. The railing will help draw the eye away from them, but they'll still be there. I also don't know what happens to the putty as it ages.

  • 6 years ago

    @User...thanks. Whatever they used, amateur is the right description! They're framers that do some finish work. I bet they've never done a staircase like this. What tool SHOULD they have used?

  • 6 years ago
    last modified: 6 years ago

    @galore2112. We had input from both the supplier of the treads and the engineer - and the architect. It seemed the screws were necessary, but that they could/should have been installed in such a way that they were less visible. There were always going to be some holes, but they were not meant to be this large. With smaller holes they could have been plugged more easily. Our main issue is the execution. The contractor should NOT have had the framing crew put it together - he should have brought someone in with the correct skill and experience. I don't think the holes themselves would be such an issue if they were smaller and didn't have the knicks and splintering all around them.

  • 6 years ago

    Is the architect involved in supervising the build process? What does he/she say?

  • 6 years ago
    last modified: 6 years ago

    @Kristin S yes, she the architect is involved and she's horrified at the result. As I mentioned, some holes were expected, but what wasn't expected was their size and the damage to the wood around them.

  • 6 years ago

    I would expect her to be telling the builder that this wasn't built according to the specs and requires a redo then, unless they can come up with a solution she thinks is adequate.

  • 6 years ago

    @Kristin S, yes that's where we're coming to. The contractor is insisting that after the painters work on it that we'll never even notice the damage (but he also thinks the dents and splintering "is just what happens with wood."). The architect is also concerned about the well-being of the treads if we were to take apart the whole thing. That's where the greatest cost is.

  • 6 years ago

    RED FLAG: "Our contractor insists that the painters can fix the appearance..."


    Oh dear. Painters do NOT fix things like this - ever!


    A FINISHING CARPENTER is the person who deals with stairs! Ever aspect of a stair needs to be dealt with by the MOST EXPENSIVE wood expert = FINISHING CARPENTER!


    The GC gets to 'eat' this one. A stair like this is SUPER easy to mess up (as seen in photos). It requires the DEDICATED SKILL of a Finishing Carpenter. These guys know code. They know DETAIL. They know the FIX (wood plugs = the fix).


    Get the architect to slam her fist on the table and DEMAND the GC find - and PAY FOR - a Finishing Carpenter. That is what this stair DEMANDS. It is an architectural design element that is not to be 'thrown together' by FARMERS! It demands far more respect than painters and putty.

  • 6 years ago

    “Caulk and paint make a carpenter what he ain’t”.


    Simple unpainted wood has no room for the kludge of caulk and paint. The design could have been better. The execution could have been better. @G & S Floor Service had the right idea.

  • 6 years ago

    oh boy. So sorry you are going through this. We tore out two staircases in this house and hired an Amish gentleman that specialized in stairways and did nothing but stairways 24/7. First really well done stairway we’ve ever had in three builds.


    Sounds like what you may need to do. stairways are not for amateurs.

  • 6 years ago

    I'm with galore on this one. A poor architectural detail for attachment of treads. Must have been frustrating for the person trying to do it.

  • 6 years ago

    @Seabornman - if there were questions about how the work should be completed, shouldn't they have asked for more detail?


  • 6 years ago
    last modified: 6 years ago

    Did anyone look at the drawing posted by the OP?

    As far as I can see, the stairs were built exactly as drawn and with the fasteners that were specified in the drawing. I'm mystified as to why the architect is horrified with the results. They built what she drew and what everyone along the line signed off on.

    I don't see how any of this is the GC's fault. AFAIC, this is all on the architect & the owners who accepted the plan.

  • 6 years ago

    I can't blame the installer.

  • 6 years ago

    really? do the instructions say to splinter the wood around each pre-drilled hole? How about "ensure poor fit to stringer, and expose the over cutting area"


    If the holes were crisp, they could be capped or epoxied over with a black color, etc. And the fitment around the stringers is poor.


    IMO there's nothing wrong with the instructions (and yes, they could have used bigger, more expensive hardware, embedded steel, etc) but it's the execution that is poor on something that is this visible.

  • 6 years ago

    I was referring to the holes. Yes the other aspects are poor.

  • 6 years ago

    really? do the instructions say to splinter the wood around each pre-drilled hole?


    Janni, I have done enough woodworking to know that this is something that just happens. Especially in wide grained flat sawn softwood that was used in this project. Especially in the new, fast growth wood that we have to work with. Especially in a glue-lam where there are hidden knots in the laminations that you can't see. Especially when you're drilling into the wood at an angle. And we don't know that 'each' hole is splintered, either, for that matter. the stringers are a standard (not architectural grade) glulam.


    You can use a brand new drill bit for each & every hole and this sort of splintering can still happen.

  • 6 years ago

    @ci_lantro. I appreciate your perspective. There might be a few exceptions, but for the most part, each and every hole is indeed splintered. In addition, they do not line up, they are not spaced evenly, and they are not equal in size. We have heard that if they had pre-drilled the holes with a jig prior to installing the stringers there would have been less splintering and the holes would have been smaller.

  • 6 years ago

    Less splintering yes, smaller holes I doubt it as you need the hole size to get put the bolt in and be and to a tool on to tighten it.

  • PRO
    6 years ago
    last modified: 6 years ago

    This appears to have been designed as a rustic industrial element, not a refined and sleek modern one. The use of the glue lam as a finish material places it firmly into that camp. While the execution is lacking some, it isn’t the disaster that it would be if the desired result were intended to be a more polished result. Some “hand done” characteristics are within the realm of the original design intent.

    If you as the homeowner desired a less rustic industrial look, then a different design with different materials should have been used. I think a little fill, some decorative plugs as an deliberate accent, and some finishing touches, would all be within the original design intent of rusticity as a design element.


    To that end, you may want to rethink your cable railing for something more industrial, like galvanized pipe railing. or something sleeker, like glass, as a contrast to the rusticity.

  • 6 years ago
    last modified: 6 years ago


    Rustic Industrial. Source: Canadian Log Homes.

    Chips, splinters and random repairs would fit if the intent were to achieve an industrial re-cycled patina. The OP's first pic doesn't seem to support that design theme.

  • 6 years ago

    With respect, everyone who is competent knows that you don't start an angled hole on the finished surface. You clamp a sacrificial block to the outside and drill through that. I could drill a hundred holes and likely not have one significant splinter (a few small things near the hole, where the drill moved wood fibers instead of cutting them, but that is all).

    In the interest of picking your battles, I am not sure that this is the one to pick, but it is certainly not impressive work.

  • 6 years ago

    The 3/8" bolt driver I have measures 9/16" in diameter, necessitating a 5/8" hole. I can put a sharp 5/8" Forstner bit in a drill press and cut one crisp 5/8" hole at 45 degrees, but I bet there's not a jig outside of a factory that can pull off what is being asked. And what are you going to do with an elongated 5/8" x 1" hole when you're done?

  • PRO
    6 years ago

    I don't recommend touring the sausage factory or the place where they teach magic tricks.

  • 6 years ago

    You glue the big splinters down w/ some CA glue and then glue fake bolt heads & washers over the holes?

  • 6 years ago
    last modified: 6 years ago

    I bet there's not a jig outside of a factory that can pull off what is being asked.

    You don't need a jig. I don't believe anyone would bother buying a jig for a one off job like this and I have had to angle in attachment points for table tops many times. A sacrificial piece of wood would work fine. This is just the basic physics of drilling holes and it is not that complicated. There is a reason that there is not splintering 2" deep into the wood, so you just make the surface of your stringer 2" deep into the wood. It really isn't hard and anyone who has ever built furniture will know very well the value of preventing tear out with sacrificial boards.

    I can put a sharp 5/8" Forstner bit in a drill press and cut one crisp 5/8" hole at 45 degrees

    Show me... Rip that thing down into some soft wood at a pace akin to pushing on a handheld drill and impress me.

    ETA: The value of jigs such as the Kreg pocket hole screws is not establishing the angle. It is creating the compression on the surface that prevents tear out. Take your Kreg jig and lift it off the surface with a spacer and watch your wood splinter the same way.

  • PRO
    6 years ago

    That's some of the magic I'm talking about.

  • 6 years ago

    Brilliant - cover that crap up with something that looks more substantial!