Software
Houzz Logo Print
strikeraj

Bluestar Burner DIY project - looking for advice before doing

6 years ago
last modified: 6 years ago
*Disclaimer*

I am only sharing my own personal experience and everyone will be trying at their own risk.

I am mechanically inclined but I am by no means a gas appliance engineer

*Disclaimer*

Hi all

After using my bluestar RCS for 5 years, I really enjoy the range. But since I cook stir fry 80% of time, I do find a couple problems still.

1. 15K BTU/hr is really not enough. It has just enough power to cook 2 portion properly at a time.

2. Even though bluestar burner is already better than a lot of sealed burners, There is still a cold spot right in the center of my wok.

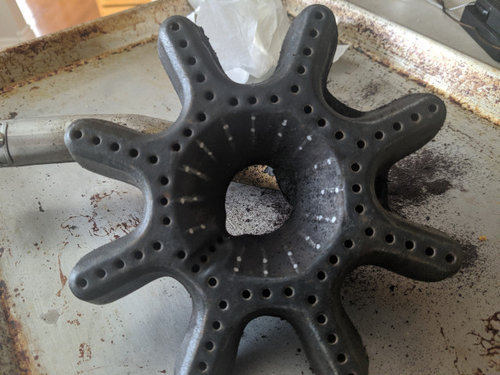
So, after checking out the new bluestar 25K burner design, I decide to make some mod to my 15K burner to make a 21-22K burner that really focuses at the center. I plan to drill two rows of holes using 7/64 drill bit (just a tad smaller than original holes, but I dont have the exact size bit). That adds a total of 30 holes to the burner. Comparing the 15K burner to the 18/22K burner, the 18/22K burner has 32 extra holes. So I am estimating this to give me similar total output with the focus in the center.


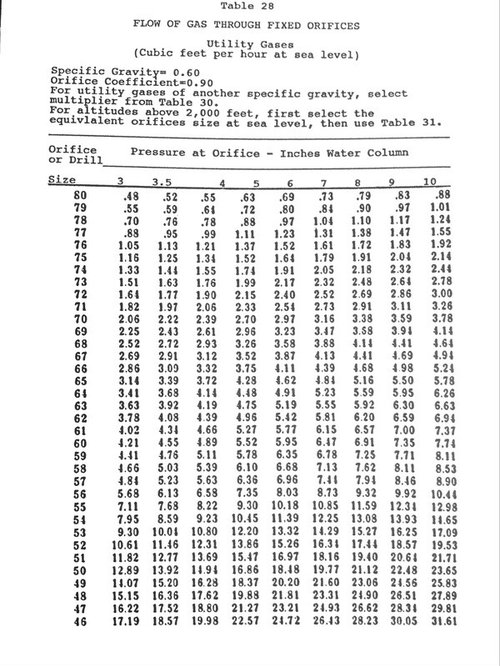
Regarding the orifice, the 15K uses #51 which gives 15.47K BTU/h @5"WC according to the chart below.

Again, due to the lack of bits I have, I plan to open it up to 5/64, which is between #47 and #48, which should give me approximately 21K BTU/h@5"WC.


So... before I actually hit it with the drill, is the something that looks obviously wrong that I should not do this mod?

Cheers

Tom

Comments (43)

  • 6 years ago

    actually now the post is up!

  • 6 years ago

    I can't advise on whether you should or should not make these modifications. Your appliance certainly won't be UL listed any more, if you do that. But only you can determine whether that's a problem in your particular application. And the good news is that this change is semi-reversible. If you mess up, you can always buy a new unaltered burner head. It'll set you back ~$100. But in the big picture of things, that's not the end of the world.


    But I do have some advice for you on the orifices. Tolerances are extremely tight for this particular part. A lot more so than for the burner heads. I doubt that you could precisely drill the orifice opening with the tools that you have available.


    But fortunately, Bluestar ranges are only moderately different from the old Garland ranges. And those ranges are still the reference design for many commercial restaurant appliances. So, it turns out that the orifices are pretty standardized. That also explains why you could find a size chart for them.


    If you need a particular orifice, don't build your own. Buy the part instead. I found that generic Garland-style orifices are often sold for around $5 a piece from commercial parts suppliers and/or restaurant supply stores.

    strikeraj thanked M
  • 6 years ago

    Thanks for your input. I will definitely look at buying options for the orifice instead.

    If I am buying, which size do you think would work best?

  • 6 years ago

    You can take educated guesses by looking up what orifice size corresponds to what power output. It's not a perfect science, as several factors (altitude, gas pressure, gas mixture, burner shape, ...) all combine. But you'll get close to what you need. If you search the archives, you should be able to find information on the orifice sizes that Bluestar uses. Then just buy several orifices in that same ballpark and try them all.


    That's actually what appliance manufacturers should ideally do for all of their ranges. Bluestar tells you how to adjust the air shutters. But they feel that replacing the orifice is probably more work than they can expect from a home owner. But since we all live at different altitudes, ideally you should also change the orifice. So, if you do things right, you'll get a better-adjusted range out of this.


    You'll need a 1/2" deep socket driver for this, if I remember correctly.

  • 6 years ago

    Thanks for the reply. I think the trial and error is a good method.

    But how can I tell when the orifice is too big and I need to step back one size?

  • 6 years ago

    You'll notice it not burning properly no matter how you adjust the air shutters. Test both the high and the low end. Sometimes only full power or only simmering will be affected

    strikeraj thanked M
  • 6 years ago

    ok I went ahead and did the mod
    *DISCLAIMER*

    DO NOT ATTEMPT THIS MOD WITHOUT KNOWING WHAT YOU ARE DOING.

    DO THIS AT YOUR OWN RISK

    *DISCLAIMER*


    Conclusion:This burner is now wok only pretty much. It definitely did what I wanted to do (higher power AND eliminate the cold spot in the middle)But this is definitely NOT a mod for everyone, as you can see the center jet is too strong causing it to ride outside the bottom of regular pans.If someone want to mod the 15K for regular use, i would say may be only drill half or even just a quarter of the holes I put in, and make it an 18k burner.This design creates too big of a difference in jet velocity between the center zone (super high velocity) and the arms (regular burner velocity), causing me not able to tune the idle flame to pure blue both at center and at the arm (center needing much more air than arm). I opted to tune the air shutter to have a clean flame at the arm cause with the wok on it, the center jet rides along the bottom of the wok and got enough air to burn cleanly all over.
    As a precaution, i will put a carbon monoxide alarm near the stove for a while, just to make sure this burner is not spitting out too much CO.

  • 6 years ago

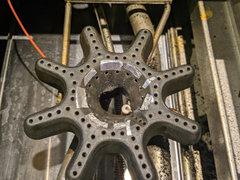
    Finished drilling


  • 6 years ago

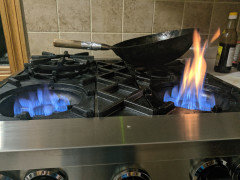
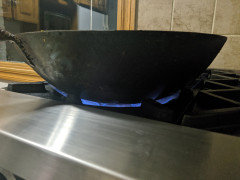
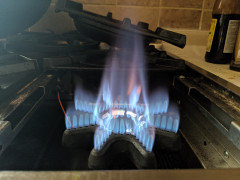
    Wok on modded burner, full blast


    wok on original 15k burner, full blast


  • 6 years ago

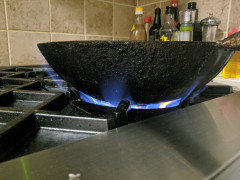
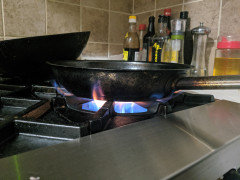
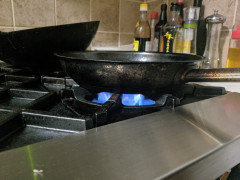
    regular pan on modded burner, full blast


    regular pan on modded burner, turned down


  • 6 years ago

    That is so funny that you immediately went for drilling all of the holes instead of gradually trying to add more. The result might in fact be more than you bargained for. But that's still really awesome -- and awe inspiring.


    Just wondering, though. Which orifice size did you eventually settle on? That would allow us to estimate the total BTU that you are getting from your only moderately domesticated pet dragon.

  • 6 years ago

    I was going to go bit by bit if I can do the drilling at my house using a power drill. But the cast iron turns out way harder than i thought so I had to ask the help of a friend who has a mill in the garage and set it up on the rotary table. I may decide to plug a few holes later on with high temp epoxy steel and play with the setting.


    Currently, it is on a #47 orifice.

  • 6 years ago

    #47 isn't even that excessively large. So, you only bumped up the BTU moderately, but you redirected the flame pattern a lot. That's quite interesting. I am curious to see how you like that for wok cooking.


    I agree with you, wok cooking is where it should make the biggest difference.

  • 6 years ago

    Update:

    So I use exhaust tape to block holes and did some testing today.

    I found that if I block the upper ring of holes, I can get a pure blue flame by turning the air shutter to almost max opening. Still on the same #47 orifice.


    Now I am going to use high temp JB weld to permanently close those ports


  • 6 years ago

    thanks. Interesting. I'm going to go ahead and order the RCS and attempt to change orifice to make it 18K. wish me luck. I'm sure I'll be back. lol

  • 5 years ago
    last modified: 5 years ago

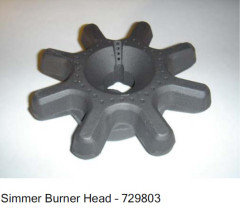
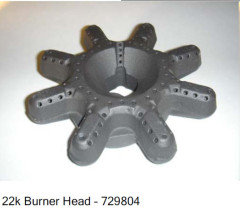
    I was wondering what you thought about drilling out the 9k simmer burner to match either the 22/25k burner. I have a few #44 and #45 orifice on order. Just need to figure out a good clamp to attach to the drill press. Thanks in advance!!

    From this...


    To this...


    Figured I would just match hole size and spacing exactly. Thoughts please:)

  • 5 years ago

    so after inspection the hole size is somewhere between 7/64th and 1/8th. Can anyone narrow it down? Thanks!!

  • 5 years ago
    last modified: 5 years ago

    @DjB1969

    Hole size i used 7/64. I know it is a bit smaller but I dont see a difference in flame between the original hole and my drilled hole.

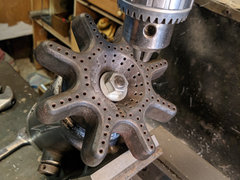
    I used a rotary chuck on a mill. The cast iron is quite hard so you need a very solid mount. See attached photo for my drilling set up.

    In terms of orifice, you will have to get as many holes as the 25K burner for it to work well if u are using 44/45 orifice. I am on a #47 orifice and you saw my result. Drilling the angled holes on the arm of the 25K burner will be a nightmare of setup. If you are doing regular cooking (ie. not a wok), I would drill the pattern I had before (15K burner pattern plus one ring in the middle on a #47 orifice.

    Hope that helps. Let me know if you have other questions.

  • 5 years ago

    On my RNB, a number 37 bit ( .104 inches) fits easily, a number 36 ( .1065 ) is a tight fit in the holes facing straight up , I didn't try on the holes that were angled.. 7/64 is .1094. I won't say whether you should or shouldn't make this mod, but unless you have a mill, don't expect to get as even a pattern of holes as strikeraj did, especially with as many as you are going to add

  • 5 years ago

    Thank you very much Barry. Very important info. I kind of figured it would be hit and miss, as the hole sizes differ from the 9k, to the 15 k. Do the angled holes go in 90 degrees to the angle, or are they straight down in line with the top holes? Seems I may be ordering a few 9k burners and finding a machinist near me lol. On a positive note. I threw in a #47 orifice for a couple of minutes on the 15k, and it was a beautiful blue flame, about an inch larger than the 15 k beside it. The investigation continues......

  • 5 years ago

    A mill is obviously the ideal tool if you have access to it. But these days, you can often achieve acceptable results, if you 3D print a jig to align your drill. And 3D printers are more readily available than a proper mill.


    You might only get a single use out of the jig, but that's really all you need. I'd print from a higher temperature plastic (e.g. ASA, PC, or nylon) and give it a shot. Ideally, you devise some plan how to do a few dry runs first. Might take a while to get this perfect, but it's well within reach for a determined hobbyist

  • 5 years ago

    @barryv_gw this is very intersting to know. So they actually have smaller drilled holes on the 18K burner. I guess that makes sense because when i drilled the 15K burner, I first added similar amount of holes to make it equivalent to the number of holes on the 18/22K burner, but the venturi cannot give enough air for complete combustion.


    @M Interesting idea on the 3D printed jig. One thing I would recommend is that you definitely need a way to mount it solid onto the drill press bench so it does not slide around when u are drilling the angled holes. Another note is you will need a good center drill to start the hole.

  • 5 years ago

    I was actually thinking of building a jig that holds the entire burner head and then positions the drill bit in exactly the place where you want it. You'd drill "through" your jig into the burner head. Ideally, you'd still use a drill press. But if in doubt, you could probably free-hand.


    I've seen cabinet makers use similar jigs (albeit made from more durable materials) to drill complicated patterns

  • 5 years ago
    last modified: 5 years ago

    Good morning guys!

    Question for barryv_gw. I'm not wanting to be a huge burden but would you be able to check the size of the angled holes. It seems max airflow vs. pressure provided will make things a little more accurate. I'm looking at a few milling carbide bits and would like to get a few of each size. Lee Valley might be able to help me out a bit. Thinking a good multi angle vise and a drill press. Patience and Mostly luck!!! All original parts will stay virgin, so everything is reversible.

    If needed I will get my brother in law busy on his 3d printer for a jig. Thanks for that idea M.

    Love your burner options strikeraj . That's a hell of a flame!!

    Too much time on my hands........


    This could work.....

    https://www.grainger.ca/en/product/DRILL-GP%2CHSS%2CSTEAM-OXIDE%2C%2337/p/GNF150-44107

  • 5 years ago

    strikeraj- The "rotary chuck". Beautiful!!! I was wondering what you used. Remind me to never say multi angle vise ever again!!! Thanks for all the info guys!

  • 5 years ago

    So the sizes of the holes on the 9 k, 15k, and 18 k seem to be the same. ( I didn't check every hole, but a few of each ) The angled holes are the same size and appear to be 90 degrees to surface, not straight up and down, so if you were mounting it to drill the holes, you would have to rotate the burner head on each of the angled sides.

  • 5 years ago

    I'm a fellow Blue Star owner and remember this thread from last year, so glad to see it revived and love the ingenuity!

  • 5 years ago

    @barryv_gw Thank you for taking that time to check!! This site and its members are amazing!!


  • 5 years ago

    @DjB1969 I dont think that guide help in this case, cause the challenge is more on angling the burner right and be able to maintain that for all the holes you need to drill


    To make sure the drill bit doesnt walk while drilling, start with a good centerdrill and that makes sure the hole would end up where you want it

  • 5 years ago

    +1 with Strickeraj. You need a center drill to start the hole , and I doubt that guide would help keep it aligned as you finished the hole with the correct bit. My point earlier was that Stricker's was a work of art. You can probably get a lot of extra holes, but getting them to line the way his did would be extremely difficult to do without some sophisticated equipment. Of course , having some slight variation in location would probably not impact the function all that much, just the looks.

  • 5 years ago

    @barryv_gw if it is a work of art, there should be no high temp epoxy and aluminum tape on it :p


    @DjB1969 actually what is your intended use for this burner? Is it for wokking or cast iron pan searing or large stock pot?

  • 5 years ago

    @strikeraj, @barryv_gw Yes I would definitely agree with your ideas to keep the bit tip from wandering. Thought that was a nifty tool though as it had a v-edge for attaching to any rounded pieces.


    Intended use for the burner is mostly wok related, but also to stop me from aging while trying to bring a pot of water to a boil.


    And yes @strikeraj your work is a piece of art... high temp epoxy and aluminum tape is just some added bling :)


    Cheers!!

  • 5 years ago

    @DjB1969 if your main use is wok, I highly recommend u to drill to my final configuration I have now, especially u are starting with the 8K burner. The arm holes create heat where I dont want for stir fry and would sometimes burn sauces that are clinging onto the side before the main portion is done. It is also easier to drill one circle of holes rather than the arms.

  • 4 years ago

    I’m following and planning on swapping an orifice. Are you all on propane or natural gas? Wondering g about propane orifice size for installing an 18k burner to push 22k with the right orifice.

  • 4 years ago

    I was on Natural Gas. I am sure you can find similar chart for propane orifice size. Just make sure u check the regulated pressure from the manifold so u use the correct chart.

  • 4 years ago

    Has anyone figured out the correct orifice size for 25k on Propane? I used the commonly linked chart to get 53, but 53 is too large. Shutter has to be 100% open and there's still a lot of orange in the flame. I'm guessing 54 or 55 even, but would love some confirmation before ordering more of these.

  • 4 years ago

    Orifices should be pretty cheap. I had previously seen them for about $5 each. But admittedly, that was before the supply chain issues that resulted from the pandemic.


    At that price, I'd be prepared to buy a variety and try them out

  • 4 years ago

    Unfortunately all the restaurant supply/commercial parts sellers have crazy $20+ shipping for orifices that could be put in an envelope, so the only game in town is amazon basically. Unless you're lucky enough to live within driving distance of one of those supply houses. #54's are basically nonexistant on amazon for whatever reason, and the sizes that are available are typically like $10/ea+. So I mean, buying a bunch and trying is what I'm doing anyway, but it's not cheap and I figured if someone had already figured it out why not get confirmation. Grinds my gears that the info isn't available form bluestar firsthand.

  • 4 years ago

    The 25k burner head is a #54 orifice for Propane/LP if anyone comes looking in the future. Shutters will be about 3/4 open.

  • 4 years ago

    Orifice size for 25K burner on prpane is #53 just a tad larger than the 22K which is #55

  • 4 years ago

    #53 for 25k heads on LP for me was too big. Shutters open 100% and there was still orange in the flame. Plus with shutters all the way open the burner is slow to light and doesn't like to go down too low. #54 is working correctly for me, with shutters at 3/4 as I mentioned above.

Sponsored
Bella Casa LLC
Average rating: 5 out of 5 stars17 Reviews
The Leading Interior Design Studio in Franklin County