Software
Houzz Logo Print
miguel_palacios59

Removing wood paneling

6 years ago

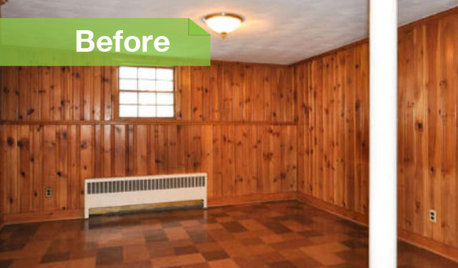
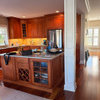
Anyone know how to remove these?

Comments (11)

  • 6 years ago
    last modified: 6 years ago

    photo didn't upload the first time.


  • 6 years ago

    Glued or nailed? Substrate? If it is glued or glued & nailed to drywall, you may decide that the Big Hammer & prybar approach will be the fastest & easiest & figure on just replacing the drywall.


    What is the replacement plan? Total removal of a wall/ partition or just paint?

    Miguel Palacios thanked ci_lantro
  • 6 years ago

    Are they real boards and not 4x8 sheets? Probably tongue and groove. You'll have to find a place to start, like at a door trim, and see how they are secured.

    Miguel Palacios thanked Seabornman
  • 6 years ago

    @ci_lantro to be honest, I am not really sure how they were installed. We are in the process of purchasing this house and this is the current state of the bathroom. I am planning on removing it and just painting. There are no major plans for renovation just the minor things like removing these panels and changing out the vanity and plumbing fixtures. I am not knocking down walls or doing anything extensive. @Seabornman they are real boards and not sheets. There are the fake sheets in the livingroom that I will be taking down as well but those appear to be much easier since its just sheeting. the ones in the bathroom are like hardwood floor planks but on the walls. and it's complete 360 on all four walls so I am going to have to take down lighting fixtures and rip out the vanity because those were all installed over the panels unfortunately... thanks for your responses. I was thinking I would have to get a crow bar but wasn't exactly sure.

  • 6 years ago

    I just removed paneling similar to this in my living room. It was attached to horizontal furring strips over studs. That's why I suggest pulling off a trim if you can, so you can get an idea what you have. Can you remove light fixture and see? You could be in for more work than you think or it could be very easy.

    Miguel Palacios thanked Seabornman
  • 6 years ago

    I agree w/ Seabornman. May be easy, maybe not. Removing a switch or outlet cover or a lighting fixture may tell more of the story as to how they were installed.


    If they are glued to the wall, something like this griddle scraper^ may be of use. I have a similar one that is always coming in handy on projects. The last time I used it was helping to level sand when I was setting flagstones.


    Miguel Palacios thanked ci_lantro
  • 6 years ago

    they are not on furring strips. They go all around the bathroom and I can see that theyre directly over the drywall. I am guessing that because they look like real wood, that they're nailed in and not glued, though its possible that they've been glued and nailed. It looks like it would be a pretty straight up job of removing them with a crowbar but the problem I realized the other day was that they're also behind the toilet and the vanity. They're not behind the shower tile though. It will just be inconvenient for my family to not be able to use the restroom until I remove the panelling and reinstall the new toilet and sink vanity. Is this something that I should be able to do within a few hours or should I just call in a professional?

  • 6 years ago

    Is this your only bathroom?

    Remove the vanity and toilet, remove all paneling, fix any drywall issues, and reinstall vanity and toilet in a few hours?

    I doubt it.


    But you could break it up into smaller projects that won't disrupt usage of the bathroom in the meantime.

    (1) remove as much paneling as you can without disturbing the toilet and vanity.

    (2) Patch and fix possible drywall issues

    (2) Remove the toilet

    (3) Remove paneling behind toilet

    (4) Patch and fix possible drywall issues behind toilet

    (5) Reinstall toilet

    (6) Remove vanity

    (7) Remove paneling behind vanity

    (8) Reinstall vanity

    (9) Paint


    This project could be split up over several days and you have breathing room if an unexpected situation arises.

    Miguel Palacios thanked greg_2015
  • 6 years ago
    last modified: 6 years ago

    There is no way to predict how long it is going to take until you know what kind of mess is behind the paneling. You may encounter holes, construction adhesive stuck to the drywall, holes that you made with the crowbar if you're not super careful, moisture damaged drywall, mold....to name a few possibilities.

    This is roughly how I would approach the job: (Assuming you don't have another bathroom...)

    1. Set up a hand wash station in the shower. Wash bowl on a bench. Bucket of water & dipper or pitcher. Electric kettle if you must have hot water. (Possibly eliminate this if there is another sink nearby.)

    2. Remove the vanity so you have more room to work.

    3. Remove as much paneling as you can.

    4. Remove the water tank from the toilet. (I hope you have a two piece toilet.) This should give you enough room to remove the paneling that is behind the toilet.

    5. Patch, paint, etc. behind the toilet. Replace the water tank. (Use the old toilet until the room is almost complete to avoid possible damage to new fixture.)

    6. Finish patching & painting the rest of the room.

    7. Install the new toilet.

    8. Install the new vanity.


    Miguel Palacios thanked ci_lantro
  • 6 years ago

    Unfortunately it is the only bathroom. I am fairly certain I can handle doing all of this without much of a problem but since this would be my first diy renovation, it would probably take me a lot longer than I was hoping for. I guess I can just remove the toilet first and take down the panelling behind it and then reinstall the toilet so that at least my family will be able to use it while the restroom is being worked on for the couple days it will take me. Thanks so much for all the advice guys. If any of you are in southern California in the desert area east of San Diego and wanna take a gander, let me know.

Sponsored
Hope Restoration & General Contracting
Average rating: 4.7 out of 5 stars35 Reviews
Columbus Design-Build, Kitchen & Bath Remodeling, Historic Renovations