Software
Houzz Logo Print
tera_hasbargen

Laying antique pavers

6 years ago
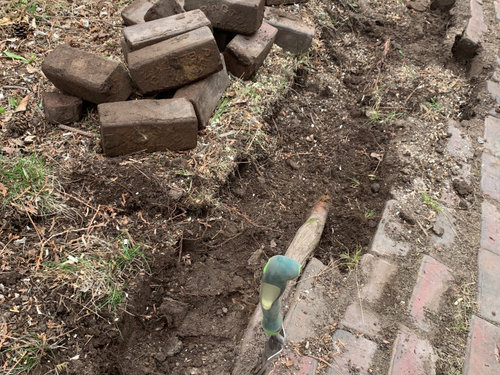
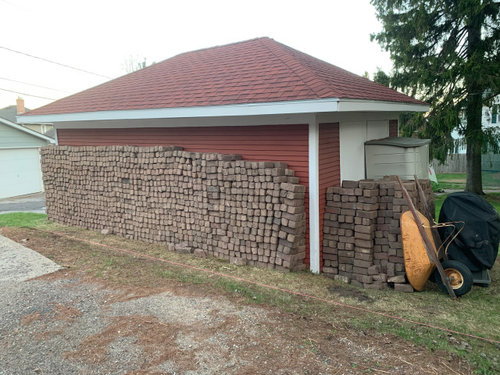
I am looking for advice for reusing antique pavers. My 1920s home had about 4000 or so Purington Block pavers used to make pathways and a patio around my house. But after 100 years of neglect and settling, it was time to remove them for safety. I live in Northern Minnesota, so do have to keep snow and frost in mind.

I would like to preserve and reuse the pavers. When talking to contractors, I have been given a hard stop or astronomical prices to use them because they are not perfect. Most of the blocks have a smooth shiny side, but height is variable from time in the ground. I could lay them on the side with the lettering up because then they would be more uniform in depth.

Does anyone have advice on how to lay antique pavers to create a safe walkway?


Comments (32)

  • 6 years ago

    If you lay the bricks lettering up, the lettering may collect debris.


  • 6 years ago
    last modified: 6 years ago

    You've been given astronomical prices because it is going to be an astronomically labor intensive job.

    In other words, if you want it done, do it yourself. Laying pavers isn't difficult, particularly if you are willing to relay parts that aren't satisfactory. The last thing the pros want is to come back and redo a job that they have already moved on from.

    I'm in the middle of a paving project that makes yours look easy - drylaid patio with uncut stone just the way it comes out of the ground. I dig out the dirt, pour in some paver base, arrange the stones the best way they fit, then dig out/fill in so the stones lay flat. It sounds like that is about what you are going to have to do. You will also have to worry about some sort of edge restraint, which I don't because of the size (depth) of some of the stones.

    After an hour or two, you'll understand why no professional wants to do the job. However, it just takes (a lot of) time.

    Edited to add: I wouldn't use the pavers for a front walk, or any other walk that is commonly used during the winter.

  • 6 years ago

    Those are nice!


    Can you have them mortared down instead of dry set? I don't know if it's possible in a climate like yours, but here (no freezing) brick walks are sometimes set on top of concrete. We've had a few patios and walks done that way because it's less maintenance than pavers (and also because modern pavers usually look like cheesy concrete fake bricks). Talk to masonry people, not guys that do pavers. Your pavers are thicker than bricks of course...


    Did you dig those up and stack them neatly yourself? That's one heck of a shelter-in-place activity! :)

  • 6 years ago

    Thanks for the replies. Yes, I dug each one out by hand and stacked them over a couple days. It’s all I did for 4 days straight! After all the work digging and stacking, it makes me want to preserve then even more.
    I understand that it is a lot of work. I was hoping that historic preservation wouldn’t cost double of getting a new product. It is interesting how nice the blocks are despite being 100 years old. They were made to last compared to modern pavers, which seem fragile.
    I hope that I can get some recommendations on how to get them to set evenly. I have read about using polymer sand to set them better and metal edging to keep the shape. I’m not sure how that works in cold weather. I also have to shovel and snow blow whatever walkway I place.

  • 6 years ago

    Tera have you looked at various methods to lay pavers? You may have to sort through what you have and sort into sizes. You will need a metal about the width of the area you are paving.

    Just a suggestion and you may not find anyone that will do it but hire the digging, laying of rock/sand, and initial compaction of the under layers. You can rent a compactor for compacting the final sand but using it is very hard work.

  • 6 years ago

    You can't compact this. That is part of the issue. Usually when a pro lays pavers, the understrata looks like ______. For what the OP wants to do, the understrata will look like __-__----___. For this, every paver has to be laid individually. You spread paver base, put down the pavers, then remove base from the ones that are too high, and add to the ones that are too low. Rinse and repeat until the pavers are level. It isn't hard, it just takes time. If the pavers settle out of level in a year or two, you pull them and relay until they are level. IME, that isn't an issue, but YMMV.

    Like I said, it is a very labor intensive pain in the neck, but perfectly doable if you approach it with the correct Zen attitude.

  • 6 years ago

    YOUTUBE demo on laying pavers. I followed this pretty carefully, the brand was techoblock which is heavy and you can drive over it. Rent a tamper. When you put the sand down and use scree board, that step doesn't get tamped and don;t walk on it. Lay the pavers down and tamp them, go over several times until surface is uniform. Sweep final sand over pavers and give a final tamping to settle sand inbetween pavers.

    The plate tamper is VERY heavy. Don't short cut the first few steps or you will have settling later on.

  • 6 years ago

    Not done it myself....but have a couple of friends who have done that. Pretty much what Sam said. Dig your space, level as much as possible....put down a layer of fine sand....tamp well and lay your pavers......adding or removing sand here and there as needed. Water well.....tramp, stomp, adjust add or remove sand......and when they are finally as level as you want either brush limestone inbetween, or add some soil and plant some sort of moss between. You won't want moss on the brick but between is beautiful.
    another friend set the antique pavers she dug from a sidewalk being replaced into cement for her patio.

  • PRO
    6 years ago
    last modified: 6 years ago

    I think you're getting wide ranging answers because we don't actually know how much disparity there is in your pavers' thicknesses. Normally, we don't set pavers of different depths so how much thickness variability you could get away with by using the standard method of paver installation, is somewhat of a guess. In the standard method, a setting bed layer of sand is screeded out over guides to a uniform thickness of about an inch. The sand is NOT compacted. The pavers are set and after they are all in place and the edges of the paver bed has been secured with edge restraint, they are compacted with the vibratory plate compactor. Since the sand was not previous compacted, the pavers are going to be 'hammered' down into it by the compactor. In essence, you are pushing something hard down into a layer of something soft. The compactor will automatically keep the top of the pavers smooth and the sand will automatically adjust to the variability of the paver thicknesses. A thicker paver will press down farther, displacing sand to its sides which will move to fill in the greater gap of the thinner pavers. In other words, the sand layer is squishing all around under the pressure of the compactor, filling in whatever space is available. I'm guessing that with a 1" sand setting bed you might be able to get away with as much as 3/8" paver thickness variation ... possibly even as much as 1/2", because the compactor is heavy and mean and does a great job of smashing down the pavers. The thicker the sand setting bed layer is, the greater the likelihood that you can successfully accommodate greater thickness variation. While the normal sand setting bed is one inch, you might want to have a layer that is 1 1/4" or 1 1/2" thick. The best thing would be to lay out a test area of pavers, compact them and see how it goes.

    All that was about thickness, but if there are other variations in the pavers' dimensions (width or length) that could cause issues with keeping a pattern consistent. We have no information about the scope or extent of the work, but dimension variability would most likely affect large areas (patio or drive) but probably not be noticeable in smaller areas, such as walks. The running bond pattern is likely going to be the most forgiving if this is an issue.

    What I would advise at all costs is pre-tamping the setting bed layer and trying to individually adjust the sand according to the thickness of each paver. That would be an unending nightmare!

  • 6 years ago

    Martha, that is so beautiful


  • 6 years ago

    Very nice, Martha.

    It is the layers beneath where the bricks are set that need to be compacted before the bricks/pavers are laid. If you want to you can set them in dirt but without the compacted underlayer they will shift.

    Normal sequence although in some areas additional layers of base are used.

    1. Add a Base Layer of Gravel (Road Base)
    2. Compact the Base Layer.
    3. Add Bedding Sand.
    4. Start Adding the Paving Stones


  • 6 years ago

    I found two different masons that seemed excited about doing the job (historic preservation) and not outrageously expensive. Apparently I was just talking to the wrong people!

  • 6 years ago

    Nice! IT looks like your original had a wavy pattern. Did it? And will it again?

  • PRO
    6 years ago

    Have you figured on a layout for the flatwork? That's as important as how the bricks are set.

  • 6 years ago

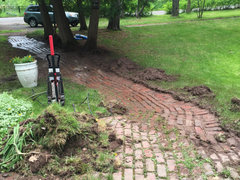
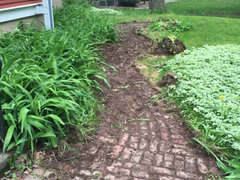
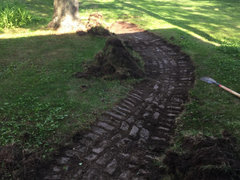
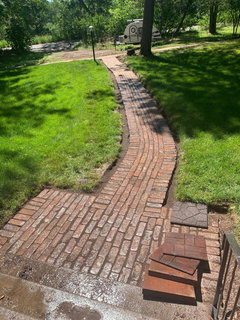
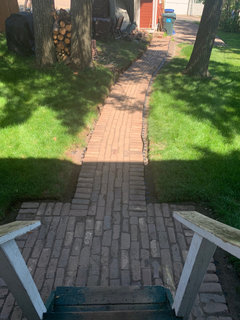
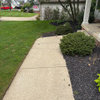
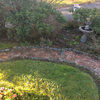
    I plan on keeping the original layout of running in middle with perpendicular edging. These are three photos from when I discovered how extensive of a brick network I had going around my house and I exposed them by removing the overgrown plants. The large cedar trees, ground cover, lilies have all been removed and the yard's grade has been fixed. I will still be dealing with frost, but will have less struggle from tree roots. Plan to start with just front and back walks and not wrap around the house.


    Where I had the most amount of trouble heaving/irregularity were next to trees. It's a little hard to appreciate, but this was how it was originally laid out.


  • 6 years ago

    Just a suggestion and you will have to talk to the person you hire about area rules but you may find that the original walkway is too narrow for current rules. If that is true for your area you may find that using the pavers that went around the sides of the house are needed to fill in the extra width may be necessary. Size here used to be 24 inches but now is wider than that.

  • PRO
    6 years ago

    Yikes ... that last picture told of a walkway horror story! In the first pictures the walk is much to close to trees, the route should give them several feet of berth.

    "I plan on keeping the original layout of running in middle with perpendicular edging." The first mistake would be to reuse the perpendicular edging detail. Professionally installed walks, for the most part, are not installed that way. The intention of the vertical edge is to restrain bricks in the walkway field from migrating away from the walk. But this is a seriously inferior method and many such walks end up looking like how yours used to be. The other failure of these old, homeowner-installed walks is the lack of a proper tamped base. I'm all for the reuse of the old bricks, but installed according to tried and true specifications and methods.

  • PRO
    6 years ago

    @ Tera Guessing you will be receiving a ton more input on this thread and some of it may be confusing or well-intended but ill-advised.

    Yardvaark's counsel is expert and I would closely follow the information you are receiving from him regarding installation.

    Your antique brick is beautiful. The finished surface probably will have slight irregularities because of existing wear differences and the joint sizes might be variable as well. Those minor variations will be part of the charm and character.

    Best of luck to you with the installation. Post a photo or two when you complete the work.

  • PRO
    6 years ago
    last modified: 6 years ago

    K&D, thank you for the compliment. And I could say the exact same thing about you. Because it's true!!! And your work is always gorgeous and inspiring!


  • 6 years ago

    I am sure that walk was there before the tree.......and outside of overgrowth from grass etc, it seems to have survived very well for 100 years....in spite of "inferior methods of installing".
    Good for you for saving ti and making a new use for the bricks.

  • PRO
    6 years ago

    @yardvaark.....just checked out the video.....the only reason I'm not lol is I don't want to wake my granddaughter. Funny stuff!

  • 6 years ago
    last modified: 6 years ago

    My grandfather and uncle ended up with a bunch of those antique bricks. When they were redoing some streets in downtown Minneapolis that still had the brick streets they welcomed the public to come and take as many as they wanted. There are still a few streets Minneapolis with brick they plan to keep for nostalgic reasons. Gramps used for a walkway in back garden and uncle used for a patio. Neither were installed that well, uncle's patio was eventually removed and concrete placed. Luckily he had a neighbor who was using them for a project.

    Anyways, I just mentioned this because that may be their origin. If you decide not to use some they are still desirable, someone will take them off your hands. Maybe even can sell them.

  • 6 years ago
    last modified: 6 years ago

    Could you use them for a decorative wall or edging instead of a walkway?

    This article has a number of interesting and clever ideas...
    https://www.ruralsprout.com/reuse-old-bricks/

  • 6 years ago

    Hi Tera,
    I love the pic showing the maze of pavers in your yard. I don’t have any advice, just wanted to say thank you for reusing them and please post pic of the finished project.

  • 6 years ago

    Still need to finish the edges. But front and back have been replaced.

  • 6 years ago

    Looks great!

  • 6 years ago

    Wow, jealous here!

  • PRO
    6 years ago

    From what I can see, it looks great. It looks like a quality restoration of a vintage material. Hopefully, it has good edge restraint so that it will last a long time.

  • 6 years ago

    Looks fabulous!!


  • 6 years ago

    Love it! You did a fabulous job.

  • 6 years ago

    I'm envious! No walk is as beautiful as one laid with antique bricks.