Software
Houzz Logo Print
toxcrusadr

Odd Nails in Old Wood Flooring

5 years ago

I'm dismantling some old maple flooring. It's not in a building anymore, so I can't tell you anything about the age of it. Let me explain.


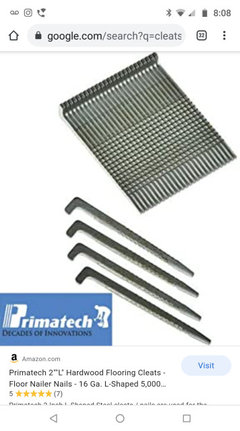
I rescued a bunch of square-yard sections of maple flooring that looks like it was cut out of a gym. Still some black stripes on it. I started taking it apart hoping to be able to reuse the boards for a hallway or other small space. The boards are nailed through the tongue with square nails that are very thin. The head of the nail is L shaped, like a tiny hockey stick. There's in inch or more sticking out the bottom where I pried them off the pine 2x3 and 2x4 support boards. It's pretty easy to break that off by bending back and forth with pliers.


I thought maybe the type of nail might give an estimate of the age. There are signs it's pretty modern: The flooring is stamped "2d & BTR" in ink on the bottom. The support boards look modern, smooth and so forth. And there were still some rubbery squares stuck to the bottom of them, like cushions to provide a little flex. But the square nails look like an old style.


Any idea how old they might be?

Comments (10)

  • 5 years ago

    I did some searching for articles on how to identify unique or antique nails. Try This article and This article. L-shaped nails have been made over the course of the last 100+ years, so could be old, could be very modern. 2d & BTR is a lumber grade. Check out this article for an explanation. This site lays out the history of lumber grade-marking in excruciating year-by-year detail (wow, the internet is a weird place). I found that 1925 is the year when lumber grade marking was considered the standard.... So, sometime in the last 100 years. I think any more digging on my part would require photos. This was a fun little scavenger hunt! Thanks!

    toxcrusadr thanked Kate Hip
  • PRO
    5 years ago

    L-cleats are still used in today's installation by installers that prefer it over staples. I use it along the walls, since my nailer will get up to the final row blind nailing. The grade stamp is 2nd grade and better. Which contains a lot of mineral streak and two tone look in maple. The flooring you have may not be that old.

    toxcrusadr thanked G & S Floor Service
  • 5 years ago

    The rubber pads have been a standard since maybe the 80s to provide a little more give to gym floors. Do fasteners look like this? I don't know how long cleats have been around.

    toxcrusadr thanked Seabornman
  • 5 years ago

    Yeah that's pretty much what they look like. Thanks for all the info everyone. I think it is pretty modern then. I just haven't run into that type of a fastener.


    I shoulda mentioned I own a sawmill and sell lumber so I'm already familiar with lumber grades. LOL


    Long as we're here, my plan is to remove all the nails and find someone who can run the boards through a sanding machine to take off the old finish. Then reinstall and refinish. Any thoughts on this or things to watch out for?


    One thing is that since the floor was cut out in sections, a lot of boards don't have T&G on the ends. Should I get the bits and make new T&G, do I risk having it warp up if I don't? I live in a climate that's dry in winter and humid in summer (Missouri).

  • PRO
    5 years ago

    I would run the boards through a thickness planer. Plane the boards to all the same thickness to limit over and under wood. It will make it easier to sand. Cut off any ends that are too thin and not usable. Have a router on hand to groove any ends needed as you install it. Other than that, Installing the floor boards with square ends is perfectly fine.

  • 5 years ago

    I do have planer, I've just never tried removing a finish with it. If that works, it would solve a huge problem.

  • 5 years ago

    I've planed used porch flooring with a finish. You need to take a cut deep enough to get under the finish and into the wood. You don't want the planer blades spinning in the finish. It can gum or dull them. Maybe 1/16 inch cut. Modern maple gym flooring should be pretty consistent thickness from board to board.

  • PRO
    5 years ago

    Make sure there are no nails on the face of the board. You will ruin your blades. Set the planer in n one height run all the boards through whether it cleans up or not before lowering the height. At the end you want tge Boards to be the same thickness. You will want to make sure there are no splinter or blowouts on the bottom that will mess with the thickness. I just hammer it flat as part of the prep work . You will run into boards that have been badly or excessively sanded. Throw it out or chop the section off and keep the good portion. If, you have nice sharp blades and can plane it with no chatter. You can get away with doing sanding at 120 and finish at 150 grit.

  • 5 years ago
    last modified: 5 years ago

    Thanks for all the comments.

    One last question: This will be installed over the existing subfloor which is T&G 1" OSB sheets. The floor is somewhat bouncy (I think because of the #2 quality floor joists with no crossbracing - by the way there is a basement underneath). It also has creaky spots. I planned to put in some additional screws in the creaky spots after pulling up the carpet. Is this an adequate subfloor for the wood flooring?

Sponsored
Haus Studio
Average rating: 4.8 out of 5 stars28 Reviews
Franklin County's Preferred Custom Cabinetry & Design Studio