

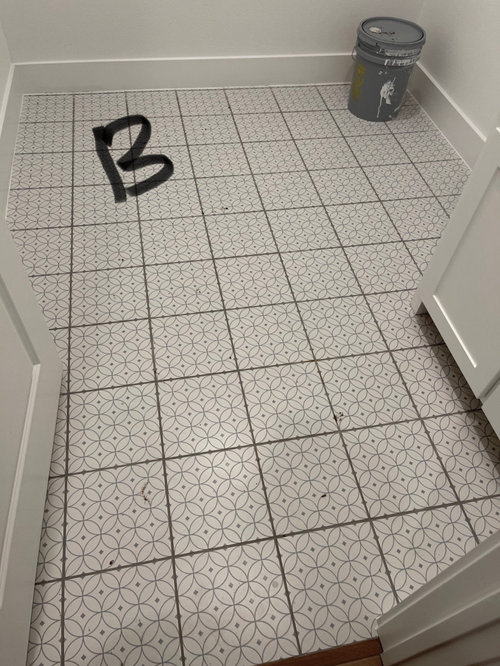
What went wrong here?
4 years ago

Featured Answer
Sort by:Oldest
Comments (14)
 4 years ago
 4 years ago
Related Professionals
Taunton Interior Designers & Decorators · Madison Architects & Building Designers · California Kitchen & Bathroom Designers · San Bernardino Kitchen & Bathroom Designers · Dothan Carpenters · Pine Bluff Carpenters · Saginaw Carpenters · Plymouth Custom Closet Designers · Burlington Flooring Contractors · Toms River Tile and Stone Contractors · York Tile and Stone Contractors · Albany Kitchen Remodelers · Plattsburgh Kitchen Remodelers · Janesville Kitchen Remodelers · Santa Maria Kitchen Remodelers- 4 years ago
- 4 years ago
- 4 years ago
- 4 years agolast modified: 4 years ago
 4 years agolast modified: 4 years ago
- 4 years ago
- 4 years ago
- 4 years ago
 4 years ago
- 4 years ago
 PRO4 years ago

Related Stories
INSIDE HOUZZHere’s Why Kitchen and Bath Renovations Are Costing More
The 2019 U.S. Houzz & Home report shows that costs have steadily risen in recent years, a trend expected to continue
Full Story
KITCHEN CABINETSChoosing New Cabinets? Here’s What to Know Before You Shop
Get the scoop on kitchen and bathroom cabinet materials and construction methods to understand your options
Full Story
MOVINGRelocating? Here’s How to Make the Big Move Better
Moving guide, Part 1: How to organize your stuff and your life for an easier household move
Full Story
MOVINGReady to Downsize? Here’s the Big Picture on Preparing to Move
Overwhelmed at the thought of moving from a bigger home to a smaller one? Our guide tells you what to expect
Full Story
ARTHere’s Looking at You: Supersize Portraiture at Home
Go big. Go bold. Hang huge portraits on blank walls for maximum impact
Full Story
HOME TECHAre the Latest High-Definition TVs for You? Here’s What to Know
See what’s new with 4K ultra HD televisions and projectors, and find out what they will cost you
Full Story
REGIONAL GARDEN GUIDESDelight in Summer’s Garden Glories — Here’s What to Do in June
Wherever you live in the United States, these guides can help you make the most of your summer garden
Full Story
GARDENING GUIDESKeep Your Cool in the Garden — Here’s What to Do in August
Don’t let summer’s heat go to your head. These U.S. gardening guides will help you make sensible choices for all of your plantings
Full Story
LIFERelocating? Here’s How to Make Moving In a Breeze
Moving guide, Part 2: Helpful tips for unpacking, organizing and setting up your new home
Full Story
COLORWant More Color in Your Home? Here’s How to Get Started
Lose your fear of dabbling in new hues with these expert words of advice
Full Story


Ramya VijayakumarOriginal Author