Software
Houzz Logo Print
jbank413

Soapstone installed today-HELP!

4 years ago
last modified: 4 years ago
Hello wise ones!


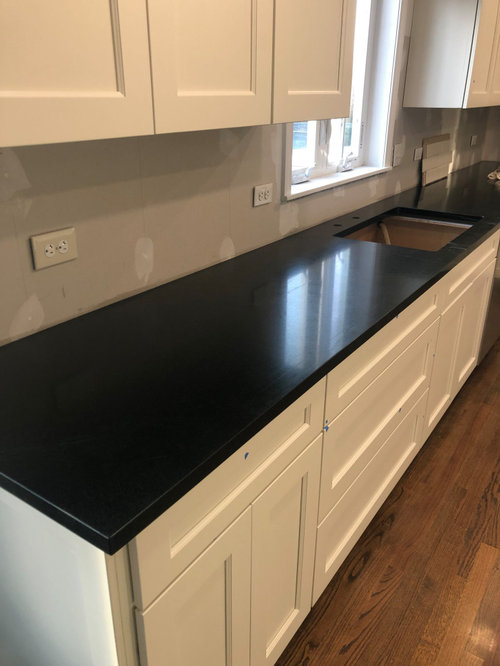
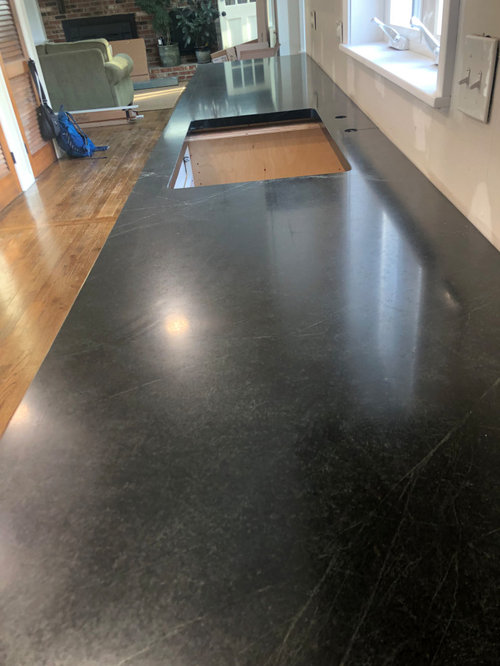
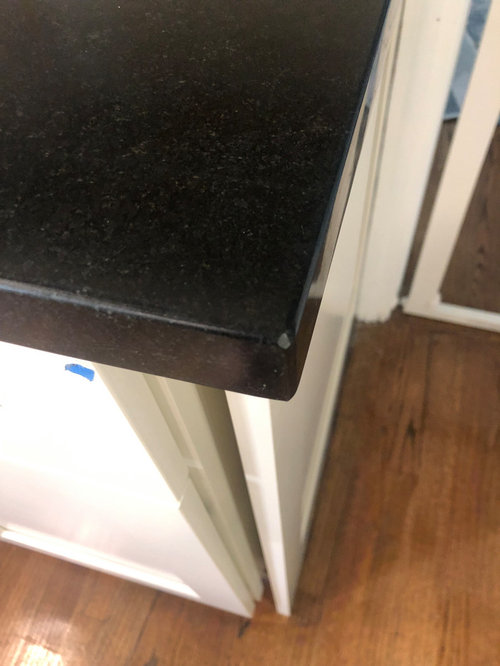
After being postponed several times over the past month our soapstone counters were finally installed today! Yay! However, while I love the slab and the overall look...I'm not as in love with the finish. I had a really hard time finding an installer near me. I found the guy I went with through the distributor (who I used because I wanted stone from Dorado) and he deals with natural stone and on his website specifically mentioned soapstone. When I spoke with him he seemed pretty knowledgeable about it and even has soapstone in his own home. I picked the slab I wanted of PA and figured I was all set. When I asked what grit he sands it to he just said he does a matte finish (which is what I wanted, but I should have pushed for an actual answer), and for an edge he said all he really does is an eased edge (which is also what I wanted). He also said it doesn't really matter when I asked about helping with the layout of where the sink and cooktop will go.


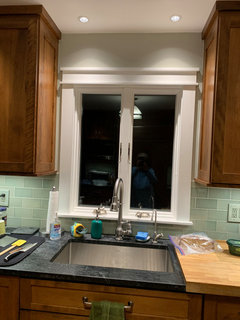
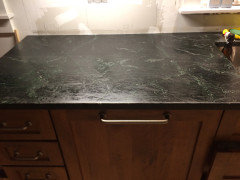
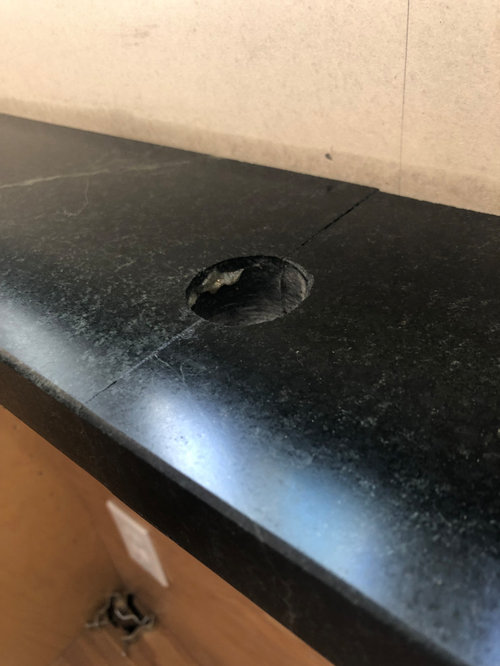
Well, today they went in and I'm concerned it wasn't done quite right. The undermount sink wasn't installed because he said the contractors needed to modify the cabinet then they can just use the clips that come with the sink. Doesn't the sink need to be glued to the soapstone? There are a few seams (which we anticipated) but they don't seem to be done very well. Should they have been sanded down smooth after joining? I read that the glue or whatever they use should be left to cure overnight before applying any wax or oil, but he applied Howards Feed and Wax before he left. And the finish. He did apply wax so I know that will make it a bit shinier, but even before that it seemed too shiny and didn't have that soft feel that soapstone is known for. They feel more like a granite. So I'm assuming he used too high of a grit. Or maybe it's the wax he used? Or maybe this is just how they're supposed to be? I asked what grit sandpaper I should use on bad scratches (trying to get it out of him) and he just said to call him and he would come out to refinish them because you can't just do a spot-you have to do the whole area. Which doesn't seem right based on what I've read. There's also lines on the stone (I'm assuming from the dolly they used to transport them). It is circled in red on one of the photos. It doesn't come off with hard rubbing. Will it wear off eventually?


I was so excited about these and now I'm feeling disappointed. I guess what I'm wondering is if this is just how soapstone is or if I should push to have them refinished. Any thoughts you have would be very appreciated!


Comments (24)

  • 4 years ago

    That seam is horrible. I can see a lip on it and the back corners of the two pieces don't align.

  • 4 years ago

    Easy fixes; don't worry. Let the guy come out and do his thing.

  • 4 years ago

    I’m no pro but that seem is worrisome for the reasons mxk3 points out. The shiny element? I gave no advice but there is a current thread with that issue too. I’m sorry you’re dealing with this. It looks like a gorgeous piece of stone! I hope you can work things out.

  • 4 years ago

    seam

  • PRO
    4 years ago

    Lay a straightedge on the stone spanning the joint to see if the two slabs are in the same plane.

  • 4 years ago
    last modified: 4 years ago

    It’s quite disheartening to see the constant threads of poorly fabricated soapstone. I’m attaching a link to just one of several threads of this type Here, in which I’ve commented.

    And, yes…that seam is very poorly done. The seam at my sink is smooth, and pretty much invisible.

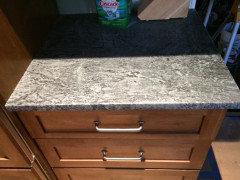
    Before oiling or waxing, the counters should’ve had a matte appearance, without shine. This is day of instillation…before oiling:

    And, after first oiling:


    J Bank thanked darbuka
  • 4 years ago

    @darbuka thanks for the photos and the link! Mine was definitely already shiny before installation. I read a lot of your replies on here when I was trying to decide what kind of stone I wanted-you were/are very helpful!

  • 4 years ago

    @Sammy @porkchop_z5b_MI How should the seam be fixed? Just sanded down? I thought it didn't look right. :(


  • 4 years ago

    Glad I could be of help…sorry you had a less than satisfactory outcome.

    A few things…1) soapstone is so dense and heavy, it does not need to get glued down to the cabinets or the sink.

    2) You definitely can sand small areas of the stone that have scratches. I have a very hard variety, Belvedere, which doesn’t scratch easily. But, when my husband dragged a cast iron pan across it a few years ago, I lightly rubbed the area with one of those rough, green Scotch pads, and then applied a bit of oil. A few days later, the scratches couldn’t be found!

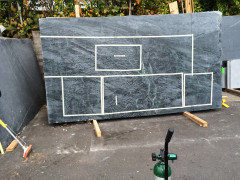
    3) Yes, you should’ve had a say in how you wanted your slab(s) templeted. At M. Teixeira, a staff person stood next to me with a roll of tape and a Sharpie pen, and marked off the sections I wanted, with locations. The sink cutout is clearly marked.


  • 4 years ago

    So I asked my installer what grit he finished it to and about the seam and this was his reply,

    “I don’t refinish the top of the counter. That is the finish it comes with from the quarry. We only polish the edges when and where they are cut.

    As for the seam at the faucet, I only have so much control over the flatness of the stone. I could attempt to sand that out, if you wish.”

    I’m not real thrilled with that answer. I’ve contacted Dorado (where the slab is from) to ask how it is treated at the quarry, and Vermont Soapstone Co. and M. Texeira to ask about how to fix it. This is just so frustrating. 😞

  • 4 years ago

    Every time I see pics of darbuka’s kitchen, I am green with envy ;)

  • 4 years ago
    last modified: 4 years ago
    Well, that explains the problem. Your counters were not fabricated (sanded). What you have is a polished stone. If you want the true silky, matte finish, someone’s going to have to come to your home; sand them on site.

    There’s this, from Teixeira’s website:

    Teixeira’s slabs are polished at the quarry. However, they are then shipped to the various Teixeira locations where they are fabricated properly, for installation.

    Dorado needs to be made aware that this distributor/installer, is not following the proper procedure for fabricating soapstone. It sullies Dorado Soapstone’s reputation, and makes for an unhappy customer.

    I hope one of the three sources provides you with a solution. Pls keep us posted.

  • PRO
    4 years ago

    The seam at the back of the sink is well within industry standards and far from "horrible". Don't forget, when the faucet is installed, you won't see half of it.


    If your stone top is strapped in place, you should have dabs of silicone or adhesive to hold it in place as the straps and/or harness are powerful enough to lift the tops from the cabinets.


    "The undermount sink wasn't installed because he said the contractors needed to modify the cabinet then they can just use the clips that come with the sink. Doesn't the sink need to be glued to the soapstone?"


    The blocking at the top sides of the cabinet needs to be removed; it kept the cabinet square during shipping and has no structural function now. It should have been removed with a hammer before the tops went in, but a multi-tool will buzz it out now. Don't use clips please; they leak and are difficult to access. There are adhesives for sinks such as Black Mamba, but they should only be used on bath vanities with larger negative reveals because they're too thick to make a good looking and sanitary seal at kitchen sinks. You want a strapped or harnessed sink with a silicone seal between the sink flange and the stone bottom. Silicone has adhesive properties, however, its function here is that of a gasket.

  • 4 years ago

    How on earth can that seam at the back of the sink be industry standard? I can see a lip for goodness sake, even from a distance in the long view, and the slabs don't line up. No way.

  • 4 years ago

    I agree. If that’s the countertop industry standard, then that ”industry“ has very low standards. It’s certainly not standard within the soapstone specialists community. I highly doubt M. Teixeira has ever left a customer with a seam like that…or Vermont Soapstone, or any of the other reputable real soapstone companies.

    The seam at my sink is totally flat, and invisible…unless you really are looking closely for it. That’s the way J Bank’s seam should be.

  • 4 years ago

    Fabrication does not typically include refinishing of the entire surface of the stone, only the cut edges get polished.

  • 4 years ago
    last modified: 4 years ago
    @HU-545516693, not so for soapstone, which gets fabricated differently than granite, marble and quartzite. A soapstone specialist, like M. Teixeira, receives polished soapstone slabs from the quarry, and then sands the surface to a matte, silky finish. Even the ”cut edges” get sanded to a matte finish, before installation in a customer’s home.

  • 4 years ago
    last modified: 4 years ago
    @darbuka While Teixeira does offer different finishes, they do not necessarily refinish the slabs unless customer requested. Soapstone is not harder to install than other materials, it is actually considered easy enough for a handy DIYer to do. Granite installers are perfectly capable of installing soapstone.

  • 4 years ago

    @HU-545516693, yes, Teixeira offers a couple of different finishes, leathered being one. However, unless leathering is requested, all of their soapstone tops are given a matte finish. No one, I mean no one, orders soapstone counters and asks for a shiny, polished surface. Soapstone is all about the matte, silky smooth look and feel. Otherwise, you might as well get a black granite.

    I never said soapstone was ”harder to install than other materials”. Read closely. What I said was, soapstone is fabricated, i.e., finished differently. As I said, above. Granite installers may be capable of installing soapstone tops, but I’ve yet to see or hear about a granite dealer who finished the tops properly. Generic stoneyards need to educate themselves about the uniqueness of soapstone. They just don’t seem inclined to.

    As discussed in another thread, I suggested people can save money, by sanding their soapstone themselves. They just need the proper tools, and the knowledge of what number grit to use.

  • 4 years ago

    So maybe tops aren’t always refinished by the fabricator…but I mentioned several times that I wanted a matte finish and didn’t want it to be shiny. He said (in writing), “We polish to a matte finish.” I’m definitely kicking myself for not getting into specifics and just trusting that he’s done this before. The photos he showed me of past projects were a beautiful matte finish so I assumed…and I know what happens when you do that. My contractors were appalled by his work when they arrived this morning. He has offered to come back to sand the tops down so I guess that’s good. But I don’t know what grit to ask for. The interwebs seems to say 80, but I also saw 120…

  • 4 years ago

    @Joseph Corlett, LLC Now I'm not sure who I should have install the sink. My contractors tried using the clips the counter guy left but they couldn't figure out how it was supposed to attach. They said they've never had to do a sink with stone before-that the counter installers have always done them. And my counter guy said he's never done one-that the plumber always does it. I'm so frustrated I just want to cry. How would you recommend installing an undermount stainless sink now that the counters are already installed?

  • PRO
    4 years ago

    I've always had the sink put in by the counter guy.

  • PRO
    4 years ago

    Don't panic please. It's easy.


    You don't say what sink you have, but it'll probably dunk into cabinet through the cutout. If it won't, tap the cabinet front off please.


    Remove the top side cabinet blocking with a multi-tool. Screw the clips on a Hercules Universal Sink Harness or a couple Sink Straps to the cabinet sides. Dunk the sink. Silicone the flange, run a bar clamp through the drain hole and through a 2x4 spanning the cutout, adjust the reveals and snug the sink in place. Attach the straps/harness, pull the clamp, Windex the squeeze-out, and you're done.


    Oh, install the faucet before all this please. Much easier.