

Stainless And Butcher Block Counters?
I’m remodeling my kitchen, DIY. Trying to decide on countertops. Mostly thinking about aesthetics here.
I have no renderings, but will try to paint a word picture of what’s going on. I'll also attach a photo of the kitchen in its current work-in-progress state.
There will be a straight 16 foot run of lower cabinets along the south, exterior wall with a double window. These will be five separate pieces. From east to west, they are:
- storage and countertop appliances cabinet: this is where appliances that can’t be operated in or won’t fit in the pantry cabinet appliance garages will live, think toaster oven, sous vide sticks, microwave, etc.
- prep sink cabinet: sink about 12“ x 24”
- prep station cabinet: this is where most prep will get done
- wash sink cabinet, sink about 18“ x 24“.
- dishwasher + dish storage cabinet.
Each cabinet will have its own, separate countertop. The sinks will similarly be separate from adjacent countertops. I do have a plan to avoid water dripping between sink and adjacent cabinet.
Lower cabinets, other than the two sink cabinets, are all inset drawers, Shaker style, maple, free-standing furniture pieces with 4“ legs. Have not decided on finish but probably will paint them white or try to stain the maple a medium, slightly honey tone.
No backsplashes behind the cabinets, but each cabinet’s counter will have an integral 4” rear ”wall”.
Sinks will be farm-style, made to measure, stone type TBD. Faucets will be T&S commercial wall-mount, wrist handles, pre-rinse hoses.
No upper cabinets. Maybe a couple open shelves, TBD. Or maybe some art.
The range is on the east wall: 36” American Range (stainless, basically a commercial range adapted to residential use). The range hood is a 48” CaptiveAire (stainless, a commercial hood).
The dishwasher is a Hobart LX30H (stainless, commercial undercounter sterilizer, uses a rack). Perhaps relevant to the countertop choice, this dishwasher emits a cloud of steam every time you open it, and you open it 10-20 times for dinner prep and cleanup. The rack comes out dripping and steaming and needs to be set on a counter for the dishes to air dry which only takes a few minutes.
On the north wall is the refrigerator and a wall of pantry cabinets. The refrigerator is a True T-23 (commercial, top and bottom door, no freezer - we have a freezer in the basement).
The west wall is French doors to the backyard.
There will be a smallish island, details TBD, just big enough for a multi-level baking rack holding half-sheet pans and an undercounter refrigerator.
Floor is wood, fir in 4“ boards. Original floor from 1911 so lots of, umm, character.
Wall color TBD. East wall will be tiled - the whole wall, from floor to ceiling.
A lot of polished copper pots will be hanging, mostly from a central copper pot rack above the island. Although, I’m open to moving them to hang on the walls, as they do block the view across the kitchen.
So that’s the general look. Lot of stainless steel, albeit commercial grade which isn’t as shiny as high end residential stainless appliances. Stained or white cabinets. Copper pots everywhere.
Usage is a lot of cooking, including large dinner parties with many courses. People do, unfortunately, like to hang out in the kitchen but I’d prefer they not, so there will be no seating at the island or any of that nonsense.
So, finally, the countertop choices.
I’d do stainless steel, butcher block, copper, or zinc. I’m open to having the three lower cabinets have different counter materials. For the island, I’d do any of those, plus stone.
For function, I’d like stainless steel, and it would be easy as I’ll have a fabricator make it, but worry it will look too cold. I like copper, would DIY that, and am the kind of person who will polish it regularly. I have not seen zinc in person, except in some French businesses, but I think I can DIY them. For butcher block I’d prefer end-grain, and could DIY it or buy it, I think that and copper would warm up the kitchen.
Thoughts?
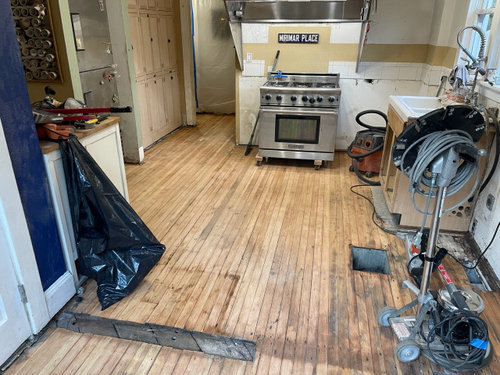
Looking east. Lower cabinets will all be on the south (right hand) wall.
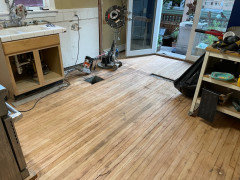
Looking west. I’ve just finished tearing out a stone tile floor, its cement board backing, plywood subfloor, old vinyl tile, and the awful black asphaltic mastic used to glue the tiles to the original wood floor. That original floor is now stripped and ready for repairs, sanding, and finishing.
Comments (47)
 2 years ago
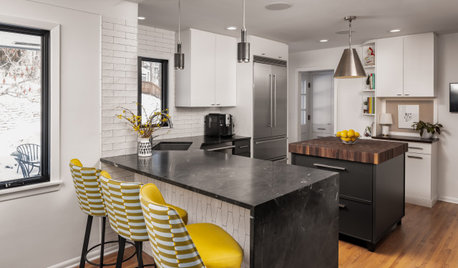
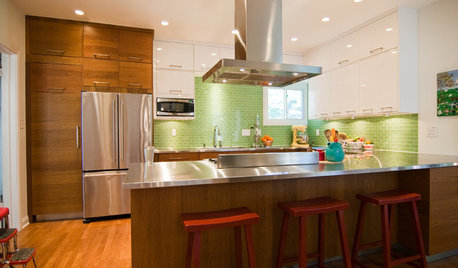
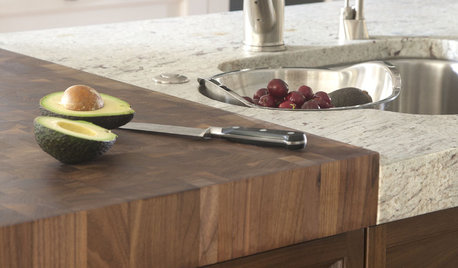
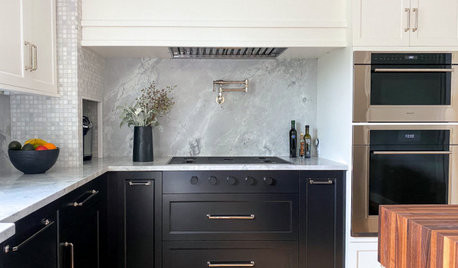
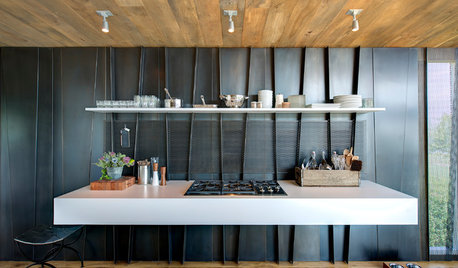
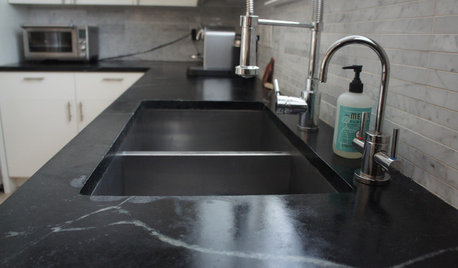
It sounds like an eclectic wonderful kitchen. I think your wood floors, copper pots, windows, and careful wall color and lighting choices will make your space warm enough to use stainless. In your situation that would be my choice. Here are a few pics of kitchens with stainless that feel warm to me. A touch of wood on your island will help.
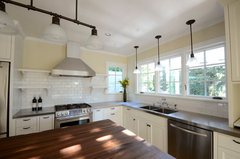 Southwest Portland Residence · More Info
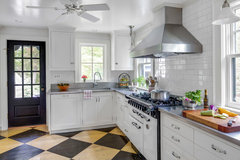 Integrated stainless steel sink and counters in a cook's kitchen- Concord, MA · More Info
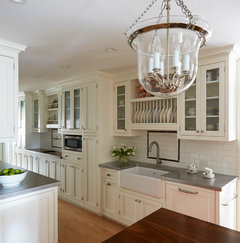 Elegant Lakefront Condo Renovation · More Info
I love eclectic and patinas. I researched the hell out of butcher block counters. Europeans seem to be fine with them anywhere, Americans are cautious of places where they encounter water. In the end, I realized I'm fine with patina, but not blackened, rotting wood. I ended up with walnut on the dry side of my kitchen and would caution you against wood near your sink unit, your dishwasher, and your drying area.
Also, why are you using separate counters on each lower piece instead of one or even two counters that span the lower pieces? It sounds like it will look choppy and be a pain in the ass to keep crumbs and everything else out of the seams.
In the "you didn't ask for it" column of advice - I love an inset cabinet with shaker doors but I really appreciate a flat front drawer with inset. Are your lowers going to be mostly drawers and will you be using flat front/
Lastly, I entertain a lot and loathe people with me in the kitchen. Have you considered adding pocket doors to yours? I did so, leave them open on a daily basis, close them when I'm entertaining. Boy do people get the message and I love to whiz around in solitude! Also very useful for containing stinky fish and truffle smells.Related Professionals
Pine Bluff Kitchen & Bathroom Designers · Rock Hill Kitchen & Bathroom Designers · Hartford Kitchen & Bathroom Designers · Terre Haute Kitchen Remodelers · California Kitchen Remodelers · Tulsa Kitchen Remodelers · Bennington Kitchen Remodelers · Florence Custom Countertops · Montgomery Custom Countertops · Wilmington Custom Countertops · Baton Rouge Custom Countertops · Southaven Custom Countertops · Taunton Custom Countertops · Pittsburgh Custom Countertops · Las Cruces Custom CountertopsJohn Liu
Original Author2 years agolast modified: 2 years agoThose pictures are very helpful, thank you!
Why separate counters - this takes a little explaining.
My house is from 1911, and the original kitchen would possibly have been furnished with separate freestanding pieces of furniture - a table, a hutch, a dresser, etc. No way to know, but before 1900 kitchens were usually that way, after 1920 the “fitted sanitary kitchen” with cabinets flush with the floor and each other was the standard, so this house was built during that transition period. (Thinking about it, I found the original 1911 ad for my house, and it didn’t mention anything special about the kitchen, so I’m quite sure it originally had an unfitted kitchen.)
I got a bug to have a kitchen that was something of a throwback to the imagined original kitchen. For practical reasons I wanted a continuous line of cabinets, but I also wanted separate freestanding pieces that were solid wood, built as furniture, on four legs.
It took years! to find a furniture maker who would make that for me. No custom kitchen cabinet shop will, or can, do it. Custom furniture makers are rare and typically build expensive statement pieces, not utilitarian kitchen cabinets. I wasted almost a year with a California furniture maker who appeared to totally get what I wanted and then his construction detail drawings showed plywood boxes with stub legs. I finally found one locally, actually two young partners. One has an architecture degree, the other art and business degrees, they are college classmates of my daughter. They did a great job, also built my pantry cabinets.
(I don’t think they want to ever do another set of kitchen furniture, the volume and weight of the things was too large for their small shop; no problem, no one has ever asked them to build such a thing before and no-one will ever again.)
Here is a (bad) photo of the cabinets, in my shop.
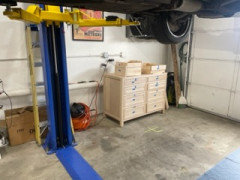
This is the dish storage cabinet. The dishwasher will be to its left.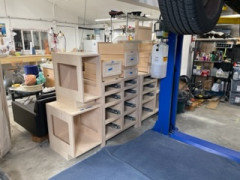
These are the prep sink cabinet stacked on the wash sink cabinet, then the storage cabinet, and obscured behind the lift is the prep cabinet.(I have the furniture maker’s drawings but it is in PDF, and I can’t figure out how to attach that file here.)
Because the storage, prep, and dish cabinets are free standing furniture pieces, they can be moved away from the wall if needed, to do work on what’s in that wall. I may even replace the threaded levelers with casters, the counters will then be about 41” high.
I have to do this kitchen in phases . . . who am I kidding, actually I just like to tinker and add/change things. Also, it will be so much easier to work on the plumbing if the adjacent cabinet is moved.
But what about water and crumbs getting into the gaps between adjacent counters? There will not be two adjacent countertops - each countertop will border either a sink, or the east/west walls. The sinks will go all the way from the front of the sink cabinet to the wall, with the rear wall of the sink higher to be an integral backsplash where the wall mount faucets will live. The sides of the sinks will be a little lower, and the adjacent counters will overlap the sides and overhang a bit (thinking 1/2”) into the sink. So the gap will be only between the top of the sink side and the underside of the countertop. That is an unseen location, and easy enough to seal with weatherstripping to stop splashes.
The countertops’ integral 4” backsplash/wall takes care of crumbs falling behind the cabinet. There will be a long but shallow 4“ deep wall-mount shelf, a couple inches above that, to visually conceal any gap between the countertop and the (old, maybe wavy?) wall.
Incidentally, the “full depth” sinks also mean their width is smaller than their depth, which saves counter space. I wanted the wash sink large enough to fit a half sheet pan (14“ x 18“) flat with room to spare, but didn’t want to take up two linear feet of counter.
The drawer faces are inset, there are no doors at all in the lower cabinets. The sink cabinets were going to have doors, but I’ve decided to install a pullout drawer with full extension slides and mount the door to it as a full overlay drawer face.
Pocket doors - it is quite possible. The doorway from dining room to kitchen, which is the usual invasion route, is located such that I could frame a pocket door there. Right now we have curtains that I pull tightly shut in a attempt at territorial defense. It is a layered defense, a breach of the curtains gives me warning so I can target the “can I help?” intruder with a glare, or thrown food. Last defense is I ask them to take the trash. And the recycling. And the compost. They usually get the hint.
(This house used to have pocket doors between the living room and dining room. Sadly, those were sealed up. The rails and rolling hangers remain, so I might restore that feature someday.)
Oh, there is not a problem with containing odors. The hood pulls 1,000 cubic ft/minute through a six foot long, 10” x 10” duct to a CaptiveAire sideblast fan on the side of the house. You could (but please don’t) smoke cigarettes in the kitchen and there’d be no odors in any other room. In theory, I can fully exchange the air in the kitchen every three minutes.
I’ll show you the pantry cabinets.
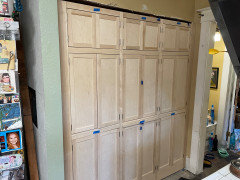
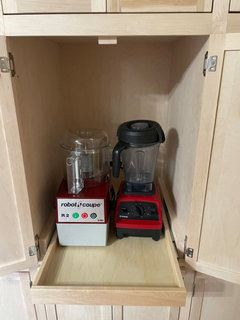
These are normal construction. They used 3/4” maple plywood for the carcasses, and it was a job manuevering then into place. I had to move two copper water supply lines. I demo’d the pointless alcoves that were there and installed these, before demo’ing the rest of the kitchen, which was an unsound decision. Some upper and lower trim and painting remains to do.There are receptacles in the left and center cabinet for appliances - mixers, blenders, etc - that will slide on rollouts. There is also a switched receptacle in one of the upper compartments for future low voltage lighting, and (maybe) a fan and duct so that I can run something in there that generates a bit of heat or moisture - like sous viding. Tinkering! Other than the garages, it is all pullout drawers of various sizes. The cat has her own drawer sized for kitty food cans, etc.
- 2 years ago
This is a great kitchen. Hope you will post the final pics. I gave up on kitchens that emulated the original house when I moved into a home built in 1852 and the original kitchen consisted of an outdoor shed like structure with an outdoor fireplace next to the outhouse. Instead I nod to inspiration of various eras. (I love an early 1900's butler's pantry.)
Thanks for the great tactics for getting guests out of the kitchen.John Liu thanked Kendrah John Liu
Original Author2 years agolast modified: 2 years agoWaving around a big dead fish and saying "anyone want to clean this fish?" also works a treat.
I think everyone should have an emergency fish stashed away.
Oooo, a butler's pantry - I can only dream.
 2 years ago
Following and looking forward to seeing the progress on your kitchen. For what it’s worth I think zinc counters would look great in your kitchen.
John Liu thanked MelissaJohn Liu
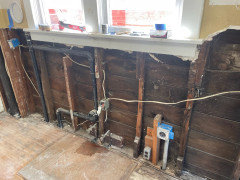
Original Author2 years agolast modified: 2 years agoThe sink wall is opened up. Every outlet and switch has to be moved. The undercounter outlets to match the new sink and dishwasher locations, the above counter outlets and switches because they are too low for the new, much higher, counters. Plumbing for two sinks. It is easier to open the whole wall.
And you find . . . stuff. Like the enthusiastic notching of the studs. I guess it doesn’t matter, nothing has fallen or sagged yet, but still we are going to sister those notched studs supporting the header.
This wall was opened within modern times, when the ABS pipes were installed and the original lath and plaster replaced by screwed drywall. I can’t think of why they needed to notch the studs so much.
I would like zinc. Finding an affordable fabricator locally may be hard. But I can buy it in sheets and DIY, it is a softer metal.- 2 years ago
I think everyone should have an emergency fish stashed away.
No hood can rid that smell!John Liu thanked Kendrah John Liu
Original Author2 years agolast modified: 2 years agoWhen the wall is open, might as well add circuits so that the trips to the basement to reset a breaker are fewer or over. In place of one 15A circuit, we’ll have two 15A and two 20A.
P.S. Don't mean to mislead - what I'm doing on electrical is not "best practice"/code, which is: separate dedicated 20A circuits for each significant load (fridge, micro, toaster oven, dishwasher, disposal, etc), one or more 15A circuits for general outlets, one or two 50-60A circuits for electric range or cooktop/oven, plus separate lighting circuits, with most of these being AFCI and GFCI protected. Strictly speaking I should have more 20A circuits.John Liu
Original Author2 years agolast modified: 2 years agoI thought the sinks would be easy - soapstone farm sinks, done - but it turns out there is much more to it, most of which I haven’t any way to decide on.
There’s the material, of course. I’ve been warned that soapstone is easily gouged, even by dropped cutlery never mind a carelessly handled saucepan, and needs regular mineral oil treatment to stay attractive. This is going to be a hard working kitchen and I’m not wanting to massage my sinks with oil and set down heavy pots with great care. So I don’t know what the sinks will be made of.
And then there’s the dimensions. Width and depth are mostly determined by the sink bases, plus some front overhang - I’m thinking not much, lest you give yourself painful hip pointers just walking around - but height can be adjusted. Naturally, I’d like to be able to fully submerge my tallest stockpots for a serious soak, but is that realistic?
Of course, the choices of deck mount or wall mount faucet, in deck soap dispenser or none, etc also have to be made.
So I screwed together some boxes from scrap 3/4” plywood and found some plastic totes that fit nicely inside. I figure on installing drain and faucets - a wall mount on one, my old deck mount on the other - and trying these out. If the “sink” is too tall, I’ll cut it down and try again. If the front protrudes too much, I’ll shift the “sink” back. And so on.
I figure that after a couple weeks, we’ll know what we want - and then I’ll have to get the real sinks fabricated. So I hope these plywood and plastic tote sinks can last for a month or so.
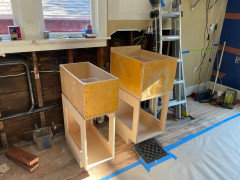
I can already say, the “sink” on the right is going to get cut lower. It’s way too tall, I feel like I’m groping for the bottom of a pit. The “sink” on the left is better, but may need to be raised to be closer to the countertop height.I’m also having a sheet metal shop make trays to line the interior bottoms of the sink bases, with a drain and a hose going through the floor into the laundry sink in the basement below. A similar drained tray will be under the dishwasher, and another under the fridge. A lot of work is going into this floor restoration, so I don’t want it ruined by a leaky fitting someday.
- 2 years ago
I prefer a sink that is not too deep, nor too shallow. I would not want one as deep as a stock pot. Part of it is because my back is not strong and it is harder to lift things that sit too low, like a pot full of heavy water.
I once had a wall mounted faucet in a 1920s apartment. It was a PITA to fix the pluming and the owner trashed the tile wall to fix the pipes inside. Don't know if this was necessary, but it made me think I want pipes that are incredibly easy to access.
Many people here complain about in deck soap dispensers. But I adore mine. I don't like junking up my counters with too many bottles and doo dads. I find it plenty easy to restock with dish soap. A few clever folks on here store a huge gallon of costco dish liquid on the cabinet floor under their sink with a tube in it connected to the soap dispenser. My cabinet space is too limited to do that but it is a nice idea.John Liu thanked Kendrah John Liu
Original Author2 years agoYes, I’m seeing the “cons” of a very tall (colloquially, deep) sink. And I think a built-in soap dispenser is super convenient.
Since I’m having the sinks made, I can have the wall mount faucet mounted in the back ”wall” of the sink, in a space that can be easily accessed. I realize that makes no sense - I’ll have to draw a sketch of what I’m thinking about.John Liu
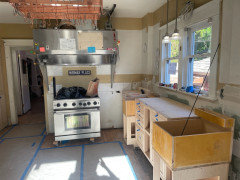
Original Author2 years agolast modified: 2 years agoThe sink wall is closed up, I have a few minor things to do, and eventually baseboard trim and paint, but the base cabinets simply roll out of the way. I’ve moved those cabinets roughly into place.
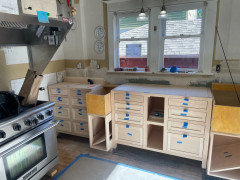
The left base cabinet, that abuts the range wall, will be for storage of stuff used for cooking - maybe tools, staples, not sure.It isn’t a comfy place to stand and work, because you’re squeezed by the hood and the future narrow landing-zone table/shelf that will be by the range, but you can easily reach in there to get things.
It’s an awkward little bit of floor, but if I had a corner cabinet you couldn’t stand there at all. And I loathe corner cabinets.
I’ll put two open shelves on the wall, between the hood and the sink wall, for toaster oven and microwave. Two 20A circuits will be in that wall.
John Liu
Original Author2 years agolast modified: 2 years agoThe center prep cabinet is where I figure on spending most of my happy time. It is under the window, not centered but I don’t have symmetry issues.
Prep sink to the left of the prep area, which I find makes sense for a right handed cook. The open spaces in the middle of that cabinet will have inset doors, I originally thought sheet pan storage, now i’m thinking of adding a narrow, deep, tall pullout drawer for bottles of oil, vinegar, mirin, stuff you use when prepping.
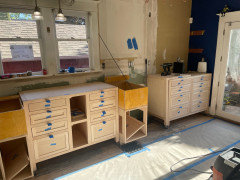
The two sink bases will be fixed in place, and since they are narrow, I didn’t like the idea of trying to get in there to fix a leak or replace a disposal. So the big openings cut in the sides are for access; just roll a cabinet out of the way and you can easily service the under-sink stuff.I will add a slideout drawer at the bottom of each sink base, with the doors used as drawer faces instead of hinged. If I put the disposal back as far as possible, I should have a bit of useful space there, for a trash container perhaps.
Each sink base is also getting a metal spill pan, that will drain to the laundry sink below.
Then there is the wash sink, the dishwasher space that will also get a drained spill pan, and the flatware and dish storage cabinet. There is an antique cabinet on the other side of the kitchen for glasses, mugs, etc.
I’m hoping to not have upper cabinets. Instead I’d like to install picture rails and hang art, or a big mirror, chalkboard, etc.
And frankly I can’t quite afford to have my furniture maker build more cabinets for awhile. The pantry cabinets and base cabinets shown in this thread cost about $23,000. I still need to have them build me an island. The cabinetry is turning out to be the most expensive part of this kitchen’s budget reno.
John Liu
Original Author2 years agolast modified: 2 years agoSo, now that you see roughly what things will look like . . . any new thoughts on counter and sink materials?
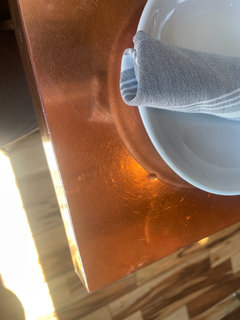
I can buy enough 22 mil/16 oz copper sheet for the three cabinets for about $600, and form and solder the counters myself. This would be the budget alternative.
(EDIT also, the sheet metal shop that has made some custom ducting for me says if I build the wood substrate, they can wrap it with roofing copper, like 20 oz.)
Here is a copper table at the place I had lunch - my work would basically look like this.
I can order a side-grain butcher block counter - e.g. for the prep cabinet - for about $700. ( EDIT $570 delivered.)Both the copper and wood alternatives will probably cost me less than having contractors come out and install laminate counters, and they’d look pretty cool I think.
I also found out where the local restaurants get their stainless steel counters made, and could have them make SS counters. They’ll be heavy gauge, commercial grade material, more utilitarian than beautiful. I could get out the buffer and polish them to any degree desired, including mirror finish - but probably won’t.
My plan had been to have the two sinks made from stone - soapstone, marble, etc. One problem is the two sinks won’t use a whole slab. Another is I’ve been quoted $1,500 per sink excluding materials. Ouch $5,000 for the sinks? Maybe I’ll see what fabricating from SS will cost.
What would look good and work well?
John Liu
Original Author2 years agoI’ve designed a metal apron front sink that can be folded and welded from a single piece of stainless steel sheet.
A little paper model confirmed the origami will work.
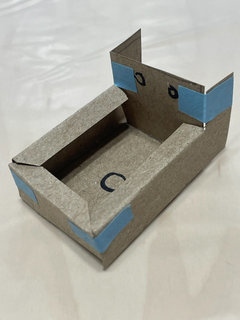
The open top and back are for easy access to plumbing. There will be a cap on the top, and the back will sit on the wall. Hopefully the commercial grade SS used will be thick and stiff enough that it won’t need reinforcing. I will have threaded studs welded to the sink bottom, so that it can be bolted to the sink base.I’m going to use the temporary sinks for a couple days, before finalizing the sink dimensions.
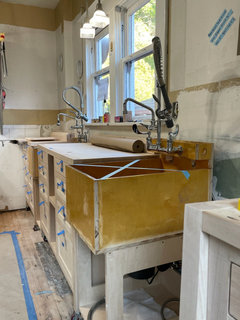
I’ve already learned that having the apron front protrude more than 1/2” will be irritating. Then I’ll do the dimensioned drawing and send those out for bid.I don’t know how much these will cost to have fabricated, or how long it will take. Hopefully not too long - I’m unsure how long my epoxy-flooded plywood boxes will remain watertight!
John Liu
Original Author2 years agolast modified: 2 years agoHey, can I get opinions?
SWMBO (my better half - it is a Rumpole of the Bailey reference) has instructed that an upper cabinet WILL be had on the far right end of the kitchen. My views on the elegance and spaciousness of open shelves, or the opportunity to hang art, were dismissed. Grump. You’d think it was her kitchen or something.
So I will commission my furniture maker to build it. It will be anywhere from 36” to 50” wide (undecided) and go in the corner you see here.
Questions:
- Go to ceiling, or not?
- Glass front doors ok? I figure if the stuff inside gets too unsightly, I can apply some vinyl window treatment to make the glass not so transparent.
- Style - the base cabs are very plain, Shaker-ish, maple, zero adornment; I was going to specify the same for the upper. Only ”features” being trim at the bottom to conceal under-cabinet lighting and trim under each shelf to conceal in-cabinet lighting. Ok, or will that be too plain?
- Weight - I was going to request the stiles and rails be thinner, and the general construction be lighter, than the solid 2 x 2 maple used in the base cabs. If constructed similar to the base cabs, the upper will be too heavy for me to install, without a lift or more big guys than I can round up at short notice.
- Depth, and clearance to counter? - that end of the base cabs is not intended to be a prep zone - its a dish storage cab and maybe a toaster or tea stuff will live there so that people seeking either will stay out of my way. Countertops will be about 26” deep.
- What features are handy to build in? I don’t know what bells and whistles one puts in upper cabinets, if one is having them custom built. Racks for hanging stemware? Microwave cubby? Retractable pull-up bar?
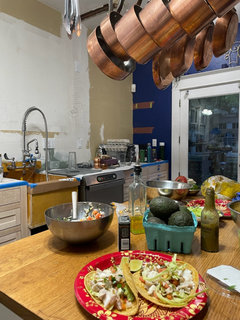
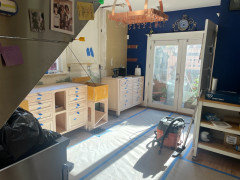
John Liu
Original Author2 years agolast modified: 2 years agoI’ve been stalled waiting for stuff I ordered to be fabricated, but it has arrived.
First was the butcher block countertop for the middle cabinet. It is just set on the cabinet here; I need to oil it and cut a 4” high, maple ”backsplash” to go between countertop and window.
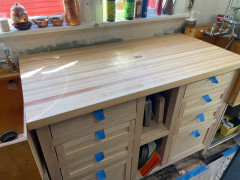
Then the sinks were done. These are 18” W x 25” D and 12” W x 25” D, 14 gauge stainless.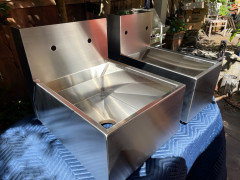
The top sink edge is folded to reduce splashing and add stiffness.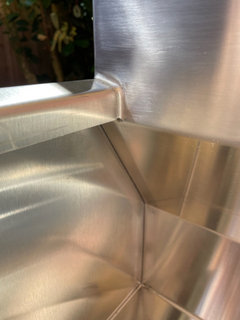
There is plenty of room for connecting the wall mount faucets, and the bend below that gives a little more sink basin volume.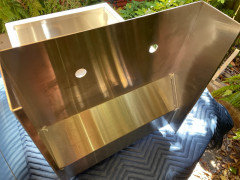
We’ve decided it would be helpful to have more glassware storage in an upper cabinet, but not helpful enough to have my furniture maker build it ($$) so I’ve been looking for an existing cabinet that I can refinish and wall-mount. Here’s what is looking good: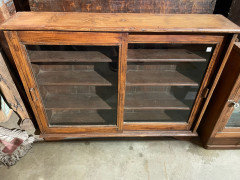
This is 44” W x 33” H but only 9” D so it won’t be “in your face” like a deep upper cabinet might be, while still accommodating glassware nicely. I’d need to strip and refinish it, then mount above the right side cabinet.John Liu
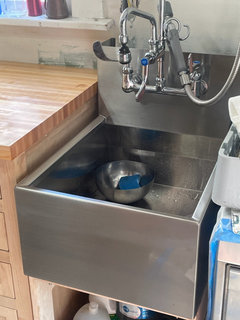
Original Author2 years agoInstalling sinks. Ok the deep steel sink and commercial faucet/pre-rinse does give a bit of “minimum wage dishwasher” vibe, but it works great.
 John Liu thanked thinkdesignlive
John Liu
Original Author2 years agolast modified: 2 years agoProbably.
The cabinets are currently on casters, and quite high with countertops at over 40", which is great for my tall family. If we should want lower countertops, I can remove the casters and drop the countertops by 2 1/4", or trim the cabinet legs by another 0-2". I wanted to make sure that would not require new sinks being fabricated (or cutting down the sink bases and opening the wall to reposition drain). So I had the sinks made so their sides are, as you see, a few inches lower than the countertops.
The issue is splashing onto the exposed cabinet sides. The sinks are deep with folded over top edges to catch splashing, but there will still be some. I can either sheath the entire cabinet side with metal (copper or SS sheet) or use the same metal sheet to make a sort of "flashing" to cover the exposed part and re-direct water back into the sink. I haven't decided, but for now the cabinet sides have a clear finish for temporary protection. They are solid wood, so not that fragile.
Conversely, if we ever want the sinks raised - or if the splashing is more of a problem that I expect - it'd be fairly easy to extend the sink bases up a few inches. The plumbing will accomodate raising the sink drain more easily than lowering the drain.
P.S. My original thought had been for the sink sides to come right up and butt tight to the underside of the countertop overhang. However, this is an "unfitted" kitchen and after living with it a bit I decided that looser clearances between adjoining cabinets would be easier to deal with and maybe look more appropriate.
P.P.S. This is kind of a "figure it out as you go" remodel. It is a weirdo concept, everything is non-standard and custom built. I'm solely focused on our preferences, not on resale, as I plan for the house to say in the family after I'm gone. I'm doing most of the work myself, and the kitchen is usable (like, all appliances are back in and working, we are cooking in it) so there is time to sort of live with things and then modify them as needed. My target for having it "done" as in "mostly presentable" is by Thanksgiving.
- 2 years ago
I’m sorry if I missed something as I didn’t read the whole thread. I don’t understand the concept behind the castor cabinets. The day to day splashing on the sides of the cabinets will be troublesome and it just looks awkward. As you don’t care about resale (or my opinion :) all that probably doesn’t matter. Hope it’s working the way you like.
John Liu thanked thinkdesignlive John Liu
Original Author2 years agothinkdesign, that is a fair concern. I think I can address it with the sheathing. If not, then I'll simply raise the sinks.
The cabinets are free standing, as this is an "unfitted" kitchen. The casters were originally just a temporary measure to make the cabinets easier to move around during the work without mangling the floor (cabinets are solid wood construction, very heavy) but I liked the extra height so for now at least, they are staying on casters.
By the way, I like the look of the butcher block countertop so much that I've decided to order butcher block for the other two cabinets as well. The only metal countertop now is going to be over the dishwasher next to the sink, where the dishrack is set to dry after the dishwasher is run.John Liu
Original Author2 years agoThe sink bottom is about 12“ below the countertop. That depth seems fine.
We’ve been using the sinks and (before they arrived) some temporary sinks of the same size, for a month or so. No back pain issues.
The only downside of the sink depth has been that some people like to simply pile dirty dishes in there. Some stern lectures have been necessary.
My daughter actually says the sinks should be deeper - but she works in a restaurant kitchen, and is used to very deep commercial sinks. 2 years ago
Im glad you aren't having issues. im shorter, my counters are standard height and my sink is 9” deep from the counter. i cant imagine any lower being comfortable id actually like a sink slight shallower..
John Liu thanked wseaJohn Liu
Original Author2 years agowsea, could you use a sink grid to raise the "effective" bottom of the sink?
John Liu
Original Authorlast yearHere is a prototype of the flashing that stops water from getting where it shouldn’t.
I cut and bent these up from some leftover galvanized steel, to make sure the shape works. I bought some 22 ga brushed stainless for the final pieces. I’ve no way to cut or bend that stuff - SS is tough! - but a friend has offered to cut the pieces out with his industrial waterjet table, and let me use his big finger brake to do the bending.
The flashing is easily removed, for deep cleaning or to move the cabinets.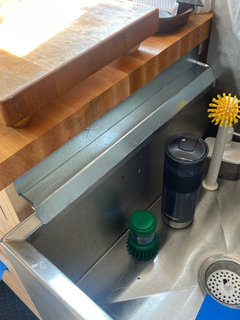
John Liu
Original Authorlast yearlast modified: last yearThis is the current state of the sink wall.
The right and left blocks are finished with Osmo Polyx Oil, with the center block I’m still using mineral oil & beeswax but if staining is a problem, I will flip that block over to the other side which is Osmo finished. After I give the Osmo-finished blocks a final light sanding (600 grit?) I’ll apply beeswax for the soft gliding feel. Wood is a tactile material, might as well make the most of that.
I need to make caps for the sink tops, make the 2.5” ledge that will continue the windowsill along the whole wall, and then finish patching and painting the wall. Since the cabinets are still on casters, they can just be rolled out of the way when I do the wall. The short backsplashes between countertop and ledge will not be done until we decide if the cabinets/countertops are staying at this height.
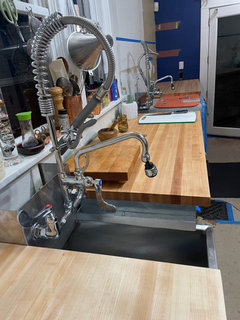
The long faucet spout on the left (prep) sink needs to be switched to the short one as used on the right (wash) sink. The long pre-rinse hose on the wash sink works very well but kind of flops around when not in use; still looking for a solution.The far (range) wall will be patched, and I need to run two 20A circuits to receptacles above that blue tape line. There will be two stainless steel shelves there for countertop oven and microwave to live on - I want to free up the counterspace. I’ll probably use standard commercial shelves; having stuff custom-fabricated is fun but I would rather not spend $3,000 and wait five weeks.
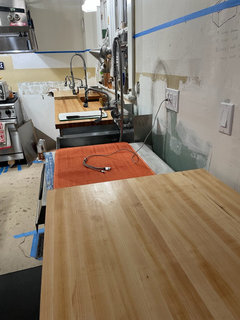
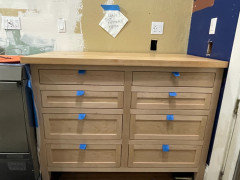
The unsightly orange drying mat in the foreground is sitting on my dishwasher. I’m figuring out what to put over the dishwasher. Some sort of drainboard, draining to the sink. Material - up in the air.I am tired of the blue painter’s tape ”drawer pulls” so we are looking at different styles and materials. In addition to polished or brushed stainless (a nod to modernity), cup pulls (a vintage look), just knobs (a bit weird? no arthritis here though), I’m also thinking of making pulls from a contrasting/darker wood.
John Liu
Original Authorlast yearFirst real dinner made in the WIP (work in progress) kitchen.
My daughter, her friends, and I made
- Beef short ribs with a red wine sauce- Mackerel poached in miso, with a teriyaki sauce (mirin, soy, sake, sugar)
- Tempura veggies
- Oyster on the half shell with uni and salmon roe
- Nigiri, salmon uni and roe
- Seared scallops
- Roasted bok choy
- Something else, can’t rightly recall - grilled peppers?
It was the first serious group cooking effort in the work-in-progress kitchen and it (the kitchen) worked well. We had five people working and there wasn’t serious butt-bumping. I learned that the weird little space between the range and counter and under the hood is my happy place, I could sauce the short ribs, sear the scallops, poach the mackerel, all with no-one in my way. We had enough counter space for everyone, and when I get the shelves up and move the toaster oven etc off the counters it will be even better.
This is pretty much how the kitchen is developing. We use it, figure out where the next thing needs to go, build that, use it some more, etc.
But I really need to get the drawer pulls selected and installed. The blue tape pulls are ripping and it’s a pain to need a utensil right now and not be able to get it because the tape pull just came off.
Here’s my favorite dish of the lot. Mackerel is an oily fishy fish, but if you soak the fillets in cold salted water, changing the water three times, the fishiness all goes away. You boil some miso broth, turn off the burner, then slide all the mackerel fillets into the broth to poach. They can stay in there indefinitely without overcooking, because the heat is off, then when it’s time to serve just pull the fillets out and drizzle with the sauce. Super easy.
John Liu
Original Authorlast yearlast modified: last yearOne interesting thing about improvising a kitchen design as you go, I’m finding, is that as you use the work-in-progress kitchen, you learn what works and can change it on the fly.
I learned something from our little dinner last night that I hadn’t expected, but will change my plans.
This is the Awkward Corner of my kitchen. There is a straight cabinet run with no corner cab, and a range with no landing area, all under the hood. What do you do with it?
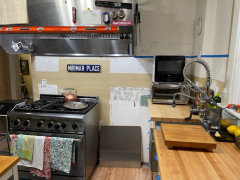
I didn’t want cabinets on the range wall for certain reasons, but I thought you need a landing area by the burners, so I figured on building some sort of shelf on either side of the range, but wouldn’t that obstruct access to the upper drawers etc etc.So last night we had four people actively prepping and three simultaneously cooking on the burners, stuff that was all pretty attention-intensive. We were deep frying tempura, searing scallops, poaching mackerel, and grilling peppers. At the same time.
So it turns out that the Awkward Corner is actually the Magic Corner. I can stand there, have two burners all to myself, sear my scallops and poach my fish, pivot to my landing space on the cabinet behind me, completely undisturbed with no-one in my space.
Meanwhile the peppers can get grilled from the other side of the range, and the tempura fried from the front of the range. Three people can use the burners together, while two or four more are prepping. Even with some slacking and kibitizing, we can crank out a lot of dishes very quickly.
So, my plans have changed. No shelves on either side of the range. I’ll put a shelf above the range, where that old blue street sign is.
I am starting to think that “landing space” is overrated if you have gas, since you can instantly shut off the heat to the burner.
What else is new - installed two 20A receptacles on the wall in that corner, stainless steel shelves coming tomorrow, this weekend the toaster oven and microwave will both be up off the countertop. Next weekend, we’re patching walls and painting.
The priorities of this reno of a smaller kitchen are, have always been:
1. Maximize usable counter space
2. Room for multiple cooks to prep and cook and wash-as-you-go at the same time
3. Maximize and organize storage space
Part of the idea is to get everything off the counters.
John Liu
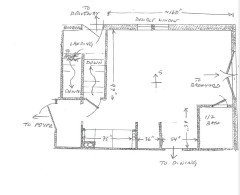
Original Authorlast yearlast modified: last yearI was asked to post dimensioned plans of the kitchen. Astonishingly, I don't have any. I did spend time modeling out various designs in CAD, but realized the time would better be devoted to actual work, so basically I ordered cabinets, tore off the floor, installed cabinets, and have been improvising from there. But I've hand-drawn some rough sketches.
Basic space - in BLACK, walls, doors, windows. Only alteration being considered, down the line, is to add another double window just east of the existing one. It is a smallish kitchen, with a weird shape from when a previous owner reclaimed a mudroom and adding a powder room, and an irritating amount of traffic going through it. EDIT: mistake, 160” is supposed to be 192”.
As it currently stands - in RED, new base cabinets and sinks along south wall, 48" hood and 36" range, new pantry cabs along north wall, 27" fridge in a 36" space, and an antique glass front cabinet we use for stemware. By the way, everything save the pantry cabs and sink bases is on casters at the moment, so I can move it out of the way to work on the walls, floor, etc. Not shown is a large pot rack hanging in the center of the room. EDIT: mistake, 160” is supposed to be 192”.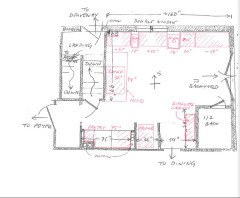
Possible additional things - in GREEN, things I'm thinking of doing. The main thing is the island. There is an IKEA island there now, I plan something stuffed with functional things (bakers' rack, undercounter fridge for prep items, trash pullout, etc). The 9" space by the fridge could hold broom, vacuum, etc. Shelves at either end of the case cabinet run would get more things off the counters. A shelf above the range could be "landing space". There is unused space in the mini-hallway to the foyer. I could scoot the antique cabinet to the side and have about three feet of wall space to use for something. EDIT: mistake, 160” is supposed to be 192”.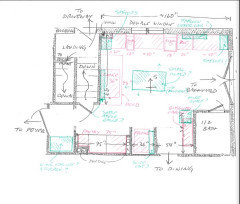
Zones - in GRAY, this is how I think of the zones and traffic. The most important things for me are: 1) to have my cook and prep space out of traffic, 2) have wash/dry well away from prep, 3) have room for more people to prep without getting in my/each others' way, 4) to have as much counter space and storage as possible in the small space available, 5) have guests looking for ice or drinks or conversation as well as through traffic staying out of these zones. We always set up drinks and appys in the dining room, but guests keep coming into the kitchen, darn them. EDIT: mistake, 160” is supposed to be 192”.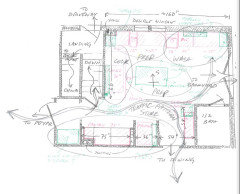
John Liu
Original Authorlast yearlast modified: last yearHere is the unsightly void above my range hood. I need to cover it up. The surround will be purely cosmetic, with no other function, and will be hung from the ceiling, to meet or overlap the top of the hood.
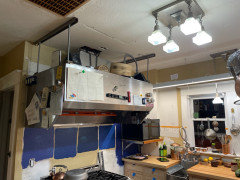
Possibilities:- A faux “cabinet” looking thing, hung from the ceiling. White painted wood with rails and stiles and suchlike.
- A stainless steel surround, visually extending the hood to the ceiling. I’d have that bent up by a sheet metal shop.
- Same as above, but copper. Not in picture, but there is a copper pot rack hanging in the middle of the room with dozens of copper saucepans hanging.
Thoughts? Again, the surround has no purpose but to look good. And ”good” is in the context of this kitchen, which is more of a “working kitchen” than a “looking kitchen”.
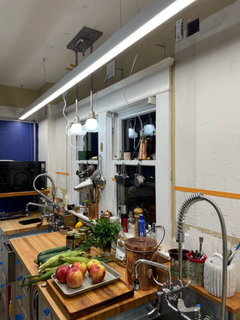
Oh, here is the LED lightbar over the counter run. I love the light quality - even, diffuse, no shadows, and much brighter than the photo shows - but dimmable too. The various wires have yet to be cleaned up. The existing pendants are going away.
John Liu
Original Authorlast yearlast modified: last yearI am thinking of getting rid of all the pendant lights in the kitchen.
Pendants are pretty and go with this old house's style, but the LED lightbars give so much better light, and the combination of pendants and lightbars is too cluttered.
The old layout was roughly this. The existing pendants are the orange rectangles. They were positioned for the original kitchen footprint, over the single sink and the center of the kitchen working area. When I added the hanging pot rack, it had to be off center and oriented at 90 degrees to the island, neither ideal. There was no or little light in the "stacks of clutter" areas, which were just drywall cubbies whose original purpose, if any, escapes me.
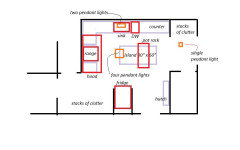
This is roughly the new layout. The island will be smaller and the pot rack re-positioned over the island. The possible lightbar locations are in orange. I could put a lightbar over the pantry wall, another in the hutch area, and a rectangle of lightbars (9’ x 5’ is available) around the perimeter of the island.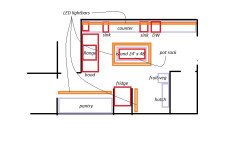
If the glowing-LED-rectangle-hanging-in-space look is too weird, I could put four-pendant fixtures on either end of the island. But they have to be four-light fixtures. It is so dark and gloomy here all winter that the kitchen requires lots and lots of daylight spectrum light - for psychological reasons as well as for cooking.hJohn Liu
Original Authorlast yearlast modified: last yearToday was time to paint. The kitchen proper is a dark blue (Ben Moore ”Starry Night Blue “) with bright white trim. This color needs lots of artificial light at night, it wouldn’t work without the LED lightbar.
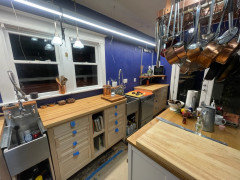
We picked this particular blue by holding polished copper pots up to swatches painted on the wall.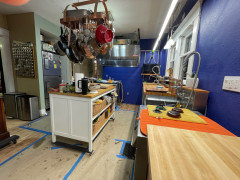
The other half of the kitchen, where the pantry cabinets and refrigerator are, are not yet painted. We might do that side the same blue, or we might use a metallic copper paint that SWMBO is putting on the mini-hallway between the kitchen and the foyer, if that paint looks coppery enough.The ceiling is going to get some little work - moving the pot rack, adding ceiling outlets, hanging more lightbars - so that is getting painted later.
John Liu
Original Authorlast yearI’ve been distracted from the kitchen project by trying to work out a dish for Thanksgiving. The idea is wouldn’t it be great or at least cute if turkeys were serving-size and boneless, so you could stuff and roast them and everyone got their very own whole mini-turkey. I’ve been working on the idea using chicken breast, and the next attempt will be with turkey breast.

Anyway, I’ve started on the floor. It is slow, and dusty, but little by little, progress is progressing.John Liu
Original Authorlast yearlast modified: last yearOnly a little progress to show. Bought some Ikea edge pulls. Taped a few in place on drawers and pantry cab doors.
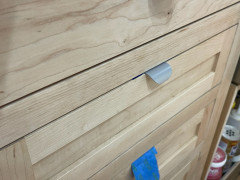
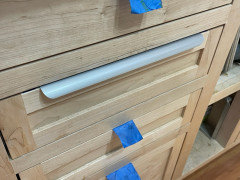
We’ll live with these for a week, figure out desired width, position, and decide if it’s worth making custom edge pulls.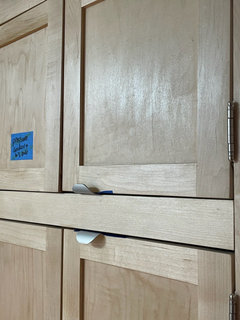
I already know I don’t like the narrow (1.5”) pulls for drawers, don’t like the wide (12” or more) pulls for doors, and don’t like the pulls mounted vertically on the doors (too in-your-face, also my door gaps are too small to fit two pulls face to face).I don’t love the silver anodized aluminum finish on the Ikea pulls; if we make custom ones, they’ll be brushed or polished stainless steel. (Although a friend pointed out we could strip off the anodizing and polish the aluminum on a buffing wheel. Polished aluminum is like a mirror - and a fingerprint sponge.)
I do love the curve and slight thickening of the finger pull; I can’t make that curve or have variable thickness with the facilities available to me. I also love the thinness of the material, which means no notching of the faces and doors.
John Liu
Original Authorlast yearlast modified: last yearThanks, Kate. You reminded me, I need to get some turkey breast and make sure that dish works with turkey, and get the time/temp and stuffing/glaze dialed before Thanksgiving. I also need to come up with a dish for the dark meat lovers; thinking of turkey rillettes or dumplings. The main is going to be leg of lamb, which I like so much more than turkey - but people will grumble if the dumb bird isn’t present.
I actually have been working on the kitchen a lot - sanding floors and adding outlets - but its just not very photogenic.John Liu
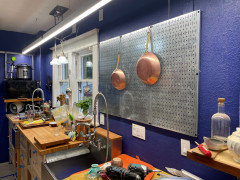
Original Authorlast yearI was planning to go skiing today, but had to stay home and make lattes for a thing my wife is hosting. So I put up three sections of stainless steel tool board. There will be a copper rail above it, with long hooks for pots. The upper half of the tool board will be pots and pans, the lower half other kitchen tools.
 last year
I absolutely adore the work and passion that's gone into your project, John. I'm seldom on this forum these days, but many years ago I was one of the first to make my own copper countertops and I can truly appreciate the thought that's gone into all your deliberations.
I currently also have an unfitted kitchen in a 1910 home with quirky custom-made cabinetry, although I'm in luck in that I married a historical restorationist who's also a carpenter and can whip up pieces as desired. Too many folks believe "it can't be done", or they are not fond of non-standard design, or are limited to the big box options & dimensions.
Your stainless tool board is a case in point: totally non-standard yet so obviously useful to a serious cook; an updated (and likely more easily cleanable) version of Julia Child's famous kitchen pegboard.
I'm sure you've seen the very well-done series of articles by Starcraft Builders on customizing the ergonomics of your kitchen and learning from the lessons of commercial kitchens: https://starcraftcustombuilders.com/kitchen.commercial.htm
Have a great Thanksgiving! Your mini-turklets are giving me food for thought.John Liu thanked Circus PeanutJohn Liu
Original Authorlast yearlast modified: last yearHi @Circus Peanut I haven't "seen" you since I was last active here, back in the marcolo era!
You'd probably posted them before, but I'd love to see pictures of your kitchen. Unfitted kitchens are like hen's teeth here, and always super cool.
Julia was on my mind. She also had her counter height custom-designed for her height. I set mine at 42", but things are designed so that they can be lowered 2" before repositioning the sinks is needed.
The tool board will be very useful, and I was sort of thinking of removing the pot rack - but SWMBO reacted so violently to the suggestion, I was slightly afraid.
I hadn't seen the Starcraft info, thank you. On a quick skim, it looks great, and "midpoint of dishwasher at counter height" would be a dream!
This project has gone on since July, and will stretch well into next year, sigh. I have two more sections of floor to do, and some more electrical and lighting, then we'll be 80% functional for Thanksgiving. The punch list remaining will be long, topped by the custom island that I can't afford to commission from my furniture maker until January. Sadly, I am not married to a furniture maker like you are, lucky girl. But I need to take the next few months off to ski . . .
P.S. How I did the mini-birds was, to brine 1/4" slices of chicken (next will be turkey), then wrap around cooked stuffing, which needs to be very flavorful stuffing as it won't get any more flavor from the roasting. Then I sous vided the mini-bird-bunlets at 135F for 3 hours - the thin slices of white meat are easy to overcook, but SV at this temp/time leaves them very moist yet safely cooked, pasteurization being a function of both temp and time. I did the SV in a steam oven but you could do it in an immersion SV. Then glaze for color and roast at 350F for only about 5-7 min to "set" the glaze. If you try this in a conventional oven, glaze first, use lowest temp (200F?) for a shortish time, temp often, and I'd even try covering in foil at first - anything to prevent overcooking. This dish is different, fun to eat, and you can do it ahead and warm to serve. They'll produce enough dripping for a creditable gravy, but I think I'll do a wine reduction.- John Liu thanked Kendrah
John Liu
Original Authorlast yearlast modified: last yearWe used to go to DeHillerin COOKWARE - STOCK POT & COOKER - SAUCEPAN - KNIVES - DEHILLERIN every time we were in Paris to buy copper pots. I like the 3mm thick pots with iron handles.
I also used to go to Cookin' in San Francisco all the time, Judith had/has the most incredible stock of French cooking stuff. The copper potrack is from Cookin', and carrying that thing to BART was not fun.
Now we get gifted copper cookware from older friends who are in the stage of de-cluttering and passing on their possessions; their kids don't want the old copper, china, or silver so it finds a home with us. Which is good, as the stuff is costly now.
Copper pots are also heavy, which will be an issue as we get older, hence wanting the pots and pans to be hung up rather than having to lift a stack of them from a bottom drawer. Someday I'll have a metalshop add loop handles to some of the larger saucepans.John Liu
Original Authorlast yearlast modified: last yearSo the Ugly But Functional Kitchen, or UBF-K to her friends, is being used a lot. It is still very much a W-I-P, I think we are only about 75% done, but I got sick of working on it and it is ski season, so the DIY is getting a break while the UBF-K gets broken in.

Tonight my daughter is making dinner, with myself and her friend as sous-chefs. The UBF-K has four workstations, which you can see here. ”My” spot, which is always my spot, the figurative head of the table, is by the prep sink and, even though I’m using it, is tidy because I’m a tidy cook. Daughter is using the island station, friend is using the station past the wash sink.We are thinking about the treatment of the long sink wall. The blue paint is not working for us. It is too dark and daughter claims it is Smurfy.
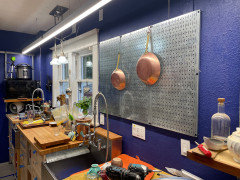
Some ideas we are thinking about:A. Blue subway tiles to about mid-window, then white paint above.
2. White subway tiles all the way to the lightbar. (The pendants will go away). If we do this, I will probably try to curve the wall were it meets the ceiling, like a real subway (think Paris Metro).
iii. Stainless steel to mid-window, then white paint above.
The copper pans and pegboard will remain, but the steel board may be swapped for a wooden one.
The range wall also needs a covering. I’ve always thought the default here would be stainless steel from floor to ceiling.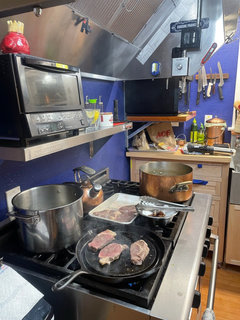





wsea