Software
Houzz Logo Print
smusec

Would you tear the tile out and have it done correctly?

12 years ago
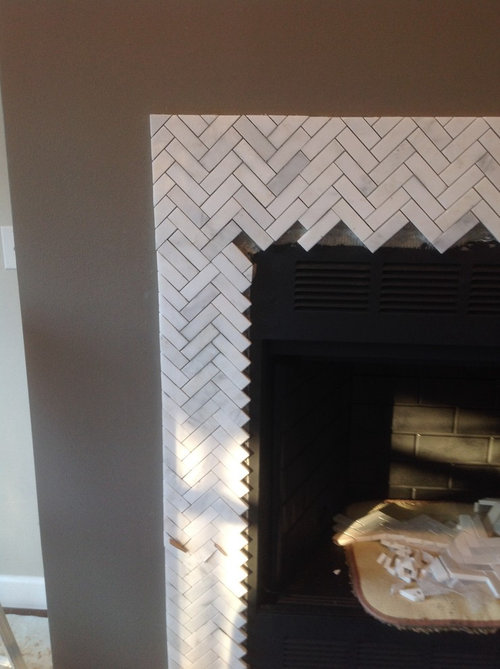
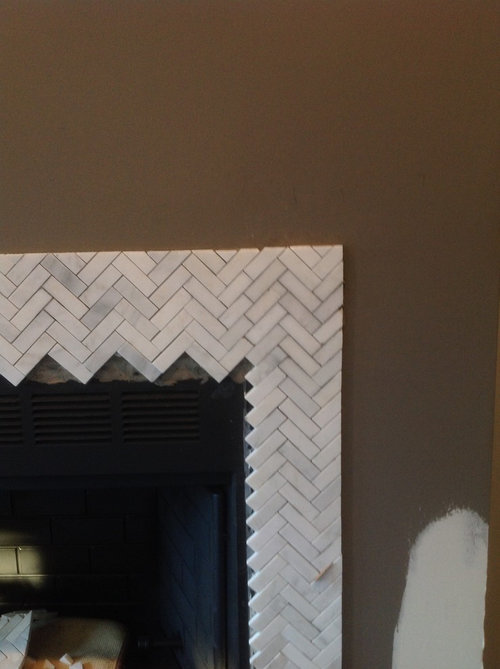
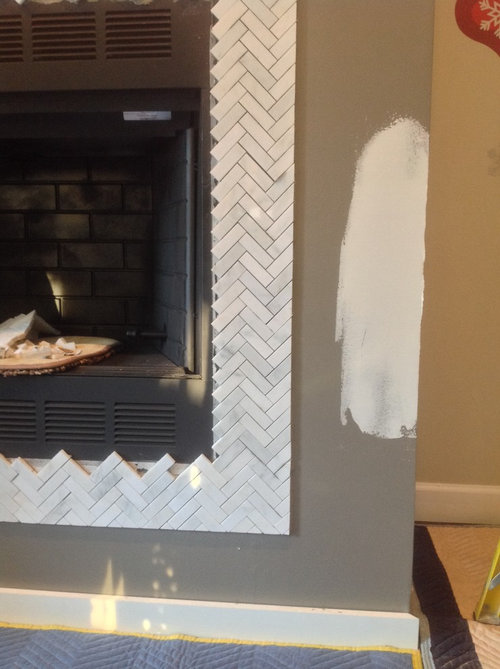
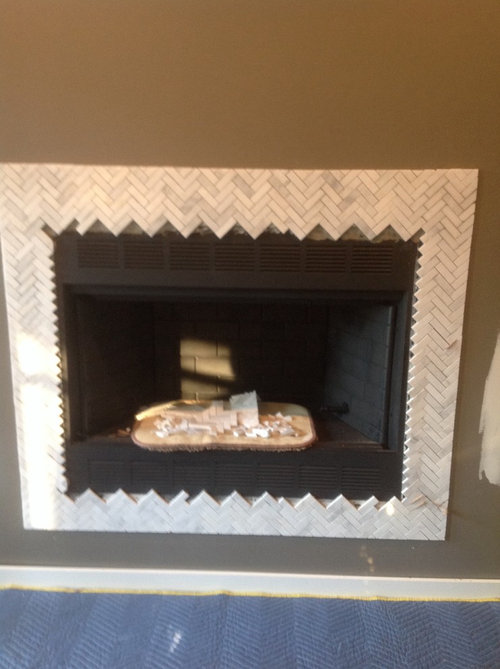
We are remodeling our fireplace and had a herringbone pattern tile installed yesterday. I notice after the installer left that there is several areas in the pattern that are not correct. I'm just wondering if anyone else notices the mistakes? Of course it's driving me crazy but my hubby says leave it. It will cost us $200 in tile and a to. Of aggravation. Please give me your honest opinion. Thanks!

Comments (128)

  • 12 years ago
    Yes!!! I can see the uneven pattern right away and it would bug me to death! Your 2nd tile choice (stacked horizontally) will be much easier to install. To the installers credit the herringbone pattern is a very tough pattern to master, especially in such a small border size like you have. Good luck. Please post pictures of the second try!
  • 12 years ago
    What would you like to say? My picture may not be uploading.
    A glitch in the latest app update I think.
  • 12 years ago
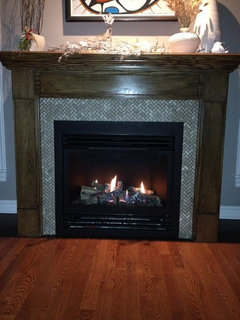
    Here is a quick shot of our herringbone fireplace.
  • 12 years ago
    The floors look orange in the pic but they're the same as the fireplace!
  • 12 years ago
    Vkilpatrick...love the tile! It looks gorgeous. I WILL use that tile someday...somewhere in my house...it's so pretty. Seeing the even pattern of yours definitely helps me realize tearing out my bad pattern tile was the right thing to do though.
  • 12 years ago
    Contemplate the fire, not the the bad tiling that you didn't rip out.
  • 12 years ago
    Ooooo Mr Rodgers you're such a doubting Thomas :) ! There are plenty of pictures on Houzz with similar tile on fireplace surrounds and no inner border tile....?

    http://houzz.com/photos/453166

    I agree there will be a rough cut edge showing around the inner edge but the tile itself is raw and tumbled so shouldn't look out of place. The weight of the tile is really my only concern. I'm afraid of it sliding and causing gaps between tiles, but I will be watching very closely during installation to make sure there are no issues with layout!
  • 12 years ago
    The weight of the tile should be a non issue. The installer can use a temporary ledger board across the upper horizontal section to keep the tile supported while the thin set cures. I just noticed that in the original pictures the outside trim had not been installed when he did the tile work. Now that it is installed you will have less freedom and will need to make some decisions about where cut tiles will end up. Given that you are holding your new tile horizontally I am assuming that is the direction you are tiling. If so I would focus on getting the upper horizontal section to have a full uncut tile running along the opening of the fireplace. In all likelihood you will not end up with full tiles along the upper trim edge or along the lower fireplace opening since you do not have any flexibility with the size of grout lines.
  • 12 years ago
    Have your tiler cut one tile the width of the side of the fireplace and see if you like the edges and look. As for what William is thinking, I am sure you are not going to change to a diagonal as you go down the sides. It will look like tiny bricks stacked up all the way down. I think it will look really good.
  • 12 years ago
    Sad that you aren't getting what you originally wanted but your new tile will be beautiful, can't wait for the pics!

    (Rant) I had an installer lay my bathroom floor tile and he did an amazing job so I called him back to do my kitchen floor. Mistake! He didn't do a very good job. We had a hard time leveling our new cabinets because of the hump he left in the middle where the sink cabinet sits. And the mess he made, I had mortar all over my walls in my living room and my new appliances. Unfortunately, I guess they can all have off days no matter how long they've been doing it.
  • 12 years ago
    last modified: 12 years ago
    If I was tiling this I would do Kiva said for having a finish edge at the fireplace opening and also lay out the tiles start in the middle and see if the sides end up with a solid width of a tile. I think ideally there wouldn't be any joints on the sides (horizontally.) I am editing this because I really don't see a problem of even offsetting the tiles on the side. These tiles should be as easy as the other ones were hard.
  • PRO
    12 years ago
    last modified: 12 years ago
    A couple of comments...

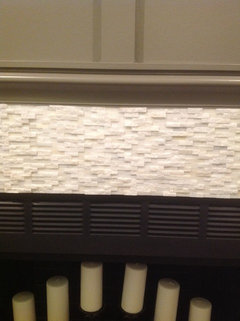
    These pieces look to be 1/2" in vertical height. If you find that after you have aligned your tile sections with the top firebox edge and you have a problem aligning the tile sections with the bottom firebox edge, consider running each leg section through the wet saw to trim it enough to accommodate the overall height dimension needed rather than cut one row in the bottom section down to a narrow piece or resort to a wider grout joint. You can make up the discrepancy within a 1/2" layout with very little visual difference.

    Typically there is a need for grout between the interlocking joints of the sections. The fabricator of the mosaic allows enough wiggle room to interlock on the job which means a little more visible space between sections. Use sanded grout and create dimension to mimic the ups and downs of the split face stone pieces. This way you won't notice the alignment of sections as much. But they will be noticeable.

    With that in mind, do you want to align the interlocking joints above the firebox with the joints below the firebox or off set them?
  • 12 years ago
    Scott design has a good solution for ensuring the bottom horizontal also has a full tile at the opening. The cuts on the vertical legs will not be very noticeable. Not sure if I love the idea of grouting the interlocking sections though since these are supposed to me grout less tiles. I would think the small voids if there are any would be filled by the thin set as they are bedded(hopefully the installer is using white thin set). Personally I would not want to see the grout at every mating sheet of tile.
  • PRO
    12 years ago
    last modified: 12 years ago
    When using a white split face marble such as this, translucent (not clear, not white) water based caulk can be effective in blending in with the white and quartz tones of the stone to eliminate the dark depth lines of the joints, however, it is a very, very time consuming task. Basically a labor of love. Also, for this application, I'm not sure how it would perform near a heat source...cracking, yellowing, shrinking, etc.
  • PRO
    12 years ago
    This is really unacceptable work in my opinion. I know many people said they couldn't tell what the problem was but I noticed right away. I work with a lot of contractors and home builders and this kind of work would never fly. I would absolutely insist they come back and redo this. This is just simply, lazy work.
  • 12 years ago
    Wow...thanks again everyone! All the advise is much appreciated...even the stuff I don't want to hear about, like cracking or how difficult this may be. I should have asked for advice before I had the herringbone tile installed...maybe I could have caught the mistakes before they happened.

    Yes, I will be running the tile horizontally. The tiles in the stacked pattern are a little under 1/2" and there is a perfect cutoff of 8" within the tile which is what I need for the top. On the bottom I do have some room to adjust with a row or less of the tile. We used 6" on the herringbone but if it it shrink so grow by a row of tile it's not a problem. I like the idea of using sanded grout or translucent caulk for the gaps if I notice them. I just bought the tile today. I tried to pick out the sheets with the least amount of gaps.

    Again...thanks everyone for helping.
  • 12 years ago
    How is your fireplace coming? Could you post photos when you get it done? I like both your tile.
  • 12 years ago
    @smusec,
    When you hire a professional to do a job, you have every right to expect them to know what they are doing. I have no idea why anyone would accept work that is substandard.
    You did the right thing, period! :)
  • 12 years ago
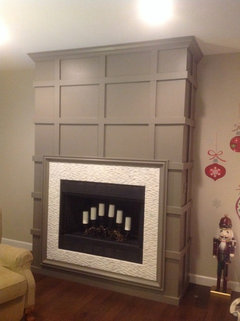
    It's done! I'm sooooo glad we tore out the tile that was installed incorrectly! We are still waiting for the crushed glass linear burner. It comes in January. The candles are just temporary. Thanks for all the advice! I would have used the grey thin set we had left over from the first install if someone hadn't suggested white...I also used sanded grout to fill in small gaps per someone's advice. Now on to the next project...kitchen floors! I know I won't be using a herringbone pattern on install!! Ha!
  • 12 years ago
    Oh...and my husband and brother in law installed these tiles...not the original installer. That's how easy it was! Took maybe 5-6 hrs.
  • 12 years ago
    last modified: 12 years ago
    You all did a great job. Didn't read the entire thread, but I hope that guy wasn't paid.
  • PRO
    12 years ago
    last modified: 12 years ago
    Thanks for giving us an update and congratulations all around - everyone deserves a pat on the back! It looks great.
  • 12 years ago
    I am SUPER picky so yes I saw it just by skimming over the area. I would take it down, carefully, and try to reuse the tile again. That kind of tile is NEVER cheap! Great choice though!
  • 12 years ago
    Just saw that you redid it! Looks amazing!
  • 12 years ago
    Oh!! That looks so great! Sometimes, mistakes turn out to be blessings!
  • 12 years ago
    Oh wow, that looks really nice. Now there won't be an issue that William Rogers brought up with the small tiles on the metal edges grout cracking and great layout. Looks like you definitely made the right choice.
  • 12 years ago
    Hard to tell unfinished it looks like a sharks mouth, scary. Might turn out to be a nice herring bone pattern when edges are finished.
  • 12 years ago
    Agreed, it looks great.
  • 12 years ago
    I'm so glad you didn't settle. Life is too long to settle for something you will have to look at every day. It's beautiful. Love the fireplace wainscot treatment! And the color! And the new tile treatment...
  • 12 years ago
    Really beautiful -- simple and stylish. Making a huge statement without shouting.
  • 12 years ago
    Very impressive. Love the new tile.
  • 12 years ago
    I love it! That tile is gorgeous!! You now have a beautiful fireplace.
  • 12 years ago
    Looks amazing!
  • 12 years ago
    Firepl turned out very nice.
  • PRO
    12 years ago
    Nice result Smusec. I'm happy you persevered. Can't tell what the vertical sides look like along the inner edges from the photo, but trust my concern there was unfounded. Enjoy!
  • 12 years ago
    Great looking re-do, I think you're going to be super happy with this. On to the next job!
  • 12 years ago
    I'm so happy that you now have the beautiful fireplace you wanted so much. Was a lot of work and frustration, but you got it right!
  • PRO
    12 years ago
    Beautiful fireplace
  • 12 years ago
    Very nice! I'm so glad you didn't settle for crappy workmanship.
  • 12 years ago
    I absolutely love how it turned out. I've never seen anything like that before! I agree that the mistakes in workmanship would have bothered me, too, but don't usually like confrontation so would probably have done the exact thing and been happy. Enjoy!
  • 12 years ago
    Very nice. Simple and classic look. The incorrect prior installation would have bothered you every time you looked at the fireplace, now you can just enjoy the fire.
  • 12 years ago
    last modified: 12 years ago
    I think it would bug me too. You are the one who has to look at it everyday. So, go with your gut feeling. To be honest, I would redo it.
  • 12 years ago
    Much better! The other design wasn't very well thought out with all those diagonal, jagged edges.
  • 12 years ago
    Yes, I'm glad you decided to re-do! It would have driven me nuts if it were me. The tiler just didn't seem to know what he/she was doing. This looks lovely, clean and consistent lines give the project a calming effect.
  • 12 years ago
    Whoever did this should be fired and you should NOT pay them. This is horrible and it's clear that the person has no clue what they're doing. Not sure how people are commenting and saying they don't see the mistake as I saw it immediately. It's totally wrong. Hope you got this fixed and aren't out any extra money.
  • 12 years ago
    check out the entire post fedgery77. This is a old post and she has redone it and posted pictures. It looks really good now!
  • 12 years ago
    I thought maybe this was a joke???
  • 11 years ago
    We are building our home and I picked the same tile for our backsplash in our master bathroom as well as the guest restroom. It all had to be ripped out and I had to find a more square backsplash. Our other backsplash in our other bathroom was also a herringbone tile and had to be torn out twice!! Should that be on the installer?? I'm tired of paying $15 a sheet
  • PRO
    11 years ago
    Re-do. You are paying for someone to install the tile the way you tell them. He/she should fix their mistakes. Best of luck
  • 11 years ago
    VERY OLD POST