Software
Houzz Logo Print
halbraswell

Before and After Kitchen

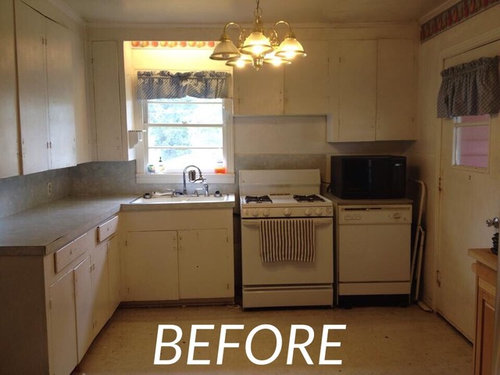
Our 1950s kitchen was bland, inefficient, small and worn out. It was 10'6" x 10'6" with a window on one wall, door to the carport on another and an 8' opening to the dining area on another.

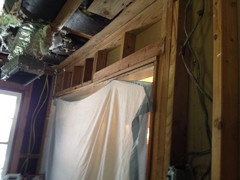
About that opening: a previous owner had turned a regular doorway on a loadbearing wall into an opening without benefit of a beam or jack studs.

A 20 CF fridge sat at the end of the cabinet run to the left.

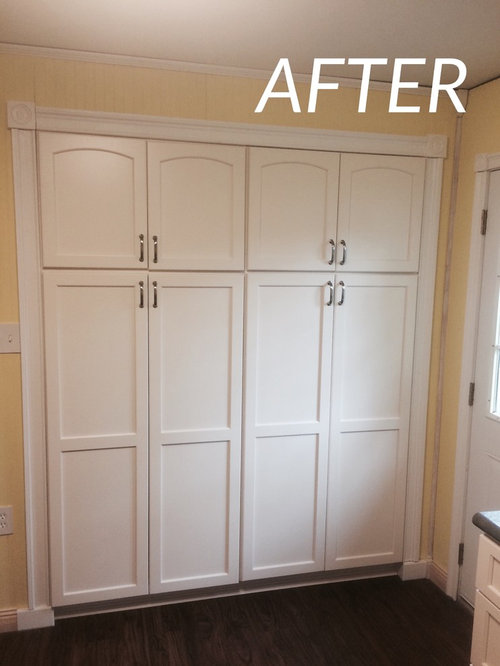
We knocked down the wall on the left side to take in a former home office that had an exterior door to the back yard and a double closet that now houses a double pantry. New dimensions are 10'6" wide x 22' long plus the 24" deep pantry.

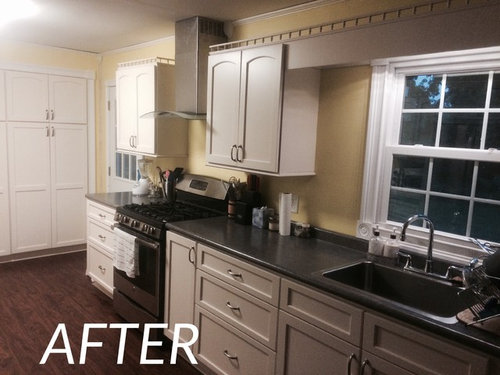
A new faucet is the only thing we used from the old kitchen. The window and sink location remained the same to use existing plumbing as much as possible.

Some highlights: the DW is to the right of the sink, and adjacent to where dishes and utensils are stored. The dining table is located straight through the opening from the dish cabinets. A Keurig and toaster are on the counter underneath the cabinet holding coffee mugs.

The exterior wall has 178" of counter in addition to the range. The old kitchen had about 84" of countertops altogether.

The twin pantries are 68" wide and have a total of 10 ROTs with Blumotion full extension soft close glides. Vertical spacing of the ROTs can be changed without tools to suit changing storage needs.

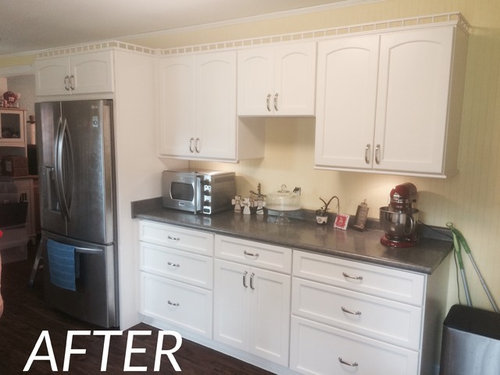
An 85" prep area is located between a 30 CF French door fridge and the pantry, directly across from the range. There are four 30" drawer bases within two steps of the range. A Sharp OTC MW will be installed on the prep wall. The cabinet underneath the MW contains ROTs for small appliances.

The 15" full-height cabinet to the right of the range was intended as a trash pullout but was hijacked for ZipLok bags, aluminum foil, trash bags, etc.

The former fluorescent lights over the sink have been replaced with LED lighting and there is also now LED lighting under all uppers.

All electrical appliances have a dedicated circuit as do all outlets so there is total flexibility for moving or adding countertop appliances. There are also four USB slots for cellphones, tablets or laptops.

We deliberately chose to have more space between the window and adjacent cabinets. When we enclose the carport next year, this window and the door to the back yard will be the only source of natural light. The wider space, which faces south, will allow more sunlight throughout the day.

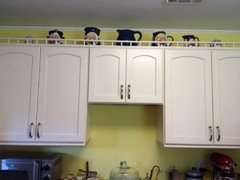
We also deliberately chose not to take cabinets to the ceiling. Financially that would have been a wash with a finished top panel (to prevent dust from falling between cabinets) and the galley rail which continued a sentimental architectural feature from the adjacent dining area. Given all of our display items, I'm sure the space above the cabinets will be put to use and the wall color above the cabinets helps break up the white cabinets and white ceiling.

I would appreciate any feedback about the reno, whether it is finishing touches or things that could have been done differently.

Also, I would be curious about what people think this reno is worth (appliances were about $5,500).

Thanks!

Comments (28)

  • PRO
    11 years ago
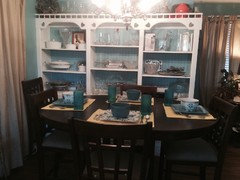
    View of dining area from the dishwasher.
  • PRO
    11 years ago
    It really looks great! Your organization is wonderful. I especially like your pantry.
  • 11 years ago
    I love it. Gorgeous countertops too!
  • PRO
    11 years ago
    Our countertops are Wilsonart Luna Shadow. Throughout the process, we had "good, better, best" alternatives for major purchases for things such as cabinets, appliances and countertops.
    Wife wanted a bright and cheerful kitchen with white cabinets and SW Fun Yellow walls. Because of that we needed a neutral countertop: but not black because it would have created a bumblebee effect, and not white because it would have looked too sterile.

    Our most expensive countertop option was Cosmic Gray from Lowe's at $60 SF. Wilsonart was $20. Our kitchen was done in phases to avoid borrowing much money, and we didn't want to risk having mismatched granite countertops. And honestly, at the time we needed to replace the central heating and AC. Getting granite was not as important as the new central heating and AC. So the choice boiled down to getting a really cheap stock laminate counter for about $500 with the intent to replace with granite in one or two years, or to get better Wilsonart and stay with it.

    We are very happy with the Wilsonart and it works well in our house. It represents great value and we actually prefer it over granite.By doing what I call "value engineering," we saved enough on our kitchen renovation to purchase a new central heating and AC system as well as the dining set shown in a photo above.
  • PRO
    11 years ago

    Nice job with the transformation!

  • PRO
    11 years ago
    One of our greatest challenges with our house is a lot of improvements are needed. We live in a small city of about 15,000 and in a quiet neighborhood of 1950s homes that often serve as starter homes (rent or purchase) or retirees (we both retired in the middle of the kitchen reno). You can get a lot of bang for your buck with an existing home here. Our mortgage is less than our car note, property taxes are less than a Pizza Hut meat lovers pizza delivered, and my wife's school system retirement is exempt from state income tax.
    Houses in our neighborhood are what I call nice but not fancy. If we were trying to flip this house, this kitchen would be overkill. This essentially is our age in place home. Over the next four years we plan to enclose the carport, replace all windows, install new siding and add a deck and improve the front porch. Our strategy has been focus on the interior first and then take care of the outside.
    Our planned improvements will make our house one of the best in the neighborhood. Rather than take out a substantial loan, were are minimizing ongoing expenses and paying for renovations as we go.
  • 11 years ago

    Toto, we're not in the 50's anymore. I can almost imagine "The Honeymooners" in that original kitchen. I can tell you are the 'proud papa' of this kitchen. Good job in prioritizing your wants and needs. Congrats on a great reno without breaking the bank. One suggestion, find a home for the foil, plastic wrap, etc in a drawer and take back your pull out trash receptacle. Banish that lidded trash can to somewhere else, far far away. Seriously, good job, pat yourself on the back. We too are aging in place, but started with the exterior: new roof, replacement windows, new siding, new landscape, added expanded outdoor patio, built in grill and the creme de la creme, an outdoor sink. We have tackled the inside upstairs doing most of the work ourselves. Redid the kitchen, laundry and powder and added what I call a mini mud room with the help of professionals. Still have the rest of downstairs to complete. I hope I don't age too fast before I finish. We too are both retired and I'm thankful everyday to be able to retire with good health and financial security. Good luck with the rest of your reno.

  • PRO
    11 years ago
    I absolutely hate the trash can. Not only does it get overstuffed (making it difficult to remove the bag from the container), oversized empty containers get piled on top at night. Aside from aesthetics, a pullout trash can can't be overfilled because of the height limit.

    I hope we can put that cabinet to its intended use.

    When we enclose the carport in February, we will be enclosing two windows, one in the dining area and one between the dining area and the dishwasher. That will give a 49" space for a counter height built in desk and upper cabinets for a laptop, cookbooks s, etc.

    We are still playing around with where to put some things in cabinets. Some are no brainers such as one base drawer contains a lot of Lodge cast iron skillets, cornbread molds, etc.
  • 11 years ago

    We both commented on Kristen M's kitchen. I got so exercised about the trash because I've spent a lifetime with no good solution for where to put the trash let alone manage it and keep it out of site. That was one of my top priorities when we redid the kitchen. We opted for a pull out that has two trash receptacles in tandem. While the kitchen was under construction, our neighborhood trash service introduced single stream recycling. Now I have a receptacle for trash and the one behind for recycle. I have another tandem smaller unit in my mini mud, one for paper recycle and a second for plastic bags. I lived 30+ years of married life under the premise that no worry, I would figure out where to store the trash. It never happened until I addressed it head on with intentional planned installations.

  • PRO
    11 years ago

    Looks Awesome! Lots of storage.

  • PRO
    11 years ago
    I did the actual kitchen design using the IKEA kitchen planner software. As a former weekly newspaper editor, dealing with space design for pages, I'm both used to design software and figuring out best use and appearance of space.

    But my wife and I collaborated on layout and style and printed out many 3D drawings from different angles to better visualize the kitchen. These were our favorite door styles but they were also among the least expensive options. They work well with the house, and given all the other things we needed, we tried to keep the cost in reason.

    The real irony is, we planned the perfect place for trash/recycling. The existing window and sink location was the immovable object in our design. The back of the pantry is adjacent to the bathroom wall that has a sink, so we toyed with putting the fridge and a pantry there. But that would have made the fridge jut out and it would have been too far from the sink.

    We wanted a 30" drawer base left of the range so we placed one by the door to the back yard. After allowing 30" for the range, we had 45" between the range and the sink cabinet. Since the prep area across from the range produces much trash along with the sink, we put the trash cabinet next to the range to be closer to the prep area.There was a six month gap between doing the main wall and the fridge wall and pantry. That's when the foil, etc found what I hope will be a temporary home.

    I'm also looking forward to Kristin's kitchen.
    I don't have an interior designer's decorating skills, but I enjoy helping people with layout dilemmas.
  • PRO
    11 years ago
    Pottery finding its way atop cabinets.
  • PRO
    11 years ago
    There are few things in a renovation that are more fun than discovering a previous owner turned a regular doorway in a loadbearing wall into an 8' opening without a header and Jack studs.
  • 11 years ago

    Thank goodness you found it before a disaster. I discovered a surprise in our house and we purchased it new. The kitchen had a standard 6'8" door behind which was sheetrock covering part of the front staircase. At approx 60" and below were shelves. I always hated the door (too many in the room) and wanted to rework that space. When we tore out the old door, dry wall and shelving, we discovered the builder had gouged out part of the support structure for the front staircase which turns behind that mini wall.

  • 11 years ago
    Sal I remember your kitchen good work and don't let Stephen big blue box guy tell you otherwise.
  • PRO
    11 years ago
    isamuel71 the big box kitchen looked like only one small drawer base which kept cost as low as it was. But the hilarious thing was the insistence the doors and drawer fronts are the main quality/cost factor (largely true); but Schuler and many other brands (as well as some "custom " shops) outsource their doors and drawer fronts to the same independent door manufacturer so my doors and drawer fronts were manufactured by the same company that manufactured Schuler doors.


    That was funny.

    I'm sure there are some better cabinets out there than mine, but I don't know that increased quality would be worth increased cost. And honestly I don't think any professional kitchen designer could have come up with a better kitchen cabinet layout for our space. As far as I can tell, we met or exceeded all NKBA guidelines.

    What also amazes me is looking at some RTA sites and them wanting$600-700 for a drawer base.

    Thanks.
  • 11 years ago
    Sal based on a response to another post your cost sure beats the big blue box where someone was touting 12k cabinets prior to appliances and rest of cost.
  • PRO
    11 years ago
    It looks great !!
  • PRO
    11 years ago
    Cabinets, even with double pantry and 10 ROTs, galley rail, top finished dust cover, finished bottom panel for uppers, light rail, toe kick and quarter round, were only $13K. Another $5,500 for appliances. Total cost of $25K. That doesn't include replacing central heat and AC in middle of renovation or a new 40 gallon water heater.
  • 11 years ago
    Hal our kitchen had 1 18, inch 2 39 inch, 1 18 inch corner, I 30 inch glass uppers.

    Lowers were 36 inch sink base 24 inch drawer/ trash pull out 10 inch spice pull out, 30 inch drawers 24 inch lazy Susan corner, 24 inch stand lower, 36 inch drawer cabinets.

    Speciality items were 33 inch pantry with roll out trays, 36 inch refrig 33 inch oven and microwave cabinet. Uppers were 42 inch tall and specialty cabs all 96 inch tall.

    Construction is full plywood and with soft close blu motion and soft close doors. Doors and sides all maple wood. Doors and drawers with 5 piece front construction.

    Door style is beaded inset all for 13k.

    No lowes no homedepot can give me that
  • PRO
    11 years ago

    This is great! Good job, much better now.

  • PRO
    11 years ago
    isamuel71 you got a lot for your money.

    I was thrilled to avoid corner cabinets and lazy susans with our galley kitchen.

    Wife had wanted a swing out pantry but the cabinet had to be a certain width and two wouldn't go in the former double closet. So we went with two 34" wide pantries and added an extra ROT in each.

    We had found some granite we liked at Lowe's but got a quote from local fabricator for about $500 less--and that was just for the long wall. Didn't get granite but if we go that route down the road that is good to know.

    Definitely pays to shop around.
  • PRO
    11 years ago

    @Hal Braswell-you did an amazing job with this kitchen update! It's an amazing transformation and I hope you are able to continue doing more great things to this fun home! Good luck and ENJOY!!!

  • PRO
    11 years ago

    Nice work!

  • 11 years ago

    Beautiful!!!

  • PRO
    11 years ago
    Homemade Mayhaw Jelly in the pantry. Now I know why we put in extra rollout trays.
  • 9 years ago
    Great remodel! Did you say you used Ikea cabinets? How have you liked them?