
Search results for "Accepting" in Home Design Ideas
 Get My Rugs LLC
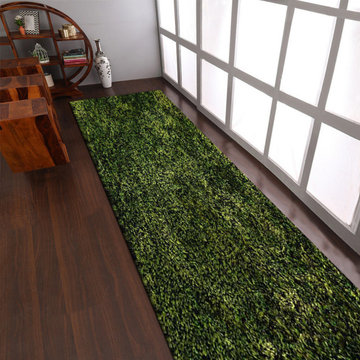
"Tremendousness is redefined by this hand tufted polyester rug which spread the prosperity in your home in the shade of green color. The solid pattern of this shag rug elaborates its beauty very well and fuels it with a much bolder look. Needless to say.
Product Features:-
Construction: Handmade
Technique: Hand Tufted shag
Shape: Runner
Color: Green
Pile: 1.5 inches
Pattern: Solid
Material: Polyester
Weight: 11.35 lbs
Origin of Manufacturing: India
Recommended Use: Indoor
Eco-Friendly: Yes
Shipping: Free Shipping
Handmade by skilled artisans enhancing in-depth color and product durabilitySolid designed and weaved by hand tufted technique.Soft polyester yarn with ultra-plush pile height of 1.5 inches for underfoot comfortSolid area rugs perfect for Living Room, Bedroom, Study Room, Dinning Room, Foyer.Free shipping and quick order dispatch. With quality product we deliver quality services to customers
Weave:- Weaving of a hand tufted shag rug is relatively easier than compared to other weaving techniques. The design is first sketched on a canvas and then material is made into it as per the design. The pile is kept very high to give it a furry look. Hand tufted rugs are very soft on face and are great for underfoot comfort. The rugs are very eye pleasing and the cost is very economical.
Material:- Polyester, an artificial fabric, have gained much popularity as rug weaving material. The polyester material rugs are highly sturdy and have gain acceptance due to its qualities like shine, wear & fade resistance, comfort, non-allergenic, moisture resistance, ease of cleaning, moth-proof, etc.
Pile:- Enjoy the high pile of this rug and place it at high footfall areas in your home, providing great underfoot comfort. This high pile rug is ideal one for the buyers who wants to place it on the flooring for the soft and cozy feel.
Proper Set Up & Care:- Hand Tufted rugs are heavy rugs and fits well with any kind of flooring. Unlike rugs of other weave the hand tufted rugs have a cotton backing which makes it anti-skid. These rugs are very durable if maintained properly.
Floor Protection:- Though hand tufted rugs have cotton backing which makes it anti-skid and harmless to the floor but you can always use a high quality rug pad to provide an extra level for floor protection.
Cleaning Methods:- For hand tufted shag rugs we recommend to go for gentle vacuum cleaning. For any stain, the users can opt for professional dry cleaning method."
 Tile Doctor Ltd
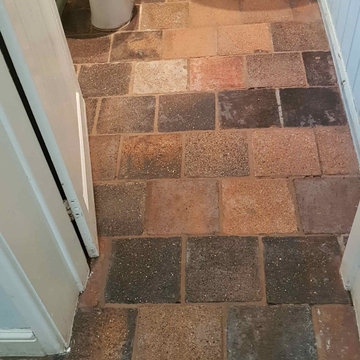
We were contacted by a client from Formby asking for advice on how to remove a thick layer of floor leveller from her Quarry tiled floor. I suspect at some point in the past a previous owner had decided to cover the tiles with lino and a cement-based levelling compound was applied to level the floor first. My client had tried to remove it herself but found it very hard going and after realising she had quite a project on her hands decided to call us instead and see if we could help with the restoration.
I worked out a quote for the client which would include removing the self-levelling compound, cleaning up the tiles and then sealing them to improve its appearance and protect it going forward. The quote was accepted, and a date agreed for the restoration to be completed which would take two days.
We have a variety of tools that we can use for removing cement but in this case, I decided to use an air operated pin gun. The head of the gun has long pins of different length which are fired at the floor gently chipping away at the floor compound, this made short work of breaking up the cement so it could be swept away. A lot easier than the method the client had previously tried.
With the floor clear of cement, it was given an acid wash with Tile Doctor Acid Gel scrubbed in with a buffing machine fitted with a black pad. The acidic formula cleans up the stone of old cement including fine particles of dust. Afterwards the gel was rinsed off the floor with water and extracted with a wet vacuum.
We let the floor dry out overnight and returned the next morning to apply the sealer. For the best results, the stone needs to be dry so before sealing I always take several moisture readings with a damp meter to make sure. The results were good so the first of what would be three coats of sealer were applied to the floor. I used Tile Doctor Colour Grow for sealing, it is an impregnating sealer that works by occupying the pores in the store thereby protecting it from within, it also brings out the colour in the stone.
Once done the floor looked great, the old self-levelling compound was gone and the rich colours in the tile had been restored. In fact is was only when finished did we realise these were in fact Baked Clay Quarry Tiles, minerals are added during manufacturing to give then colour, although 95% clay they are very tough like stone. The client was over the moon with the outcome, the floor had been restored to its’ former glory.
For aftercare I recommended the use of Tile Doctor Neutral Tile Cleaner to keep the floor in good condition. It is pH neutral so will ensure the newly applied sealer is not compromised and the floor will continue to look good for a long while to come.
Andrew Robb
Merseyside Tile Doctor
 Tile Doctor Ltd
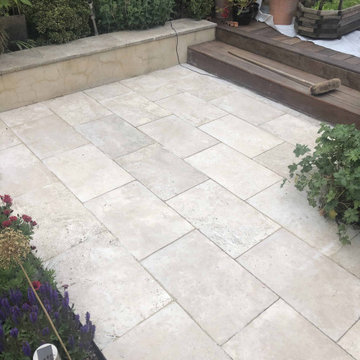
The picture shows an Travertine patio that was installed at a property in Hackney E5 around ten years ago and it had never been sealed. Over the year’s pollution and weather etc had taken its toll on the stone leaving the travertine stained with lichen, dull and grey as opposed to their original white/cream colour. Had the patio been sealed it would have provided some protection from the elements.
I conducted an initial visit where I tested several products to see what would be the most effective and establish what was required. Using that knowledge, I followed up with a written quote which was accepted, and a date arranged to complete the work.
We have adopted new working practices since the COVID-19 epidemic so we can work safely inside or outside but given the excellent weather this year this was an ideal and much easier to maintain social distancing.
During day 1 on site I started by sweeping away loose stones and other debris you typically find on patios. Then Tile Doctor Patio and Brick Driveway cleaner was applied neat to the stone and left for two hours. This is a very strong product designed for use by professionals which cuts through the dirt and was ideal for this situation. There are certain precautions you do need to take when using it such as wearing PPE and you must keep it away from ponds etc.
Using water to lubricate, the solution was then scrubbed into the stone using a coarse 200-grit pad fitted to a rotary machine and followed up with a lot of rinsing and extracting with water and a wet vacuum.
To refine the surface after the coarse Travertine the 200-grit pad I followed with 400, 800 and then 1500-grit burnishing pads in sequence rinsing with water and extracting after each pad was applied. This process is known as burnishing and closes the pores in the stone giving it a polished appearance. By this point the Travertine looked way better and we were starting to get the smooth finish back.
The weather held so the following morning a 3000-grit polishing pad was applied dry to the stone using only a little water. This brings up the appearance of the stone even further and has the added advantage of leaving it dry and ready for sealing.
The client wanted a natural appearance so two coats of Tile Doctor Ultra Seal were applied to seal the stone. Ultra-Seal is an impregnating sealer that soaks into the stone, protecting it from within yet without changing the appearance of the stone leaving a completely natural look.
The client very happy with job and now proud so show off her revamped patio. They hadn’t realised that the patio should have looked like this from the start. For aftercare I recommended they use Tile Doctor Stone Soap, many day to day cleaning products you find in supermarkets can strip off a sealer so if your using something else do check the label first.
Jackson Davis
East London Tile Doctor

 Susan Tully Interiors
We love when our clients trust us enough to do a second project for them. In the case of this couple looking for a NYC Pied-a-Terre – this was our 4th! After designing their homes in Bernardsville, NJ and San Diego, CA and a home for their daughter in Orange County, CA, we were called up for duty on the search for a NYC apartment which would accommodate this couple with room enough for their four children as well!
What we cherish most about working with clients is the trust that develops over time. In this case, not only were we asked to come on board for design and project coordination, but we also helped with the actual apartment selection decision between locations in TriBeCa, Upper West Side and the West Village. The TriBeCa building didn’t have enough services in the building; the Upper West Side neighborhood was too busy and impersonal; and, the West Village apartment was just right.
Our work on this apartment was to oversee the design and build-out of the combination of a 3,000 square foot 3-bedroom unit with a 1,000 square foot 1-bedroom unit. We reorganized the space to accommodate this family of 6. The living room in the 1 bedroom became the media room; the kitchen became a bar; and the bedroom became a guest suite.
The most amazing feature of this apartment are its views – uptown to the Empire State Building, downtown to the Statue of Liberty and west for the most vibrant sunsets. We opened up the space to create view lines through the apartment all the way back into the home office.
Customizing New York City apartments takes creativity and patience. In order to install recessed lighting, Ray devised a floating ceiling situated below the existing concrete ceiling to accept the wiring and housing.
In the design of the space, we wanted to create a flow and continuity between the public spaces. To do this, we designed walnut panels which run from the center hall through the media room into the office and on to the sitting room. The richness of the wood helps ground the space and draws your eye to the lightness of the gorgeous views. For additional light capture, we designed a 9 foot by 10 foot metal and mirror wall treatment in the living room. The purpose is to catch the light and reflect it back into the living space creating expansiveness and brightness.
Adding unique and meaningful art pieces is the critical final stage of design. For the master bedroom, we commissioned Ira Lohan, a Santa Fe, NM artist we know, to create a totem with glass feathers. This piece was inspired by folklore from his Native American roots which says home is defined by where an eagle’s feathers land. Ira drove this piece across the country and delivered and installed it himself!!
 Tile Doctor Ltd
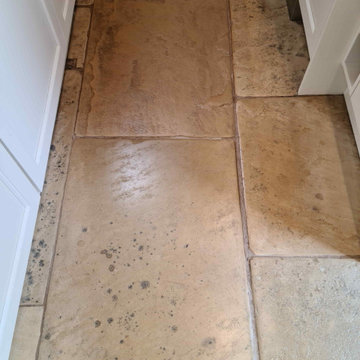
These pictures are of a beautiful Sandstone floor in Ilkley, the tiles were sourced from Lapicida of Harrogate and installed around twelve years prior. If you take a look at their website now you will see they are selling a similar London White Sandstone for nearly £100 per m2. This floor was 35 square metres so clearly this was a significant investment for the owner at the time.
After twelve years of use however the sealer had worn off the floor and dirt had become ingrained in the pores of the stone making it very difficult to keep clean. A good sealer takes a long time to wear off so the change to the appearance of the stone happens so slowly you don’t notice it. The floor was now looking permanently dirty, and the owner of the property had decided it was time to get it renovated.
Before quoting I paid a visit to the property to survey the floor and conduct an initial test clean which came out well. The test cleaning did not go as quickly as I had hoped it might however, due to traces of old satin sealer on some of the stone. It’s important to remove all the old sealer before applying new or you can end up with a patchy appearance. The remnants of old sealer proved challenging to remove as a result I had to try several products and methods before working out the right approach. In the end I resulted to using a product called Tile Doctor Wax Away. I had considered applying diamond burnishing pads which would have been a quicker option, but the flagstones had a riven finish, and the dirt was deeply pitted.
With a successful cleaning plan worked out I provided the client with a which was accepted, and a date agreed for my return.
The cleaning plan I had worked out was to apply a strong dilution of Tile Doctor Wax Away, leave it to soak into the stone for thirty minutes and then scrub it in with a rotary buffer fitted with a black scrubbing pad. The old sealer proved to be tough to remove and in total I used five litres of Tile Doctor Wax Away in the process, as I said it was a big floor!
On day three, I sealed the floor using three coats of Tile Doctor Seal and Go which gave the Sandstone a lovely satin finish that the client liked. This product is also water based so it doesn’t leave a smell as it dries.
Once done the floor was completely transformed, and my client very pleased with the floor which looked so much lighter and cleaner. For aftercare cleaning I recommended the use of Tile Doctor Neutral Tile Cleaner for maintenance, it is pH neutral so will ensure the newly applied seal is protected. It has a nice fresh smell and is gentle enough to use frequently keeping the newly renovated floor looking lovely.
Nigel Stoker
North West Yorkshire Tile Doctor

 Visbeen Architects
Featuring a classic H-shaped plan and minimalist details, the Winston was designed with the modern family in mind. This home carefully balances a sleek and uniform façade with more contemporary elements. This balance is noticed best when looking at the home on axis with the front or rear doors. Simple lap siding serve as a backdrop to the careful arrangement of windows and outdoor spaces. Stepping through a pair of natural wood entry doors gives way to sweeping vistas through the living and dining rooms. Anchoring the left side of the main level, and on axis with the living room, is a large white kitchen island and tiled range surround. To the right, and behind the living rooms sleek fireplace, is a vertical corridor that grants access to the upper level bedrooms, main level master suite, and lower level spaces. Serving as backdrop to this vertical corridor is a floor to ceiling glass display room for a sizeable wine collection. Set three steps down from the living room and through an articulating glass wall, the screened porch is enclosed by a retractable screen system that allows the room to be heated during cold nights. In all rooms, preferential treatment is given to maximize exposure to the rear yard, making this a perfect lakefront home.

 Robin's Nest Interiors
Updated Spec Home: The Bathrooms
The last stop on the main level of this Updated Spec Home are the Bathrooms. Every surface of the Guest Bath and Master Bath was touched- even some renovations in the Master bedroom. All I can say is thank goodness these two love wallpaper – we selected classic patterns for each bath that will stand the test of time!
Guest Bathroom
The Guest Bath also doubles as my mom’s bath. The footprint remained the same but we updated everything. A new vanity was chosen to give her that furniture look while still providing some storage – although there is a linen closet located just outside the bath. We topped it off with a beautiful mirror with great detail and an equally great light fixture. Also, we mixed the finishes in the bath between nickel and champagne, i.e., gold/silver mix. Mixing metals is perfectly acceptable and quite frankly way more interesting the everything matching. Updated Spec Home Bathrooms - Robin's Nest Interiors
Updated Spec Home Bathrooms - Robin's Nest Interiors
We found this amazing wallpaper with its subtle colors and pattern and selected a large square tile to coordinate for the floor. Yes, you can do a large tile in a small bath because it actually makes the space feel larger. For finishing touches, we had this gorgeous shower curtain made. Above the new toilet, we added interesting abstract artwork framed in a large mat so it would not clash with the wallpaper.
Master Bathroom
Originally, the Master Bath had a large garden tub as the focal point and a tiny stand up shower in the corner. We removed the garden tub, moved the shower to this area as the focal point and turned the tiny shower into a much needed linen closet. At this point, I know you are thinking, what about resale with no tub? There is a tub in the Guest Bath so the house will still be appealing to young families or bath lovers alike.
© 2016 RealTourCast | Tim Furlong Jr.
Tile selections came first – my sister fell in love with this gorgeous dark greige glass tile. We used it in the upper half of the shower while keeping the lower half light with this plank tile in a striated pattern. We carried the plank tile onto the floor for a seamless look.
Updated Spec Home Bathrooms - Robin's Nest Interiors
We replaced the two vanities with stock cabinetry that looks custom in a rich wood stain. Also, we found a gorgeous granite remnant for the countertop and finished off the vanity area with oversized mirrors, sleek lighting, and striking hardware.Updated Spec Home Bathrooms - Robin's Nest Interiors
The wallpaper is absolutely perfect for this space – it adds an interesting backdrop without overpowering the room. Her fantastic artwork was able to fit in the niche next to the new toilet. This is one gorgeous bath!
Updated Spec Home Bathrooms - Robin's Nest Interiors
Coming Soon
Spoiler Alert – my mom and sister have decided to update their Basement Family Room and add a small Powder Bath so look for Season 2 of the Updated Spec Home series!
See the rest of this house through these links! Foyer & Great Room, Kitchen & Breakfast Area, Bedrooms, Guest Bedroom.
 Robin's Nest Interiors
Updated Spec Home: The Bathrooms
The last stop on the main level of this Updated Spec Home are the Bathrooms. Every surface of the Guest Bath and Master Bath was touched- even some renovations in the Master bedroom. All I can say is thank goodness these two love wallpaper – we selected classic patterns for each bath that will stand the test of time!
Guest Bathroom
The Guest Bath also doubles as my mom’s bath. The footprint remained the same but we updated everything. A new vanity was chosen to give her that furniture look while still providing some storage – although there is a linen closet located just outside the bath. We topped it off with a beautiful mirror with great detail and an equally great light fixture. Also, we mixed the finishes in the bath between nickel and champagne, i.e., gold/silver mix. Mixing metals is perfectly acceptable and quite frankly way more interesting the everything matching. Updated Spec Home Bathrooms - Robin's Nest Interiors
Updated Spec Home Bathrooms - Robin's Nest Interiors
We found this amazing wallpaper with its subtle colors and pattern and selected a large square tile to coordinate for the floor. Yes, you can do a large tile in a small bath because it actually makes the space feel larger. For finishing touches, we had this gorgeous shower curtain made. Above the new toilet, we added interesting abstract artwork framed in a large mat so it would not clash with the wallpaper.
Master Bathroom
Originally, the Master Bath had a large garden tub as the focal point and a tiny stand up shower in the corner. We removed the garden tub, moved the shower to this area as the focal point and turned the tiny shower into a much needed linen closet. At this point, I know you are thinking, what about resale with no tub? There is a tub in the Guest Bath so the house will still be appealing to young families or bath lovers alike.
© 2016 RealTourCast | Tim Furlong Jr.
Tile selections came first – my sister fell in love with this gorgeous dark greige glass tile. We used it in the upper half of the shower while keeping the lower half light with this plank tile in a striated pattern. We carried the plank tile onto the floor for a seamless look.
Updated Spec Home Bathrooms - Robin's Nest Interiors
We replaced the two vanities with stock cabinetry that looks custom in a rich wood stain. Also, we found a gorgeous granite remnant for the countertop and finished off the vanity area with oversized mirrors, sleek lighting, and striking hardware.Updated Spec Home Bathrooms - Robin's Nest Interiors
The wallpaper is absolutely perfect for this space – it adds an interesting backdrop without overpowering the room. Her fantastic artwork was able to fit in the niche next to the new toilet. This is one gorgeous bath!
Updated Spec Home Bathrooms - Robin's Nest Interiors
Coming Soon
Spoiler Alert – my mom and sister have decided to update their Basement Family Room and add a small Powder Bath so look for Season 2 of the Updated Spec Home series!
See the rest of this house through these links! Foyer & Great Room, Kitchen & Breakfast Area, Bedrooms, Guest Bedroom.
 Robin's Nest Interiors
Updated Spec Home: The Bathrooms
The last stop on the main level of this Updated Spec Home are the Bathrooms. Every surface of the Guest Bath and Master Bath was touched- even some renovations in the Master bedroom. All I can say is thank goodness these two love wallpaper – we selected classic patterns for each bath that will stand the test of time!
Guest Bathroom
The Guest Bath also doubles as my mom’s bath. The footprint remained the same but we updated everything. A new vanity was chosen to give her that furniture look while still providing some storage – although there is a linen closet located just outside the bath. We topped it off with a beautiful mirror with great detail and an equally great light fixture. Also, we mixed the finishes in the bath between nickel and champagne, i.e., gold/silver mix. Mixing metals is perfectly acceptable and quite frankly way more interesting the everything matching. Updated Spec Home Bathrooms - Robin's Nest Interiors
Updated Spec Home Bathrooms - Robin's Nest Interiors
We found this amazing wallpaper with its subtle colors and pattern and selected a large square tile to coordinate for the floor. Yes, you can do a large tile in a small bath because it actually makes the space feel larger. For finishing touches, we had this gorgeous shower curtain made. Above the new toilet, we added interesting abstract artwork framed in a large mat so it would not clash with the wallpaper.
Master Bathroom
Originally, the Master Bath had a large garden tub as the focal point and a tiny stand up shower in the corner. We removed the garden tub, moved the shower to this area as the focal point and turned the tiny shower into a much needed linen closet. At this point, I know you are thinking, what about resale with no tub? There is a tub in the Guest Bath so the house will still be appealing to young families or bath lovers alike.
© 2016 RealTourCast | Tim Furlong Jr.
Tile selections came first – my sister fell in love with this gorgeous dark greige glass tile. We used it in the upper half of the shower while keeping the lower half light with this plank tile in a striated pattern. We carried the plank tile onto the floor for a seamless look.
Updated Spec Home Bathrooms - Robin's Nest Interiors
We replaced the two vanities with stock cabinetry that looks custom in a rich wood stain. Also, we found a gorgeous granite remnant for the countertop and finished off the vanity area with oversized mirrors, sleek lighting, and striking hardware.Updated Spec Home Bathrooms - Robin's Nest Interiors
The wallpaper is absolutely perfect for this space – it adds an interesting backdrop without overpowering the room. Her fantastic artwork was able to fit in the niche next to the new toilet. This is one gorgeous bath!
Updated Spec Home Bathrooms - Robin's Nest Interiors
Coming Soon
Spoiler Alert – my mom and sister have decided to update their Basement Family Room and add a small Powder Bath so look for Season 2 of the Updated Spec Home series!
See the rest of this house through these links! Foyer & Great Room, Kitchen & Breakfast Area, Bedrooms, Guest Bedroom.
 Tile Doctor Ltd
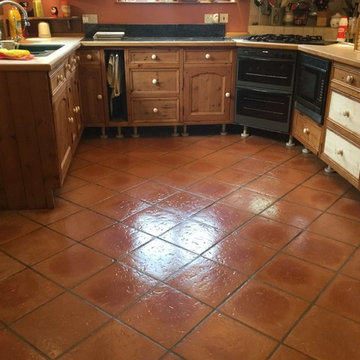
This Terracotta tiled floor was installed in the kitchen of a cottage in the small village of Maidford near Towcester. The tiles were not looking their best and the owner of the property realised it was time to do something about it and contacted Tile Doctor to have the floor stripped and resealed. Stripping and Sealing tile and stone floors is our bread and butter so I was more than happy to pop round and survey the floor which was approximately 9m2.
The grout had darkened with dirt and the previous tile sealer was failing so dirt was now getting ingrained in the Terracotta making it difficult to clean in places and leading to a patchy appearance. We discussed the work involved, my quote was accepted, and a date agreed for me to return and complete the work which would take two days, one to clean and one to seal.
After tidying up the Kitchen and removing the kickboards from underneath the kitchen units I set about working on cleaning and stripping the Terracotta floor of old sealers. To start I tested a small area with a strong dilution of Tile Doctor Wax Away. Wax was quite often used on Terracotta so I figured this product would be a good place to start. My suspicions were proved correct, and I found this to be the best product for removing the many layers of sealant on the floor. Wax Away is a new alkaline product by Tile Doctor and ideal for cleaning clay-based tiles such as Terracotta.
With my sights set on the rest of the floor Wax Away was scrubbed into the tile using a 17” rotary floor scrubbing machine and a black scrubbing pad running on a slow speed which helps to reduce splashing. This activity soon brought the dirt off the floor and the soiled cleaning solution was removed using a wet vacuum and the floor was rinsed down with clean water. The cleaning process was repeated a couple of times until I was happy with the floor, a stiff hand brush was then used along the grout lines with a dilution of Tile Doctor Pro-Clean to clean up the grout.
After rinsing and extracting the floor again the floor was inspected, and I noticed there were a few stubborn paint splashes on the tiles. I managed to remove these and these by spot treating the affected area with Tile Doctor Remove and Go and a steamer to lift the stain out of the clay tile. Once happy the floor was clean it was given a thorough rinse to neutralise it and remove any trace of cleaning products and then left it to dry.
I allowed the floor to dry for several days before returning to seal the Terracotta using numerous coats of Tile Doctor Seal and Go which is an ideal sealer for Terracotta and provides durable stain protection together with a low sheen finish. Terracotta is by its nature very porous and so it’s not unknown for it to take up to nine coats of sealer, which can take some time to apply as like paint you have to wait until it’s dry before it will take the next coat.
The customer was so impressed by the results I achieved in their kitchen they decided to go ahead and book me in to carry out this process throughout the whole of the ground floor which included lounge, study and hallway.
Phil Vissian
Northamptonshire Tile Doctor
 Main Line Kitchen Design
 has a different business model than other kitchen showrooms, designers, and cabinetry dealers. The difference helps us to do five important things better than our competitors.
The kitchens we sell are better designed and our designers are more experienced. This is because we insist on showing customers designs we recommend, BEFORE, we do a design they request. This way, final designs tend to be more collaborative and professional. Our designers are more experienced because they are better paid and design with more cabinet brands than at other dealers.
Our pricing for cabinets is less than other cabinet dealers. This is because we do not have a showroom open to the public, and we require a small deposit and a screening before we accept customers. This helps our designers spend their time more effectively. And, it eliminates 80% of the overhead kitchen showrooms spend on staffing, larger displays, and on a curbside location.
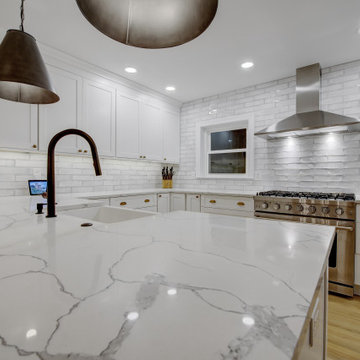
We carry more brands of cabinetry than other dealers. This is possible because we display one cabinet for each brand we sell. Through glass countertops clients can examine a brands construction quality, and we display the door styles and finishes of our brands. Instead of the larger displays customers see in traditional showrooms, our customers can view 5 million kitchens on Houzz.com, or the hundreds of our kitchen renovations we show on Houzz, our web site, and in framed photos on the walls of our office building.
Kitchen construction is often better organized and generally costs less. This is because we recommend general contractors free of charge. They supervise construction from scheduling to completion. This eliminates a middleman, reduces delays, and eliminates the fees that almost all showrooms and home centers charge their customers. We are also happy to work with any contractor a customer finds on their own. If we haven’t worked with that contractor before they may need more of our direction, but both companies can benefit from working together and possibly referring each other in the future.
Less problems arise, and if they do, they are handled more quickly. This is because every kitchen we sell is reviewed by at least 3 kitchen designers during the ordering process. Our Operations Manager Ed Sossich checks orders and schedules all warehouse and home deliveries. Our delivery manager Mark Mitten supervises every delivery and checks in each cabinet and part. And our CRM system, Monday, prompts each person responsible for each phase of a customer’s kitchen with automated alerts. This keeps things moving, even during supply chain disruptions, and ensures no step is overlooked.
Main Line Kitchen Design’s company slogan is “The world of kitchen design is changing . . . “. We pride ourselves on being innovative in everything we do. From our web site and how we advertise, to the gift we send each customer upon the completion of their kitchen.
Our business model helps us receive 100’s of 5-star reviews, and makes our kitchen projects more enjoyable for everyone.
We look forward to working with you.
 Susan Tully Interiors
We love when our clients trust us enough to do a second project for them. In the case of this couple looking for a NYC Pied-a-Terre – this was our 4th! After designing their homes in Bernardsville, NJ and San Diego, CA and a home for their daughter in Orange County, CA, we were called up for duty on the search for a NYC apartment which would accommodate this couple with room enough for their four children as well!
What we cherish most about working with clients is the trust that develops over time. In this case, not only were we asked to come on board for design and project coordination, but we also helped with the actual apartment selection decision between locations in TriBeCa, Upper West Side and the West Village. The TriBeCa building didn’t have enough services in the building; the Upper West Side neighborhood was too busy and impersonal; and, the West Village apartment was just right.
Our work on this apartment was to oversee the design and build-out of the combination of a 3,000 square foot 3-bedroom unit with a 1,000 square foot 1-bedroom unit. We reorganized the space to accommodate this family of 6. The living room in the 1 bedroom became the media room; the kitchen became a bar; and the bedroom became a guest suite.
The most amazing feature of this apartment are its views – uptown to the Empire State Building, downtown to the Statue of Liberty and west for the most vibrant sunsets. We opened up the space to create view lines through the apartment all the way back into the home office.
Customizing New York City apartments takes creativity and patience. In order to install recessed lighting, Ray devised a floating ceiling situated below the existing concrete ceiling to accept the wiring and housing.
In the design of the space, we wanted to create a flow and continuity between the public spaces. To do this, we designed walnut panels which run from the center hall through the media room into the office and on to the sitting room. The richness of the wood helps ground the space and draws your eye to the lightness of the gorgeous views. For additional light capture, we designed a 9 foot by 10 foot metal and mirror wall treatment in the living room. The purpose is to catch the light and reflect it back into the living space creating expansiveness and brightness.
Adding unique and meaningful art pieces is the critical final stage of design. For the master bedroom, we commissioned Ira Lohan, a Santa Fe, NM artist we know, to create a totem with glass feathers. This piece was inspired by folklore from his Native American roots which says home is defined by where an eagle’s feathers land. Ira drove this piece across the country and delivered and installed it himself!!
 Nathan Allan Glass Studios Inc.
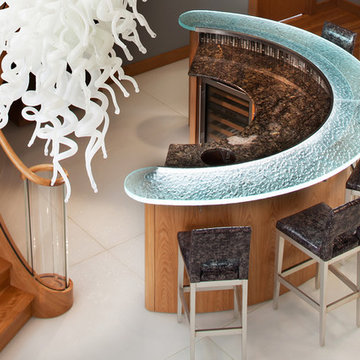
What surprises people most when entering and walking on the glowing white surface in this particular Private Residence (Williamsburg, VA) is when they find out they are walking on a sea of glass! Yes, GLASS! Not marble, not granite, but GLASS! Nathan Allan has created a very fresh, unique flooring surface, which is smooth to touch on the majority of the glass surface, yet has an almost invisible safety finish permanently embedded in the glass surface.
THE GLASS
Nathan Allan’s Glass Flooring incorporates features which are visually stunning, while also providing a safety finish which provides comfort to everyone walking on the glass. Our Sandstone texture is forged into the bottom surface of the glass, while our exclusive Glass Sandpaper safety finish is fused onto the walking surface. To enhance all features, we added a bright, sparkling, White Metallic color finish throughout each flooring panel.
SPECIFICATIONS
Each Glass Flooring panel is produced in 1/2″ (12mm) thick, Low Iron, tempered safety glass. Tempered glass provides added strength, insuring that the Glass Flooring can accept a heavy load. Panels vary in size and dimension, with most panels measured at a block size of 5’0 x 6’0 (1500mm x 1800mm). Perimeter Edge panels were carved and shaped to fit tightly against the curved walls. Glass Sandpaper, ASTM tested in labs with the highest slip-coefficient safety ratings, is fused onto the walking surface, to provide a very comfortable and effective safety feature.
Flooring Glass Details:
1/2″ (12mm) thick, Low iron tempered safety glass
Flat Polished Edges
Glass Sandpaper on walking surface
Sandstone texture on bottom surface
White Metallic color finish on bottom surface
Panels sizes up to 5’0 x 6’0
Approximately 800 square feet of glass flooring
Perimeter panels shape cut to fit
Almost overshadowed by the spectacular flooring is a 1.5” thick, Heavy Glasstop, Crescent shaped, with Nathan Allan’s Rocky Mountain texture.
DESIGN
A White Sea of Glass flooring is the finished result of combining a light Sandstone texture on the bottom glass surface, with the added touch of a sparkling White Metallic color finish. Combined with our Glass Sandpaper safety finish, and the natural and artificial light sources, our Glass Flooring shimmers within the entire entrance space.
INSTALLATION
Using very important installation techniques, Nathan Allan worked hand in hand with great team of professionals: Vicki Bristow, designer, W. M. Jordan Company, GC, and Pompei Inc, glass flooring installer. Templates were produced for all perimeter edge panels, and every shaped panel. All flooring panels are secured to the substrate with special adhesives, and joints are filled with matching color sealants.
“A beautiful project is always enhanced when working with quality, prestigious builders, and talented trade’s people. The tight organization and open communication by all the team members contributed greatly to a project proceeding seamlessly, with the incredible visual results to prove it.” Barry Allan – Director
Photo credit: Morgan Howarth
 Tile Doctor Ltd
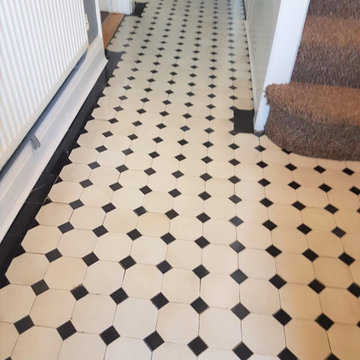
This enquiry from Neath came from an elderly gentleman who was moving into a care home in the near future and wanted his Victorian tiled hallway renovated before the property went on the market. He mentioned he didn’t think it was that dirty however it could do with a clean and reseal.
We arranged to call in one morning and take a look at the tiles and whilst there we completed a test clean so we could provide an accurate price for renovating the floor. For the clean I applied Tile Doctor Pro-Clean, the purpose of this was to see whether and how fast the dirt would shift and also to get an idea of the condition of the floor beneath the layer of dirt.
The test clean went well and the owner was happy to accept our price and suggested that as we had already made a start we might as well continue. Fortunately, there were two of us that day and I only had a couple of other quotes in the area, so I was able to crack on. I should mention this work was done at the beginning of 2020 before the COVID-19 lockdown.
All sorts of detritus gets walked into hallways so we began by using a hand held scraper to take off any anything that sat upon/above the floors surface. This also makes the cleaning process that little bit easier for us. The earlier test clean had enabled us to establish which cleaning methods and products would work best on the floor so it was just a question of putting the plan into action.
The process involved applying a strong dilution of Tile Doctor Pro-Clean to the floor, leaving it to soak in for ten minutes and then working it with a coarse 400-grit diamond pad fitted to a rotary buffer. More water was applied for lubrication where required and the soil produced afterwards was rinsed off and extracted with a wet vacuum. The pad is encrusted with industrial diamonds and cuts into the tile and removes a very thin layer leaving the tile very clean.
After extracting the soil, the floor was inspected, and we noticed that there were a few tiles throughout the floor that needed more work. To deal with these we used hand-held diamond blocks of varying grits to remove the ingrained dirt and bring the tiles back to life.
The client was over the moon with the results of the cleaning and we scheduled a date of the following week to come back and seal the tiles. We also discussed sealers and he had asked if we could leave the floor with a shiny finish. With that in mind we recommended Tile Doctors Seal and Go which works really well on Victorian tiles. It is also water based and so doesn’t produce a smell as it dries.
On our return the floor was given a quick wipe down and once dry sealed with four coats of Tile Doctor Seal and Go which will add protection and make them easy to keep clean.
Once complete the floor looked great and very welcoming, just what you need when selling a property as initial impressions always count.
Adrian Iacono
Swansea Tile Doctor

 highland
Selling your home can be stressful, particularly if you’re short on time. Many homeowners in Springfield, OH find themselves in situations when the traditional real estate process is too slow, too expensive, or too uncertain. Repairs, showings, agent commissions, buyer financing delays and inspection issues can make a simple sale a long and frustrating experience.
That’s why more homeowners are looking for a faster and easier way to sell. If you need a quick home sale in Springfield, OH, Sell House Now Columbus offers a practical solution for people who want to sell their house fast for cash without the usual problems of listing on the market.
A Quicker Way to Sell Your Springfield, OH Home
The old way of selling takes weeks or months. First, you may need to clean, repair and stage the home. Then you have to wait for buyers, schedule showings, negotiate offers and hope the buyer’s loan gets approved. Even after you’ve accepted an offer, the deal can still fall apart due to inspection results, appraisal problems, or financing issues. This process may not be ideal for homeowners who need speed and certainty. Sell House Now Columbus offers cash for homes in Springfield and the surrounding Ohio areas so homeowners can avoid these delays. Don't have to wait for the perfect buyer; you can work directly with a local cash home buyer who understands your situation and can close on your timeline.
Why Homeowners Prefer to Sell Their Homes for Cash
There are a number of reasons why someone might need to sell fast. Some homeowners are going through foreclosure, divorce, relocation, inherited property, problem tenants, expensive repairs or just a house they don’t want to sit vacant. Other people don’t want to spend money fixing up a property before they sell it; A cash sale can be helpful because it eliminates many common roadblocks. You don't have to wait for bank financing. You do not need to prep your home for open houses. You don’t have to keep paying for repairs, utilities, taxes or maintenance while your home is sitting on the market. Sell House Now Columbus allows homeowners to sell their house as-is. This means that you don’t have to repair the roof, update the kitchen, repaint the walls, replace the flooring or clean out every room before closing. The company buys homes as they are, saving time and money.
Sell Your House As-Is Springfield, OH
One of the biggest advantages to working with a cash buyer is the ability to sell as-is. Many houses need work, and that work can cost a lot of money. A typical buyer may seek repair credits, price reductions, or major upgrades before closing. Sometimes lenders won’t finance a home with serious issues in its condition. Selling as-is provides a simpler path for homeowners. You can still ask for a cash offer whether the property has old plumbing, roof damage, outdated rooms, foundation concerns, fire damage, water damage, or years of deferred maintenance. This is particularly helpful for homeowners who have inherited a property or own a house they no longer live in. Rather than sinking thousands of dollars into a property you don’t want to hold on to, you can sell it directly and move on.
No Listing or Agent Commissions Hassles
When you list a house with a real estate agent, commissions and fees can eat into the amount you take home. You’ll also have to pay for repairs, cleaning, staging, photography, inspections, and closing costs. These costs can add up quickly. Selling it for cash makes the math easier. Sell House Now, Columbus lets homeowners bypass the traditional listing process. No open houses, no weekend showings, no need to keep the place spotless for buyers. Skip the uncertainty of waiting for offers and the stress of strangers walking through your home. Privacy is another important advantage for many sellers. A direct sale might be more discreet than putting a house on the open market.
How It Works
Sell House Now, Columbus makes it easy. First you talk about your house. Next the company reviews the property and puts together a fair cash offer. If the offer sounds good to you, you can choose a completion date to suit your needs. This simple process is helpful for home owners that need to make decisions quickly. There is no pressure of a traditional sale and you don’t have to accept an offer. The goal is to provide you a clear choice to determine what works best for you.
When a Quick Sale is Beneficial
Often a quick home sale in Springfield, OH can come in handy. If you are behind on your mortgage, selling quickly can help you avoid more financial stress. If you’re relocating for work, you probably won’t have months to wait for a buyer. If you are going through a divorce, a quick sale can help both parties move on. A direct cash sale can also be a win for landlords. If you’re tired of working around the tenants, the late rent, the damage, and the constant maintenance calls, selling the property may be a better option than continuing to manage it. Another popular reason people search for cash buyers is inherited homes. Many inherited properties require repairs, have multiple decision-makers or come with emotional stress. A fast cash sale can make the process easier and help families close on the property faster.
Go ahead confidently
Selling a home doesn’t have to be hard. If you want to avoid uncertainty, repairs, commissions and delays, working with a local cash home buyer is a smart move. Selling a House Is Easy With Sell House Now Columbus for homeowners Springfield, OH who want a faster, easier way to sell.
If your house is vacant, old, damaged, rented, inherited or you just don’t need it anymore, you can ask for a fair cash offer and choose the closing timeline that best suits you. Sell House Now Columbus is a convenient solution for homeowners who want speed, convenience, and peace of mind. Selling your house fast in Springfield, OH can be a great way to save time, avoid stress, and move on without the headache of the traditional real estate market.
A Quicker Way to Sell Your Springfield, OH Home
The old way of selling takes weeks or months. First, you may need to clean, repair and stage the home. Then you have to wait for buyers, schedule showings, negotiate offers and hope the buyer’s loan gets approved. Even after you’ve accepted an offer, the deal can still fall apart due to inspection results, appraisal problems, or financing issues. This process may not be ideal for homeowners who need speed and certainty. Sell House Now Columbus offers cash for homes in Springfield and the surrounding Ohio areas so homeowners can avoid these delays. Don't have to wait for the perfect buyer; you can work directly with a local cash home buyer who understands your situation and can close on your timeline.
Why Homeowners Prefer to Sell Their Homes for Cash
There are a number of reasons why someone might need to sell fast. Some homeowners are going through foreclosure, divorce, relocation, inherited property, problem tenants, expensive repairs or just a house they don’t want to sit vacant. Other people don’t want to spend money fixing up a property before they sell it; A cash sale can be helpful because it eliminates many common roadblocks. You don't have to wait for bank financing. You do not need to prep your home for open houses. You don’t have to keep paying for repairs, utilities, taxes or maintenance while your home is sitting on the market. Sell House Now Columbus allows homeowners to sell their house as-is. This means that you don’t have to repair the roof, update the kitchen, repaint the walls, replace the flooring or clean out every room before closing. The company buys homes as they are, saving time and money.
Sell Your House As-Is Springfield, OH
One of the biggest advantages to working with a cash buyer is the ability to sell as-is. Many houses need work, and that work can cost a lot of money. A typical buyer may seek repair credits, price reductions, or major upgrades before closing. Sometimes lenders won’t finance a home with serious issues in its condition. Selling as-is provides a simpler path for homeowners. You can still ask for a cash offer whether the property has old plumbing, roof damage, outdated rooms, foundation concerns, fire damage, water damage, or years of deferred maintenance. This is particularly helpful for homeowners who have inherited a property or own a house they no longer live in. Rather than sinking thousands of dollars into a property you don’t want to hold on to, you can sell it directly and move on.
No Listing or Agent Commissions Hassles
When you list a house with a real estate agent, commissions and fees can eat into the amount you take home. You’ll also have to pay for repairs, cleaning, staging, photography, inspections, and closing costs. These costs can add up quickly. Selling it for cash makes the math easier. Sell House Now, Columbus lets homeowners bypass the traditional listing process. No open houses, no weekend showings, no need to keep the place spotless for buyers. Skip the uncertainty of waiting for offers and the stress of strangers walking through your home. Privacy is another important advantage for many sellers. A direct sale might be more discreet than putting a house on the open market.
How It Works
Sell House Now, Columbus makes it easy. First you talk about your house. Next the company reviews the property and puts together a fair cash offer. If the offer sounds good to you, you can choose a completion date to suit your needs. This simple process is helpful for home owners that need to make decisions quickly. There is no pressure of a traditional sale and you don’t have to accept an offer. The goal is to provide you a clear choice to determine what works best for you.
When a Quick Sale is Beneficial
Often a quick home sale in Springfield, OH can come in handy. If you are behind on your mortgage, selling quickly can help you avoid more financial stress. If you’re relocating for work, you probably won’t have months to wait for a buyer. If you are going through a divorce, a quick sale can help both parties move on. A direct cash sale can also be a win for landlords. If you’re tired of working around the tenants, the late rent, the damage, and the constant maintenance calls, selling the property may be a better option than continuing to manage it. Another popular reason people search for cash buyers is inherited homes. Many inherited properties require repairs, have multiple decision-makers or come with emotional stress. A fast cash sale can make the process easier and help families close on the property faster.
Go ahead confidently
Selling a home doesn’t have to be hard. If you want to avoid uncertainty, repairs, commissions and delays, working with a local cash home buyer is a smart move. Selling a House Is Easy With Sell House Now Columbus for homeowners Springfield, OH who want a faster, easier way to sell.
If your house is vacant, old, damaged, rented, inherited or you just don’t need it anymore, you can ask for a fair cash offer and choose the closing timeline that best suits you. Sell House Now Columbus is a convenient solution for homeowners who want speed, convenience, and peace of mind. Selling your house fast in Springfield, OH can be a great way to save time, avoid stress, and move on without the headache of the traditional real estate market.

 threshold interiors
Location: New York, NY, United States
This Loft was tastefully renovated back in the '90s, but was due for an update and an expansion of the kitchen and dining areas to accommodate the client's cooking skills and entertaining needs. EnlargIing the island and adding cabinetry to delineate the office, bar and dining areas was a priority. The bathroom was updated to feel like a tranquil spa with beautiful new tile, plumbing fixtures and cabinets. Our biggest challenge was coordinating the entire renovation while our client was out of town for the Summer!
Photographed by: James Salomon

 Copperleaf Partners LLC / Copperleaf Residential
Inspiration for a timeless bathroom remodel in Atlanta with an undermount sink
 Tile Doctor Ltd
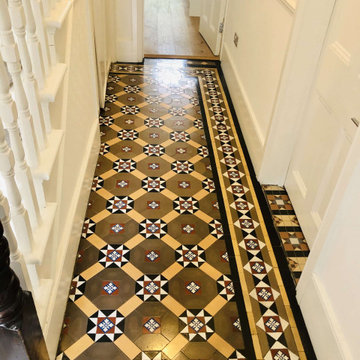
This customer had just moved into a property in Chesham around eighteen months ago. During that time, they had completely renovated the property and in the process had pulled up the hallway carpet to discover a lovely Victorian tiled floor which appeared to be in good condition but very dirty. Period features like these can add a lot of value to a house these days and so they decided to investigate having it professionally cleaned and contacted me for a quote.
Although I can give some indication of price over the phone you never know exactly what to expect so my preference is to visit the property a conduct a test clean. It’s a little trickier to do this now due to COVID-19 but using a combination of PPE, maximum ventilation and social distancing measures I was able to work on the floor. The tiles were in good order with no replacements needed so my focus would be removing carpet adhesive and ingrained dirt. The test went well, and I followed up with a quotation which was accepted, and a date arranged to do the work.
I had worked out previously that the quickest was to deep clean the floor and remove the glue and any old seal was to apply Tile Doctor Remove and Go which as its name suggests is a coatings removed designed for Tiled floors. My method was to spray strong a dilution of Remove and Go onto the Victorian tiles and leave it to soak in for fifteen minutes. Then it was scrubbed in with a black scrubbing pad fitted to a rotary machine. The soil was rinsed off using a minimal of water and extracted with a wet vacuum.
Once the floor had dried, I inspected the tiles and could see more work would be needed to get the white tiles really sparkling. For this I went over the floor using a 200-grit resurfacing pad using water to lubricate the process, I also used handheld burnishing blocks of different grits to do the edges. With this extra effort and another rinse with water to remove the soil the floor looked great, and so I left for the day so it could dry out ready for sealing.
I came back the next day and started by taking moisture readings with a damp meter to ensure the tiles were dry and ready for sealing. This is important as you don’t want to apply sealer to a damp tile and old floors can suffer from damp issues due to the lack of a damp proof membrane.
All was well with the floor, so I was able to move straight onto sealing which started with the application of a single coat of Tile Doctor Colour Grow. This is an impregnating sealer that soaks into the pores of the tile enhancing colour and adding protection. Once this had dried, I followed up with another seven coats of Tile Doctor Seal and Go which adds further protection and leaves a nice subtle sheen to the tiles. This product works really well on old Victorian Tiles like these and being water based it doesn’t leave a smell as it dries.
Andrew Newstead
South Buckinghamshire Tile Doctor
 Robin's Nest Interiors
Updated Spec Home: The Bathrooms
The last stop on the main level of this Updated Spec Home are the Bathrooms. Every surface of the Guest Bath and Master Bath was touched- even some renovations in the Master bedroom. All I can say is thank goodness these two love wallpaper – we selected classic patterns for each bath that will stand the test of time!
Guest Bathroom
The Guest Bath also doubles as my mom’s bath. The footprint remained the same but we updated everything. A new vanity was chosen to give her that furniture look while still providing some storage – although there is a linen closet located just outside the bath. We topped it off with a beautiful mirror with great detail and an equally great light fixture. Also, we mixed the finishes in the bath between nickel and champagne, i.e., gold/silver mix. Mixing metals is perfectly acceptable and quite frankly way more interesting the everything matching. Updated Spec Home Bathrooms - Robin's Nest Interiors
Updated Spec Home Bathrooms - Robin's Nest Interiors
We found this amazing wallpaper with its subtle colors and pattern and selected a large square tile to coordinate for the floor. Yes, you can do a large tile in a small bath because it actually makes the space feel larger. For finishing touches, we had this gorgeous shower curtain made. Above the new toilet, we added interesting abstract artwork framed in a large mat so it would not clash with the wallpaper.
Master Bathroom
Originally, the Master Bath had a large garden tub as the focal point and a tiny stand up shower in the corner. We removed the garden tub, moved the shower to this area as the focal point and turned the tiny shower into a much needed linen closet. At this point, I know you are thinking, what about resale with no tub? There is a tub in the Guest Bath so the house will still be appealing to young families or bath lovers alike.
© 2016 RealTourCast | Tim Furlong Jr.
Tile selections came first – my sister fell in love with this gorgeous dark greige glass tile. We used it in the upper half of the shower while keeping the lower half light with this plank tile in a striated pattern. We carried the plank tile onto the floor for a seamless look.
Updated Spec Home Bathrooms - Robin's Nest Interiors
We replaced the two vanities with stock cabinetry that looks custom in a rich wood stain. Also, we found a gorgeous granite remnant for the countertop and finished off the vanity area with oversized mirrors, sleek lighting, and striking hardware.Updated Spec Home Bathrooms - Robin's Nest Interiors
The wallpaper is absolutely perfect for this space – it adds an interesting backdrop without overpowering the room. Her fantastic artwork was able to fit in the niche next to the new toilet. This is one gorgeous bath!
Updated Spec Home Bathrooms - Robin's Nest Interiors
Coming Soon
Spoiler Alert – my mom and sister have decided to update their Basement Family Room and add a small Powder Bath so look for Season 2 of the Updated Spec Home series!
See the rest of this house through these links! Foyer & Great Room, Kitchen & Breakfast Area, Bedrooms, Guest Bedroom.
 Main Line Kitchen Design
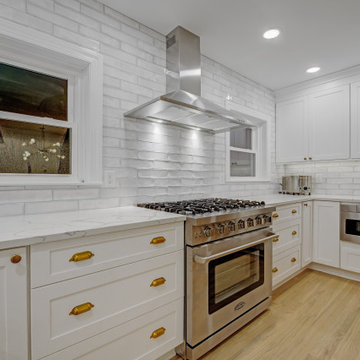
 has a different business model than other kitchen showrooms, designers, and cabinetry dealers. The difference helps us to do five important things better than our competitors.
The kitchens we sell are better designed and our designers are more experienced. This is because we insist on showing customers designs we recommend, BEFORE, we do a design they request. This way, final designs tend to be more collaborative and professional. Our designers are more experienced because they are better paid and design with more cabinet brands than at other dealers.
Our pricing for cabinets is less than other cabinet dealers. This is because we do not have a showroom open to the public, and we require a small deposit and a screening before we accept customers. This helps our designers spend their time more effectively. And, it eliminates 80% of the overhead kitchen showrooms spend on staffing, larger displays, and on a curbside location.
We carry more brands of cabinetry than other dealers. This is possible because we display one cabinet for each brand we sell. Through glass countertops clients can examine a brands construction quality, and we display the door styles and finishes of our brands. Instead of the larger displays customers see in traditional showrooms, our customers can view 5 million kitchens on Houzz.com, or the hundreds of our kitchen renovations we show on Houzz, our web site, and in framed photos on the walls of our office building.
Kitchen construction is often better organized and generally costs less. This is because we recommend general contractors free of charge. They supervise construction from scheduling to completion. This eliminates a middleman, reduces delays, and eliminates the fees that almost all showrooms and home centers charge their customers. We are also happy to work with any contractor a customer finds on their own. If we haven’t worked with that contractor before they may need more of our direction, but both companies can benefit from working together and possibly referring each other in the future.
Less problems arise, and if they do, they are handled more quickly. This is because every kitchen we sell is reviewed by at least 3 kitchen designers during the ordering process. Our Operations Manager Ed Sossich checks orders and schedules all warehouse and home deliveries. Our delivery manager Mark Mitten supervises every delivery and checks in each cabinet and part. And our CRM system, Monday, prompts each person responsible for each phase of a customer’s kitchen with automated alerts. This keeps things moving, even during supply chain disruptions, and ensures no step is overlooked.
Main Line Kitchen Design’s company slogan is “The world of kitchen design is changing . . . “. We pride ourselves on being innovative in everything we do. From our web site and how we advertise, to the gift we send each customer upon the completion of their kitchen.
Our business model helps us receive 100’s of 5-star reviews, and makes our kitchen projects more enjoyable for everyone.
We look forward to working with you.
148