
Search results for "Accepting" in Home Design Ideas
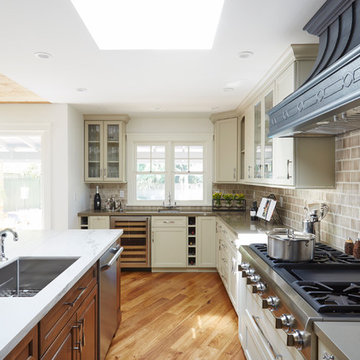
 Signature Kitchen & Bath Design Inc.
Gorgeous enough to be on the cover of any and every interior design magazine, this Los Gatos kitchen will truly take your breath away. Light green cabinets on the perimeter paired with a cherry island complimented by a vaulted ceiling and Cambria counter tops polish off this stunning kitchen.
Photographer: Mike Kaskel
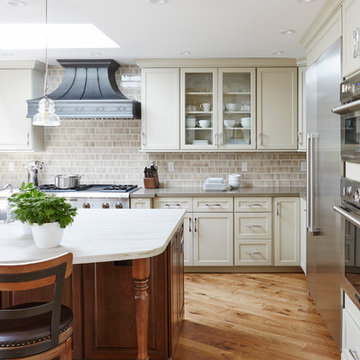 Signature Kitchen & Bath Design Inc.
Gorgeous enough to be on the cover of any and every interior design magazine, this Los Gatos kitchen will truly take your breath away. Light green cabinets on the perimeter paired with a cherry island complimented by a vaulted ceiling and Cambria counter tops polish off this stunning kitchen.
Photographer: Mike Kaskel

 BRC Remodeling Group
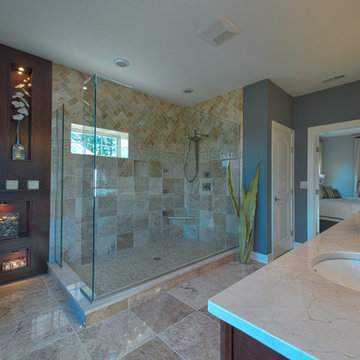
This was a lovely bathroom renovation we did. The mirrors, shower glass, and cabinets are all custom made pieces. We did a split level Vanity to accommodate both clients heights and it came together perfectly.
Find the right local pro for your project

 Twelve Stones Designs, LLC
Christopher Davison, AIA
Mid-sized transitional enclosed medium tone wood floor home theater photo in Austin with beige walls and a media wall
Mid-sized transitional enclosed medium tone wood floor home theater photo in Austin with beige walls and a media wall

 Built To Perfection Inc.
This home addition includes two brand new bedrooms, three stylish bathrooms, and a fully equipped laundry room—all designed with modern living in mind. The thoughtful layout enhances convenience and comfort, while high-quality finishes bring a touch of elegance to each space. Perfect for growing families or hosting guests, this upgrade adds both function and value to the home.

Mahonia aquifolium / Oregon grape
Photo: born1945, via Flickr, licensed under Creative Commons Attribution-2.0 Generic.
 Tile Doctor Ltd
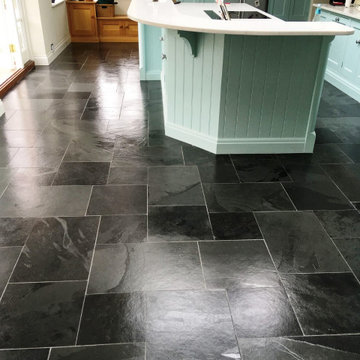
Our client had previously employed another company to tackle this large Slate floor in Walton on Thames but they hadn’t managed to remove the old sealer due to it being an old varnish seal. Varnish was used as a traditional way of sealing stone but can be damaged by scratching and it does little to improve the look of the stone. Varnish is also very difficult to break down which is a problem as it’s important to remove the old sealant before applying new, applying a new sealer onto Varnish simply wouldn’t work.
I visited the property to survey the floor and work out which combination of products and methods would work best and after some testing and I was able to confirm that not only could the old varnish be removed but once re-sealed with a modern sealer the slate would be transformed.
The client was over the moon to hear this news as they had thought there was nothing, they could do to improve the floor.
With a price and schedule agreed I returned to the property at a later date and started by tackling the varnish. The method I used was to apply Tile Doctor Remove and Go, let it soak into the floor for ten minutes and then work it in with a heavy rotary scrubbing machine fitted with a black pad. The soil was then rinsed with water and extracted off the floor with a wet vacuum.
The floor was then inspected, and each tile checked to ensure the varnish was completely gone, any stubborn areas were then spot treated and scrubbed by hand. Once I was satisfied, I set about giving the stone a deep clean by repeating the same process with Tile Doctor Pro-Clean. As before all the soil and cleaning products were then low pressure rinsed off the stone and vacuumed away. The floor was then left to dry overnight.
I returned the following day to apply a new modern sealer. First, I tested the floor was dry using the moisture meter. It was in the acceptable readings range, so I was able to start applying the sealer straight away.
For this floor I chose to apply Tile Doctor Seal and Go, it works really well on Slate tiles and as you can see from the photographs it completely transformed the appearance of the stone. Seal and Go is a water-based blend of acrylic polymers that provides both a stain resistant surface seal and a durable low-sheen finish, being water based it has the added advantage of not giving off any odour as it dries. The client had specified earlier that they didn’t want the floor to look shiny to the resultant silky appearance was the perfect solution. Thee coats were applied, and my client was very pleased with the finish.
Jonathan Oldham
South Middlesex Tile Doctor


 User
This Seattle waterfront home received a design overhaul. The revamped home earns its minimalist design with Nordic profiles and Japanese allure, nestled on the banks of the Lake Washington shoreline. The Laurelhurst neighborhood is charming as well as highly desired for the region. The home is conveniently situated just north of downtown Seattle, filled with commerce, arts and culture. However, its discreet location begs for a slower pace of life with water recreation at the ready. The quiet refuge boasts a private dock and boat house for days full of lakeside enjoyment.
The remodel kept the existing building perimeter intact, observing the tight bounds of the neighborhood. To optimize the location, a minimalist design with awe-inspiring materials was selected. Keeping the exterior simple, the thin white brick base of the home contrasts the Sho Sugi Ban second-story exterior. Furthermore, the gable roof mimics the traditional Scandinavian home profile that is notorious for simplicity.
 Tile Doctor Ltd
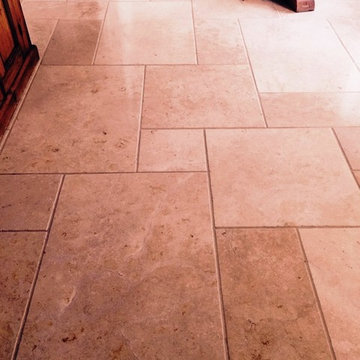
I was asked by a customer in Leatherhead, Surrey to clean the Limestone tiled floors that had been installed throughout the ground floor of his house. I popped round to take a look at the job and could see that the Limestone tile and grout was quite dirty; it was clear that the sealer had broken down and dirt was now becoming ingrained into the stone and grout.
The floor would need to be burnished and re-sealed to get it back to its original condition and so I provided a quote to do the work. The quote was accepted although he did ask if I could provide a couple of references from former clients; there are over 70 testimonials from past customers on my website so this was not a problem and I was happy to do so. Once he had received the references he called to book me in.
Cleaning Limestone Floor Tiles
My first job was to protect the walls and units before scrubbing the first area with a hot solution of Tile Doctor Pro-Clean using a rotary machine fitted with a brush head attachment. This process lifted the dirt out from the grout, the surface and any holes.
The floor was then rinsed thoroughly with clean water to remove any cleaning products and I then proceeded to burnish the Limestone tiles using a set of four burnishing pads system fitted to a rotary machine. You start with a coarse pad lubricated with a little water and this removes any remaining sealers and ingrained dirt from the stone. Any slurry is then rinsed away and you move onto the remaining medium, fine and superfine polishing pads which bring back the polished surface, again each pad needs to be lubricated with a little water which needs to be rinsed away after each pad. It was a large area so as you can imagine this took some time to apply this process to the entire floor so I focused on the Kitchen then first day and came back the second day to work on the hallway and utility room.
Sealing Limestone Floor Tiles
On the third day I came back to seal the floors using two coats of Tile Doctor Colour Grow which is a colour enhancing penetrating sealer that brings out the different shades of colour in Limestone and is designed to provide maximum stain protection on natural stone floors. The last step was to buff the floor to a nice shine with a rotary machine fitted with a white pad.
The grout is now back to its original grey as opposed to black and the Limestone look new again, needless to say the customer was really pleased with the finish and has since recommended my services to other friends.
 Tile Doctor Ltd
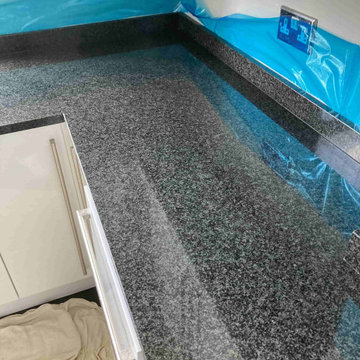
Although expensive Granite makes the most beautiful and practical stone worktop you can install in your kitchen. It gives real wow factor to a room and this kitchen in Folkestone was no different. Normally granite needs little maintenance however Folkestone has very hard water (often referred to as limescale) containing high levels of calcium and over time the calcium in the water gets deposited on nearby surfaces. According to the Affinity Water website the water in Folkestone contains 287.5 mg of calcium per litre which is classed as hard.
The owner of the property contacted us explaining that due to this problem the build-up of calcium deposits had overtaken her sink and countertop to a degree that she couldn`t deal with it through normal cleaning and a restoration was required. There are several household products on the market that can remove limescale however you need to be very careful when using these on natural stone as they use acids to break down the calcium and this can etch stone making the problem worse (always read the label). I went and had a look at the problem and gave her a quote for resolving the problem, which she was happy to accept.
Before starting the renovation, I protected the floor with dust sheets and the walls with a blue film that is easy to remove. Then to tackle the limescale I carefully went over each part of the Granite counter using a set of six-inch Tile Doctor Burnishing pads applying them in sequence from coarse to extra fine. To give extra cleaning power the coarser pads were applied with Tile Doctor Oxy-Gel which is an alkaline cleaning gel. The pads were fitted to a hand buffer and the soil generated by the abrasive pads was rinsed off between pads with water. For the finer detail such as the groves in the granite draining board, I used diamond encrusted handheld burnishing blocks of various grits. With the combination of diamond tooling and lots of elbow grease the job took around five hours to complete and the granite now has the polished look it deserves.
The granite worksurface does not require an actual sealer to be applied. However, maintenance is the key to keeping the stone in great condition so for aftercare I left the owner with a bottle of Tile Doctor Stone Patina Spray. This product is designed for cleaning stone worktops and contains a special ingredient that maintains the lustre. This should ensure the Limescale becomes manageable and can be cleaned more easily.
I made a striking difference to the appearance of the Granite Worktop and the owner was over the moon with the result.
Michael Conlon
South Kent Tile Doctor

 Fred Parker Company, Inc.
“EURO-LAKEVIEW ESTATE”
This beautifully wooded lake-side estate is owned by a very special couple who contacted the Fred Parker Company design-build team from the company’s Houzz.com professional website profile. The owners were interviewing design-build firms, and Custom Builder and AIBD Building Designer Ron Parker and ASID Interior Designer Lila Parker connected with this special couple on their first appointment. The couple was recently married and both had survived the loss of their spouse in years past. Ron and Lila accepted this as a very special opportunity to fulfill the owner’s dreams for this home through taking a fresh and very unique approach to this amazing residence and property.
The incredible home was originally designed and built by the husband for his family. Ron and Lila understood the importance of honoring and respecting the significance of these memories. The wife had a beautifully restored home on White Rock Lake and desired for the design and feel of her existing home to be incorporated with the architecture and style of this home to be renovated. The Parker’s design / build team embraced this tremendous opportunity and were awarded the contracts for design and construction.
Additions were created to expand the Kitchen and Dining Area overlooking the lake. A beautiful European style kitchen was designed to include flush inset and stained cabinets; quartz counters with a “waterfall effect” at the island and serving bar; significant cabinet and storage details; large and expansive Andersen Windows and Patio Doors, custom wood beams, and oversized porcelain tile flooring. The Family Area was redesigned with a custom entertainment center and new Andersen Doors and Windows. Other remodeling and interior design upgrades were completed in the home including converting the existing Dining Room and Butler’s Pantry into a Library and Reading Area, and remodeling the Powder Room to include a free-standing contemporary vanity. Changes and upgrades were also made to the Study and Master Bath. A large patio was built with stone retaining walls, borders, planters, and steps leading to the beautifully terraced yard.
This project also included a quaint and refreshing detached Art Room addition with cathedral ceiling, nestled in the trees overlooking the lake. A new two-car garage addition with storage closets was also added to the existing garage. Due to the proximately of these additions to the lake, special permission and critical guidelines were required by the Corps of Engineers and local city building authorities. These legal requirements created design, engineering, and building challenges which were approved and completed as required.
Ron and Lila Parker and the Fred Parker Company Design / Build Team are extremely proud of the work that was achieved to redesign, renovate, and update this amazing estate for this fine couple and their families. Ron’s personal mission statement “To meet or exceed the client’s expectations and end with a good relationship” was certainly tested but he believes this was respectively achieved as indicated by the client’s eloquent “Five-Star Houzz Review”.
 Tile Doctor Ltd
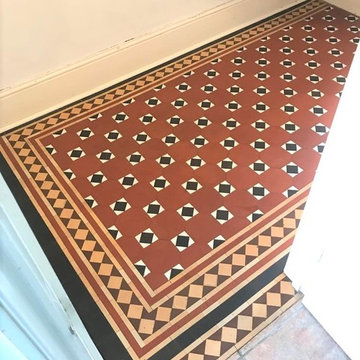
Our client had recently moved to a property in Newport, Gwent and when removing the carpet in the hallway she discovered this beautiful Victorian Tiled floor. The property had numerous period features and realising the value that the floor could add to the property she was keen to have it restored and so contacted Tile Doctor for help.
We popped round to survey the floor and except for a couple of broken tiles it had preserved well under the carpet. It was a shame the previous owner had covered the floor over but I was confident we could source some matching tiles to replace the broken ones and then restore the overall appearance. We gave the client a quote for the work which would take a couple of days. Pleased to hear that the floor could be restored and that it could soon be on show the quote was accepted and a date set to do the work.
We returned later the same month to renovate the floor and started by removing the broken tiles, cleaning out the old grout and adhesive and then relaying matching replacements. There are several specialist suppliers that can supply Victorian tiles so we can usually source reclaimed or reproduction tiles.
Some of the grout lines had dropped so as well as grouting around the replacement tiles more renovation work was needed to ensure the grout was level. We used quick setting products for this work, so I was able to move on to cleaning the floor later that afternoon.
To restore the appearance of the Victorian Tiles I used a strong dilution of Tile Doctor Pro-Clean combined with Tile Doctor Remove and Go which was left to soak in for ten minutes before being scrubbed into the tiles. This created a powerful cleaner/stripper cocktail which gets to work at removing dirt, grime and breaking down old sealers paint splashes.
After extracting the soil using a wet vacuum the floor was inspected. There were a few stubborn areas which were treated to a repeat clean and a wire brush to get the floor as clean as possible.
The floor was rinsed with water to remove any trace of cleaning products and then as much moisture as possible was extracted using a wet vacuum. The floor was left to dry off overnight and we arranged to return the next day to apply a sealer.
The following morning, we checked the floor was dry using a damp meter and this confirmed we were good to apply the sealer. The floor was sealed with Tile Doctor Colour Grow which is an impregnating sealer that protects the floor and enhances the beautiful colours in the tile. Three coats of the sealer were applied allowing each coat to dry before applying the next.
The client was very happy with the result and how beautiful the floor looked as you can see from the picture.
Paul Wales
Monmouthshire Tile Doctor

 Adobe Interiors
Looking for a stunning and unique leather barstool for your home? Look no further than our Chisum Levi Barstool. With a solid hardwood frame and subtle denim blue leather, this barstool is the perfect accent piece for any home, dining room, or living area. The brass-studded accents and worn, comforting feel of the leather give this barstool a perfect motif, while the armrests' gentle curve and sturdy squared base provide comfort and support. Handcrafted from Knotty Alder, the Chisum Levi Barstool is a truly authentic and elegant addition to any space.
But that's not all - the Chisum Levi Barstool also features a full 360 degree swivel mechanism, allowing for easy movement and comfortable seating. Plus, with the option to choose either bar or counter height, this barstool is customizable to fit your needs. Experience the beauty, charm, and stand-alone character of our Chisum Levi Barstool and bring color and life to your home today. These handcrafted, 100% American made barstools are a must-have for any dynamic set.
Overall Barstool Dimensions: 43" H x 26" W x 22" D
Seat Height: 30"
Top of Arm Height: 40"
Overall Counter Stool Dimension: 38" H x 26" W x 22" D
Seat Height: 25"
Top of Arm Height: 35"
Leather Description: Every hide will have personality of its own. Drum dyed, these hides are then hand sanded, giving each one an individual look, accented by the natural markings that Mother Nature has already provided. A coat of silicon completes the process leaving a finished article that will be uniquely rustic without a raspy feel. The leather enthusiast will recognize it as a natural product with the healed scars, fat wrinkles, and range marks. Due to the character of this leather, significant color variations are to be expected and accepted..
100% top grain cowhide leather is characterized by variations in shade, texture, color and grain. Healed marks and scars are to be expected and enhance the natural beauty of the hides. These variations should not be considered defects as they are normal and unique features of genuine 100% top grain cowhide leather.
Frame Construction: Made with American Alder Wood, our frames are glued, screwed and dowelled at the joints. Two coats of high quality stain is hand rubbed on the wood finish and then sealed with industrial grade clear coat.

 Tile Doctor Ltd
When you discover an old Victorian tiled floor underneath carpet, the first question that will probably pop into your mind is: can it be restored?
The answer, in the majority of cases, is yes. In fact, Tile Doctor has completed hundreds of Victorian tiled floor restorations. Victorian tiles have a timeless quality about them and are still popular for residential use even in the twenty first century.
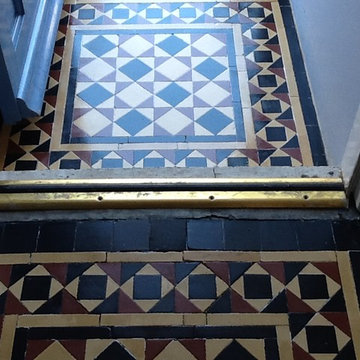
What you can usually expect upon lifting your carpet is for the tiles to be covered in carpet adhesives and grippers, as was the case with this particular example of a Victorian Tiles hallway floor at a property in Bedford. Sometimes you might also find paint splashes or other staining left over from decoration work. And, of course, the tiles will be dirty and in much need of a deep clean. These issues spoil the original appearance of the tiles, but with the right methods and products, a complete restoration can be achieved quickly and cost-effectively.
My first task upon arriving at the proper was to carry out a site survey to address the condition of the tiles, before running a quick test clean on a small area of the floor. The result was good and so I was confident that I could achieve a high-quality restoration for the client.
A quote was issued and accepted, and the work was booked in at a date that was convenient for the customer.
Returning to the property, my first course of action was to mix a strong dilution of Tile Doctor Pro Clean, which is a powerful alkaline cleaner safe to use on natural stone, with hot water. This cleaning solution was sprayed along all edges of the floor loosen the glue securing the carpet grippers. I then successfully removed the adhesive carefully using handheld tools to avoid damaging any tiles.
Once this was done, I applied Tile Doctor Remove and Go, scrubbing it into the tiles with a rotary machine. This product is designed to remove heavy soiling, paint splashes and old waxes and sealers. The soiled solution was then extracted using a wet vacuum and stubborn areas re-treated until I was satisfied the floor was clean.
The entire floor was then given a thorough rinse with water to remove any trace of cleaning products and extracted using a wet vax machine.
The floor was allowed to dry for several days before I was able to return to seal the tiles. It’s always important to leave significant time for the floor to dry because any moisture left over can impact the performance of the sealer.
The choice of sealer was Tile Doctor Seal and Go Extra, which provides robust protection against dirt and stains, with a light sheen finish. I chose this sealer not only because the customer wanted a light sheen finish, but also because this particular sealer is fully breathable. Dampness can sometimes be an issue with old Victorian and Quarry tiles which were installed before damp proof membranes became standard.
The transformation achieved within the space of a week was quite incredible and the colours in the tile have really come through.
Another satisfied customer!
David Vissian
Bedfordshire Tile Doctor

 S2 Builders
Kristin Zwiers Photography
Kitchen - traditional u-shaped kitchen idea in Seattle with shaker cabinets, white cabinets, granite countertops, red backsplash and stainless steel appliances
Kitchen - traditional u-shaped kitchen idea in Seattle with shaker cabinets, white cabinets, granite countertops, red backsplash and stainless steel appliances

 Joy Street Design
Printed wallpaper, marble, and high-end finishes abound in these luxurious bathrooms designed by our Oakland studio:
Designed by Oakland interior design studio Joy Street Design. Serving Alameda, Berkeley, Orinda, Walnut Creek, Piedmont, and San Francisco.
For more about Joy Street Design, click here: https://www.joystreetdesign.com/
To learn more about this project, click here:
https://www.joystreetdesign.com/portfolio/high-end-bathroom-houston

 Zuver Construction
This home was once one story. Zuver Construction took the entire home down to its studs, redesigned the flow of the main floor, added a staircase and completely new second story. The result is a home that blends modern efficiencies and style with rich warmth and traditional elements. Notice: state-of-the-art appliances in the kitchen, the moveable bookshelf that reveals a closet, neon/changing colored undercabinet lights in the bathrooms and a master suite fit for a luxurious hotel.
Photo credit: Real Estate Tours Oregon

 CourseworkService
The natural right of each youngster to a quality instruction was initially recognized in 1948 in the Universal Declaration of Human Rights (UDHR). Embraced by the UN General Assembly on 10 December 1948, the Universal Declaration of Human Rights (UDHR) states that: everybody has the privilege to training and that it ought to be free in any event at the essential level. Not just does everybody have the privilege to a free and mandatory essential instruction, that training ought to concentrate on full human advancement, fortify admiration for human rights, and advance comprehension, resistance and companionship (UDHR Article 26).
The 1960, UNESCO Convention Against Discrimination in Education fortifies the privilege to a free and obligatory quality essential trainings laid out in the 1948 UDHR, and further orders that segregation in instruction is an infringement of human rights. It sets out that segregation in instruction incorporates any qualification, rejection, restriction or inclination that depends on race, shading, sex, dialect, religion, political or other feeling, national or social birthplace, monetary condition or conception.
The Convention on the Rights of the Child of 1989 further characterized youngsters' entitlement to training. The Millennium Development Goals and other worldwide traditions have subsequent to fortified instruction as a widespread right to be ensured to ALL youngsters.
Rights-based methodology
Getting to and accepting a quality training is an all inclusive human right. Instruct A Child's work is established in the privilege of ALL CHILDREN around the globe to get to a quality training that regards and elevates their entitlement to pride and full improvement.
There are three imperative parts of instruction as a human right:
Investment in quality instruction in itself;
The act of human rights in training; and
Training as a privilege that encourages the satisfaction of different rights.
Our work depends on various global instruments that recognize instruction as a human right. A few of these global instruments show the fancied nature, or nature of this training. When we take a gander at these instruments together and translate them we go a long ways past single articles to a web of responsibilities that identifies with the profundity and expansiveness of how to start to comprehend instructive quality.
Elucidation of the different instruments as to quality training must be inserted inside of the general current nearby and world settings and desires of instruction. That is, training must be set and comprehended as far as the bigger setting. A quality training must reflect learning in connection to the learner as an individual, a family and group part, and a portion of a world society.
A quality instruction comprehends the past, is significant to the present, and has a perspective to what's to come. Quality training identifies with learning building and the handy utilization of all types of information by special people who capacity both freely and in connection to others. A quality instruction mirrors the dynamic way of society and dialects, the estimation of the person in connection to the bigger setting, and the significance of living in a way that advances equity in the present and encourages an economical future.
About the Author: She is a superb essayist. Her major is «Phycology». She examines the issues of kids' advanceme at courseworkservice.com

 AYDIN Hides
MEASUREMENTS:
Cowhide Patchwork Rug / Rectangular / Multi-color / PREMIUM QUALITY / HAND MADE / HAND STITCHED / UNIQUE AND EXCLUSIVE
Size: 118in x 78in. . Approx 64 sqft, Weight 22 lbs.
KEY FEATURES:
-Brand New Cowhide Patchwork Rug
-Country of Origin: BOSNIA
-Premium Quality
-Hand Made
-Hand Stitched
-100% genuine cowhide leather
-European (Balkan) breed animals
-Each product is BRANDED with serial number and Craftsmanship seal.
WHY OUR HIDES ARE DIFFERENT?
1. Hides used for making COWHIDE PATCHWORK RUGS are sourced ethically and humanely and 100% as byproduct of meat production;
2. Animals are free-range raised, sustainable sourced and grown mainly on mountain pastures in Bosnia;
3. Animal skins are of breeds endemic to Balkan region of Eastern Europe;
4. Skins ARE NOT processed by mass processing facility, but rather family owned business with "Old Craft" certificate. This means that such business falls in "tradition" category of business in Bosnia, since third family generation takes care of business;
5. All skins are hand processed using solutions with the P.H value of drinking water! We have been assured into that by actually being present inside the workshop during skin processing;
6. Skins are processed in small batches, usually 5-10 at the time, in order for skin to preserve, to the greatest extend, its natural distinctions and quality;
NOTE: The photo on this page represents design and style of this rug and IT IS AN IMAGE OF ACTUAL product you will receive. All rug sizes are approximate. Due to the difference of monitor colors, some rug colors may vary slightly.
NOTE: Few products may contain some natural flaws due to conditions inherent to natural animal products (scratches, insect bites, wrinkles, cuts, etc.) that will be discretely repaired. Please note that WE DO NOT WEDGE OUR COWHIDES but we rather discretely stitch and repair. Such flaws are acceptable for this type of product, since it represents the life of the animal to the fullest possible extent.
CARE INSTRUCTIONS:
Vacuum, shake and rotate the rug regularly. Remove dried spots immediately by scraping carefully towards the middle of the spot. Do not rub wet spots. Absorb moisture with paper towel and clean with a damp cloth and mild detergent. Professional carpet cleaning when needed. Always use the standard floor head, never use rotating brush, when vacuuming the rug.
 Robin's Nest Interiors
Updated Spec Home: The Bathrooms
The last stop on the main level of this Updated Spec Home are the Bathrooms. Every surface of the Guest Bath and Master Bath was touched- even some renovations in the Master bedroom. All I can say is thank goodness these two love wallpaper – we selected classic patterns for each bath that will stand the test of time!
Guest Bathroom
The Guest Bath also doubles as my mom’s bath. The footprint remained the same but we updated everything. A new vanity was chosen to give her that furniture look while still providing some storage – although there is a linen closet located just outside the bath. We topped it off with a beautiful mirror with great detail and an equally great light fixture. Also, we mixed the finishes in the bath between nickel and champagne, i.e., gold/silver mix. Mixing metals is perfectly acceptable and quite frankly way more interesting the everything matching. Updated Spec Home Bathrooms - Robin's Nest Interiors
Updated Spec Home Bathrooms - Robin's Nest Interiors
We found this amazing wallpaper with its subtle colors and pattern and selected a large square tile to coordinate for the floor. Yes, you can do a large tile in a small bath because it actually makes the space feel larger. For finishing touches, we had this gorgeous shower curtain made. Above the new toilet, we added interesting abstract artwork framed in a large mat so it would not clash with the wallpaper.
Master Bathroom
Originally, the Master Bath had a large garden tub as the focal point and a tiny stand up shower in the corner. We removed the garden tub, moved the shower to this area as the focal point and turned the tiny shower into a much needed linen closet. At this point, I know you are thinking, what about resale with no tub? There is a tub in the Guest Bath so the house will still be appealing to young families or bath lovers alike.
© 2016 RealTourCast | Tim Furlong Jr.
Tile selections came first – my sister fell in love with this gorgeous dark greige glass tile. We used it in the upper half of the shower while keeping the lower half light with this plank tile in a striated pattern. We carried the plank tile onto the floor for a seamless look.
Updated Spec Home Bathrooms - Robin's Nest Interiors
We replaced the two vanities with stock cabinetry that looks custom in a rich wood stain. Also, we found a gorgeous granite remnant for the countertop and finished off the vanity area with oversized mirrors, sleek lighting, and striking hardware.Updated Spec Home Bathrooms - Robin's Nest Interiors
The wallpaper is absolutely perfect for this space – it adds an interesting backdrop without overpowering the room. Her fantastic artwork was able to fit in the niche next to the new toilet. This is one gorgeous bath!
Updated Spec Home Bathrooms - Robin's Nest Interiors
Coming Soon
Spoiler Alert – my mom and sister have decided to update their Basement Family Room and add a small Powder Bath so look for Season 2 of the Updated Spec Home series!
See the rest of this house through these links! Foyer & Great Room, Kitchen & Breakfast Area, Bedrooms, Guest Bedroom.
146