
Search results for "Accepting" in Home Design Ideas
 Adobe Interiors
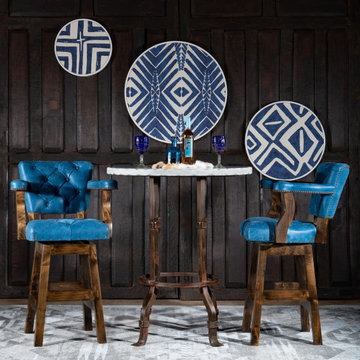
Looking for a stunning and unique leather barstool for your home? Look no further than our Chisum Levi Barstool. With a solid hardwood frame and subtle denim blue leather, this barstool is the perfect accent piece for any home, dining room, or living area. The brass-studded accents and worn, comforting feel of the leather give this barstool a perfect motif, while the armrests' gentle curve and sturdy squared base provide comfort and support. Handcrafted from Knotty Alder, the Chisum Levi Barstool is a truly authentic and elegant addition to any space.
But that's not all - the Chisum Levi Barstool also features a full 360 degree swivel mechanism, allowing for easy movement and comfortable seating. Plus, with the option to choose either bar or counter height, this barstool is customizable to fit your needs. Experience the beauty, charm, and stand-alone character of our Chisum Levi Barstool and bring color and life to your home today. These handcrafted, 100% American made barstools are a must-have for any dynamic set.
Overall Barstool Dimensions: 43" H x 26" W x 22" D
Seat Height: 30"
Top of Arm Height: 40"
Overall Counter Stool Dimension: 38" H x 26" W x 22" D
Seat Height: 25"
Top of Arm Height: 35"
Leather Description: Every hide will have personality of its own. Drum dyed, these hides are then hand sanded, giving each one an individual look, accented by the natural markings that Mother Nature has already provided. A coat of silicon completes the process leaving a finished article that will be uniquely rustic without a raspy feel. The leather enthusiast will recognize it as a natural product with the healed scars, fat wrinkles, and range marks. Due to the character of this leather, significant color variations are to be expected and accepted..
100% top grain cowhide leather is characterized by variations in shade, texture, color and grain. Healed marks and scars are to be expected and enhance the natural beauty of the hides. These variations should not be considered defects as they are normal and unique features of genuine 100% top grain cowhide leather.
Frame Construction: Made with American Alder Wood, our frames are glued, screwed and dowelled at the joints. Two coats of high quality stain is hand rubbed on the wood finish and then sealed with industrial grade clear coat.
 Tile Doctor Ltd
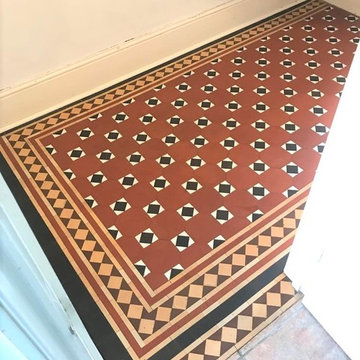
Our client had recently moved to a property in Newport, Gwent and when removing the carpet in the hallway she discovered this beautiful Victorian Tiled floor. The property had numerous period features and realising the value that the floor could add to the property she was keen to have it restored and so contacted Tile Doctor for help.
We popped round to survey the floor and except for a couple of broken tiles it had preserved well under the carpet. It was a shame the previous owner had covered the floor over but I was confident we could source some matching tiles to replace the broken ones and then restore the overall appearance. We gave the client a quote for the work which would take a couple of days. Pleased to hear that the floor could be restored and that it could soon be on show the quote was accepted and a date set to do the work.
We returned later the same month to renovate the floor and started by removing the broken tiles, cleaning out the old grout and adhesive and then relaying matching replacements. There are several specialist suppliers that can supply Victorian tiles so we can usually source reclaimed or reproduction tiles.
Some of the grout lines had dropped so as well as grouting around the replacement tiles more renovation work was needed to ensure the grout was level. We used quick setting products for this work, so I was able to move on to cleaning the floor later that afternoon.
To restore the appearance of the Victorian Tiles I used a strong dilution of Tile Doctor Pro-Clean combined with Tile Doctor Remove and Go which was left to soak in for ten minutes before being scrubbed into the tiles. This created a powerful cleaner/stripper cocktail which gets to work at removing dirt, grime and breaking down old sealers paint splashes.
After extracting the soil using a wet vacuum the floor was inspected. There were a few stubborn areas which were treated to a repeat clean and a wire brush to get the floor as clean as possible.
The floor was rinsed with water to remove any trace of cleaning products and then as much moisture as possible was extracted using a wet vacuum. The floor was left to dry off overnight and we arranged to return the next day to apply a sealer.
The following morning, we checked the floor was dry using a damp meter and this confirmed we were good to apply the sealer. The floor was sealed with Tile Doctor Colour Grow which is an impregnating sealer that protects the floor and enhances the beautiful colours in the tile. Three coats of the sealer were applied allowing each coat to dry before applying the next.
The client was very happy with the result and how beautiful the floor looked as you can see from the picture.
Paul Wales
Monmouthshire Tile Doctor

 S2 Builders
Kristin Zwiers Photography
Kitchen - traditional u-shaped kitchen idea in Seattle with shaker cabinets, white cabinets, granite countertops, red backsplash and stainless steel appliances
Kitchen - traditional u-shaped kitchen idea in Seattle with shaker cabinets, white cabinets, granite countertops, red backsplash and stainless steel appliances
Find the right local pro for your project

 Zuver Construction
This home was once one story. Zuver Construction took the entire home down to its studs, redesigned the flow of the main floor, added a staircase and completely new second story. The result is a home that blends modern efficiencies and style with rich warmth and traditional elements. Notice: state-of-the-art appliances in the kitchen, the moveable bookshelf that reveals a closet, neon/changing colored undercabinet lights in the bathrooms and a master suite fit for a luxurious hotel.
Photo credit: Real Estate Tours Oregon

 AYDIN Hides
MEASUREMENTS:
Cowhide Patchwork Rug / Rectangular / Multi-color / PREMIUM QUALITY / HAND MADE / HAND STITCHED / UNIQUE AND EXCLUSIVE
Size: 118in x 78in. . Approx 64 sqft, Weight 22 lbs.
KEY FEATURES:
-Brand New Cowhide Patchwork Rug
-Country of Origin: BOSNIA
-Premium Quality
-Hand Made
-Hand Stitched
-100% genuine cowhide leather
-European (Balkan) breed animals
-Each product is BRANDED with serial number and Craftsmanship seal.
WHY OUR HIDES ARE DIFFERENT?
1. Hides used for making COWHIDE PATCHWORK RUGS are sourced ethically and humanely and 100% as byproduct of meat production;
2. Animals are free-range raised, sustainable sourced and grown mainly on mountain pastures in Bosnia;
3. Animal skins are of breeds endemic to Balkan region of Eastern Europe;
4. Skins ARE NOT processed by mass processing facility, but rather family owned business with "Old Craft" certificate. This means that such business falls in "tradition" category of business in Bosnia, since third family generation takes care of business;
5. All skins are hand processed using solutions with the P.H value of drinking water! We have been assured into that by actually being present inside the workshop during skin processing;
6. Skins are processed in small batches, usually 5-10 at the time, in order for skin to preserve, to the greatest extend, its natural distinctions and quality;
NOTE: The photo on this page represents design and style of this rug and IT IS AN IMAGE OF ACTUAL product you will receive. All rug sizes are approximate. Due to the difference of monitor colors, some rug colors may vary slightly.
NOTE: Few products may contain some natural flaws due to conditions inherent to natural animal products (scratches, insect bites, wrinkles, cuts, etc.) that will be discretely repaired. Please note that WE DO NOT WEDGE OUR COWHIDES but we rather discretely stitch and repair. Such flaws are acceptable for this type of product, since it represents the life of the animal to the fullest possible extent.
CARE INSTRUCTIONS:
Vacuum, shake and rotate the rug regularly. Remove dried spots immediately by scraping carefully towards the middle of the spot. Do not rub wet spots. Absorb moisture with paper towel and clean with a damp cloth and mild detergent. Professional carpet cleaning when needed. Always use the standard floor head, never use rotating brush, when vacuuming the rug.

 CourseworkService
The natural right of each youngster to a quality instruction was initially recognized in 1948 in the Universal Declaration of Human Rights (UDHR). Embraced by the UN General Assembly on 10 December 1948, the Universal Declaration of Human Rights (UDHR) states that: everybody has the privilege to training and that it ought to be free in any event at the essential level. Not just does everybody have the privilege to a free and mandatory essential instruction, that training ought to concentrate on full human advancement, fortify admiration for human rights, and advance comprehension, resistance and companionship (UDHR Article 26).
The 1960, UNESCO Convention Against Discrimination in Education fortifies the privilege to a free and obligatory quality essential trainings laid out in the 1948 UDHR, and further orders that segregation in instruction is an infringement of human rights. It sets out that segregation in instruction incorporates any qualification, rejection, restriction or inclination that depends on race, shading, sex, dialect, religion, political or other feeling, national or social birthplace, monetary condition or conception.
The Convention on the Rights of the Child of 1989 further characterized youngsters' entitlement to training. The Millennium Development Goals and other worldwide traditions have subsequent to fortified instruction as a widespread right to be ensured to ALL youngsters.
Rights-based methodology
Getting to and accepting a quality training is an all inclusive human right. Instruct A Child's work is established in the privilege of ALL CHILDREN around the globe to get to a quality training that regards and elevates their entitlement to pride and full improvement.
There are three imperative parts of instruction as a human right:
Investment in quality instruction in itself;
The act of human rights in training; and
Training as a privilege that encourages the satisfaction of different rights.
Our work depends on various global instruments that recognize instruction as a human right. A few of these global instruments show the fancied nature, or nature of this training. When we take a gander at these instruments together and translate them we go a long ways past single articles to a web of responsibilities that identifies with the profundity and expansiveness of how to start to comprehend instructive quality.
Elucidation of the different instruments as to quality training must be inserted inside of the general current nearby and world settings and desires of instruction. That is, training must be set and comprehended as far as the bigger setting. A quality training must reflect learning in connection to the learner as an individual, a family and group part, and a portion of a world society.
A quality instruction comprehends the past, is significant to the present, and has a perspective to what's to come. Quality training identifies with learning building and the handy utilization of all types of information by special people who capacity both freely and in connection to others. A quality instruction mirrors the dynamic way of society and dialects, the estimation of the person in connection to the bigger setting, and the significance of living in a way that advances equity in the present and encourages an economical future.
About the Author: She is a superb essayist. Her major is «Phycology». She examines the issues of kids' advanceme at courseworkservice.com

 Robin's Nest Interiors
Updated Spec Home: The Bathrooms
The last stop on the main level of this Updated Spec Home are the Bathrooms. Every surface of the Guest Bath and Master Bath was touched- even some renovations in the Master bedroom. All I can say is thank goodness these two love wallpaper – we selected classic patterns for each bath that will stand the test of time!
Guest Bathroom
The Guest Bath also doubles as my mom’s bath. The footprint remained the same but we updated everything. A new vanity was chosen to give her that furniture look while still providing some storage – although there is a linen closet located just outside the bath. We topped it off with a beautiful mirror with great detail and an equally great light fixture. Also, we mixed the finishes in the bath between nickel and champagne, i.e., gold/silver mix. Mixing metals is perfectly acceptable and quite frankly way more interesting the everything matching. Updated Spec Home Bathrooms - Robin's Nest Interiors
Updated Spec Home Bathrooms - Robin's Nest Interiors
We found this amazing wallpaper with its subtle colors and pattern and selected a large square tile to coordinate for the floor. Yes, you can do a large tile in a small bath because it actually makes the space feel larger. For finishing touches, we had this gorgeous shower curtain made. Above the new toilet, we added interesting abstract artwork framed in a large mat so it would not clash with the wallpaper.
Master Bathroom
Originally, the Master Bath had a large garden tub as the focal point and a tiny stand up shower in the corner. We removed the garden tub, moved the shower to this area as the focal point and turned the tiny shower into a much needed linen closet. At this point, I know you are thinking, what about resale with no tub? There is a tub in the Guest Bath so the house will still be appealing to young families or bath lovers alike.
© 2016 RealTourCast | Tim Furlong Jr.
Tile selections came first – my sister fell in love with this gorgeous dark greige glass tile. We used it in the upper half of the shower while keeping the lower half light with this plank tile in a striated pattern. We carried the plank tile onto the floor for a seamless look.
Updated Spec Home Bathrooms - Robin's Nest Interiors
We replaced the two vanities with stock cabinetry that looks custom in a rich wood stain. Also, we found a gorgeous granite remnant for the countertop and finished off the vanity area with oversized mirrors, sleek lighting, and striking hardware.Updated Spec Home Bathrooms - Robin's Nest Interiors
The wallpaper is absolutely perfect for this space – it adds an interesting backdrop without overpowering the room. Her fantastic artwork was able to fit in the niche next to the new toilet. This is one gorgeous bath!
Updated Spec Home Bathrooms - Robin's Nest Interiors
Coming Soon
Spoiler Alert – my mom and sister have decided to update their Basement Family Room and add a small Powder Bath so look for Season 2 of the Updated Spec Home series!
See the rest of this house through these links! Foyer & Great Room, Kitchen & Breakfast Area, Bedrooms, Guest Bedroom.


 A. Houck Designs, Inc.
Lydia Cutter
Example of a transitional light wood floor entryway design in DC Metro with blue walls
Example of a transitional light wood floor entryway design in DC Metro with blue walls

 Susan Tully Interiors
We love when our clients trust us enough to do a second project for them. In the case of this couple looking for a NYC Pied-a-Terre – this was our 4th! After designing their homes in Bernardsville, NJ and San Diego, CA and a home for their daughter in Orange County, CA, we were called up for duty on the search for a NYC apartment which would accommodate this couple with room enough for their four children as well!
What we cherish most about working with clients is the trust that develops over time. In this case, not only were we asked to come on board for design and project coordination, but we also helped with the actual apartment selection decision between locations in TriBeCa, Upper West Side and the West Village. The TriBeCa building didn’t have enough services in the building; the Upper West Side neighborhood was too busy and impersonal; and, the West Village apartment was just right.
Our work on this apartment was to oversee the design and build-out of the combination of a 3,000 square foot 3-bedroom unit with a 1,000 square foot 1-bedroom unit. We reorganized the space to accommodate this family of 6. The living room in the 1 bedroom became the media room; the kitchen became a bar; and the bedroom became a guest suite.
The most amazing feature of this apartment are its views – uptown to the Empire State Building, downtown to the Statue of Liberty and west for the most vibrant sunsets. We opened up the space to create view lines through the apartment all the way back into the home office.
Customizing New York City apartments takes creativity and patience. In order to install recessed lighting, Ray devised a floating ceiling situated below the existing concrete ceiling to accept the wiring and housing.
In the design of the space, we wanted to create a flow and continuity between the public spaces. To do this, we designed walnut panels which run from the center hall through the media room into the office and on to the sitting room. The richness of the wood helps ground the space and draws your eye to the lightness of the gorgeous views. For additional light capture, we designed a 9 foot by 10 foot metal and mirror wall treatment in the living room. The purpose is to catch the light and reflect it back into the living space creating expansiveness and brightness.
Adding unique and meaningful art pieces is the critical final stage of design. For the master bedroom, we commissioned Ira Lohan, a Santa Fe, NM artist we know, to create a totem with glass feathers. This piece was inspired by folklore from his Native American roots which says home is defined by where an eagle’s feathers land. Ira drove this piece across the country and delivered and installed it himself!!
 Nathan Allan Glass Studios Inc.
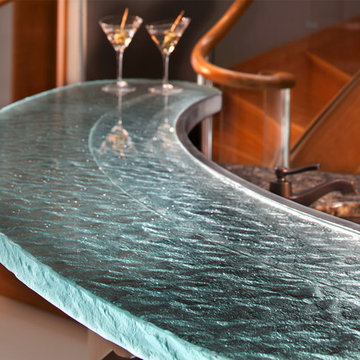
What surprises people most when entering and walking on the glowing white surface in this particular Private Residence (Williamsburg, VA) is when they find out they are walking on a sea of glass! Yes, GLASS! Not marble, not granite, but GLASS! Nathan Allan has created a very fresh, unique flooring surface, which is smooth to touch on the majority of the glass surface, yet has an almost invisible safety finish permanently embedded in the glass surface.
THE GLASS
Nathan Allan’s Glass Flooring incorporates features which are visually stunning, while also providing a safety finish which provides comfort to everyone walking on the glass. Our Sandstone texture is forged into the bottom surface of the glass, while our exclusive Glass Sandpaper safety finish is fused onto the walking surface. To enhance all features, we added a bright, sparkling, White Metallic color finish throughout each flooring panel.
SPECIFICATIONS
Each Glass Flooring panel is produced in 1/2″ (12mm) thick, Low Iron, tempered safety glass. Tempered glass provides added strength, insuring that the Glass Flooring can accept a heavy load. Panels vary in size and dimension, with most panels measured at a block size of 5’0 x 6’0 (1500mm x 1800mm). Perimeter Edge panels were carved and shaped to fit tightly against the curved walls. Glass Sandpaper, ASTM tested in labs with the highest slip-coefficient safety ratings, is fused onto the walking surface, to provide a very comfortable and effective safety feature.
Flooring Glass Details:
1/2″ (12mm) thick, Low iron tempered safety glass
Flat Polished Edges
Glass Sandpaper on walking surface
Sandstone texture on bottom surface
White Metallic color finish on bottom surface
Panels sizes up to 5’0 x 6’0
Approximately 800 square feet of glass flooring
Perimeter panels shape cut to fit
Almost overshadowed by the spectacular flooring is a 1.5” thick, Heavy Glasstop, Crescent shaped, with Nathan Allan’s Rocky Mountain texture.
DESIGN
A White Sea of Glass flooring is the finished result of combining a light Sandstone texture on the bottom glass surface, with the added touch of a sparkling White Metallic color finish. Combined with our Glass Sandpaper safety finish, and the natural and artificial light sources, our Glass Flooring shimmers within the entire entrance space.
INSTALLATION
Using very important installation techniques, Nathan Allan worked hand in hand with great team of professionals: Vicki Bristow, designer, W. M. Jordan Company, GC, and Pompei Inc, glass flooring installer. Templates were produced for all perimeter edge panels, and every shaped panel. All flooring panels are secured to the substrate with special adhesives, and joints are filled with matching color sealants.
“A beautiful project is always enhanced when working with quality, prestigious builders, and talented trade’s people. The tight organization and open communication by all the team members contributed greatly to a project proceeding seamlessly, with the incredible visual results to prove it.” Barry Allan – Director
Photo credit: Morgan Howarth

 Progressive Design Build
The Challenge
This beautiful waterfront home was begging for an update. Our clients wanted a contemporary design with modern finishes. They craved improved functionality in the kitchen, hardwood flooring in the living areas, and a spacious walk-in closet in the master bathroom. With two children in school, our clients also needed the project completed during their summer vacation – leaving a slim 90 days for the entire remodel. Could we do it? …Challenge accepted!
Our Solution
With their active summer travel schedule, our clients elected to vacate their home for the duration of the project. This was ideal for the intrusive nature of the scope of work.
In preparation, our design team created a project plan to suit our client’s needs. With such a clear timeline, we were able to select and order long-lead items in plenty of time for the project start date.
In the kitchen, we rearranged the layout to provide superior ventilation for the cooktop on the exterior wall. We added two large storage cabinets with glass doors, accented by a sleek mosaic backsplash of glass tile. We also incorporated a large contemporary waterfall island into the room. With seating at one end, the island provides both increased functionality and an eye-catching focal point for the center of the room. On the interior wall of the kitchen, we maximized storage with a wall of built-in cabinetry – complete with pullout pantry cabinets, a double oven, and a large stainless refrigerator.
Our clients wisely chose rich, dark-colored wood flooring to add warmth to the contemporary design. After installing the flooring in the kitchen, we brought it into the main living areas as well. In the great room, we wrapped the existing gas fireplace in a neutral stack stone. The effect of the stone on the media and window wall is breathtaking.
In the master bathroom, we expanded the closet by pushing the wall back into the adjacent pass-through hallway. The new walk-in closet now includes an impressive closet organization system.
Returning to the master bathroom, we removed the single vanity and repositioned the toilet, allowing for a new, curb-less glass shower and a his-and-hers vanity. The entire vanity and shower wall is finished in white 12×24 porcelain tile. The vertical glass mosaic accent band and backlit floating mirrors add to the clean, modern style. To the left of the master bathroom entry, we even added a matching make-up area.
Finally, we installed a number of elegant enhancements in the remaining rooms. The clients chose a bronze metal relief accent wall as well as some colorful finishes and artwork for the entry and hallway.
Exceptional Results
Our clients were simply thrilled with the final product! Not only did they return from their summer vacation to a gorgeous home remodel, but we concluded the project a full week ahead of schedule. As a result, the family was able to move in sooner than planned, giving them plenty of time to acclimate to the renovated space before their kids returned to school. Ultimately, we provided the outstanding results and customer experience that our clients had been searching for.
“We met with many other contractors leading up to signing with Progressive Design Build. When we met Mike, we finally felt safe. We had heard so many horror stories about contractors! Progressive was the best move we could have made. They made our dream house become a reality. Vernon was in charge of our project and everything went better than we expected. Our project was completed earlier than expected, too. Our questions and concerns were dealt with quickly and professionally, the job site was always clean, and all subs were friendly and professional. We had a wonderful experience with Progressive Design Build. We’re so grateful we found them.” – The Mader Family
 AYDIN Hides
MEASUREMENTS:
Cowhide Patchwork Rug / Rectangular / Multi-color / PREMIUM QUALITY / HAND MADE / HAND STITCHED / UNIQUE AND EXCLUSIVE
Size: 118in x 78in. . Approx 64 sqft, Weight 22 lbs.
KEY FEATURES:
-Brand New Cowhide Patchwork Rug
-Country of Origin: BOSNIA
-Premium Quality
-Hand Made
-Hand Stitched
-100% genuine cowhide leather
-European (Balkan) breed animals
-Each product is BRANDED with serial number and Craftsmanship seal.
WHY OUR HIDES ARE DIFFERENT?
1. Hides used for making COWHIDE PATCHWORK RUGS are sourced ethically and humanely and 100% as byproduct of meat production;
2. Animals are free-range raised, sustainable sourced and grown mainly on mountain pastures in Bosnia;
3. Animal skins are of breeds endemic to Balkan region of Eastern Europe;
4. Skins ARE NOT processed by mass processing facility, but rather family owned business with "Old Craft" certificate. This means that such business falls in "tradition" category of business in Bosnia, since third family generation takes care of business;
5. All skins are hand processed using solutions with the P.H value of drinking water! We have been assured into that by actually being present inside the workshop during skin processing;
6. Skins are processed in small batches, usually 5-10 at the time, in order for skin to preserve, to the greatest extend, its natural distinctions and quality;
NOTE: The photo on this page represents design and style of this rug and IT IS AN IMAGE OF ACTUAL product you will receive. All rug sizes are approximate. Due to the difference of monitor colors, some rug colors may vary slightly.
NOTE: Few products may contain some natural flaws due to conditions inherent to natural animal products (scratches, insect bites, wrinkles, cuts, etc.) that will be discretely repaired. Please note that WE DO NOT WEDGE OUR COWHIDES but we rather discretely stitch and repair. Such flaws are acceptable for this type of product, since it represents the life of the animal to the fullest possible extent.
CARE INSTRUCTIONS:
Vacuum, shake and rotate the rug regularly. Remove dried spots immediately by scraping carefully towards the middle of the spot. Do not rub wet spots. Absorb moisture with paper towel and clean with a damp cloth and mild detergent. Professional carpet cleaning when needed. Always use the standard floor head, never use rotating brush, when vacuuming the rug.
 Tile Doctor Ltd
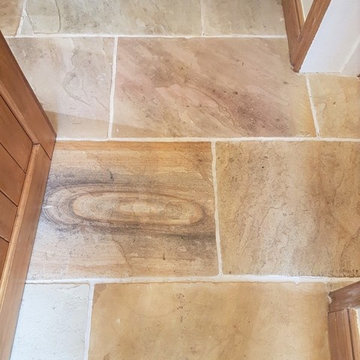
The pictures below are of a multi coloured sandstone floor installed at a property in East Keswick which is a village approximately halfway between Harrogate and Leeds. (Not to be confused with the more famous Keswick in the Lake District)
The stone floor had not been cleaned professionally for ten years and although the grout looked clean It was clear that any sealer that was once present had long since worn off leaving the stone unprotected. The result was dirt had become deeply ingrained in the Sandstone leading causing the stone to darken and hide its true beauty and rich colouring. The client had tried lots of different products to clean the floor but had not had any luck.
I visited the property and carried out a few successful patch tests resulting in the floor becoming much cleaner. They were happy to go ahead with my quote and we arranged a time to return and complete the work.
I prepared the area before starting, taping up the skirting boards and doors to protect them from the splashing that can happen during the intensive cleaning process.
To get the sandstone clean I applied a medium dilution of Tile Doctor Pro-Clean to the floor and allowed it to soak in for ten minutes. The solution was then worked into the Sandstone using a rotary floor machine fitted with a black scrubbing pad. More Pro-Clean was applied with a hand-held scrubbing brush to get deep into the grout lines and to reach into the corners.
Once done the floor was rinsed with water and the soil extracted with a wet vacuum. The floor was inspected, and the process repeated until I was satisfied that the stone and grout had released all the trapped dirt. After a final rinse, the wet vacuum was used to get as much moisture out of the stone as possible and then the floor left to dry out fully overnight.
Returning the following morning, I first checked that the floor was dry using a damp meter. The sealer won’t cure if there is any moisture in the stone and I’ve been known to reschedule sealing a floor if the readings are too high. On this occasion I was satisfied that the floor was within acceptable levels, so I was ready to seal the floor.
I used three coats of Tile Doctor Colour Grow to seal the floor, this is an impregnating sealer which intensifies natural colours whilst providing durable protection against stains, an essential feature in an area such as a hallway which is subject to constant foot traffic.
As you can see from the photos the transformation was quite impressive, the floor became much lighter and almost unrecognisable, the natural colours of the stone were now visible, and the floor looked beautiful. The client was very happy with the end result and has said they would not hesitate to recommend me to others.
Nigel Stoker
North West Yorkshire Tile Doctor
 Levite Construction Co
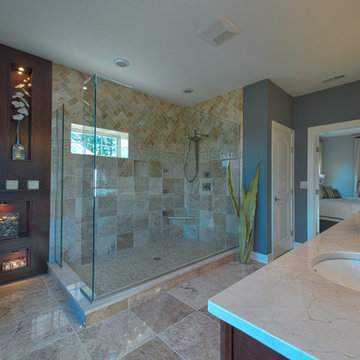
?✨ Transforming Dreams: From Damage to Elegance in Capitol Hill, Seattle ✨?
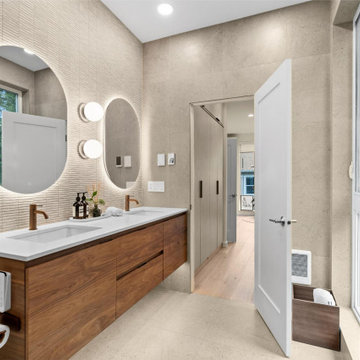
At Levite Construction, we believe in turning challenges into opportunities, and that's exactly what we did with this stunning project in Capitol Hill, Seattle, WA. Witness the incredible journey of restoring a beautiful town house that fell victim to water damage, as we share with you the remarkable transformation that showcases our expertise, dedication, and unwavering commitment to excellence.
? Repairing the Aftermath? The story began with a distress call, a plea for help from a water-damaged home in Capitol Hill. Our skilled team swiftly sprang into action, assessing the damage and devising a comprehensive plan for restoration. From minor repairs to major overhauls, we left no stone unturned in bringing this residence back to life.
? A Vision Takes Shape ?
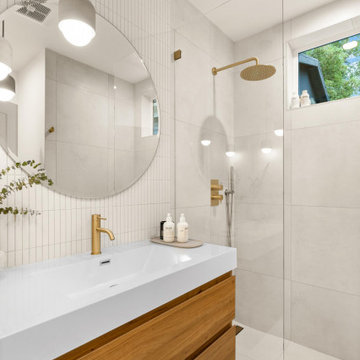
Our creative design team envisioned a space that not only corrected the damage but also elevated the aesthetic to new heights. The challenge was accepted – to create a spa-like haven that exudes luxury and tranquility while maintaining a smart and functional layout.
? A Tranquil Retreat - Smart Bathroom Remodeling ?
Step into our world of ingenuity as you explore the images of the spa-inspired bathrooms. Every detail has been meticulously curated to evoke a sense of serenity. From innovative fixtures to thoughtfully chosen color palettes, this space is a testament to our dedication to crafting exceptional experiences.
? Every Inch Transformed?
Witness the metamorphosis as our skilled team undertook tasks that spanned the spectrum of construction artistry. Admire the seamless new floor installation, where every step taken is now on a canvas of elegance. The rich tapestry of paintwork dances in harmony with carefully crafted cabinetry, breathing life into this once-damaged dwelling.
?♂️ Expertise in Action ?♂️
Our project managers played a pivotal role in orchestrating this symphony of construction. Their meticulous planning, relentless dedication, and unwavering attention to detail ensured that every aspect of this project was executed flawlessly.
? Result: Elegance Redefined ?
As you scroll through the images, you'll witness the culmination of our endeavors – a home that has been resurrected from the ruins and reimagined with elegance. Levite Construction's commitment to quality, innovation, and customer satisfaction shines through every corner of this remodel.
? Capture the Journey?
Explore the photo gallery capturing the transition from devastation to breathtaking beauty. Every image is a testament to the passion and craftsmanship that define Levite Construction.
Thank you for joining us on this remarkable journey from adversity to triumph. We're proud to have turned a challenge into an opportunity and to have brought a smile back to this Capitol Hill home.
At Levite Construction, we don't just build structures; we build dreams.
#LeviteConstruction #FromDamageToElegance #CapitolHillRestoration #CraftingDreamHomes
 Progressive Design Build
The Challenge
This beautiful waterfront home was begging for an update. Our clients wanted a contemporary design with modern finishes. They craved improved functionality in the kitchen, hardwood flooring in the living areas, and a spacious walk-in closet in the master bathroom. With two children in school, our clients also needed the project completed during their summer vacation – leaving a slim 90 days for the entire remodel. Could we do it? …Challenge accepted!
Our Solution
With their active summer travel schedule, our clients elected to vacate their home for the duration of the project. This was ideal for the intrusive nature of the scope of work.
In preparation, our design team created a project plan to suit our client’s needs. With such a clear timeline, we were able to select and order long-lead items in plenty of time for the project start date.
In the kitchen, we rearranged the layout to provide superior ventilation for the cooktop on the exterior wall. We added two large storage cabinets with glass doors, accented by a sleek mosaic backsplash of glass tile. We also incorporated a large contemporary waterfall island into the room. With seating at one end, the island provides both increased functionality and an eye-catching focal point for the center of the room. On the interior wall of the kitchen, we maximized storage with a wall of built-in cabinetry – complete with pullout pantry cabinets, a double oven, and a large stainless refrigerator.
Our clients wisely chose rich, dark-colored wood flooring to add warmth to the contemporary design. After installing the flooring in the kitchen, we brought it into the main living areas as well. In the great room, we wrapped the existing gas fireplace in a neutral stack stone. The effect of the stone on the media and window wall is breathtaking.
In the master bathroom, we expanded the closet by pushing the wall back into the adjacent pass-through hallway. The new walk-in closet now includes an impressive closet organization system.
Returning to the master bathroom, we removed the single vanity and repositioned the toilet, allowing for a new, curb-less glass shower and a his-and-hers vanity. The entire vanity and shower wall is finished in white 12×24 porcelain tile. The vertical glass mosaic accent band and backlit floating mirrors add to the clean, modern style. To the left of the master bathroom entry, we even added a matching make-up area.
Finally, we installed a number of elegant enhancements in the remaining rooms. The clients chose a bronze metal relief accent wall as well as some colorful finishes and artwork for the entry and hallway.
Exceptional Results
Our clients were simply thrilled with the final product! Not only did they return from their summer vacation to a gorgeous home remodel, but we concluded the project a full week ahead of schedule. As a result, the family was able to move in sooner than planned, giving them plenty of time to acclimate to the renovated space before their kids returned to school. Ultimately, we provided the outstanding results and customer experience that our clients had been searching for.
“We met with many other contractors leading up to signing with Progressive Design Build. When we met Mike, we finally felt safe. We had heard so many horror stories about contractors! Progressive was the best move we could have made. They made our dream house become a reality. Vernon was in charge of our project and everything went better than we expected. Our project was completed earlier than expected, too. Our questions and concerns were dealt with quickly and professionally, the job site was always clean, and all subs were friendly and professional. We had a wonderful experience with Progressive Design Build. We’re so grateful we found them.” – The Mader Family
 Tile Doctor Ltd
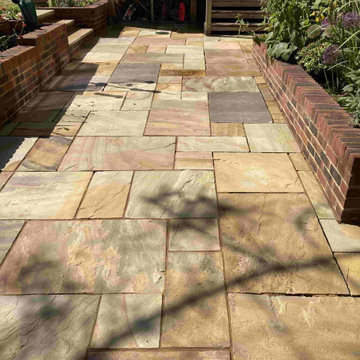
A customer from the Tunbridge Wells borough of Southborough got in touch with me regarding the renovation of their Sandstone Paved Drive and Patio. The paving surrounded the property and since all the facias had recently been renewed on the house the stone was letting the overall appearance of the property down.
It had been sometime since the Sandstone had been cleaned and as you can see from the photos what was once a beautiful stone had now darkened and lost much of its natural colour. I went to the property to do a quick site visit to check what needed to be done. I worked out a quote for cleaning to the stone which was accepted and a convenient time to carry out the work was agreed.
I have a very powerful high pressure cleaning system installed in my van which makes short work of cleaning stone and brick. Not only is it very effective at cleaning its designed as a closed system, so all the waste is extracted back to a large grey water tank in the van. Now you can use an everyday power washer to clean up external stone however they are not as powerful and so take much longer, also the result does not tend to be as good.
It was a large area, so I approached the job in sections and started by pre-wetting the stone with water. Then I applied Tile Doctor Patio & Brick Driveway Cleaner which is a powerful outdoor cleaning solution formulated to power through patio blackspots, lichen, moss, and stains. This is a commercial product designed for professional use so if you are looking at using it yourself, please take care and use the right protection.
The cleaner was left to soak into the really dirty areas whilst I focused on the cleaning the other parts of the drive and patio with the van mounted pressure washer. I was then able to return to the deeper stains later. Using a combination of the Tile Doctor Brick and Patio Cleaner along with our van mounted pressure cleaning system we were able to completely transform the properties kerb appeal.
Applying a sealer now the Sandstone was clean would have improved the look of the stone further and made the patio easier to keep clean going forward; however, it was a very large area which would require a lot of sealer. Keen to keep the cost down it was agreed not to apply a sealer and instead they intend to do more regular cleaning. The patio did look in great condition following the deep cleaning and so difficult to justify at this stage.
My customer was very happy with the transformed patio and the look of delight was clearly visible. It’s a great feeling when you have a happy customer and this was one of those jobs where their satisfaction was so uplifting, especially during these times.
Michael Conlon
South Kent TIle Doctor
 Levite Construction Co
?✨ Transforming Dreams: From Damage to Elegance in Capitol Hill, Seattle ✨?
At Levite Construction, we believe in turning challenges into opportunities, and that's exactly what we did with this stunning project in Capitol Hill, Seattle, WA. Witness the incredible journey of restoring a beautiful town house that fell victim to water damage, as we share with you the remarkable transformation that showcases our expertise, dedication, and unwavering commitment to excellence.
? Repairing the Aftermath? The story began with a distress call, a plea for help from a water-damaged home in Capitol Hill. Our skilled team swiftly sprang into action, assessing the damage and devising a comprehensive plan for restoration. From minor repairs to major overhauls, we left no stone unturned in bringing this residence back to life.
? A Vision Takes Shape ?
Our creative design team envisioned a space that not only corrected the damage but also elevated the aesthetic to new heights. The challenge was accepted – to create a spa-like haven that exudes luxury and tranquility while maintaining a smart and functional layout.
? A Tranquil Retreat - Smart Bathroom Remodeling ?
Step into our world of ingenuity as you explore the images of the spa-inspired bathrooms. Every detail has been meticulously curated to evoke a sense of serenity. From innovative fixtures to thoughtfully chosen color palettes, this space is a testament to our dedication to crafting exceptional experiences.
? Every Inch Transformed?
Witness the metamorphosis as our skilled team undertook tasks that spanned the spectrum of construction artistry. Admire the seamless new floor installation, where every step taken is now on a canvas of elegance. The rich tapestry of paintwork dances in harmony with carefully crafted cabinetry, breathing life into this once-damaged dwelling.
?♂️ Expertise in Action ?♂️
Our project managers played a pivotal role in orchestrating this symphony of construction. Their meticulous planning, relentless dedication, and unwavering attention to detail ensured that every aspect of this project was executed flawlessly.
? Result: Elegance Redefined ?
As you scroll through the images, you'll witness the culmination of our endeavors – a home that has been resurrected from the ruins and reimagined with elegance. Levite Construction's commitment to quality, innovation, and customer satisfaction shines through every corner of this remodel.
? Capture the Journey?
Explore the photo gallery capturing the transition from devastation to breathtaking beauty. Every image is a testament to the passion and craftsmanship that define Levite Construction.
Thank you for joining us on this remarkable journey from adversity to triumph. We're proud to have turned a challenge into an opportunity and to have brought a smile back to this Capitol Hill home.
At Levite Construction, we don't just build structures; we build dreams.
#LeviteConstruction #FromDamageToElegance #CapitolHillRestoration #CraftingDreamHomes
 Nathan Allan Glass Studios Inc.
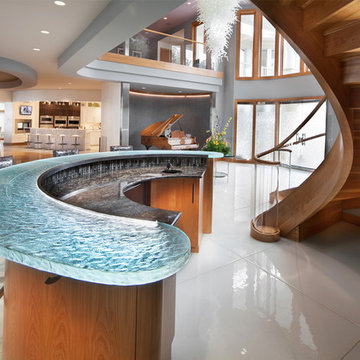
What surprises people most when entering and walking on the glowing white surface in this particular Private Residence (Williamsburg, VA) is when they find out they are walking on a sea of glass! Yes, GLASS! Not marble, not granite, but GLASS! Nathan Allan has created a very fresh, unique flooring surface, which is smooth to touch on the majority of the glass surface, yet has an almost invisible safety finish permanently embedded in the glass surface.
THE GLASS
Nathan Allan’s Glass Flooring incorporates features which are visually stunning, while also providing a safety finish which provides comfort to everyone walking on the glass. Our Sandstone texture is forged into the bottom surface of the glass, while our exclusive Glass Sandpaper safety finish is fused onto the walking surface. To enhance all features, we added a bright, sparkling, White Metallic color finish throughout each flooring panel.
SPECIFICATIONS
Each Glass Flooring panel is produced in 1/2″ (12mm) thick, Low Iron, tempered safety glass. Tempered glass provides added strength, insuring that the Glass Flooring can accept a heavy load. Panels vary in size and dimension, with most panels measured at a block size of 5’0 x 6’0 (1500mm x 1800mm). Perimeter Edge panels were carved and shaped to fit tightly against the curved walls. Glass Sandpaper, ASTM tested in labs with the highest slip-coefficient safety ratings, is fused onto the walking surface, to provide a very comfortable and effective safety feature.
Flooring Glass Details:
1/2″ (12mm) thick, Low iron tempered safety glass
Flat Polished Edges
Glass Sandpaper on walking surface
Sandstone texture on bottom surface
White Metallic color finish on bottom surface
Panels sizes up to 5’0 x 6’0
Approximately 800 square feet of glass flooring
Perimeter panels shape cut to fit
Almost overshadowed by the spectacular flooring is a 1.5” thick, Heavy Glasstop, Crescent shaped, with Nathan Allan’s Rocky Mountain texture.
DESIGN
A White Sea of Glass flooring is the finished result of combining a light Sandstone texture on the bottom glass surface, with the added touch of a sparkling White Metallic color finish. Combined with our Glass Sandpaper safety finish, and the natural and artificial light sources, our Glass Flooring shimmers within the entire entrance space.
INSTALLATION
Using very important installation techniques, Nathan Allan worked hand in hand with great team of professionals: Vicki Bristow, designer, W. M. Jordan Company, GC, and Pompei Inc, glass flooring installer. Templates were produced for all perimeter edge panels, and every shaped panel. All flooring panels are secured to the substrate with special adhesives, and joints are filled with matching color sealants.
“A beautiful project is always enhanced when working with quality, prestigious builders, and talented trade’s people. The tight organization and open communication by all the team members contributed greatly to a project proceeding seamlessly, with the incredible visual results to prove it.” Barry Allan – Director
Photo credit: Morgan Howarth
 Susan Tully Interiors
We love when our clients trust us enough to do a second project for them. In the case of this couple looking for a NYC Pied-a-Terre – this was our 4th! After designing their homes in Bernardsville, NJ and San Diego, CA and a home for their daughter in Orange County, CA, we were called up for duty on the search for a NYC apartment which would accommodate this couple with room enough for their four children as well!
What we cherish most about working with clients is the trust that develops over time. In this case, not only were we asked to come on board for design and project coordination, but we also helped with the actual apartment selection decision between locations in TriBeCa, Upper West Side and the West Village. The TriBeCa building didn’t have enough services in the building; the Upper West Side neighborhood was too busy and impersonal; and, the West Village apartment was just right.
Our work on this apartment was to oversee the design and build-out of the combination of a 3,000 square foot 3-bedroom unit with a 1,000 square foot 1-bedroom unit. We reorganized the space to accommodate this family of 6. The living room in the 1 bedroom became the media room; the kitchen became a bar; and the bedroom became a guest suite.
The most amazing feature of this apartment are its views – uptown to the Empire State Building, downtown to the Statue of Liberty and west for the most vibrant sunsets. We opened up the space to create view lines through the apartment all the way back into the home office.
Customizing New York City apartments takes creativity and patience. In order to install recessed lighting, Ray devised a floating ceiling situated below the existing concrete ceiling to accept the wiring and housing.
In the design of the space, we wanted to create a flow and continuity between the public spaces. To do this, we designed walnut panels which run from the center hall through the media room into the office and on to the sitting room. The richness of the wood helps ground the space and draws your eye to the lightness of the gorgeous views. For additional light capture, we designed a 9 foot by 10 foot metal and mirror wall treatment in the living room. The purpose is to catch the light and reflect it back into the living space creating expansiveness and brightness.
Adding unique and meaningful art pieces is the critical final stage of design. For the master bedroom, we commissioned Ira Lohan, a Santa Fe, NM artist we know, to create a totem with glass feathers. This piece was inspired by folklore from his Native American roots which says home is defined by where an eagle’s feathers land. Ira drove this piece across the country and delivered and installed it himself!!

 Pennsylvania Landscape & Nursery Association
Terren Landscapes http://www.terrenlandscapes.com
Project Entry: Pembrooke Estate Rain Garden
2014 PLNA Awards for Landscape Excellence Winner
Category: Sustainable Landscape &60,000-$120,000
Award Level: Silver
Project Description:
The client contracted our company to solve multiple existing drainage problems. In a heavy rain event the existing French drain system would overflow, causing water to pool in the driveway. After investigating the system we found that the capacity of the French drain was undersized for the amount of storm water from the large rain events received in recent years. As a result of our findings and at the request of the homeowner, we designed a storm water management system to capture all storm water from the structures on the property and regenerate the underground aquifers for the volume of a 5.8” rainstorm. In addition to the new drain system, the homeowners wanted a rain garden to provide a backdrop for an existing formal garden, provide a habitat for wildlife, and provide screening from an adjacent neighbor.
Throughout the design process many challenges were presented, including an existing gas line, which ran directly through the area that best suited the bioswale. The existence of the gas line caused us to alter the shape and depth of the bioswale in some areas. We also inspected the existing downspouts to make sure there were no obstructions that would impede the system’s efficiency, and then conducted a test pit dig to make sure we had sufficient percolation rates for disposal of storm water.
To effectively capture the storm water runoff, the existing downspouts were piped from the main house and the large detached garage to a large catch basin located at the low point in the driveway. The driveway catch basin contains two outlet pipes at different elevations within the basin allowing water from smaller rain events to enter the bioswale and rain garden area to percolate into the soil before excess water overflows into a sediment trap which filters out any debris and is then piped to an underground StormTech® pit to slowly percolate into the ground. The other outlet pipe in the driveway catch basin is used for larger storm water events, taking the water directly to the StormTech® pit.
Accepting and slowing the velocity of the storm water, mitigation of erosion, and filtering out pollutants contained in the “first flush” of rainfall are the primary functions of the bioswale and rain garden. Planting these areas with mostly native plant species helps carry out these functions while attracting and providing shelter for wildlife.
The ‘Niobe’ weeping willow is the centerpiece of the rain garden, connecting with the axis of the existing formal garden. To screen the neighboring property we chose Chamaecyparis nootkatensis ‘Pendula’ for its graceful evergreen habit and tolerance of wet sites. ‘Ivory Halo’ dogwood and Panicum ‘Cloud Nine’ were used for screening as well as winter interest. To provide deciduous structure to the garden Taxodium distichum and Magnolia virginiana were used in conjunction with witch hazel. Mostly native wetland perennials were used due to their tolerance of wet conditions and occasional drought.
The area above the StormTech® pit provides space for the client’s family to relax. The rain garden and bioswale provide screening, storm water management, a habitat for wildlife, and plants that enhance the adjacent formal garden.
Photo Credit: Terren Landscapes
143