
Search results for "Aftercare" in Home Design Ideas


 TreHus Architects+Interior Designers+Builders
Example of a large classic u-shaped dark wood floor eat-in kitchen design in Minneapolis with a double-bowl sink, recessed-panel cabinets, white cabinets, white backsplash, stainless steel appliances, an island and black countertops

 threshold interiors
Location: New York, NY, United States
This Loft was tastefully renovated back in the '90s, but was due for an update and an expansion of the kitchen and dining areas to accommodate the client's cooking skills and entertaining needs. EnlargIing the island and adding cabinetry to delineate the office, bar and dining areas was a priority. The bathroom was updated to feel like a tranquil spa with beautiful new tile, plumbing fixtures and cabinets. Our biggest challenge was coordinating the entire renovation while our client was out of town for the Summer!
Photographed by: James Salomon
Find the right local pro for your project

 User
DECO Window Fashions
Sheer pleated custom made drapes, ceiling mount metal rod.
Trendy bedroom photo in Austin
Trendy bedroom photo in Austin

 Tile Doctor Ltd
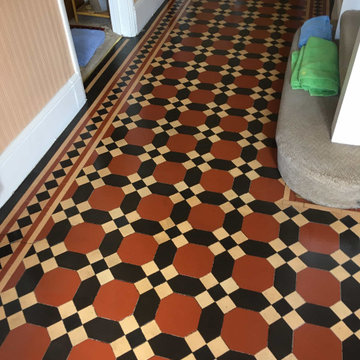
This Victorian floor in Twickenham, Middlesex was in good physical condition for its age but needed a good deep clean. Our customer had informed us that they had never cleaned or sealed the floor in the sixteen years that they had lived there so it was well overdue.
I went over to survey the floor and completed a test clean on a small section of tiling to see which products/techniques would work best. I like to do this as it demonstrates to the client what can be done, and it allows me to come up with an accurate price for doing the work.
As you can see from the pictures, there was quite a difference in the test patch compared to the rest of the floor. Years of foot traffic from the street had taken its’ toll and the floor was very dirty. Luckily, the floor was in very good condition and had not worn too badly.
Once they had seen the test patch, they were confident that it would be worth go ahead with my quote. It would ensure that the period feature was retained for many years to come. The colours on the floor were quite faded so it would be nice to get it restored.
I started the cleaning process by first taping up the surrounding skirting boards and doors to ensure they were protected from potential splashing. Cleaning involved spraying the Victorian tiles with a strong dilution of Tile Doctor Pro-Clean which is a dedicated Tile and Grout cleaning product. This was left to soak in for about ten minutes and then scrubbed in using a black pad fitted to a heavy-duty rotary scrubber.
This gives the floor a good mechanical scrub and works wonders releasing the ground-in dirt and soil from the tiles. The strong dilution of Pro-Clean will also remove any remaining sealers from the tile, however after sixteen years I doubted there would much trace of sealer left. Once done the floor was rinsed with water and all the soils removed with a wet vacuum.
Following the initial clean the colours were already much stronger. Next step however was to improve on that by giving the floor an acid rinse using Tile Doctor Grout Clean-Up. This removes mineral deposits and generally brightens up the appearance of the tile. After another round of scrubbing the floor was rinsed with our high-pressure washer and then vacuumed, extracting all of the dirty water and dirt away in one go. The floor was looking a lot better and was left to dry overnight.
After allowing the floor to dry overnight, we returned the next day to seal the floor. First, checking the floor was dry using the damp meter. Floors of this age can take a little longer to dry as there is no damp-proof membrane so it’s always worth checking as applying a sealer to damp tiles is not a good idea.
Once I was satisfied it was dry eight coats of Tile Doctor Seal and Go sheen finish sealer were applied. This takes a while to do as each coat needs to dry before applying the next. The sealer will protect the Victorian tiles for dirt and stains, it also enhanced the colours in the tile and will make it easier to keep the floor clean going forward.
My client was very pleased with the floor and mentioned that they should have called me in sooner! For aftercare cleaning I recommended Tile Doctor Neutral Clean which is an effective cleaner with a neutral pH, its designed for cleaning tiles without degrading the sealer.
Jonathan Oldham
South Middlesex Tile Doctor

 Coco Maison Design
We reimagined a closed-off room as a mighty mudroom with a pet spa for the Pasadena Showcase House of Design 2020. It features a dog bath with Japanese tile and a dog-bone drain, storage for the kids’ gear, a dog kennel, a wi-fi enabled washer/dryer, and a steam closet.
---
Project designed by Courtney Thomas Design in La Cañada. Serving Pasadena, Glendale, Monrovia, San Marino, Sierra Madre, South Pasadena, and Altadena.
For more about Courtney Thomas Design, click here: https://www.courtneythomasdesign.com/
To learn more about this project, click here:
https://www.courtneythomasdesign.com/portfolio/pasadena-showcase-pet-friendly-mudroom/

 FOUR POINT DESIGN BUILD INC
Interior Designer - Laura Schwartz-Muller
General Contractor - Cliff Muller
Photographer - Brian Thomas Jones
Copyright 2014
Inspiration for a mid-sized farmhouse u-shaped medium tone wood floor eat-in kitchen remodel in Los Angeles with a farmhouse sink, shaker cabinets, white cabinets, solid surface countertops, white backsplash, subway tile backsplash, stainless steel appliances and a peninsula
Inspiration for a mid-sized farmhouse u-shaped medium tone wood floor eat-in kitchen remodel in Los Angeles with a farmhouse sink, shaker cabinets, white cabinets, solid surface countertops, white backsplash, subway tile backsplash, stainless steel appliances and a peninsula
 Tile Doctor Ltd
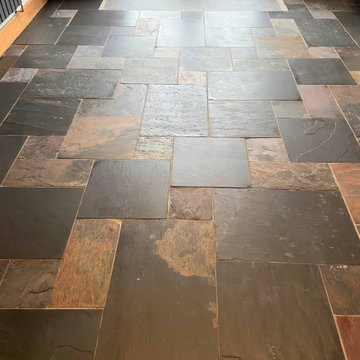
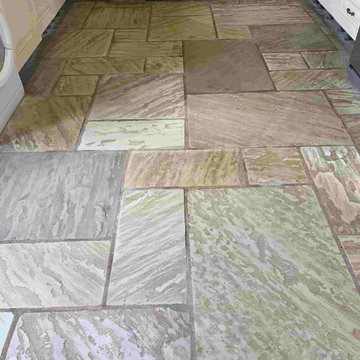
The pictures below are of Chinese Slate floor in the Kitchen of a property in the small village of Clifton just south of Penrith. We often get asked what the difference is between Rough and Semi Riven Slate, and this floor was a mixture of both.
If you look closely at the pictures and check out the darker parts of the floor you will see these smoother Semi Riven Slate, whereas the light copper-coloured parts of the floor were of the rougher textured variety. It’s not that unusual for stone to be mixed in this fashion as it can be supplied from different quarries in order to achieve a particular look.
The blend of different slates makes little difference when it comes to cleaning as the process is essentially the same. I would advise though if you intend to clean the floor using a mop then you should opt for Semi Riven Slate as Rough Slate can shred your mops and make it harder to maintain. We tend to use industrial floor buffing machines which work well on both surfaces so are less effected.
There was a bit of wax on this floor so to remove this Tile Doctor Wax Away was applied. The product was left to stand for fifteen minutes before being scrubbed into the stone, rinsed and then the soil extracted with a wet vacuum.
We then finished the cleaning with an Acid Rinse which involves scrubbing the Slate with Tile Doctor Grout Clean-up. This not only works well at cleaning up the stone and grout but also neutralises the alkaline pH left over from using Wax Away. I am very wary of the pH level of the floor as it could have an impact on the new sealer, giving the floor an acid rinse before sealing also ensures a better bond with the sealer.
Naturally, you can’t leave a strong product like Grout Clean-up on the Stone for long as it could etch the surface so once done the floor was thoroughly rinsed with water and extracted again with a wet vacuum. A mop and bucket and lots of sponges won’t do the job on a large area like this.
Once we finished the clean, we left it to dry off overnight and came back the next day to apply the sealer. We were originally going to apply a satin finish sealer, but the client had a big dog with sharp claws which could of scratched and marked the sealer so decided against it. I advised the client to use an Impregnating sealer called Tile Doctor Colour Grow, which lifts the natural colours in the stone, but is not a topical shiny sealer as the seal soaks into the Slate and leaves a a nice matt finish instead. Only two coats of sealer were needed, and the floor looked like new again.
My client was very happy with the difference in the appearance of the stone and how much cleaner the grout was, so much so they the following feedback for us, which is always appreciated.
“Totally impressed with the team they couldn’t have been more professional and even left me with some cleaner. My horrible 12 year old slate tiles look fabulous”
As usual we left a free bottle of Tile Doctor Neutral Tile Cleaner for aftercare, it’s very important not to undo all that hard work by using a product which will damage the seal, using a pH neutral cleaner will keep the seal looking sharp and fresh for years to come.
Heidi Taylor
North Cumbria Tile Doctor
 Tile Doctor Ltd
This client at a property in Bamber Bridge was really fed up with his Indian sandstone kitchen floor. The sandstone suited the age of the property but due to its course rough texture he was having issues keeping the stone clean and maintaining it to a decent standard. Ideally, he wanted something long lasting that was easier to keep clean.
Sealers can only help so much on a rough stone like this, in my opinion really rough stone is best sold for use outside in patio’s etc. My client didn’t want to rip it up as it ran underneath the kitchen units and it cost them a lot of money to have it laid, so having been on our website and checked out our previous work they realised we could mill the stone and smooth down the rough texture to a much smoother finish and yet still leave enough texture in the stone for it to look very natural.
We have developed a system at Tile Doctor called “Milling” which is very similar to sanding rough wood to reveal the inner patina. Once done we then we give it one more clean before adding a fresh sealer to add protection. Milling does change the look of the stone as you will see on the before and after pictures on this page, so it is not for everyone. It is however a one-off process so once done it will never need to be milled again. Like all stone floors it will still benefit from a deep clean and re-seal every five years (depending on use) just to keep it looking its best but after milling you will be able to walk on the stone in bare feet or socks and slippers as it really does make a big difference to the finish.
By milling we mainly use coarse-grit burnishing pads that contain segments made from hard industrial diamonds. Working our way up the different grits the pads are applied using a weighted floor buffer which is run over each tile several times to cut the stone back. The process is so effective we often find that the pads are all you need to clean the stone so hardly ever use any chemicals with this process, apart from the sealer which is applied once fully dry.
I should mention that Milling is not something a customer should consider doing themselves as you need invest in a heavy-duty weighted buffing machine which are rarely available for hire.
To seal internal Sandstone floors, I usually use Tile Doctor Colour Grow which brings out the natural colours in the stone. On this occasion however two coats of Tile Doctor Ultra Seal were applied to the stone and grout which results in an invisible natural finish and better matched the clients’ requirements.
My client was really pleased with the new floor and left the following feedback:
“Only finished today but looks so good now. Russell did a great job milling the flags to a much smoother finish. Two coats of sealant applied by Heidi on last day which hopefully will keep it looking that way. Mark F. Bamber Bridge”
For aftercare cleaning I left them with a bottle of Tile Doctor Neutral Cleaner which is specially designed for cleaning sealed floors. You need to be very careful when using supermarket cleaners as many are tool strong and will slowly strip the sealer off the floor, always read the label.
Russell Taylor
Lancashire Tile Doctor


 MIL DESIGN & CONSTRUCTION
Urban gray tile and cement tile ceramic tile bathroom photo with a console sink, concrete countertops and gray walls
 Tile Doctor Ltd
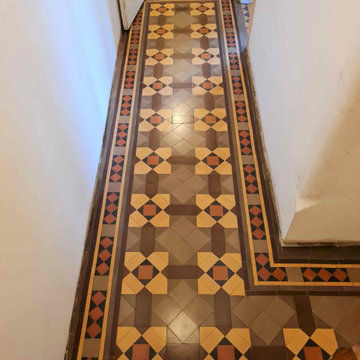
We were contacted by a customer in West Kirby who needed help renovating a Victorian tiled hallway in a house they had just purchased. Kirby is a desirable seaside location North of Heswall that expanded with the arrival of the railway in 1848. The railway brought a demand for property and so it’s not unusual to find housing stock in this area dating back to the Victorian era.
The Victorian tiles at this property appear to have been neglected by the previous owner and were now looking very dull and marked by paint from decorating; all the colours looked washed out and the floor was now looking very unappealing.
The good news however is that this problem is not uncommon and with a deep clean and a fresh sealer applied it can be transformed. I gave the owner a quote which was accepted a date agreed for my return to do the work.
On the first day the floor was sprayed with a neat solution of Tile Doctor Remove and Go which is a powerful alkaline cleaning and stripping agent used to remove old seals and paint. The solution was left to dwell for about twenty minutes so it could soak in and get to work. It was then scrubbed into the tiles using a coarse 200-grit pad fitted to a heavy buffing machine. Water was then added to the floor for lubrication and the soils released from the pores of the tile during scrubbing was removed by with a wet vacuum.
To treat the stubborn paint stains and remains of what I suspect was carpet adhesive a hand scraper and wire brush was used, this was made easier by the Remove and Go which had softened the paint etc.
The next stage was to give the Victorian tiles a mild acid wash using Acid Gel which is applied to the floor, scrubbed in, and rinsed off with a little water then extracted using the wet vacuum. We always recommend an acid wash for old floors like these as it will counter any efflorescent salts resident in the tiles and helps to remove other mineral contaminates and old grout that can mask the true beauty of the tiles.
I left the tiles to dry out for two days before returning to apply the sealer, first checking it was dry by testing for moisture in various places with an electronic damp tester. It’s not a good idea to apply a sealer to a damp floor so we always check first.
Satisfied the floor was dry, I started applying a coat of Tile Doctor Colour Grow which is a colour enhancing impregnating sealer that helps to bring out the true colours in the tile. This was allowed to dry for thirty minutes and then followed up five coats of Tile Doctor Seal and Go Extra which is a breathable sealer that leaves a lovely satin finish and builds on the protection.
Once done the Victorian hallway tiles looked so much cleaner and healthier. It was quite a transformation and the new sealer had given the floor a nice low sheen shine which the customer was very happy with.
For aftercare cleaning I left them with a bottle of Tile Doctor Neutral Cleaner which is specially formulated for cleaning sealed tiles. We don’t recommend tile cleaning products you find on supermarket shelves as the are usually too strong and can strip a sealer off the floor prematurely. If your choosing another product to clean your floor always read the label to make sure its compatible.
Andrew Robb
Merseyside Tile Doctor

 Atelier Armbruster
Master bathroom
Photos: Natalia Lorca Ruiz
Mid-sized trendy master white tile and ceramic tile ceramic tile and black floor doorless shower photo in New York with flat-panel cabinets, white cabinets, a wall-mount toilet, white walls, an integrated sink, solid surface countertops and a hinged shower door
Mid-sized trendy master white tile and ceramic tile ceramic tile and black floor doorless shower photo in New York with flat-panel cabinets, white cabinets, a wall-mount toilet, white walls, an integrated sink, solid surface countertops and a hinged shower door
 Tile Doctor Ltd
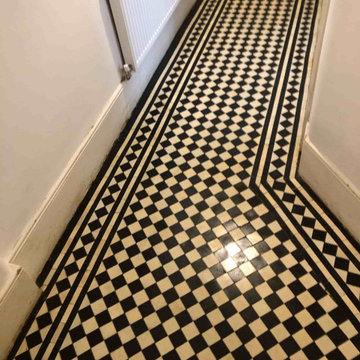
This property was in theLadbroke Grove area of West London near Kensington. The client had found an old and probably original black and white checkered pattern Victorian tiled floor under their cork tiled flooring. They also reported that it was badly damaged so I thought it would be best if I paid them a visit first to see how extensive the damage was and whether it was repairable. The floor was in a quite a state, the tiles were covered in glue from the cork and had several areas had been back filled with cement.
I reassured them that the damage could be rectified, and that it would be possible to completely restore the floor back to a good standard. I would have to remove the glue, remove the cement that had been used to level the floor and replace with reclaimed tiles to match. They were relieved to find out it could be done and happy with my quote I was instructed to go ahead with the work.
We started by taping up the skirting boards to protect the woodwork. With this done attention was turned to the glue which was softened using a strong dilution of Tile Doctor Remove and Go so it could be carefully scraped off. Multiple techniques and tools were needed to remove the glue including hand-held scrappers and a black pad fitted to a buffing machine. For the stubborn areas steam was applied to help lift the adhesive out the tile.
Once all the glue was removed the floor was rinsed and the alkaline cleaner neutralised with Tile Doctor Grout Clean Up which further cleaned the tiles and removed old traces of grout from the floor. Old floors like this generally don’t have a damp proof membrane underneath so the acids in the Grout Clean-up also counter any efflorescent salts trapped in the tile.
Once this was completed the slurry was removed with a wet vacuum and left to fully dry out overnight.
The following day focus turned to repairing the areas of the floor where the tiles were missing or broken. The main issue being the cemented areas, we see this a lot with Victorian Hallways and generally what happens is a heating engineer digs out the floor to install pipework. Not being tilers, your average plumber then repairs the floor with a self-levelling cement that brings the level up to the surface of the tile so it can be covered with lino, carpet of in this case cork.
The sub floor was then rebuilt with rapid setting self-levelling compound but this time to below the level of the tile.
Once the new base was dry it was a just a question of re-tiling with the replacement tiles to match the original checkered pattern. The replacement reproduction tiles were sourced from Original Features in Crouch End North London. After grouting we left the floor to dry out over the weekend.
When we returned to seal the floor our first step was to check the floor was dry using a moisture meter. This is critical as the sealant will not cure correctly if there is too much moisture in the floor. In this case the extra two days we had allowed had done its job and the test had confirmed it was ready to accept a sealer.
The client wanted the floor finish not to be too shiny once sealed so we opted to seal with two coats of Tile Doctor Seal and Go Extra. This is good choice for old Victorian floors such as this example as it’s special acrylic-based formula allows for moisture vapour transmission which as mentioned previously is a concern where no damp proof membrane has been installed.
I’m please to confirm my clients were delighted with the result, as you can see from the pictures the black and white floor restoration makes for a dramatic entrance well in keeping with the style of the property. For aftercare I recommended the use of Tile Doctor Neutral Tile Cleaner which will keep the tiles in good condition going forward without damaging the new sealer.
Jackson Davis
Central London Tile Doctor

 Blanchard Design Studio
Remark Visions
Mid-sized elegant dark wood floor enclosed dining room photo in Boston with white walls and no fireplace
Mid-sized elegant dark wood floor enclosed dining room photo in Boston with white walls and no fireplace
 Tile Doctor Ltd
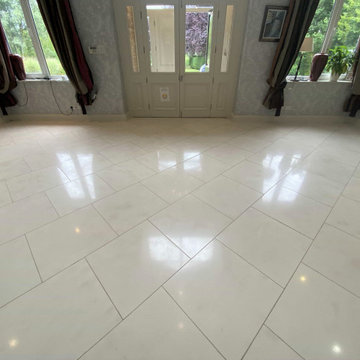
This job was for a repeat client in Toft near Cambridge who had aa stunning large hallway that was tiled in beautiful pale Limestone. My client had asked me back to work on the floor having previously completed the deep clean and seal of a Terracotta floor previously.
The Limestone tiling in the entrance hall had years of some type of topical sealer applied to it. This caused the stone to look slightly discoloured and from certain lights showed up hundreds of scratches and smudges embedded in the seal. I’ve tried to capture this problem in the photographs on this page, but it was very difficult.
A topical sealer sits on the surface of the tile where it is vulnerable to scratching, hallways are generally high traffic areas and so more likely to see this sort of problem. Ideally an impregnating sealer should have been applied, impregnators work by occupying the pores in the stone thus preventing soiling from becoming ingrained in the stone.
Before starting we protected the woodwork against splashing with blue film, I don’t usually make a great deal of mess, but you can never be too careful when working in someone’s property especially one as beautiful as this.
To strip off the old sealer I began by applying a strong dilution of Tile Doctor Remove and Go to the Limestone tiles. I split the floor into sections and used a 400-grit diamond burnishing pad to work the Tile Doctor Remove and Go into the tiles. The floor was then rinsed off using our high-pressure cleaning system that applies pressurised hot water to the floor whilst simultaneously extracting the soil with its built-in vacuum. The system is quite heavy, so it is built into my van, and I run a large flexible hose to a spinner tool that does the cleaning. It is an expensive tool, but it saves a lot of time and leaves the floor fairly dry afterwards.
The 400-grit pad had released a lot of the sealer but there were quite a few layers to get through, so I changed the burnishing pad to a coarse 200-grit pad and repeated the process. After another rinse and extract I would see it had the desired effect and I was able to carry on building up the finish on the Limestone by apply the 400-grit followed by the 800, 1500 grit pads. It was a large floor and so this took up much of the day so once complete I left for the day so it could dry off overnight.
The next day I finished the polishing process with the application of a 3000-grit burnishing pad which is applied with a little water sprayed onto the tile and really brings up the polish on the stone. This process has the added advantage of leaving the floor dry so not long afterwards I was able to move on to sealing.
For this floor two coats of Tile Doctor Ultra-Seal were applied, it is an impregnating sealer that won’t alter the colour of the tiles leaving a natural look.
My client was much happier with the new finish and has asked for another quotation on some more Terracotta flooring that needs attention. For aftercare I recommend using Tile Doctor stone soap, it’s a special formula that builds on the patina which will help maintain the polished appearance of the Limestone.
Tom Conlon
Cambridge Tile Doctor

 Kaminski + Pew
Simple white living area with large window, white walls and trim, and matte black door hardware. Photography by Kyle Born.
Inspiration for a small contemporary enclosed light wood floor and beige floor living room remodel in Philadelphia with white walls, no fireplace and no tv
Inspiration for a small contemporary enclosed light wood floor and beige floor living room remodel in Philadelphia with white walls, no fireplace and no tv

 Karin Bennett Designs
Large elegant master dark wood floor and brown floor bedroom photo in Toronto with gray walls

 All Natural Stone
Akdo Tile Signature Glass Stagger Thassos 2 Mosaic
Trendy bathroom photo in San Francisco
Trendy bathroom photo in San Francisco
5