
Search results for "Attempt">attempt" in Home Design Ideas

 Jeannine Williams Design
Park Avenue Penthouse - Living Room
Photo by Kris Tamburello Photography
Inspiration for a transitional living room remodel in New York
Inspiration for a transitional living room remodel in New York

 MARGARITA BRAVO
The bathrooms in this Golden, Colorado, home are a mix of rustic and refined design — such as this copper vessel sink set against a wood shiplap wall, neutral color palettes, and bronze hardware:
Project designed by Denver, Colorado interior designer Margarita Bravo. She serves Denver as well as surrounding areas such as Cherry Hills Village, Englewood, Greenwood Village, and Bow Mar.
For more about MARGARITA BRAVO, click here: https://www.margaritabravo.com/
To learn more about this project, click here:
https://www.margaritabravo.com/portfolio/modern-rustic-bathrooms-colorado/
 Magikflame
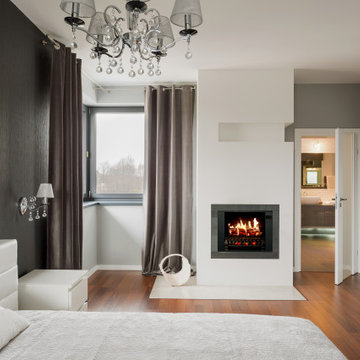
With the 28" Insert Only inspired by MagikFlame, you can upgrade your home décor and stay warm all winter long. Its easy-to-use controls and realistic flame effects make it a perfect addition to any living space. Discover MagikFlame electric fireplaces: https://magikflame.com/product-category/buy-electric-fireplaces/
Dimensions: 28"W x 32"T x 12"D
Our patented HoloFlame technology is a real game-changer. Others use a mechanical means to recreate the look of fire. Instead, we use actual video of real fire which we then project onto a physical log set making it look like those logs are actually burning. Therefore, you get all the details you would with real fire like wispy smoke and even burning embers which other fireplaces are not capable of producing. We spent 5 years of R&D to produce this cutting-edge technology.
At MagikFlame, our goal is to create the most realistic electric fireplaces ever made. We also believe in improving quality of life by providing people with the best possible cozy and relaxing environment every night. Using our patented holoflame technology, we've innovated the electric fireplace to bring you effortless cozy with friends and family. Because quality family time and relaxation after a hard workday or activity is life changing.
Experience 30 Flames. Built-In Heater. Sound.
Subscribe to our channel for tips on how to enhance your interior design, accessories, and focal points. Learn more about fireplace technology and the cozy, relaxation, and family atmosphere improvements to your home. We have everything you need to guide you on a journey to forge the American home and better living atmosphere.
Shop With Us Online: https://magikflame.com
Like MagikFlame on Facebook: https://www.facebook.com/MagikFlame
Follow MagikFlame on Instagram: https://www.instagram.com/magikflamefireplaces/
Tweet With Us: https://twitter.com/MagikFlameFire
Pin With Us: https://www.pinterest.com/MagikFlameElectricFireplaces
We attempt to be as accurate as possible. However, MagikFlame cannot guarantee that product descriptions, images or other content of products or services are 100% accurate, complete, reliable, current, or error-free. Some items may appear slightly larger or smaller than the actual size due to screen defaults and photography techniques. This also includes any momentary stutters or artifacts in frames of the flame video loop. Other items may be represented at a larger than the actual size in order to clearly show details, or smaller than the actual size to show the entire item.
Find the right local pro for your project
 Tile Doctor Ltd
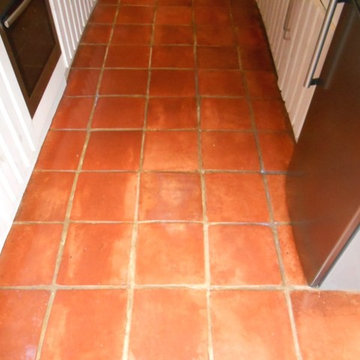
Not too long ago, I visited a house in the town of Fulwood in Preston, Lancashire. My client had a Terracotta tiled floor which had been neglected for many years and in their attempt to improve it had unfortunately been given some very poor advice by tile retailers, all of whom sold him different products, and each of which was unsuitable. Using these different products in succession had resulted in the depreciation of the floor’s texture and smoothness, in turn making the clay difficult to clean and maintain.
As per my usual process I ran a small test clean to demonstrate what could be done to improve the floor and I was commissioned to restore the floor back to its former glory.
I started by mixing a strong cleaning solution consisting of one part Tile Doctor Pro-Clean to three parts water. The solution was applied to the floor and left it to dwell for a short period. The high alkaline cleaner seeps into the pores of the tile getting underneath and lifting out the ingrained dirt and breaking down the old sealers. Then, I agitated the floor using a scrubbing pad fitted to a rotary floor machine before using a wet vacuum to suck up the resulting soiled solution.
There were a few paint marks dotted across the floor, but these were not noticeable until after I had given the Terracotta a deep clean. To remove the paint marks I used Tile Doctor Remove & Go, which is specially formulated to break down paint stains, adhesives and coatings. This product was used in combination with a steamer which, when applied directly to the tiles, helped to lift the paint out. Following this, I rinsed the entire floor a couple of times to remove any trace of cleaning product, and vacuumed up the excess moisture.
It’s always best to let the floor dry completely prior to sealing as applying sealer to a damp floor will affect the sealer. I left the house to allow this to take place overnight returning the next day. To get the best out of the Terracotta I sealed the floor using one coat of Tile Doctor Colour Grow, which is an impregnating sealer that soaks into the pores of the tile and acts as both as a bonding sealer enhancing the natural colours and darkening the clay (as requested by my client).
After the coat of Colour Grow had dried, I applied a further seven coats of Tile Doctor Seal & Go, which achieves a nice, low sheen Satin finish. Before leaving my happy client to enjoy his newly restored Terracotta floor, I made sure to provide some professional cleaning and long-term maintenance advice.
Russell Taylor
Lancashire Tile Doctor
 Tile Doctor Ltd
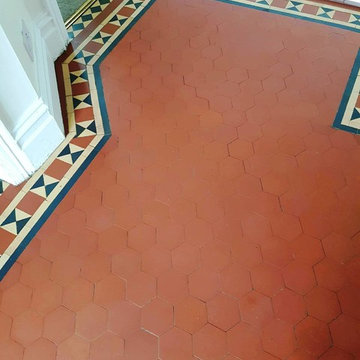
From The 1860s Victorian tiled floors started to appear in public buildings and by the 1890s they had become an essential feature in the most ordinary Victorian terraced houses. Although these floors fell out of fashion during the 1960s and ’70s, when many of them were covered over, they are now being rediscovered by their present owners and this is exactly what happened to my customer in the village of Littleover.
The customer had attempted to clean the floor by themselves but they couldn’t archive the result wanted, fortunately they discovered the Derbyshire Tile Doctor and after their call I went over and did a test for cleaning to make sure I can archive the needed results. They were happy with what they saw, so they booked me in to complete the work.
For cleaning the hallway I used a strong dilution of Tile Doctors Pro Clean which is strong multi-purpose high-alkaline cleaner. I left the Pro Clean to dwell for 10 minutes and then worked it in the tiles by using a strong black scrubbing pad fitted to my rotary machine. After scrubbing I rinsed the floor several times with clean water to remove any trace of cleaning product from the floor.
After successfully cleaning the hall I moved on to the porch which still had some old topical sealer on less walked areas. On these areas I had to use Tile Doctors own very effective stripper Remove and Go. Remove and Go has a long dwell time to remove any given sealer or wax so I left it to soak in for fifteen minutes followed by scrubbing it in with black pad fitted to rotary machine. The next step was to wash off the residue with water which was then removed using a wet vacuum.
Following this the tiles were given a rinse with Tile Doctor Grout Clean-up which is an acid based product that can remove grout smears and mineral deposits. Last step before sealing was to give the floor a thorough wash down with clean water to remove any cleaning product left on the tiles and then I left the floor to dry overnight.
Next day when I returned I used my damp tester to make sure that the floor is completely dry. Luckily for me floor was all dry and I started sealing. For sealing I used Tile Doctors Colour Grow Sealer which is colour enhancing breathable sealer. I applied 2 coats of the sealer and after every coat I polished off the excess with clean cotton cloths.
The result was really good and my customer was very happy with the work and said that now the floor looks transformed.
Tony Olmet
Derbyshire Tile Doctor
 Tile Doctor Ltd
If you have a tiled shower area in your home, it’s very likely you’ve experienced problems with the grout becoming excessively dirty and ridden with displeasing black spots of mould. The underlying issue is due to inadequate ventilation which can be a real problem in modern insulated houses and occasionally the grout can get so imbued with contamination that the problem needs to be resolved professionally.
In the case of this Ceramic tiled shower area, located at a property in Galgate, Lancashire, mould had turned the grout black and had got into the sealant strip around the base. The property owner had tried using the run-of-the-mill cleaning products you can buy in superstores, but they simply couldn’t get the job done. So, she contacted me to see what could be done.
At Tile Doctor, we come across the problem of mouldy shower tiles very often. Excess soaps and shampoos – many of which contain chemicals that harmful to the grout – can quickly build-up if not removed, causing mould and soap scum to emerge quickly, and before you know it, you have a problem like this one.
Thankfully, with the right strength product and cleaning methods, mould can be removed quite easily. The cleaning product used here was Tile Doctor Mould Away, which does what it says on the bottle and can quickly remove mould and black spots from grout and silicone. I applied Mould Away to the grout and surrounding Ceramic tiles and left it to dwell for a short period, before starting to clean the affected areas carefully using soft nail brushes and a small amount of water.
Sometimes it is necessary to repeat this process several times to achieve the best possible results, but in this case two attempts was all it took to get the grout looking like new once again.
Following the cleaning, the area was rinsed thoroughly with water, before bring dried off quickly with a heat gun on a low setting. I then sealed the grout with a single coat of Tile Doctor Wall Grout Sealer, which is a water-based sealer designed to protect against water, oil and acid-based contaminants, and stop them from spoiling the appearance of the grout. It also provides a transparent finish that does not diminish the original colouring of the grout. To add the finishing touches, I polished off the Ceramic tiles as these were already fully glazed and did not require any extra sealer.
The before and after photos are a testament to how significantly the condition and appearance of the grout was quickly improved and needless to say, the customer was very satisfied with the result.
Russell Taylor
Lancashire Tile Doctor

 Atelier Armbruster
Master bathroom
Photos: Natalia Lorca Ruiz
Mid-sized trendy master white tile and ceramic tile ceramic tile and black floor doorless shower photo in New York with flat-panel cabinets, white cabinets, a wall-mount toilet, white walls, an integrated sink, solid surface countertops and a hinged shower door
Mid-sized trendy master white tile and ceramic tile ceramic tile and black floor doorless shower photo in New York with flat-panel cabinets, white cabinets, a wall-mount toilet, white walls, an integrated sink, solid surface countertops and a hinged shower door

 Build It Right Remodeling
Tile is 6" x 24" Running Bond Lay
Berkshire Hickory with Summer Wheat Grout Color
Inspiration for a mid-sized coastal bathroom remodel in Milwaukee
Inspiration for a mid-sized coastal bathroom remodel in Milwaukee

 J&J Carpet One Floor & Home
Flooring: Bedrosians, Forest 8x36 Wood Plank Tile in Walnut
Shower Tile: Florida Tile, Sierra Clay 12x24 in Continent for the shower walls and floor. Bedrosians, Forest 8x36 in Black for the accent wall.
 Magikflame
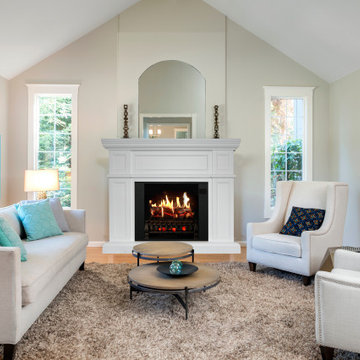
Stay cozy and comfortable with the Artemis white electric fireplace inspired by MagikFlame. Its customizable temperature settings and realistic flame effects create a warm and inviting atmosphere in any room, making it perfect for any homeowner. Discover MagikFlame electric fireplaces: https://magikflame.com/product-category/buy-electric-fireplaces/
Our patented technology is a real game-changer. Others use a mechanical means to recreate the look of fire. Instead, we use actual video of real fire which we then project onto a physical log set making it look like those logs are actually burning.
Therefore, you get all the details you would with real fire like wispy smoke and even burning embers which other fireplaces are not capable of producing. We spent 5 years of R&D to produce this cutting edge technology.
The Artemis mantel package is a fantastic choice for luxurious homes. This mantel is pure bright white. The Artemis features an elegant arry of rectangular and square-shaped details framed in by crown molding on the front center piece and on the side posts. A perfect fit for a modern home. The Artemis is made from high-quality woods and is a premium piece of furniture.
At MagikFlame, our goal is to create the most realistic electric fireplaces ever made. We also believe in improving quality of life by providing people with the best possible cozy and relaxing environment every night. Using our patented holoflame technology, we've innovated the electric fireplace to bring you effortless cozy with friends and family. Because quality family time and relaxation after a hard workday or activity is life changing.
Experience 30 Flames. Built-In Heater. Sound.
Subscribe to our channel for tips on how to enhance your interior design, accessories, and focal points. Learn more about fireplace technology and the cozy, relaxation, and family atmosphere improvements to your home. We have everything you need to guide you on a journey to forge the American home and better living atmosphere.
Shop With Us Online: https://magikflame.com
Like MagikFlame on Facebook: https://www.facebook.com/MagikFlame
Follow MagikFlame on Instagram: https://www.instagram.com/magikflamefireplaces/
Tweet With Us: https://twitter.com/MagikFlameFire
Pin With Us: https://www.pinterest.com/MagikFlameElectricFireplaces
We attempt to be as accurate as possible. However, MagikFlame cannot guarantee that product descriptions, images or other content of products or services are 100% accurate, complete, reliable, current, or error-free. Some items may appear slightly larger or smaller than the actual size due to screen defaults and photography techniques. This also includes any momentary stutters or artifacts in frames of the flame video loop. Other items may be represented at a larger than the actual size in order to clearly show details, or smaller than the actual size to show the entire item.
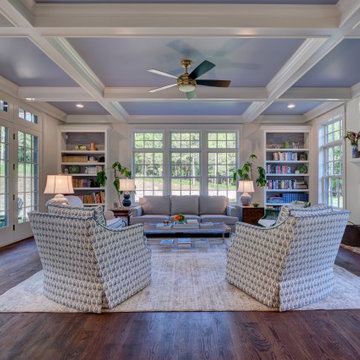


 TKS Design Group
Free ebook, Creating the Ideal Kitchen. DOWNLOAD NOW
Sometimes it take a few tries to get a space to work how you want it to and that’s exactly what happened with this Hinsdale client. Their desire for a family friendly, open floor plan had them reworking an opening between the kitchen and family room and relocating some pantry cabinets in an attempt to make their home’s flow more suitable to their lifestyle. After living with this small change for a few years, they decided that a full kitchen remodel was really what was needed to make their home function the way they desired.
They came in with the stereotypical “sketch on a napkin” done by an architect friend, and we proceeded to make that design come to life with a few tweaks along the way. The space was quite unique and also a bit challenging because of its multiple angled walls. While interesting, angles can be a challenge when trying make a space functional.
The new kitchen has a great lineup of large appliances, including a large built-in fridge, steam oven and Galley workstation, which is a large prep sink that utilizes several inserts such as strainers and cutting boards and acts as a very large prep space. The new induction cooktop is easy to keep clean and a microwave drawer in the island is located away from the main prep space for convenient access.
The main perimeter has tons of countertop space, with additional prep space available at the island and a slightly raised peninsula for casual meals and nice homework spot for the couple’s teenaged children. The kitchen also included a large shallow depth pantry and a large counter height desk area for keeping track of paperwork.
The weathered finish on the cabinets and custom metal hood are a nice juxtaposition to the more sleek glass mosaic backsplash and waterfall countertops. The pendants and cabinet hardware provide modern details that provide an overall casual yet sophisticated feel in this transitional design.
Designed by: Susan Klimala, CKD, CBD
Photography by: Mike Kaskel
For more information on kitchen and bath design ideas go to: www.kitchenstudio-ge.com

 Taylor Made Cabinets, Leominster MA
Angela Taylor, Taylor Made Cabinets of Leominster MA
Kitchen pantry - mid-sized transitional l-shaped light wood floor kitchen pantry idea in Boston with recessed-panel cabinets, white cabinets, granite countertops, stainless steel appliances and an island
Kitchen pantry - mid-sized transitional l-shaped light wood floor kitchen pantry idea in Boston with recessed-panel cabinets, white cabinets, granite countertops, stainless steel appliances and an island
 Powell Construction
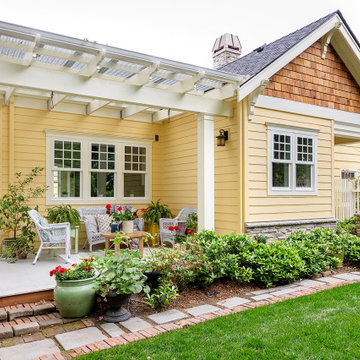
Originally built in 1938, this bungalow cottage had enduring character, but its traditional closed kitchen layout – typical of the era – didn’t align with the way the homeowners envisioned living in the space. Inspired by their travels through England’s Cotswolds, the French countryside, and Carmel’s whimsical Storybook Cottages by the Sea, the homeowners dreamed of a home that captured the romance of cottages and one that would seamlessly connect with their stunning English-style garden.
After years of attempting to reimagine the kitchen in its original location the homeowners realized it would never truly suit the way they lived & wanted to entertain. The original kitchen was historical & was built when the kitchen was the last room you wanted guests to see. It was tucked into the front corner of the home off a hallway leading to the main level bedrooms and bath. To reach the dining room, you passed through a servery swing door, then continued into the living room. While the original door had charm, it disrupted the flow and connection between the kitchen and the main living areas.
To bring the homeowners’ vision to life, the design called for a bold move—relocating the kitchen entirely. We designed a 560-square-foot addition off the living room – placing the kitchen at the heart of the home and connecting it to the gardens. The new space includes a sunlit breakfast nook, a charming butler’s pantry, a garden vestibule with its own entry porch, and a wraparound porch that encourages indoor-outdoor living. The main level remodel also redefined existing spaces: the old dining room was transformed into a cozy study library, while a former bedroom became an elegant dining room just off the new kitchen.
Every design decision honored the home’s original 1938 architecture and character. Matching the home’s original 1.5-story proportions, the new kitchen wing was designed with intersecting gables that echo the scale and pitch of the existing roofline. A stone-wrapped chimney topped with a handcrafted copper cap is straight from the pages of a storybook. Decorative corbels, intricate window trim, and cedar shake in the gable ends further connect the new architecture to the home’s historic detailing.
Finishes and fixtures were thoughtfully chosen to marry the home’s moodier, character-rich original rooms with the brighter, lighter new spaces. The result is a timeless transformation that feels as though it has always been part of the home – an enchanting blend of storybook charm, functional design, and garden-centered living.
At the ground level, a Pennsylvania bluestone porch and stone skirting ground the addition in traditional materials. Inside, a tongue-and-groove ceiling with hand-hewn beams gives purpose and intimacy to the heightened kitchen ceiling. The home’s signature arched openings were meticulously replicated in the new kitchen, breakfast nook, and dining room, ensuring a seamless transition between old and new. Every element – inside and out – was chosen to honor the original home while enhancing the charm, character, and connection to the garden.
Photos by MK Photography
 Tile Doctor Ltd
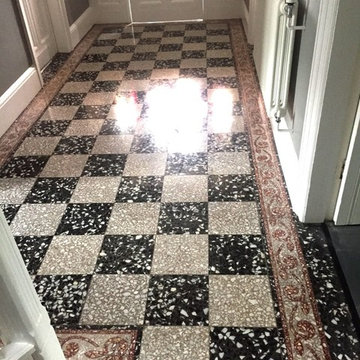
For this job, I paid a visit to the bustling town of Windermere in South Cumbria. My client asked me to refinish a black and white Terrazzo tiled entrance and hallway floor. Terrazzo if you’re not familiar is a very interesting and beautiful stone of Italian origin, which has been used for flooring in houses for centuries.
We had previously quoted to do the work on this floor however the customer has also received a quote from another firm in Glasgow and had chosen to go with them solely because they were more expensive. However, it stands to reason that the most expensive companies are not always the best quality and Tile Doctor prides itself on the amount of customer feedback we display on our websites which we believe is a far better indicator.
On the arranged day no one from the Glasgow firm showed up and after following up with the firm a young man in his early 20s arrived five hours late and began work on the floor. According to the customer he spent three days attempting to complete the job, but ran out of time and asked the client to apply the sealer themselves. The client applied the sealer, but as she had never done it before the floor turned out blotchy in appearance and she was far from happy.
To cut a long story short, my client complained to the Glaswegian company, after all she had paid for a full service and not received it. Unable to get a satisfactory conclusion from them she decided to call in Tile Doctor to put the matter right. I must point out that although I have included before and after photos one this post it’s really difficult to appreciate the extent of the problem without seeing the floor in real life.
To resolve the sealer, and to provide my client with the polished finish she had originally wanted, I burnished the floor using a set of four Tile Doctor Diamond encrusted burnishing pads. Each of the four pads has a different grit: I first applied the coarse pad and worked my way through medium, fine and eventually very fine using a little water to lubricate and rinsing the floor between each pad to remove any residue; after the burnishing process was complete I gave the entire floor a final, thorough wash.
I then used a wet-vac machine to extract the water and get the floor as dry as possible before leaving for the day and allowing it to fully dry completely overnight, it’s very important that the floor is as moisture free as possible before being sealed as it can affect the final result.
The next day I returned to the house and sealed the floor with two coats of Tile Doctor Colour Grow, an impregnating, colour-enhancing sealer that really accentuates the look of the black and white tiles.
Now that the problem has been resolved, my client is very happy with the condition of her Terrazzo tiled entrance and hallway floor.
Heidi Taylor
South Cumbria Tile Doctor
 Powell Construction
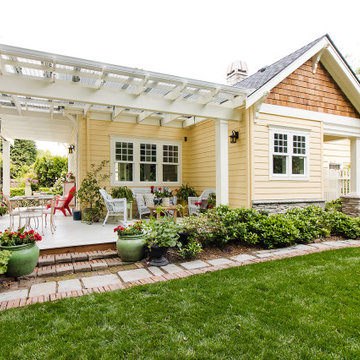
Originally built in 1938, this bungalow cottage had enduring character, but its traditional closed kitchen layout – typical of the era – didn’t align with the way the homeowners envisioned living in the space. Inspired by their travels through England’s Cotswolds, the French countryside, and Carmel’s whimsical Storybook Cottages by the Sea, the homeowners dreamed of a home that captured the romance of cottages and one that would seamlessly connect with their stunning English-style garden.
After years of attempting to reimagine the kitchen in its original location the homeowners realized it would never truly suit the way they lived & wanted to entertain. The original kitchen was historical & was built when the kitchen was the last room you wanted guests to see. It was tucked into the front corner of the home off a hallway leading to the main level bedrooms and bath. To reach the dining room, you passed through a servery swing door, then continued into the living room. While the original door had charm, it disrupted the flow and connection between the kitchen and the main living areas.
To bring the homeowners’ vision to life, the design called for a bold move—relocating the kitchen entirely. We designed a 560-square-foot addition off the living room – placing the kitchen at the heart of the home and connecting it to the gardens. The new space includes a sunlit breakfast nook, a charming butler’s pantry, a garden vestibule with its own entry porch, and a wraparound porch that encourages indoor-outdoor living. The main level remodel also redefined existing spaces: the old dining room was transformed into a cozy study library, while a former bedroom became an elegant dining room just off the new kitchen.
Every design decision honored the home’s original 1938 architecture and character. Matching the home’s original 1.5-story proportions, the new kitchen wing was designed with intersecting gables that echo the scale and pitch of the existing roofline. A stone-wrapped chimney topped with a handcrafted copper cap is straight from the pages of a storybook. Decorative corbels, intricate window trim, and cedar shake in the gable ends further connect the new architecture to the home’s historic detailing.
Finishes and fixtures were thoughtfully chosen to marry the home’s moodier, character-rich original rooms with the brighter, lighter new spaces. The result is a timeless transformation that feels as though it has always been part of the home – an enchanting blend of storybook charm, functional design, and garden-centered living.
At the ground level, a Pennsylvania bluestone porch and stone skirting ground the addition in traditional materials. Inside, a tongue-and-groove ceiling with hand-hewn beams gives purpose and intimacy to the heightened kitchen ceiling. The home’s signature arched openings were meticulously replicated in the new kitchen, breakfast nook, and dining room, ensuring a seamless transition between old and new. Every element – inside and out – was chosen to honor the original home while enhancing the charm, character, and connection to the garden.
Photos by MK Photography

 Powell Construction
Originally built in 1938, this bungalow cottage had enduring character, but its traditional closed kitchen layout – typical of the era – didn’t align with the way the homeowners envisioned living in the space. Inspired by their travels through England’s Cotswolds, the French countryside, and Carmel’s whimsical Storybook Cottages by the Sea, the homeowners dreamed of a home that captured the romance of cottages and one that would seamlessly connect with their stunning English-style garden.
After years of attempting to reimagine the kitchen in its original location the homeowners realized it would never truly suit the way they lived & wanted to entertain. The original kitchen was historical & was built when the kitchen was the last room you wanted guests to see. It was tucked into the front corner of the home off a hallway leading to the main level bedrooms and bath. To reach the dining room, you passed through a servery swing door, then continued into the living room. While the original door had charm, it disrupted the flow and connection between the kitchen and the main living areas.
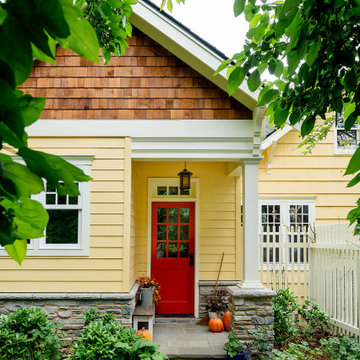
To bring the homeowners’ vision to life, the design called for a bold move—relocating the kitchen entirely. We designed a 560-square-foot addition off the living room – placing the kitchen at the heart of the home and connecting it to the gardens. The new space includes a sunlit breakfast nook, a charming butler’s pantry, a garden vestibule with its own entry porch, and a wraparound porch that encourages indoor-outdoor living. The main level remodel also redefined existing spaces: the old dining room was transformed into a cozy study library, while a former bedroom became an elegant dining room just off the new kitchen.
Every design decision honored the home’s original 1938 architecture and character. Matching the home’s original 1.5-story proportions, the new kitchen wing was designed with intersecting gables that echo the scale and pitch of the existing roofline. A stone-wrapped chimney topped with a handcrafted copper cap is straight from the pages of a storybook. Decorative corbels, intricate window trim, and cedar shake in the gable ends further connect the new architecture to the home’s historic detailing.
Finishes and fixtures were thoughtfully chosen to marry the home’s moodier, character-rich original rooms with the brighter, lighter new spaces. The result is a timeless transformation that feels as though it has always been part of the home – an enchanting blend of storybook charm, functional design, and garden-centered living.
At the ground level, a Pennsylvania bluestone porch and stone skirting ground the addition in traditional materials. Inside, a tongue-and-groove ceiling with hand-hewn beams gives purpose and intimacy to the heightened kitchen ceiling. The home’s signature arched openings were meticulously replicated in the new kitchen, breakfast nook, and dining room, ensuring a seamless transition between old and new. Every element – inside and out – was chosen to honor the original home while enhancing the charm, character, and connection to the garden.
Photos by MK Photography


42