
Search results for "Being care workers" in Home Design Ideas

 O'Hanlon Kitchen & Bath
This kitchen was beautifully transformed into a Modern Rustic masterpiece. We were honored to have a part in the design and installation of the cabinets and countertop as well as being the general contractor for the project. The homeowners, Mr. Scott & Ms. Rauhofer are not new to architecture and home design. Their home had previously won an architectural award for its construction and design.
Mr. Scott & Ms. Rauhofer utilized the expertise of many different artists and contractors on this project. Our designer, Tracy West, worked with them on the design of their new kitchen. They did have a separate contractor who took care of the rough-in work (wall removal, refinishing the floors, electrical, and plumbing) as well as configuring the installation of the unique 3Form Lightbox above the sink.
Julie Gabrielli with Gabrielli Design Studio masterfully designed the above-mentioned lightbox, which was then installed by Baltic Custom Construction (additional contractor). Ken Girardini with Girardini Design artfully designed and constructed many metal artwork pieces to showcase in the space. Ken also beautifully crafted the distinctive cabinet hardware pieces seen throughout.
This stunning kitchen was incredibly well thought out and planned, using the many talents of some local artists and craftsmen to truly showcase what is possible to create a beautiful space within the home.
New Cabs: DeWils Blanco Supermatte Luxe
Countertop: Cambria Warm Britannica with Waterfall island
Hardware: Ken Girardini with Girardini Design
Backsplash: customer supplied
Sink: Kraus KHU32
Stove: Miele 48” Rangetop with Grill Model: KMR 1355 G / KMR 1355 LP
Stove Hood: Miele Décor Island Ventilation Hood DA 424V-6
Refrigerator: Subzero
Convection Oven: Miele ContourLine 30” H 6780 BP
Dishwasher: Miele EcoFlex Series
Microwave: Miele PureLine 24” Microwave Oven M 6260 TC
Cabinet accessories by Dewils and Fineline accessories in the drawers.
Lightbox Info- https://www.3-form.com/collaborate/light_design/
Tracy West
Kitchen Designer
O’Hanlon Kitchens, Inc.
47 Loveton Circle, Ste. D
Sparks, MD 21152
443-285-0558
717-755-5555
www.OKitchens.com
Melanie Sammons
Project Coordinator
O’Hanlon Kitchens, Inc.
47 Loveton Circle, Ste. D
Sparks, MD 21152
443-285-0558
717-755-5555
www.OKitchens.com
Baltic Custom Construction, Inc.
8 Havenfield Dr, Parkville, MD 21234
410-375-1283
Ken Girardini
keng@girardinidesign.com
927 Buckhorn Rd
Sykesville, MD. 21784
410-549-3499
Julie E Gabrielli, NCARB, LEED AP
Gabrielli Design Studio, LLC
2224 Crest Rd
Baltimore, MD 21209
julie@gabriellidesign.com
410-530-0389
www.gabriellidesign.com
blog: juliegabrielli com

 Dura Supreme Cabinetry
With an ideal location in the Pacific Heights neighborhood of San Francisco, this dated Victorian residence had "beautiful bones" but had been sitting on the market for a year before being purchased with plans to revitalize the interior. Interior designer, Noel Han, explained, "Historical Victorian homes in this area often have beautiful architectural elements that I aim to preserve, but the floor plan and layout tend to be stuffy, not live-able and not light filled. Modern families want bright, light-filled, spacious rooms that take advantage of outdoor views and living spaces, and function well for storage, meals and entertaining."
Preserving the architectural integrity and special features of the home was one of Han's goals but at the same time, she re-designed the space, moving walls and adding windows to create an open floorplan that flowed easily between the kitchen and outdoor living spaces. Where the range once stood in the original design, now an entire wall of windows provides panoramic views of the outdoors and fills the kitchen with light. Below the windows, Han designed a long bank of base cabinets with drawers to provide plenty of storage and work surface. Light now pours into the space even on foggy days. The range was moved to the opposite wall so that beautiful window views could be added to the kitchen.
Han selected a palette of finishes with an eye toward creating a "soft color aesthetic". "White painted finishes are very popular right now but would have felt stark and cold in this space," she explained. "The French grey paint from Dura Supreme was a perfect complement for this vintage Victorian home, to create a classic color scheme".
"This beautiful home already had hardware elements with a vintage brass finish, so I carefully selected antiqued, brushed brass hardware, plumbing and metal finishes to blend with the original elements," said Han. She continued, "The La Cornue French Range adds modern function with a French antique look."
"I appreciate working with Dura Supreme cabinetry because of the quality of the cabinetry, fast delivery and the custom options. I'm able to create beautiful architectural details like the pull-out columns on both sides of the range and the curved mullion doors on the furniture hutch, and they offer a stunning palette of finishes and styles," explained Han. For the bath cabinetry, Han created a similar palette of finishes and styles to create a complementary look throughout the entire home.
Product Details:
Perimeter: Dura Supreme Cabinetry shown in the St. Augustine door style and Mullion Pattern #15 door style with a “Zinc” painted finish.
Kitchen Island: Dura Supreme Cabinetry shown in the St. Augustine door style with a Clove stain and Black Accent finish on Cherry wood.
For more information about Noel Han, Interior Designer, click to her website here www.atelnoel.com.
For more information about Gilmans Kitchens and Baths, click to their website here www.gkandb.com.
Photography by: Ned Bonzi www.nedbonzi.com.
Request a FREE Dura Supreme Brochure Packet:
http://www.durasupreme.com/request-brochure
 Drury Design
THE SETUP
This client lives in a great high-rise condo in downtown Chicago. Alicia has already remodeled a few areas of her home, including her kitchen and home office. The bathroom is one of the last big places the client wanted to update. The existing bathroom had a large, outdated whirlpool tub in the corner. It was a darker space that had a lack of natural light. There are no windows (due to the bathroom’s location within the high-rise building). So, the idea was to brighten up the space and give the client an updated, elegant primary bathroom that is more her style and tailor-made for her routines.
Design Objectives:
- Make the space brighter.
- Create different daily routine stations to maximize functionality while keeping things clutter-free – a makeup station, a blow-dry station, and a sink-needs station.
- Achieve the client’s specific style and function needs while also keeping the look and design open to future possibilities: different users of the space/resale clients.
Design Challenges:
- Toilet cannot be moved. (In a high-rise, you can’t really move plumbing around too much when reimagining a space)
- Existing bathroom had a soffit that hid a lot of electrical wiring, so completely removing the soffit wasn’t an option.
- The blow-dry station needs to accommodate the client’s preference for standing up.
- Finding a place for the make-up station, which the client wants oriented for sitting.
- Create storage within the shower that can eliminate the clutter of personal care products that are actually needed every day. Do this, while keeping the client’s favorite things about the existing shower: the shower bench, a tub filler faucet (for rinsing shaving cream when shaving legs) and a low niche for placing her foot when shaving her legs.
THE RENEWED SPACE
Design Solutions:
- Extended a bit of wall near the toilet to give the commode its own area within the space, but without closing it off into a claustrophobic WC.
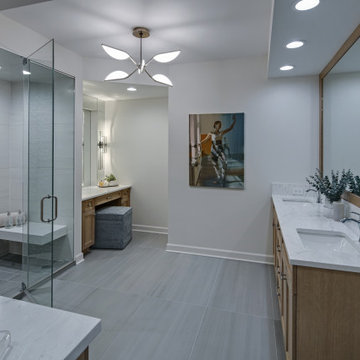
- Worked within the reality of the existing soffit situation, reshaping it to align with the new shower. Can lights were also added. Installed a beautiful ceiling light fixture that works within the new soffit shape, commanding attention and adding light, as if the sofit shape was chosen for it.
- Created a nice, furniture-looking 42”-high cabinet with pullout drawers to be the blow-dry station, complete with a mirror and a nice top. The pullout drawers are all powered, concealing a Dyson dryer and curling iron (and all the accoutrements) while keeping them plugged in, which is ideal for easy usage and put away. A stylish mirror on the wall above the cabinet, and proper lighting, make this the perfect blow-dry station. The top has a grommet that can accommodate a power cord should the client ever want to have a powered device on top of the cabinet.
- Put the sit-down makeup station where the tub used to be, putting the mirror back into a new recessed wall just a bit, allowing the area to have more room.
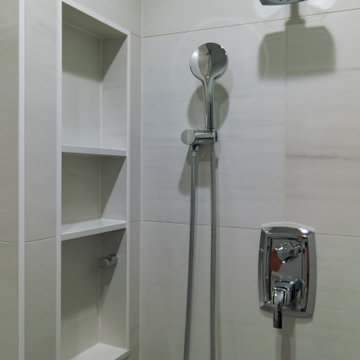
- Created a niche in the shower’s inner wall so that you can’t see it unless you are literally inside the shower. At the client’s request, it also has a hook so she can hang her loofa. Hiding the utility niche in this way allowed us to use the full main wall of the shower as a canvas for a beautiful accent stripe of raised decorative tile. The new shower has her old favorites, too: the tub filler, foot niche and bench.
Alicia’s client loves her new primary bathroom, especially the blow dry area. It is very accommodating for her, as a tall lady, while being very easy to use. The drawers store everything. Being powered, they make using already-plugged in appliances very easy to use and put away.
Her previous makeup station was a freestanding vanity with a single drawer, so beauty products were all over the surface top. With her new makeup station, everything is nicely tucked away and organized in drawers.
The new lighting is fantastic and the colors are light and soft. The clients loves the overall look and feel of her new bathroom and raves about how well the functionality-minded design makes her morning routine – and her life – easier and enjoyable!
Find the right local pro for your project
 O'Hanlon Kitchen & Bath
This kitchen was beautifully transformed into a Modern Rustic masterpiece. We were honored to have a part in the design and installation of the cabinets and countertop as well as being the general contractor for the project. The homeowners, Mr. Scott & Ms. Rauhofer are not new to architecture and home design. Their home had previously won an architectural award for its construction and design.
Mr. Scott & Ms. Rauhofer utilized the expertise of many different artists and contractors on this project. Our designer, Tracy West, worked with them on the design of their new kitchen. They did have a separate contractor who took care of the rough-in work (wall removal, refinishing the floors, electrical, and plumbing) as well as configuring the installation of the unique 3Form Lightbox above the sink.
Julie Gabrielli with Gabrielli Design Studio masterfully designed the above-mentioned lightbox, which was then installed by Baltic Custom Construction (additional contractor). Ken Girardini with Girardini Design artfully designed and constructed many metal artwork pieces to showcase in the space. Ken also beautifully crafted the distinctive cabinet hardware pieces seen throughout.
This stunning kitchen was incredibly well thought out and planned, using the many talents of some local artists and craftsmen to truly showcase what is possible to create a beautiful space within the home.
New Cabs: DeWils Blanco Supermatte Luxe
Countertop: Cambria Warm Britannica with Waterfall island
Hardware: Ken Girardini with Girardini Design
Backsplash: customer supplied
Sink: Kraus KHU32
Stove: Miele 48” Rangetop with Grill Model: KMR 1355 G / KMR 1355 LP
Stove Hood: Miele Décor Island Ventilation Hood DA 424V-6
Refrigerator: Subzero
Convection Oven: Miele ContourLine 30” H 6780 BP
Dishwasher: Miele EcoFlex Series
Microwave: Miele PureLine 24” Microwave Oven M 6260 TC
Cabinet accessories by Dewils and Fineline accessories in the drawers.
Lightbox Info- https://www.3-form.com/collaborate/light_design/
Tracy West
Kitchen Designer
O’Hanlon Kitchens, Inc.
47 Loveton Circle, Ste. D
Sparks, MD 21152
443-285-0558
717-755-5555
www.OKitchens.com
Melanie Sammons
Project Coordinator
O’Hanlon Kitchens, Inc.
47 Loveton Circle, Ste. D
Sparks, MD 21152
443-285-0558
717-755-5555
www.OKitchens.com
Baltic Custom Construction, Inc.
8 Havenfield Dr, Parkville, MD 21234
410-375-1283
Ken Girardini
keng@girardinidesign.com
927 Buckhorn Rd
Sykesville, MD. 21784
410-549-3499
Julie E Gabrielli, NCARB, LEED AP
Gabrielli Design Studio, LLC
2224 Crest Rd
Baltimore, MD 21209
julie@gabriellidesign.com
410-530-0389
www.gabriellidesign.com
blog: juliegabrielli com
 Drury Design
THE SETUP
This client lives in a great high-rise condo in downtown Chicago. Alicia has already remodeled a few areas of her home, including her kitchen and home office. The bathroom is one of the last big places the client wanted to update. The existing bathroom had a large, outdated whirlpool tub in the corner. It was a darker space that had a lack of natural light. There are no windows (due to the bathroom’s location within the high-rise building). So, the idea was to brighten up the space and give the client an updated, elegant primary bathroom that is more her style and tailor-made for her routines.
Design Objectives:
- Make the space brighter.
- Create different daily routine stations to maximize functionality while keeping things clutter-free – a makeup station, a blow-dry station, and a sink-needs station.
- Achieve the client’s specific style and function needs while also keeping the look and design open to future possibilities: different users of the space/resale clients.
Design Challenges:
- Toilet cannot be moved. (In a high-rise, you can’t really move plumbing around too much when reimagining a space)
- Existing bathroom had a soffit that hid a lot of electrical wiring, so completely removing the soffit wasn’t an option.
- The blow-dry station needs to accommodate the client’s preference for standing up.
- Finding a place for the make-up station, which the client wants oriented for sitting.
- Create storage within the shower that can eliminate the clutter of personal care products that are actually needed every day. Do this, while keeping the client’s favorite things about the existing shower: the shower bench, a tub filler faucet (for rinsing shaving cream when shaving legs) and a low niche for placing her foot when shaving her legs.
THE RENEWED SPACE
Design Solutions:
- Extended a bit of wall near the toilet to give the commode its own area within the space, but without closing it off into a claustrophobic WC.
- Worked within the reality of the existing soffit situation, reshaping it to align with the new shower. Can lights were also added. Installed a beautiful ceiling light fixture that works within the new soffit shape, commanding attention and adding light, as if the sofit shape was chosen for it.
- Created a nice, furniture-looking 42”-high cabinet with pullout drawers to be the blow-dry station, complete with a mirror and a nice top. The pullout drawers are all powered, concealing a Dyson dryer and curling iron (and all the accoutrements) while keeping them plugged in, which is ideal for easy usage and put away. A stylish mirror on the wall above the cabinet, and proper lighting, make this the perfect blow-dry station. The top has a grommet that can accommodate a power cord should the client ever want to have a powered device on top of the cabinet.
- Put the sit-down makeup station where the tub used to be, putting the mirror back into a new recessed wall just a bit, allowing the area to have more room.
- Created a niche in the shower’s inner wall so that you can’t see it unless you are literally inside the shower. At the client’s request, it also has a hook so she can hang her loofa. Hiding the utility niche in this way allowed us to use the full main wall of the shower as a canvas for a beautiful accent stripe of raised decorative tile. The new shower has her old favorites, too: the tub filler, foot niche and bench.
Alicia’s client loves her new primary bathroom, especially the blow dry area. It is very accommodating for her, as a tall lady, while being very easy to use. The drawers store everything. Being powered, they make using already-plugged in appliances very easy to use and put away.
Her previous makeup station was a freestanding vanity with a single drawer, so beauty products were all over the surface top. With her new makeup station, everything is nicely tucked away and organized in drawers.
The new lighting is fantastic and the colors are light and soft. The clients loves the overall look and feel of her new bathroom and raves about how well the functionality-minded design makes her morning routine – and her life – easier and enjoyable!

 User
Reference: BB513-2EWC-US
Model: CARRARA
Color: White Gray Carrara
Shape: rectangular
Finish: polished
US Dimensions: 27.5" x 19.7" x 2.40"
EU Dimensions: 70x50x6cm
US Drain size: standard hole size (1.5")
Faucet hole size: 1.38" - 35mm
Shipping: CA=$39 - NY=$79 - FL=$73 - IL=$51...
Weight: 88 lbs - 40 Kgs
Material: Carrara marble grade A
Rectangular Natural stone bathroom sink CARRARA - 27.5" x 19.7" x 2.40"- is a genuine interior DECO White marble. The "Exceptional" cut in the block without any comparison with plastic and other chemical resin market often unaffordable. You will definitely not let anyone feel indifferent with this 100% natural stone unique in the US and exclusively available on Living'ROC.net.
The outstanding opportunity to make your world unique! Add great value to your home by installing LivingRoc's Creations and tell your stone story through the years of conception. Its Zen-style, pure and sleek lines will give a cool and chic look to your trendy bathroom.
Made from a superb block of Carrara White Marble this bathroom vessel sink will delight lovers of beautiful work, looking for rare, products. Add value to your home by transforming your bathroom into an oasis of elegance, calm, and tranquillity. Discover the well-being and the restful feeling our creation can offer you.
CARRARA is one of the most fashionable in our bathrooms range. The very popular Carrara marble is dominant in strength of great value and authentic in look and feel.
Our creation is delivered without an overflow drain and faucet (not included) - every US drains and faucets models you can find on the market will fit perfectly on Living'ROC vessel sink. This model is ready to use over the countertop.
The photos you see online have been taken with extreme care by our Founder CEO - Florent LEPVREAU, because without them we would not be one of the natural stone business key player of the online European continent. Once you have encountered the product in your home you will always have pure happiness for the love of the materials. It will be beyond your expectations because what you see online at livingroc.net is what you will receive. This is why we always guarantee a degree of quality (Grade A) and impeccable finish as can attest with the reviews filed by our customers. We also draw your attention to the fact that veining, misprints and other variations of colors (often on marble and onyx) and various stone particularities make all the charm of the stone and distinguish it from non-natural materials! Simply our living'ROC style.
 Drury Design
THE SETUP
This client lives in a great high-rise condo in downtown Chicago. Alicia has already remodeled a few areas of her home, including her kitchen and home office. The bathroom is one of the last big places the client wanted to update. The existing bathroom had a large, outdated whirlpool tub in the corner. It was a darker space that had a lack of natural light. There are no windows (due to the bathroom’s location within the high-rise building). So, the idea was to brighten up the space and give the client an updated, elegant primary bathroom that is more her style and tailor-made for her routines.
Design Objectives:
- Make the space brighter.
- Create different daily routine stations to maximize functionality while keeping things clutter-free – a makeup station, a blow-dry station, and a sink-needs station.
- Achieve the client’s specific style and function needs while also keeping the look and design open to future possibilities: different users of the space/resale clients.
Design Challenges:
- Toilet cannot be moved. (In a high-rise, you can’t really move plumbing around too much when reimagining a space)
- Existing bathroom had a soffit that hid a lot of electrical wiring, so completely removing the soffit wasn’t an option.
- The blow-dry station needs to accommodate the client’s preference for standing up.
- Finding a place for the make-up station, which the client wants oriented for sitting.
- Create storage within the shower that can eliminate the clutter of personal care products that are actually needed every day. Do this, while keeping the client’s favorite things about the existing shower: the shower bench, a tub filler faucet (for rinsing shaving cream when shaving legs) and a low niche for placing her foot when shaving her legs.
THE RENEWED SPACE
Design Solutions:
- Extended a bit of wall near the toilet to give the commode its own area within the space, but without closing it off into a claustrophobic WC.
- Worked within the reality of the existing soffit situation, reshaping it to align with the new shower. Can lights were also added. Installed a beautiful ceiling light fixture that works within the new soffit shape, commanding attention and adding light, as if the sofit shape was chosen for it.
- Created a nice, furniture-looking 42”-high cabinet with pullout drawers to be the blow-dry station, complete with a mirror and a nice top. The pullout drawers are all powered, concealing a Dyson dryer and curling iron (and all the accoutrements) while keeping them plugged in, which is ideal for easy usage and put away. A stylish mirror on the wall above the cabinet, and proper lighting, make this the perfect blow-dry station. The top has a grommet that can accommodate a power cord should the client ever want to have a powered device on top of the cabinet.
- Put the sit-down makeup station where the tub used to be, putting the mirror back into a new recessed wall just a bit, allowing the area to have more room.
- Created a niche in the shower’s inner wall so that you can’t see it unless you are literally inside the shower. At the client’s request, it also has a hook so she can hang her loofa. Hiding the utility niche in this way allowed us to use the full main wall of the shower as a canvas for a beautiful accent stripe of raised decorative tile. The new shower has her old favorites, too: the tub filler, foot niche and bench.
Alicia’s client loves her new primary bathroom, especially the blow dry area. It is very accommodating for her, as a tall lady, while being very easy to use. The drawers store everything. Being powered, they make using already-plugged in appliances very easy to use and put away.
Her previous makeup station was a freestanding vanity with a single drawer, so beauty products were all over the surface top. With her new makeup station, everything is nicely tucked away and organized in drawers.
The new lighting is fantastic and the colors are light and soft. The clients loves the overall look and feel of her new bathroom and raves about how well the functionality-minded design makes her morning routine – and her life – easier and enjoyable!
Sponsored
Plain City, OH

The Creative Kitchen Company
Columbus Area Kitchen Remodeling and Refacing Professional

 C.E. Pontz Sons
This Backyard Waterfall project included installation of a pondless waterfall approximately 15' in length on a sloped bank at the area next to the existing pool. The backyard waterfall cascades down the existing embankment. There is still retaining wall work in progress as of this video and pictures being shot. Future landscaping will be installed once surrounding hardscaping has been complete. Rocks and Boulders for this project were chosen and supplied by home owner. This pondless waterfall project was installed in Mohnton (Berks County), PA.
Pondless Waterfalls are simply a re-circulating waterfall and/or stream without the presence of a pond. You can enjoy the sight and sound of running water without the maintenance of a pond.
The waterfall is undoubtedly the most beautiful and favored feature in a water garden. If space is lacking in your yard or you have safety concerns with a pond, go Pondless! The name basically explains it all. It’s a waterfall and stream, without the pond. So why would you want a waterfall without a pond? The truth is that a Pondless Waterfall isn’t for everyone, but it can be a great alternative for someone who isn’t quite sure if a pond is right for their family.
Because there is no pool of water, a Pondless Waterfall is a great option if you are concerned about safety issues associated with a traditional pond.
Cost can be a big factor when considering the type of pond you want to build. In most cases, the price of a Pondless waterfall will be less than a pond, because there is less labor involved, as well as less rock and materials. Operating costs are also less. Because you’re not dealing with an established ecosystem, it’s not necessary to run the pump 24/7.
The small size of the Pondless Waterfall means you can build and enjoy a beautiful waterfall anywhere in you yard. Taking care of your Pondless Waterfall is easy. Filling the reservoir every few weeks to compensate for water loss because of evaporation is all that’s required.
Perhaps the best part of the Pondless Waterfall is the possibility for the future. If you change your mind later, wishing you’d build a pond, that’s ok! If you leave enough room around the base of the waterfall, it’s easy to add a pond onto a Pondless Waterfall.
A Pondless Waterfall works much like a regular pond. The hole, deeper than a normal pond, is dug then lined with rock and gravel, and filled with water. The water is then circulated from beneath the rocks and gravel by a pump that sits on the bottom, inside a Snorkel™ Vault and Centipede™ Module. A pipe runs from there up to a BioFalls Filter and into an overflowing waterfall, where it falls back into the reservoir. Since the water level never pools above the level of the rock and gravel fill, it give the appearance of a waterfall without a pond, when in fact, the “pond” is there but not visible.
The Pondless Waterfall has made many water-lovers who were previously unable to indulge in the sweet sounds of falling water, very happy. It’s a great alternative for those who are trying to get their feet wet, or looking to fit a little bit of paradise into their own backyard. In other words, when all else fails … go Pondless!
 Drury Design
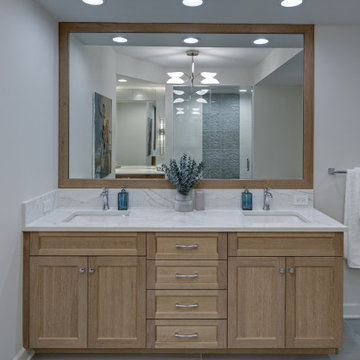
THE SETUP
This client lives in a great high-rise condo in downtown Chicago. Alicia has already remodeled a few areas of her home, including her kitchen and home office. The bathroom is one of the last big places the client wanted to update. The existing bathroom had a large, outdated whirlpool tub in the corner. It was a darker space that had a lack of natural light. There are no windows (due to the bathroom’s location within the high-rise building). So, the idea was to brighten up the space and give the client an updated, elegant primary bathroom that is more her style and tailor-made for her routines.
Design Objectives:
- Make the space brighter.
- Create different daily routine stations to maximize functionality while keeping things clutter-free – a makeup station, a blow-dry station, and a sink-needs station.
- Achieve the client’s specific style and function needs while also keeping the look and design open to future possibilities: different users of the space/resale clients.
Design Challenges:
- Toilet cannot be moved. (In a high-rise, you can’t really move plumbing around too much when reimagining a space)
- Existing bathroom had a soffit that hid a lot of electrical wiring, so completely removing the soffit wasn’t an option.
- The blow-dry station needs to accommodate the client’s preference for standing up.
- Finding a place for the make-up station, which the client wants oriented for sitting.
- Create storage within the shower that can eliminate the clutter of personal care products that are actually needed every day. Do this, while keeping the client’s favorite things about the existing shower: the shower bench, a tub filler faucet (for rinsing shaving cream when shaving legs) and a low niche for placing her foot when shaving her legs.
THE RENEWED SPACE
Design Solutions:
- Extended a bit of wall near the toilet to give the commode its own area within the space, but without closing it off into a claustrophobic WC.
- Worked within the reality of the existing soffit situation, reshaping it to align with the new shower. Can lights were also added. Installed a beautiful ceiling light fixture that works within the new soffit shape, commanding attention and adding light, as if the sofit shape was chosen for it.
- Created a nice, furniture-looking 42”-high cabinet with pullout drawers to be the blow-dry station, complete with a mirror and a nice top. The pullout drawers are all powered, concealing a Dyson dryer and curling iron (and all the accoutrements) while keeping them plugged in, which is ideal for easy usage and put away. A stylish mirror on the wall above the cabinet, and proper lighting, make this the perfect blow-dry station. The top has a grommet that can accommodate a power cord should the client ever want to have a powered device on top of the cabinet.
- Put the sit-down makeup station where the tub used to be, putting the mirror back into a new recessed wall just a bit, allowing the area to have more room.
- Created a niche in the shower’s inner wall so that you can’t see it unless you are literally inside the shower. At the client’s request, it also has a hook so she can hang her loofa. Hiding the utility niche in this way allowed us to use the full main wall of the shower as a canvas for a beautiful accent stripe of raised decorative tile. The new shower has her old favorites, too: the tub filler, foot niche and bench.
Alicia’s client loves her new primary bathroom, especially the blow dry area. It is very accommodating for her, as a tall lady, while being very easy to use. The drawers store everything. Being powered, they make using already-plugged in appliances very easy to use and put away.
Her previous makeup station was a freestanding vanity with a single drawer, so beauty products were all over the surface top. With her new makeup station, everything is nicely tucked away and organized in drawers.
The new lighting is fantastic and the colors are light and soft. The clients loves the overall look and feel of her new bathroom and raves about how well the functionality-minded design makes her morning routine – and her life – easier and enjoyable!
 Tile Doctor Ltd
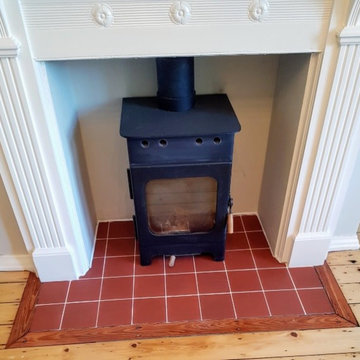
We received an inquiry from a client in Lindow End near Wilmslow Golf Club in the Cheshire stockbroker belt. They were restoring their home and were unhappy with the state of the Quarry tiled hearth under their log burning stove. We arranged a site visit to survey the tile and grout and provide a quote for restoring the appearance. The village is situated in what’s known as the ‘Cheshire Golden Triangle’ which is one of the most sought-after places to live in the UK after London. As a result, we often find ourselves in this area working on some very nice properties, so it wasn’t long before we were able to call in and survey the tiles.
As you can see from the pictures the hearth was quite dirty and the grouting had discoloured from years of use of the wood burner. The work here was a minor part of their restoration which had included significant building work. We agreed a price to carry out the work, which should only take a day and were able to return the following week.
Our first job was to cover the newly sanded and sealed wooden floors with dust sheets, so we didn’t mark them as we came in the front door to the lounge. We always try and make as little mess as possible and we are always as careful as possible.
We then sprayed Tile Doctor Pro-Clean on the fire hearth tiles. This is a multi-purpose tile and grout cleaner which would make light work of the dirty tiles. The product was left to soak into the Quarry tile and grout for about twenty minutes before being scrubbed in. The hearth was a small area, so this was done by hand and then washed down with clean water.
The dirty residue was removed using a wet vacuum then the tiles where wiped down with a clean micro fibre cloth. We then dried off the tiles using a little encouragement with a heat gun to speed up the drying process. Speed drying the tile and grout in this manor would allow us to complete the work in one visit.
Once the tiles and grout lines were dry it was clear that years of dirt and soiling had stained the grout, so although no much cleaner it was clear more work would be needed to give the grout a fresh and consistent appearance.
To address this issue with the grout we selected to apply a Sandstone Tile Doctor Grout Colourant. This is applied with a small brush and brushed it into the grout lines. It is quite a precise job but any colourant that goes onto the tiles is removed with a baby wipe before it dries. This process really transformed the look of the grout, the colourant also forms a barrier over the grout which will protect it going forward and make it easier to clean.
The Quarry tiles were then given a coat of Tile Doctor Colour Grow which is an impregnating colour enhancing sealer. This brings out the best in the quarry tiles and adds protection against future staining which will be needed given its location.
The client was very happy with the finish, in fact the hearth looked like it had been newly tiled, the impact of the recoloured grout was that striking. Sometimes the smallest jobs can be the most rewarding.
Andrew Robb
East Cheshire Tile Doctor
 Drury Design
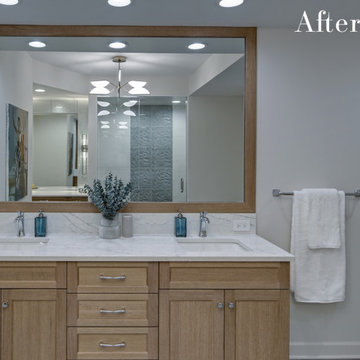
THE SETUP
This client lives in a great high-rise condo in downtown Chicago. Alicia has already remodeled a few areas of her home, including her kitchen and home office. The bathroom is one of the last big places the client wanted to update. The existing bathroom had a large, outdated whirlpool tub in the corner. It was a darker space that had a lack of natural light. There are no windows (due to the bathroom’s location within the high-rise building). So, the idea was to brighten up the space and give the client an updated, elegant primary bathroom that is more her style and tailor-made for her routines.
Design Objectives:
- Make the space brighter.
- Create different daily routine stations to maximize functionality while keeping things clutter-free – a makeup station, a blow-dry station, and a sink-needs station.
- Achieve the client’s specific style and function needs while also keeping the look and design open to future possibilities: different users of the space/resale clients.
Design Challenges:
- Toilet cannot be moved. (In a high-rise, you can’t really move plumbing around too much when reimagining a space)
- Existing bathroom had a soffit that hid a lot of electrical wiring, so completely removing the soffit wasn’t an option.
- The blow-dry station needs to accommodate the client’s preference for standing up.
- Finding a place for the make-up station, which the client wants oriented for sitting.
- Create storage within the shower that can eliminate the clutter of personal care products that are actually needed every day. Do this, while keeping the client’s favorite things about the existing shower: the shower bench, a tub filler faucet (for rinsing shaving cream when shaving legs) and a low niche for placing her foot when shaving her legs.
THE RENEWED SPACE
Design Solutions:
- Extended a bit of wall near the toilet to give the commode its own area within the space, but without closing it off into a claustrophobic WC.
- Worked within the reality of the existing soffit situation, reshaping it to align with the new shower. Can lights were also added. Installed a beautiful ceiling light fixture that works within the new soffit shape, commanding attention and adding light, as if the sofit shape was chosen for it.
- Created a nice, furniture-looking 42”-high cabinet with pullout drawers to be the blow-dry station, complete with a mirror and a nice top. The pullout drawers are all powered, concealing a Dyson dryer and curling iron (and all the accoutrements) while keeping them plugged in, which is ideal for easy usage and put away. A stylish mirror on the wall above the cabinet, and proper lighting, make this the perfect blow-dry station. The top has a grommet that can accommodate a power cord should the client ever want to have a powered device on top of the cabinet.
- Put the sit-down makeup station where the tub used to be, putting the mirror back into a new recessed wall just a bit, allowing the area to have more room.
- Created a niche in the shower’s inner wall so that you can’t see it unless you are literally inside the shower. At the client’s request, it also has a hook so she can hang her loofa. Hiding the utility niche in this way allowed us to use the full main wall of the shower as a canvas for a beautiful accent stripe of raised decorative tile. The new shower has her old favorites, too: the tub filler, foot niche and bench.
Alicia’s client loves her new primary bathroom, especially the blow dry area. It is very accommodating for her, as a tall lady, while being very easy to use. The drawers store everything. Being powered, they make using already-plugged in appliances very easy to use and put away.
Her previous makeup station was a freestanding vanity with a single drawer, so beauty products were all over the surface top. With her new makeup station, everything is nicely tucked away and organized in drawers.
The new lighting is fantastic and the colors are light and soft. The clients loves the overall look and feel of her new bathroom and raves about how well the functionality-minded design makes her morning routine – and her life – easier and enjoyable!
 O'Hanlon Kitchen & Bath
This kitchen was beautifully transformed into a Modern Rustic masterpiece. We were honored to have a part in the design and installation of the cabinets and countertop as well as being the general contractor for the project. The homeowners, Mr. Scott & Ms. Rauhofer are not new to architecture and home design. Their home had previously won an architectural award for its construction and design.
Mr. Scott & Ms. Rauhofer utilized the expertise of many different artists and contractors on this project. Our designer, Tracy West, worked with them on the design of their new kitchen. They did have a separate contractor who took care of the rough-in work (wall removal, refinishing the floors, electrical, and plumbing) as well as configuring the installation of the unique 3Form Lightbox above the sink.
Julie Gabrielli with Gabrielli Design Studio masterfully designed the above-mentioned lightbox, which was then installed by Baltic Custom Construction (additional contractor). Ken Girardini with Girardini Design artfully designed and constructed many metal artwork pieces to showcase in the space. Ken also beautifully crafted the distinctive cabinet hardware pieces seen throughout.
This stunning kitchen was incredibly well thought out and planned, using the many talents of some local artists and craftsmen to truly showcase what is possible to create a beautiful space within the home.
New Cabs: DeWils Blanco Supermatte Luxe
Countertop: Cambria Warm Britannica with Waterfall island
Hardware: Ken Girardini with Girardini Design
Backsplash: customer supplied
Sink: Kraus KHU32
Stove: Miele 48” Rangetop with Grill Model: KMR 1355 G / KMR 1355 LP
Stove Hood: Miele Décor Island Ventilation Hood DA 424V-6
Refrigerator: Subzero
Convection Oven: Miele ContourLine 30” H 6780 BP
Dishwasher: Miele EcoFlex Series
Microwave: Miele PureLine 24” Microwave Oven M 6260 TC
Cabinet accessories by Dewils and Fineline accessories in the drawers.
Lightbox Info- https://www.3-form.com/collaborate/light_design/
Tracy West
Kitchen Designer
O’Hanlon Kitchens, Inc.
47 Loveton Circle, Ste. D
Sparks, MD 21152
443-285-0558
717-755-5555
www.OKitchens.com
Melanie Sammons
Project Coordinator
O’Hanlon Kitchens, Inc.
47 Loveton Circle, Ste. D
Sparks, MD 21152
443-285-0558
717-755-5555
www.OKitchens.com
Baltic Custom Construction, Inc.
8 Havenfield Dr, Parkville, MD 21234
410-375-1283
Ken Girardini
keng@girardinidesign.com
927 Buckhorn Rd
Sykesville, MD. 21784
410-549-3499
Julie E Gabrielli, NCARB, LEED AP
Gabrielli Design Studio, LLC
2224 Crest Rd
Baltimore, MD 21209
julie@gabriellidesign.com
410-530-0389
www.gabriellidesign.com
blog: juliegabrielli com
 C.E. Pontz Sons
This Backyard Waterfall project included installation of a pondless waterfall approximately 15' in length on a sloped bank at the area next to the existing pool. The backyard waterfall cascades down the existing embankment. There is still retaining wall work in progress as of this video and pictures being shot. Future landscaping will be installed once surrounding hardscaping has been complete. Rocks and Boulders for this project were chosen and supplied by home owner. This pondless waterfall project was installed in Mohnton (Berks County), PA.
Pondless Waterfalls are simply a re-circulating waterfall and/or stream without the presence of a pond. You can enjoy the sight and sound of running water without the maintenance of a pond.
The waterfall is undoubtedly the most beautiful and favored feature in a water garden. If space is lacking in your yard or you have safety concerns with a pond, go Pondless! The name basically explains it all. It’s a waterfall and stream, without the pond. So why would you want a waterfall without a pond? The truth is that a Pondless Waterfall isn’t for everyone, but it can be a great alternative for someone who isn’t quite sure if a pond is right for their family.
Because there is no pool of water, a Pondless Waterfall is a great option if you are concerned about safety issues associated with a traditional pond.
Cost can be a big factor when considering the type of pond you want to build. In most cases, the price of a Pondless waterfall will be less than a pond, because there is less labor involved, as well as less rock and materials. Operating costs are also less. Because you’re not dealing with an established ecosystem, it’s not necessary to run the pump 24/7.
The small size of the Pondless Waterfall means you can build and enjoy a beautiful waterfall anywhere in you yard. Taking care of your Pondless Waterfall is easy. Filling the reservoir every few weeks to compensate for water loss because of evaporation is all that’s required.
Perhaps the best part of the Pondless Waterfall is the possibility for the future. If you change your mind later, wishing you’d build a pond, that’s ok! If you leave enough room around the base of the waterfall, it’s easy to add a pond onto a Pondless Waterfall.
A Pondless Waterfall works much like a regular pond. The hole, deeper than a normal pond, is dug then lined with rock and gravel, and filled with water. The water is then circulated from beneath the rocks and gravel by a pump that sits on the bottom, inside a Snorkel™ Vault and Centipede™ Module. A pipe runs from there up to a BioFalls Filter and into an overflowing waterfall, where it falls back into the reservoir. Since the water level never pools above the level of the rock and gravel fill, it give the appearance of a waterfall without a pond, when in fact, the “pond” is there but not visible.
The Pondless Waterfall has made many water-lovers who were previously unable to indulge in the sweet sounds of falling water, very happy. It’s a great alternative for those who are trying to get their feet wet, or looking to fit a little bit of paradise into their own backyard. In other words, when all else fails … go Pondless!
Sponsored
Delaware, OH

Buckeye Basements, Inc.
Central Ohio's Basement Finishing ExpertsBest Of Houzz '13-'21
 Dura Supreme Cabinetry
With an ideal location in the Pacific Heights neighborhood of San Francisco, this dated Victorian residence had "beautiful bones" but had been sitting on the market for a year before being purchased with plans to revitalize the interior. Interior designer, Noel Han, explained, "Historical Victorian homes in this area often have beautiful architectural elements that I aim to preserve, but the floor plan and layout tend to be stuffy, not live-able and not light filled. Modern families want bright, light-filled, spacious rooms that take advantage of outdoor views and living spaces, and function well for storage, meals and entertaining."
Preserving the architectural integrity and special features of the home was one of Han's goals but at the same time, she re-designed the space, moving walls and adding windows to create an open floorplan that flowed easily between the kitchen and outdoor living spaces. Where the range once stood in the original design, now an entire wall of windows provides panoramic views of the outdoors and fills the kitchen with light. Below the windows, Han designed a long bank of base cabinets with drawers to provide plenty of storage and work surface. Light now pours into the space even on foggy days. The range was moved to the opposite wall so that beautiful window views could be added to the kitchen.
Han selected a palette of finishes with an eye toward creating a "soft color aesthetic". "White painted finishes are very popular right now but would have felt stark and cold in this space," she explained. "The French grey paint from Dura Supreme was a perfect complement for this vintage Victorian home, to create a classic color scheme".
"This beautiful home already had hardware elements with a vintage brass finish, so I carefully selected antiqued, brushed brass hardware, plumbing and metal finishes to blend with the original elements," said Han. She continued, "The La Cornue French Range adds modern function with a French antique look."
"I appreciate working with Dura Supreme cabinetry because of the quality of the cabinetry, fast delivery and the custom options. I'm able to create beautiful architectural details like the pull-out columns on both sides of the range and the curved mullion doors on the furniture hutch, and they offer a stunning palette of finishes and styles," explained Han. For the bath cabinetry, Han created a similar palette of finishes and styles to create a complementary look throughout the entire home.
Product Details:
Perimeter: Dura Supreme Cabinetry shown in the St. Augustine door style and Mullion Pattern #15 door style with a “Zinc” painted finish.
Kitchen Island: Dura Supreme Cabinetry shown in the St. Augustine door style with a Clove stain and Black Accent finish on Cherry wood.
For more information about Noel Han, Interior Designer, click to her website here www.atelnoel.com.
For more information about Gilmans Kitchens and Baths, click to their website here www.gkandb.com.
Photography by: Ned Bonzi www.nedbonzi.com.
Request a FREE Dura Supreme Brochure Packet:
http://www.durasupreme.com/request-brochure

 Hearthstone Inc
Richard Herman is in the hospitality business and owns several upscale hotels in Florida and in other states as well as cattle ranches in both Florida and Missouri. Their farm in Ocala is by farm their most unique. The property serves as a 4-H demonstration project for the purpose of children’s education. They have been working with the Academy Prep of St. Pete which is dedicated to inner-city youths that are selected on the basis of need and achievement. Wife Diane spends her time on the farm raising Gypsy Vanners, a diminutive draft horse named after the job they did in Eastern Europe, pulling the wagons (vans) for gypsies that wandered across the continent. On the Ocala farm, there are several mules with a unique profession.
Richard had visited the Hearthstone display at a Log & Timber Home Shows at the Orlando Convention Center many years ago. He was impressed that Hearthstone had stayed in touch with him over the years by mailings, invitations to shows, and periodic phone calls. When the time came to start serious consideration of the design of barn, Hearthstone responded promptly and professionally to Richard and Diane’s requests for information and a review of their ideas for their barn, which would serve as the centerpiece for their new farm.
They wanted a multipurpose facility that could accommodate an educational environment and a large hall suitable for the fundraising events for his charities. Richard wanted a barn that reflected the look and feel of barns built at the dawn of the 20th century. Besides the rustic chicken houses and vegetable gardens, they have completely renovated a 1020’s era farmhouse to be as historically correct as possible and serves as the entry to the farm.
“They very careful to feel us out, get comfortable with our capabilities, and be convinced that we could perform as promised,” said Project Manager John Ricketson of Hearthstone.
Design Process
There were some initial drawings that gave us a start on the basic shape and size of the barn. From there, it was a process of narrowing down the uses of each area and the spans that could be achieved. The barn was going to have the traditional “board & batten” exterior siding and a metal roof. There is a cantilevered ‘hay hood” on the north gable end above the large sliding barn doors that open into the foyer and horse stalls. The wings house a combination of areas, beginning with the large restrooms to accommodate crowds for events. Other parts of the wings have garage areas for the farm vehicles, feed room, tack room, wash rack, storage, offices, and smaller restrooms.
Keeping with the look and feel of the turn of the century, Hearthstone developed a process for giving the timbers a surface texture that mimicked the circular cuts of timbers that had just come out of an old sawmill. This was easier said than done. Randy Giles guided his millwright (Wolfgang) in designing a machine that would do this effectively.
The barn was delivered in October of 2014 and was erected over the course of two weeks, thanks to a hardworking crew (Eric Foster) and near-perfect weather. After the Hearthstone crew completed the erection and roof dry-in, it was time for the local carpenters to step up and install some light conventional framing on the gable ends before applying the roof fascia and exterior board & batten siding. Next came the big sliding barn doors, plumbing, electrical, heating, and cooling. Large rustic fixtures were hung from the great hall roof timbers.
Exterior
The board & batten siding was cypress and allowed to turn color naturally as rain hit it and the sun started working on it with UV rays. This method causes a much grayer look closer to the ground and less so where the roof overhang provides protection. The North end has some large limestone boulders and planters arranged around the pad with tall pampas grass. The planters provide casual seating before events and during outside receptions. The entire area was sodded with lush St. Augustine grass and split rail fences were added to enclose the barn area. The corrugated metal roof was a special order material that immediately rusted after being exposed to moisture. The layer of rust protects the metal from the elements.
Interior
The board & batten theme was carried throughout most of the interior with the timbers left natural to show off the circular saw texture. All of the tongue & groove decking was shipped in advance to allow the local painter to pre-stain it with a dark brown transparent stain that is a beautiful background to the light color Eastern White Pine timbers.
“Everything was unique in this project” said Project Manager John Ricketson. “The setting on a small demonstration farm close to Ocala, the multipurpose design, the circular saw texture on the timbers.”
The Hermans are very proud of their farm’s outcome. Richard sent a note to Randy Giles, owner of Hearthstone: “The Barn is fantastic, not a single problem, period. Next month, we have Jo Dee Messina coming in to help with a fundraiser for a local center for abused kids. Folks love the farm, ...... but that barn gets all of the attention. I would encourage you to use me as a reference for your sales team, feel free to extend my cell phone to any prospective purchasers.”
 O'Hanlon Kitchen & Bath
This kitchen was beautifully transformed into a Modern Rustic masterpiece. We were honored to have a part in the design and installation of the cabinets and countertop as well as being the general contractor for the project. The homeowners, Mr. Scott & Ms. Rauhofer are not new to architecture and home design. Their home had previously won an architectural award for its construction and design.
Mr. Scott & Ms. Rauhofer utilized the expertise of many different artists and contractors on this project. Our designer, Tracy West, worked with them on the design of their new kitchen. They did have a separate contractor who took care of the rough-in work (wall removal, refinishing the floors, electrical, and plumbing) as well as configuring the installation of the unique 3Form Lightbox above the sink.
Julie Gabrielli with Gabrielli Design Studio masterfully designed the above-mentioned lightbox, which was then installed by Baltic Custom Construction (additional contractor). Ken Girardini with Girardini Design artfully designed and constructed many metal artwork pieces to showcase in the space. Ken also beautifully crafted the distinctive cabinet hardware pieces seen throughout.
This stunning kitchen was incredibly well thought out and planned, using the many talents of some local artists and craftsmen to truly showcase what is possible to create a beautiful space within the home.
New Cabs: DeWils Blanco Supermatte Luxe
Countertop: Cambria Warm Britannica with Waterfall island
Hardware: Ken Girardini with Girardini Design
Backsplash: customer supplied
Sink: Kraus KHU32
Stove: Miele 48” Rangetop with Grill Model: KMR 1355 G / KMR 1355 LP
Stove Hood: Miele Décor Island Ventilation Hood DA 424V-6
Refrigerator: Subzero
Convection Oven: Miele ContourLine 30” H 6780 BP
Dishwasher: Miele EcoFlex Series
Microwave: Miele PureLine 24” Microwave Oven M 6260 TC
Cabinet accessories by Dewils and Fineline accessories in the drawers.
Lightbox Info- https://www.3-form.com/collaborate/light_design/
Tracy West
Kitchen Designer
O’Hanlon Kitchens, Inc.
47 Loveton Circle, Ste. D
Sparks, MD 21152
443-285-0558
717-755-5555
www.OKitchens.com
Melanie Sammons
Project Coordinator
O’Hanlon Kitchens, Inc.
47 Loveton Circle, Ste. D
Sparks, MD 21152
443-285-0558
717-755-5555
www.OKitchens.com
Baltic Custom Construction, Inc.
8 Havenfield Dr, Parkville, MD 21234
410-375-1283
Ken Girardini
keng@girardinidesign.com
927 Buckhorn Rd
Sykesville, MD. 21784
410-549-3499
Julie E Gabrielli, NCARB, LEED AP
Gabrielli Design Studio, LLC
2224 Crest Rd
Baltimore, MD 21209
julie@gabriellidesign.com
410-530-0389
www.gabriellidesign.com
blog: juliegabrielli com
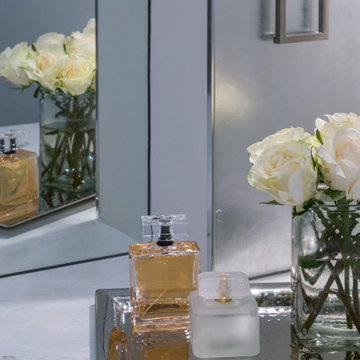 Drury Design
THE SETUP
This client lives in a great high-rise condo in downtown Chicago. Alicia has already remodeled a few areas of her home, including her kitchen and home office. The bathroom is one of the last big places the client wanted to update. The existing bathroom had a large, outdated whirlpool tub in the corner. It was a darker space that had a lack of natural light. There are no windows (due to the bathroom’s location within the high-rise building). So, the idea was to brighten up the space and give the client an updated, elegant primary bathroom that is more her style and tailor-made for her routines.
Design Objectives:
- Make the space brighter.
- Create different daily routine stations to maximize functionality while keeping things clutter-free – a makeup station, a blow-dry station, and a sink-needs station.
- Achieve the client’s specific style and function needs while also keeping the look and design open to future possibilities: different users of the space/resale clients.
Design Challenges:
- Toilet cannot be moved. (In a high-rise, you can’t really move plumbing around too much when reimagining a space)
- Existing bathroom had a soffit that hid a lot of electrical wiring, so completely removing the soffit wasn’t an option.
- The blow-dry station needs to accommodate the client’s preference for standing up.
- Finding a place for the make-up station, which the client wants oriented for sitting.
- Create storage within the shower that can eliminate the clutter of personal care products that are actually needed every day. Do this, while keeping the client’s favorite things about the existing shower: the shower bench, a tub filler faucet (for rinsing shaving cream when shaving legs) and a low niche for placing her foot when shaving her legs.
THE RENEWED SPACE
Design Solutions:
- Extended a bit of wall near the toilet to give the commode its own area within the space, but without closing it off into a claustrophobic WC.
- Worked within the reality of the existing soffit situation, reshaping it to align with the new shower. Can lights were also added. Installed a beautiful ceiling light fixture that works within the new soffit shape, commanding attention and adding light, as if the sofit shape was chosen for it.
- Created a nice, furniture-looking 42”-high cabinet with pullout drawers to be the blow-dry station, complete with a mirror and a nice top. The pullout drawers are all powered, concealing a Dyson dryer and curling iron (and all the accoutrements) while keeping them plugged in, which is ideal for easy usage and put away. A stylish mirror on the wall above the cabinet, and proper lighting, make this the perfect blow-dry station. The top has a grommet that can accommodate a power cord should the client ever want to have a powered device on top of the cabinet.
- Put the sit-down makeup station where the tub used to be, putting the mirror back into a new recessed wall just a bit, allowing the area to have more room.
- Created a niche in the shower’s inner wall so that you can’t see it unless you are literally inside the shower. At the client’s request, it also has a hook so she can hang her loofa. Hiding the utility niche in this way allowed us to use the full main wall of the shower as a canvas for a beautiful accent stripe of raised decorative tile. The new shower has her old favorites, too: the tub filler, foot niche and bench.
Alicia’s client loves her new primary bathroom, especially the blow dry area. It is very accommodating for her, as a tall lady, while being very easy to use. The drawers store everything. Being powered, they make using already-plugged in appliances very easy to use and put away.
Her previous makeup station was a freestanding vanity with a single drawer, so beauty products were all over the surface top. With her new makeup station, everything is nicely tucked away and organized in drawers.
The new lighting is fantastic and the colors are light and soft. The clients loves the overall look and feel of her new bathroom and raves about how well the functionality-minded design makes her morning routine – and her life – easier and enjoyable!
Sponsored
Columbus, OH
Free consultation for landscape design!

Peabody Landscape Group
Columbus' Reliable Landscape Design & Contracting
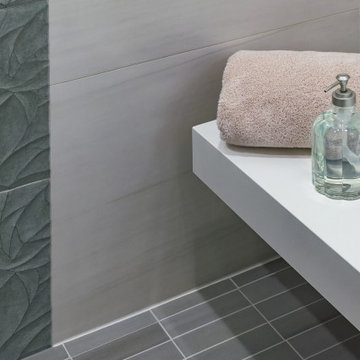 Drury Design
THE SETUP
This client lives in a great high-rise condo in downtown Chicago. Alicia has already remodeled a few areas of her home, including her kitchen and home office. The bathroom is one of the last big places the client wanted to update. The existing bathroom had a large, outdated whirlpool tub in the corner. It was a darker space that had a lack of natural light. There are no windows (due to the bathroom’s location within the high-rise building). So, the idea was to brighten up the space and give the client an updated, elegant primary bathroom that is more her style and tailor-made for her routines.
Design Objectives:
- Make the space brighter.
- Create different daily routine stations to maximize functionality while keeping things clutter-free – a makeup station, a blow-dry station, and a sink-needs station.
- Achieve the client’s specific style and function needs while also keeping the look and design open to future possibilities: different users of the space/resale clients.
Design Challenges:
- Toilet cannot be moved. (In a high-rise, you can’t really move plumbing around too much when reimagining a space)
- Existing bathroom had a soffit that hid a lot of electrical wiring, so completely removing the soffit wasn’t an option.
- The blow-dry station needs to accommodate the client’s preference for standing up.
- Finding a place for the make-up station, which the client wants oriented for sitting.
- Create storage within the shower that can eliminate the clutter of personal care products that are actually needed every day. Do this, while keeping the client’s favorite things about the existing shower: the shower bench, a tub filler faucet (for rinsing shaving cream when shaving legs) and a low niche for placing her foot when shaving her legs.
THE RENEWED SPACE
Design Solutions:
- Extended a bit of wall near the toilet to give the commode its own area within the space, but without closing it off into a claustrophobic WC.
- Worked within the reality of the existing soffit situation, reshaping it to align with the new shower. Can lights were also added. Installed a beautiful ceiling light fixture that works within the new soffit shape, commanding attention and adding light, as if the sofit shape was chosen for it.
- Created a nice, furniture-looking 42”-high cabinet with pullout drawers to be the blow-dry station, complete with a mirror and a nice top. The pullout drawers are all powered, concealing a Dyson dryer and curling iron (and all the accoutrements) while keeping them plugged in, which is ideal for easy usage and put away. A stylish mirror on the wall above the cabinet, and proper lighting, make this the perfect blow-dry station. The top has a grommet that can accommodate a power cord should the client ever want to have a powered device on top of the cabinet.
- Put the sit-down makeup station where the tub used to be, putting the mirror back into a new recessed wall just a bit, allowing the area to have more room.
- Created a niche in the shower’s inner wall so that you can’t see it unless you are literally inside the shower. At the client’s request, it also has a hook so she can hang her loofa. Hiding the utility niche in this way allowed us to use the full main wall of the shower as a canvas for a beautiful accent stripe of raised decorative tile. The new shower has her old favorites, too: the tub filler, foot niche and bench.
Alicia’s client loves her new primary bathroom, especially the blow dry area. It is very accommodating for her, as a tall lady, while being very easy to use. The drawers store everything. Being powered, they make using already-plugged in appliances very easy to use and put away.
Her previous makeup station was a freestanding vanity with a single drawer, so beauty products were all over the surface top. With her new makeup station, everything is nicely tucked away and organized in drawers.
The new lighting is fantastic and the colors are light and soft. The clients loves the overall look and feel of her new bathroom and raves about how well the functionality-minded design makes her morning routine – and her life – easier and enjoyable!
 O'Hanlon Kitchen & Bath
This kitchen was beautifully transformed into a Modern Rustic masterpiece. We were honored to have a part in the design and installation of the cabinets and countertop as well as being the general contractor for the project. The homeowners, Mr. Scott & Ms. Rauhofer are not new to architecture and home design. Their home had previously won an architectural award for its construction and design.
Mr. Scott & Ms. Rauhofer utilized the expertise of many different artists and contractors on this project. Our designer, Tracy West, worked with them on the design of their new kitchen. They did have a separate contractor who took care of the rough-in work (wall removal, refinishing the floors, electrical, and plumbing) as well as configuring the installation of the unique 3Form Lightbox above the sink.
Julie Gabrielli with Gabrielli Design Studio masterfully designed the above-mentioned lightbox, which was then installed by Baltic Custom Construction (additional contractor). Ken Girardini with Girardini Design artfully designed and constructed many metal artwork pieces to showcase in the space. Ken also beautifully crafted the distinctive cabinet hardware pieces seen throughout.
This stunning kitchen was incredibly well thought out and planned, using the many talents of some local artists and craftsmen to truly showcase what is possible to create a beautiful space within the home.
New Cabs: DeWils Blanco Supermatte Luxe
Countertop: Cambria Warm Britannica with Waterfall island
Hardware: Ken Girardini with Girardini Design
Backsplash: customer supplied
Sink: Kraus KHU32
Stove: Miele 48” Rangetop with Grill Model: KMR 1355 G / KMR 1355 LP
Stove Hood: Miele Décor Island Ventilation Hood DA 424V-6
Refrigerator: Subzero
Convection Oven: Miele ContourLine 30” H 6780 BP
Dishwasher: Miele EcoFlex Series
Microwave: Miele PureLine 24” Microwave Oven M 6260 TC
Cabinet accessories by Dewils and Fineline accessories in the drawers.
Lightbox Info- https://www.3-form.com/collaborate/light_design/
Tracy West
Kitchen Designer
O’Hanlon Kitchens, Inc.
47 Loveton Circle, Ste. D
Sparks, MD 21152
443-285-0558
717-755-5555
www.OKitchens.com
Melanie Sammons
Project Coordinator
O’Hanlon Kitchens, Inc.
47 Loveton Circle, Ste. D
Sparks, MD 21152
443-285-0558
717-755-5555
www.OKitchens.com
Baltic Custom Construction, Inc.
8 Havenfield Dr, Parkville, MD 21234
410-375-1283
Ken Girardini
keng@girardinidesign.com
927 Buckhorn Rd
Sykesville, MD. 21784
410-549-3499
Julie E Gabrielli, NCARB, LEED AP
Gabrielli Design Studio, LLC
2224 Crest Rd
Baltimore, MD 21209
julie@gabriellidesign.com
410-530-0389
www.gabriellidesign.com
blog: juliegabrielli com
 O'Hanlon Kitchen & Bath
This kitchen was beautifully transformed into a Modern Rustic masterpiece. We were honored to have a part in the design and installation of the cabinets and countertop as well as being the general contractor for the project. The homeowners, Mr. Scott & Ms. Rauhofer are not new to architecture and home design. Their home had previously won an architectural award for its construction and design.
Mr. Scott & Ms. Rauhofer utilized the expertise of many different artists and contractors on this project. Our designer, Tracy West, worked with them on the design of their new kitchen. They did have a separate contractor who took care of the rough-in work (wall removal, refinishing the floors, electrical, and plumbing) as well as configuring the installation of the unique 3Form Lightbox above the sink.
Julie Gabrielli with Gabrielli Design Studio masterfully designed the above-mentioned lightbox, which was then installed by Baltic Custom Construction (additional contractor). Ken Girardini with Girardini Design artfully designed and constructed many metal artwork pieces to showcase in the space. Ken also beautifully crafted the distinctive cabinet hardware pieces seen throughout.
This stunning kitchen was incredibly well thought out and planned, using the many talents of some local artists and craftsmen to truly showcase what is possible to create a beautiful space within the home.
New Cabs: DeWils Blanco Supermatte Luxe
Countertop: Cambria Warm Britannica with Waterfall island
Hardware: Ken Girardini with Girardini Design
Backsplash: customer supplied
Sink: Kraus KHU32
Stove: Miele 48” Rangetop with Grill Model: KMR 1355 G / KMR 1355 LP
Stove Hood: Miele Décor Island Ventilation Hood DA 424V-6
Refrigerator: Subzero
Convection Oven: Miele ContourLine 30” H 6780 BP
Dishwasher: Miele EcoFlex Series
Microwave: Miele PureLine 24” Microwave Oven M 6260 TC
Cabinet accessories by Dewils and Fineline accessories in the drawers.
Lightbox Info- https://www.3-form.com/collaborate/light_design/
Tracy West
Kitchen Designer
O’Hanlon Kitchens, Inc.
47 Loveton Circle, Ste. D
Sparks, MD 21152
443-285-0558
717-755-5555
www.OKitchens.com
Melanie Sammons
Project Coordinator
O’Hanlon Kitchens, Inc.
47 Loveton Circle, Ste. D
Sparks, MD 21152
443-285-0558
717-755-5555
www.OKitchens.com
Baltic Custom Construction, Inc.
8 Havenfield Dr, Parkville, MD 21234
410-375-1283
Ken Girardini
keng@girardinidesign.com
927 Buckhorn Rd
Sykesville, MD. 21784
410-549-3499
Julie E Gabrielli, NCARB, LEED AP
Gabrielli Design Studio, LLC
2224 Crest Rd
Baltimore, MD 21209
julie@gabriellidesign.com
410-530-0389
www.gabriellidesign.com
blog: juliegabrielli com
126