
Search results for "Bonus start up" in Home Design Ideas
 Alair Homes Plano
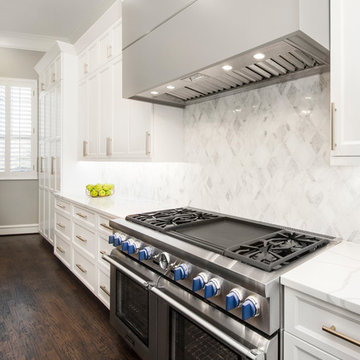
Our clients came to us wanting to update and open up their kitchen, breakfast nook, wet bar, and den. They wanted a cleaner look without clutter but didn’t want to go with an all-white kitchen, fearing it’s too trendy. Their kitchen was not utilized well and was not aesthetically appealing; it was very ornate and dark. The cooktop was too far back in the kitchen towards the butler’s pantry, making it awkward when cooking, so they knew they wanted that moved. The rest was left up to our designer to overcome these obstacles and give them their dream kitchen.
We gutted the kitchen cabinets, including the built-in china cabinet and all finishes. The pony wall that once separated the kitchen from the den (and also housed the sink, dishwasher, and ice maker) was removed, and those appliances were relocated to the new large island, which had a ton of storage and a 15” overhang for bar seating. Beautiful aged brass Quebec 6-light pendants were hung above the island.
All cabinets were replaced and drawers were designed to maximize storage. The Eclipse “Greensboro” cabinetry was painted gray with satin brass Emtek Mod Hex “Urban Modern” pulls. A large banquet seating area was added where the stand-alone kitchen table once sat. The main wall was covered with 20x20 white Golwoo tile. The backsplash in the kitchen and the banquette accent tile was a contemporary coordinating Tempesta Neve polished Wheaton mosaic marble.
In the wet bar, they wanted to completely gut and replace everything! The overhang was useless and it was closed off with a large bar that they wanted to be opened up, so we leveled out the ceilings and filled in the original doorway into the bar in order for the flow into the kitchen and living room more natural. We gutted all cabinets, plumbing, appliances, light fixtures, and the pass-through pony wall. A beautiful backsplash was installed using Nova Hex Graphite ceramic mosaic 5x5 tile. A 15” overhang was added at the counter for bar seating.
In the den, they hated the brick fireplace and wanted a less rustic look. The original mantel was very bulky and dark, whereas they preferred a more rectangular firebox opening, if possible. We removed the fireplace and surrounding hearth, brick, and trim, as well as the built-in cabinets. The new fireplace was flush with the wall and surrounded with Tempesta Neve Polished Marble 8x20 installed in a Herringbone pattern. The TV was hung above the fireplace and floating shelves were added to the surrounding walls for photographs and artwork.
They wanted to completely gut and replace everything in the powder bath, so we started by adding blocking in the wall for the new floating cabinet and a white vessel sink. Black Boardwalk Charcoal Hex Porcelain mosaic 2x2 tile was used on the bathroom floor; coordinating with a contemporary “Cleopatra Silver Amalfi” black glass 2x4 mosaic wall tile. Two Schoolhouse Electric “Isaac” short arm brass sconces were added above the aged brass metal framed hexagon mirror. The countertops used in here, as well as the kitchen and bar, were Elements quartz “White Lightning.” We refinished all existing wood floors downstairs with hand scraped with the grain. Our clients absolutely love their new space with its ease of organization and functionality.
 Change Your Bathroom©
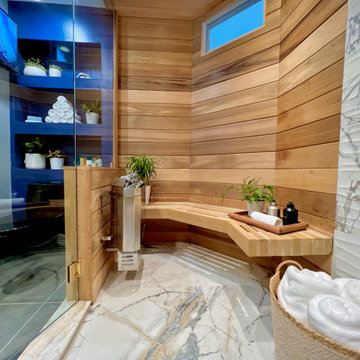
This transformation started with a builder grade bathroom and was expanded into a sauna wet room. With cedar walls and ceiling and a custom cedar bench, the sauna heats the space for a relaxing dry heat experience. The goal of this space was to create a sauna in the secondary bathroom and be as efficient as possible with the space. This bathroom transformed from a standard secondary bathroom to a ergonomic spa without impacting the functionality of the bedroom.
This project was super fun, we were working inside of a guest bedroom, to create a functional, yet expansive bathroom. We started with a standard bathroom layout and by building out into the large guest bedroom that was used as an office, we were able to create enough square footage in the bathroom without detracting from the bedroom aesthetics or function. We worked with the client on her specific requests and put all of the materials into a 3D design to visualize the new space.
Houzz Write Up: https://www.houzz.com/magazine/bathroom-of-the-week-stylish-spa-retreat-with-a-real-sauna-stsetivw-vs~168139419
The layout of the bathroom needed to change to incorporate the larger wet room/sauna. By expanding the room slightly it gave us the needed space to relocate the toilet, the vanity and the entrance to the bathroom allowing for the wet room to have the full length of the new space.
This bathroom includes a cedar sauna room that is incorporated inside of the shower, the custom cedar bench follows the curvature of the room's new layout and a window was added to allow the natural sunlight to come in from the bedroom. The aromatic properties of the cedar are delightful whether it's being used with the dry sauna heat and also when the shower is steaming the space. In the shower are matching porcelain, marble-look tiles, with architectural texture on the shower walls contrasting with the warm, smooth cedar boards. Also, by increasing the depth of the toilet wall, we were able to create useful towel storage without detracting from the room significantly.
This entire project and client was a joy to work with.

 Classic Installations
We are electrical contractors. We do back-up power installations and full off-grid installations
We do the installation of petrol or diesel generators, with automatic or manual change over switches. We install inverters with battery banks (12 Volt | 24 Volt | 48 Volt) and (photovoltaic) solar panels with charge controllers.
We do the installation of manual or automatic change-over switches for switching between Eskom power and generator power during power failures | load shedding.
We service the Greater Johannesburg area, including Sandton, Roodepoort, Randburg and surrounding areas.
For more information, please contact us.
Contact: Tom le Grange
Cell Phone / WhatsApp: 084 502 4164
Email: legrange.tom@gmail.com
Find the right local pro for your project
 Tile Doctor Ltd
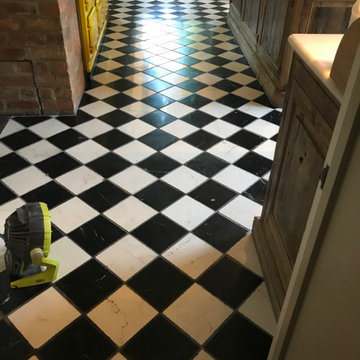
The tiles shown in the photographs below are classic distressed Black and White Italian Marble installed in the kitchen of a property in Bamber Bridge which is South of Preston. Some of the tiles had an issue with loose grout which I suspect was due to the suspended wooden floor and a small amount of movement had resulted in the grout cracking.
Ideally more support would be needed under the floor to prevent this, in the meantime however I recommended removing the grout and replacing with a flexible grout product that could cope with the movement. The tiles also needed a clean, polish and reseal so it made sense to address the issue with the grout as part of the work.
Working as a two-man team we started by cleaning the floor with a set of diamond burnishing pads starting with a coarse 400-grit, followed by 800 and 1500 grit. Water was used to lubricate the process and the floor was rinsed with water between pads with the fine slurry generated by the process extracted using a wet vacuum. These pads remove ingrained dirt and then slowly refine the appearance of the Marble building up its polished appearance in the process.
The next step was to rake out all the grout which as discussed was compromised and needed replacing. We had to be very careful when removing the grout due to the electric heating mat under the floor, any damage to that would require ripping the floor up. With the old grout removed and the floor cleaned the floor was then grouted using Mapei Ultra-colour which is a flexible and fully waterproof grout more than suitable for this situation.
Between us we managed to pack a lot into day one which was tough, however with the hardest tasks out of the way day two should be a lot easier.
Day two started with an initial clean making sure to remove any excess grout smeared on the surface that can affect the look of the tile if not removed. This was followed by the application of the last of the set of burnishing pads which is a 3,000-grit pad that really brings up the polish on the marble. You only need a small amount of water sprayed onto the floor when applying this last pad so by late morning the floor was dry and ready for sealing. The customer wanted a better sheen appearance than they previously had, fortunately we find the Diamond burnishing pads do this well, they also tighten up the pores of the stone as well which means less sealer is needed.
The floor was then sealed with Tile Doctor Colour Grow which is an impregnating sealer that improves colour and soaks into the stone occupying the pores and thereby preventing dirt from becoming ingrained. Once complete the floor looked great and the client was very happy.
Sealers and Polish do wear down with use over time so before leaving I discussed our annual maintenance plan option which will ensure the appearance of the Marble floor always looks good. The plan involves returning once a year to further polish the floor with a high-grade burnishing pad and to add more sealer if required. We also discussed the use of Tile Doctor Stone Soap for regular cleaning, it is a pH neutral cleaner which is ideal for stone floors like Marble which are acid sensitive.
Russell Taylor
Lancashire Tile Doctor
 Tile Doctor Ltd
This customer from the historic city of Cardiff was keen to see what Tile Doctor could do to put some life back into their treasured Limestone kitchen floor that was laid in 2008. My first observations were mainly centred on the horrific condition of the surface which although adequately sealed initially the floor had not received any subsequent maintenance and its condition had deteriorated over time. The light shining in from the patio doors highlighted all the imperfections in the floor caused by surface wear and tear commonly seen in high traffic areas such as a kitchen.
Upon closer inspection, there were further problems: the floor was stained and scuffed, and in most places the sealer had worn off completely allowing the dirt to become ingrained into the pores of the Limestone. Additionally the grout was recessed but was now flush with the tile surface due to dirt build-up. There were also areas contaminated with grease and kitchen cooking oil.
The Limestone floor tiles were 20mm thick French Limestone, and had been laid very well so there was no requirement to do any tile or grout repairs however to get this floor back to its original condition the surface would need to be reconditioned using the Tile Doctor four stage burnishing system.
I started by giving the floor a wash with a medium dilution of Tile Doctor Pro-Clean, focusing mainly on the grout lines in order to remove the muck that had built-up there. I used a special stiff grout brush for this activity; it’s quite narrow and ideal for grout scrubbing.
This worked well, but the significant build-up of dirt along some of the grout lines meant more work was required. I tackled this problem with a hand scraper assisted with steam. At the end of this process, the whole floor was then rinsed down with water to remove any soil and the resulting slurry was then extracted using a wet vacuum.
The next step was to start the burnishing process, which basically involves applying four diamond encrusted floor pads in sequence over the floor. Each pad is a different grade, starting with the most abrasive coarse pad and moving through to the finer grades using a little water to lubricate and rinsing away any slurry between each pad.
I eventually finished with the extra fine pad which builds up shine and lustre on the tile; it had taken two days to clean the grout and burnish the Limestone but the floor was much improved and so after a final rinse down I left the floor to dry off overnight with the aid of the underfloor heating.
During this time, I also addressed the stained Limestone in the area of the kitchen where the dustbin was situated. This had been a major upset for the customer and I’m happy to report I managed to deal with it. However, it was quite an involved process, so I’ll write about this in a separate post.
On the third day I came back to seal the floor, checking first that it had dried sufficiently with a damp meter. Fortunately, the underfloor heating had done a great job of drying the stone and I was able to seal the floor using three coats of Tile Doctor Colour Grow sealant. This sealant not only provides a durable seal but also penetrates deep into the pores of the stone protecting it from within and enhancing the natural colours of the Limestone in the process.
After the final layer of sealant, I worked over the floor again with the extra fine burnishing pad both to add shine again following sealing, and to ensure that no smear marks were visible as the lighting conditions were unforgiving and highlighted any imperfections.
The customer was delighted with the results: so much so, in fact, that they booked me in to restore their Victorian hallway floor as well but that’s a story for another time!
Julian Iancono
SE Wales Tile Doctor
 Tile Doctor Ltd
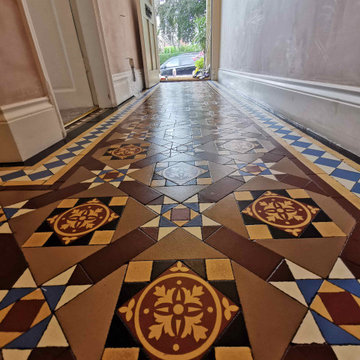
A young couple recently bought a house in Barnsley and were renovating it from top to bottom, included in the plan was the desire to have the previously unloved Victorian floor made beautiful again. The house stands in an area of Barnsley famous for its’ big Victorian villas and quite rightly they felt it was important to ensure period features like this original floor were correctly maintained.
Due to the floor being covered up for many years the floor had developed damp staining, it also had a lot of paint splattered on it. There were also some loose tiles that needed fixing back in place and the layer of old floor polish was present which would need removing.
I started by protecting all the skirting boards, doors and carpets bordering the tiles from splashing. The loose tiles were then cleaned up and then secured back in place using a fast-setting adhesive.
Once the adhesive was set, I turned my attention to stripping and cleaning the floor starting with the application of a coarse 200-grit diamond pad fitted to a weighted rotary buffing machine. The pad was lubricated using a dilution of Tile Doctor Remove & Go which was applied to small sections of the floor and left to soak in for ten minutes first. I run the buffing machine at a slow speed to minimise splashing. Remove & Go is amazing at removing old floor coatings (i.e. sealers), dirt and grime from the floor. When the diamond pad had been used on each section of the floor for five minutes the slurry was vacuumed up using a wet vac machine and I moved onto the next section. Once the whole floor had been cleaned in this way it was time to start the next step.
Old floors like this which don’t have the benefit of a damp proof membrane, and have been covered up for a long time, can suffer from efflorescence issues due to moisture being trapped in the tile. This will result in white salt staining appearing on the tiles for days, weeks and sometimes months afterwards. To counter this the alkaline salts are neutralised by giving the floor an acid rinse using Tile Doctor Acid Gel and leaving it to dwell for five minutes before going over the floor again with the coarse diamond pad. The slurry was again removed with a wet vacuum and the floor was scrubbed clean with damp cloths.
I returned a few days later once the floor had dried to seal the floor. The client wanted a satin finish so knowing the floor had damp and efflorescence issues I opted for Tile Doctor Seal and Go Extra. This is a topical sealer which leaves a lovely satin finish but also allows for the floor to breathe. six coats were required to make the floor look perfect, allowing the lovely colours to come through.
Once complete the floor looked much brighter and the colours really shone through. The owners were really happy with the renovation we carried out and before leaving I took time to discuss how best to maintain the tiles going forward including the use of Neutral Tile cleaner.
Matthew Lovett
South Yorkshire Tile Doctor
 Tile Doctor Ltd
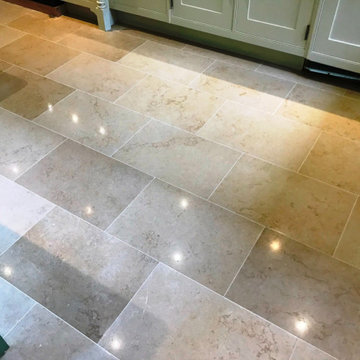
The owner of this recently purchased property in the Berkshire village of Twyford had inherited a Jerusalem limestone floor that had been installed throughout the ground floor including the Kitchen. The previous owner hadn’t maintained the stone floor very well and as a result it had become dull, patchy and the new owner was finding it impossible to keep clean. The floor was becoming a problem for them and they had been considering ripping it all up and getting it replaced. However due to the size of the floor and potential cost of replacing it they searched for other solutions and contacted Tile Doctor to see if it could be renovated.
I scheduled an appointment with the owners to survey the floor and it wasn’t long before I realised that we could achieve a great result by polishing the Limestone using a set of diamond burnishing pads. To prove how well I thought the floor would clean up I offered to complete a demo within the small utility room. This was arranged and completed a week later, as I expected once I had finished the demo the floor looked fantastic, more importantly the client was ecstatic with the results and couldn’t wait to book us in to complete the rest of the house.
It was a large floor so I estimated the process would take 4-5 days to complete and would need to work in sections starting with the kitchen then progressing into the study and cloakroom, dining room and finishing off with the entrance hall. Thankfully I had an empty house to work in which helped as I could start sealing the area I worked on the prior day.
The limestone had become quite pitted in the high traffic area, these pits had filled up with soil and become unsightly. My first task was to deep clean the dirt filled pits and grout, to do this I used a strong dilution of Tile Doctor Pro Clean and a stiff nylon brush making sure I could get into the pits releasing the dirt, then vacuuming up all the chemical slurry as I went along.
The next task was to fill these pits I used a two-part epoxy filler that matched the colour of the stone. Once the filler had dried, I worked through the hand burnishing blocks from 100 grit to 400 and I smoothed out the areas that had been filled.
Now the holes/pits had been filled I continued with the restoration of the floor by moving onto the burnishing process using diamond encrusted floor burnishing pads. This involves honing the Limestone with a set of burnishing pads starting at 400-grit. The pads are applied to the floor with a heavy floor buffing machine using water to lubricate the process. The pad is run over each tile around three times and the fine slurry this process generates is rinsed off afterwards with water and then extracted with a wet vacuum. You then move onto the 800-grit and then 1500-grit slowly building back the appearance of the stone.
As I had worked in sections/rooms at a time I was able to allow a full day drying time before sealing. Happy with the depth of colour from the pad system I opted to seal the floor with two coats of Tile Doctor Ultra-Seal. I had a range of sealers to choose from an in this case I felt Ultra-Seal would be most suited as it doesn’t change the natural appearance of the Limestone yet will provide years of protection and make it much easier to keep clean.
The owners were over the moon with how the limestone now looked and relieved that their problem floor had been restored. For aftercare cleaning I recommended Tile Doctor Stone Soap which is designed for maintaining the patina on polished stone floors.
Dennis Buckland
Berkshire Tile Doctor
Sponsored
Columbus, OH
Free consultation for landscape design!

Peabody Landscape Group
Franklin County's Reliable Landscape Design & Contracting
 Classic Installations
We are electrical contractors. We do back-up power installations and full off-grid installations
We do the installation of petrol or diesel generators, with automatic or manual change over switches. We install inverters with battery banks (12 Volt | 24 Volt | 48 Volt) and (photovoltaic) solar panels with charge controllers.
We do the installation of manual or automatic change-over switches for switching between Eskom power and generator power during power failures | load shedding.
We service the Greater Johannesburg area, including Sandton, Roodepoort, Randburg and surrounding areas.
For more information, please contact us.
Contact: Tom le Grange
Cell Phone / WhatsApp: 084 502 4164
Email: legrange.tom@gmail.com
 Classic Installations
We are electrical contractors. We do back-up power installations and full off-grid installations
We do the installation of petrol or diesel generators, with automatic or manual change over switches. We install inverters with battery banks (12 Volt | 24 Volt | 48 Volt) and (photovoltaic) solar panels with charge controllers.
We do the installation of manual or automatic change-over switches for switching between Eskom power and generator power during power failures | load shedding.
We service the Greater Johannesburg area, including Sandton, Roodepoort, Randburg and surrounding areas.
For more information, please contact us.
Contact: Tom le Grange
Cell Phone / WhatsApp: 084 502 4164
Email: legrange.tom@gmail.com
 Save home
Kitchen trends may come and go, but some classic choices are forever. Take antique white kitchen cabinets for instance.
White kitchen cabinets have ruled the mainstream decor for several years, and continue to do so. They not only blend seamlessly with just about any kitchen space but dramatically uplifts the ambiance with the furniture and accessories.
Antique white kitchen cabinets represent a restricted yet unique color palette. In other words, it can be considered a neutral binding color point for all the other elements like countertops, floorings, and fixtures. Besides, it serves as a great backdrop for any shades that one might pick for a semi-classic or completely modern kitchen.
Contrary to what many would like to believe, antique white kitchen cabinets are never boring, especially, if you know your way of working around it. In fact, quite the reverse, as white shaker cabinets make for a perfect pair to inclusions like marble countertops and interlocked wooden tiles.
No matter what, white kitchen cabinets bring forth the very best of depth and dimension in equal measure. If you have been planning to design your culinary space with antique white kitchen cabinets, this guide can be your first cue.
Here’s a look at 10 master tips to design a kitchen using white cabinets.
Embracing the Rustic Charm
Do you fancy a rustic styled kitchen space?
White kitchen cabinets can be paired alongside open shelves that are a picturesque setting, reminiscent of the French flea market. To add essence to the scene, opt for brick flooring connecting the space to an adjoining terrace looking over a sea or any water body.
The Eternal Black Accent
Many homeowners envision a cozy kitchen space to unwind themselves, cooking their favorite meal.
Antique white kitchen cabinets when matched with black accents readily impart a warm and inviting aura to the whole space. To spice up things, you might introduce a steel countertop and nickel made cookware.
The Old-World Bliss
Antique white cabinets are easily differentiated from others in the row owing to its classical trims and muted scrolls. When looking to create an old-world kitchen, white cabinets work fine with brass detailing on doorknobs and cabinet handles. Upholstered stools for counters, deviated barrage drawers, heavy kitchen sinks, mosaic tiles, and grey backsplashes can be other inclusions.
The Scullery Styled Kitchen
Antique white kitchen cabinets are rather an accessory of convenience for a culinary space, that also doubles up as a scullery.
Typically, such a structure is often deprived of broad daylight. Thus, it becomes more important to get the lighting done right. Start with overhead lamps or use LED light strips right under the cabinet or across the shelves overhead. With antique white kitchen cabinets, the setting of a scullery is per-designed to excel by all means. You might as well choose to include brass details, paired alongside the soapstone counters, further complemented by suspended shelves.
For the Country Hearted
Birdcage chairs placed around a pine casted table, with pendant lamps hanging above does throw in some serious country vibes. Tell you what, antique white kitchen cabinets
are seemingly the first choice for any country-inspired kitchen space. Add a few open shelves and a pair of garlands for the kitchen windows, and you are good to go!
Character Building
When it comes to designing a living space, character-building contrasts are a good way to add uncanny charm and appeal.
White shaker cabinets are a perfect choice to create a lovely nautical atmosphere paired with the right set of elements; furniture and fixtures.
Start by pairing your white cabinets with a simple toned down hemlock kitchen island. To add a dash of an urban feel, introduce counter stools in lilac.
If your budget prevails, you might as well take your designing game up a notch with a banquette type seating arrangement, using a combination of leather and acrylic fabric.
Picking Your Granite
Picking on the granite style for your antique white kitchen cabinets
can be a tad tricky.
Always aim to work with granite and glaze that are of the same color. Look for variation across granite offerings to add a little bit of jazz to your otherwise worldly setting.
While buying from the store, always ask for a sample to take back home and view it under varying light conditions.
Of Balance and Symmetry
If you have a U-shaped kitchen, it is necessary to pay close attention to details.
To avoid a mismatch, you will need to keep it toned down to one theme which would have the antique white cabinets in between and trickle-down further to the stovetops, plate trails, and open shelves.
Tile Floorings in Muted Colors
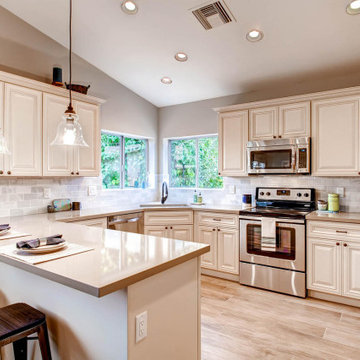
When designing a kitchen space with white cabinets, glass displays are usually a preferred choice. For such a setting, it is recommended that you stick to using flooring tiles in light colors. Beige and light grey are quite a popular choice.
Dine-in Style
Antique white kitchen cabinets can be used to bring the very best out of a dine-in style kitchen. Start by pairing the cabinets with a refectory table, preferably one that mimics the 19th-century furniture style.
Throw in a couple of bamboo-casted chairs with plank floorings to render an easy-going, modern, and functional vibe.
Wrap up
Hands down, antique white kitchen cabinets are the perfect pick for just about any style kitchen. Now that you have great insight into designing your culinary space, it's time to put things into action!
White kitchen cabinets have ruled the mainstream decor for several years, and continue to do so. They not only blend seamlessly with just about any kitchen space but dramatically uplifts the ambiance with the furniture and accessories.
Antique white kitchen cabinets represent a restricted yet unique color palette. In other words, it can be considered a neutral binding color point for all the other elements like countertops, floorings, and fixtures. Besides, it serves as a great backdrop for any shades that one might pick for a semi-classic or completely modern kitchen.
Contrary to what many would like to believe, antique white kitchen cabinets are never boring, especially, if you know your way of working around it. In fact, quite the reverse, as white shaker cabinets make for a perfect pair to inclusions like marble countertops and interlocked wooden tiles.
No matter what, white kitchen cabinets bring forth the very best of depth and dimension in equal measure. If you have been planning to design your culinary space with antique white kitchen cabinets, this guide can be your first cue.
Here’s a look at 10 master tips to design a kitchen using white cabinets.
Embracing the Rustic Charm
Do you fancy a rustic styled kitchen space?
White kitchen cabinets can be paired alongside open shelves that are a picturesque setting, reminiscent of the French flea market. To add essence to the scene, opt for brick flooring connecting the space to an adjoining terrace looking over a sea or any water body.
The Eternal Black Accent
Many homeowners envision a cozy kitchen space to unwind themselves, cooking their favorite meal.
Antique white kitchen cabinets when matched with black accents readily impart a warm and inviting aura to the whole space. To spice up things, you might introduce a steel countertop and nickel made cookware.
The Old-World Bliss
Antique white cabinets are easily differentiated from others in the row owing to its classical trims and muted scrolls. When looking to create an old-world kitchen, white cabinets work fine with brass detailing on doorknobs and cabinet handles. Upholstered stools for counters, deviated barrage drawers, heavy kitchen sinks, mosaic tiles, and grey backsplashes can be other inclusions.
The Scullery Styled Kitchen
Antique white kitchen cabinets are rather an accessory of convenience for a culinary space, that also doubles up as a scullery.
Typically, such a structure is often deprived of broad daylight. Thus, it becomes more important to get the lighting done right. Start with overhead lamps or use LED light strips right under the cabinet or across the shelves overhead. With antique white kitchen cabinets, the setting of a scullery is per-designed to excel by all means. You might as well choose to include brass details, paired alongside the soapstone counters, further complemented by suspended shelves.
For the Country Hearted
Birdcage chairs placed around a pine casted table, with pendant lamps hanging above does throw in some serious country vibes. Tell you what, antique white kitchen cabinets
are seemingly the first choice for any country-inspired kitchen space. Add a few open shelves and a pair of garlands for the kitchen windows, and you are good to go!
Character Building
When it comes to designing a living space, character-building contrasts are a good way to add uncanny charm and appeal.
White shaker cabinets are a perfect choice to create a lovely nautical atmosphere paired with the right set of elements; furniture and fixtures.
Start by pairing your white cabinets with a simple toned down hemlock kitchen island. To add a dash of an urban feel, introduce counter stools in lilac.
If your budget prevails, you might as well take your designing game up a notch with a banquette type seating arrangement, using a combination of leather and acrylic fabric.
Picking Your Granite
Picking on the granite style for your antique white kitchen cabinets
can be a tad tricky.
Always aim to work with granite and glaze that are of the same color. Look for variation across granite offerings to add a little bit of jazz to your otherwise worldly setting.
While buying from the store, always ask for a sample to take back home and view it under varying light conditions.
Of Balance and Symmetry
If you have a U-shaped kitchen, it is necessary to pay close attention to details.
To avoid a mismatch, you will need to keep it toned down to one theme which would have the antique white cabinets in between and trickle-down further to the stovetops, plate trails, and open shelves.
Tile Floorings in Muted Colors
When designing a kitchen space with white cabinets, glass displays are usually a preferred choice. For such a setting, it is recommended that you stick to using flooring tiles in light colors. Beige and light grey are quite a popular choice.
Dine-in Style
Antique white kitchen cabinets can be used to bring the very best out of a dine-in style kitchen. Start by pairing the cabinets with a refectory table, preferably one that mimics the 19th-century furniture style.
Throw in a couple of bamboo-casted chairs with plank floorings to render an easy-going, modern, and functional vibe.
Wrap up
Hands down, antique white kitchen cabinets are the perfect pick for just about any style kitchen. Now that you have great insight into designing your culinary space, it's time to put things into action!
 TRG Architecture + Interior Design
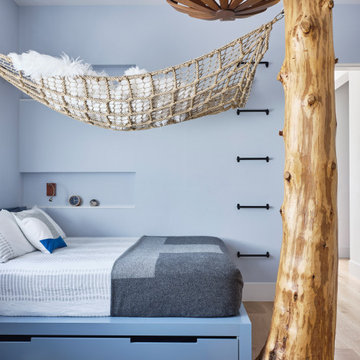
This room was all about making it up to the younger son! By that I mean his brother has the killer view. Given that he’s into the outdoors as much as his parents, we decided to bring the outdoors in to him and ordered up a 10’ cedar tree and configured a custom hammock to hang from it. He also got the trap door in this closet, but I think you already know about that!
 Hearthstone Inc
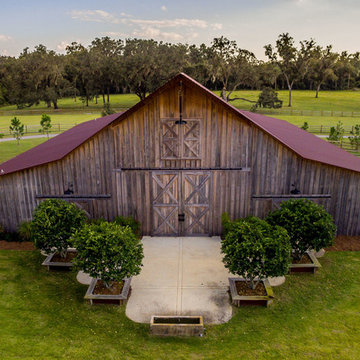
Richard Herman is in the hospitality business and owns several upscale hotels in Florida and in other states as well as cattle ranches in both Florida and Missouri. Their farm in Ocala is by farm their most unique. The property serves as a 4-H demonstration project for the purpose of children’s education. They have been working with the Academy Prep of St. Pete which is dedicated to inner-city youths that are selected on the basis of need and achievement. Wife Diane spends her time on the farm raising Gypsy Vanners, a diminutive draft horse named after the job they did in Eastern Europe, pulling the wagons (vans) for gypsies that wandered across the continent. On the Ocala farm, there are several mules with a unique profession.
Richard had visited the Hearthstone display at a Log & Timber Home Shows at the Orlando Convention Center many years ago. He was impressed that Hearthstone had stayed in touch with him over the years by mailings, invitations to shows, and periodic phone calls. When the time came to start serious consideration of the design of barn, Hearthstone responded promptly and professionally to Richard and Diane’s requests for information and a review of their ideas for their barn, which would serve as the centerpiece for their new farm.
They wanted a multipurpose facility that could accommodate an educational environment and a large hall suitable for the fundraising events for his charities. Richard wanted a barn that reflected the look and feel of barns built at the dawn of the 20th century. Besides the rustic chicken houses and vegetable gardens, they have completely renovated a 1020’s era farmhouse to be as historically correct as possible and serves as the entry to the farm.
“They very careful to feel us out, get comfortable with our capabilities, and be convinced that we could perform as promised,” said Project Manager John Ricketson of Hearthstone.
Design Process
There were some initial drawings that gave us a start on the basic shape and size of the barn. From there, it was a process of narrowing down the uses of each area and the spans that could be achieved. The barn was going to have the traditional “board & batten” exterior siding and a metal roof. There is a cantilevered ‘hay hood” on the north gable end above the large sliding barn doors that open into the foyer and horse stalls. The wings house a combination of areas, beginning with the large restrooms to accommodate crowds for events. Other parts of the wings have garage areas for the farm vehicles, feed room, tack room, wash rack, storage, offices, and smaller restrooms.
Keeping with the look and feel of the turn of the century, Hearthstone developed a process for giving the timbers a surface texture that mimicked the circular cuts of timbers that had just come out of an old sawmill. This was easier said than done. Randy Giles guided his millwright (Wolfgang) in designing a machine that would do this effectively.
The barn was delivered in October of 2014 and was erected over the course of two weeks, thanks to a hardworking crew (Eric Foster) and near-perfect weather. After the Hearthstone crew completed the erection and roof dry-in, it was time for the local carpenters to step up and install some light conventional framing on the gable ends before applying the roof fascia and exterior board & batten siding. Next came the big sliding barn doors, plumbing, electrical, heating, and cooling. Large rustic fixtures were hung from the great hall roof timbers.
Exterior
The board & batten siding was cypress and allowed to turn color naturally as rain hit it and the sun started working on it with UV rays. This method causes a much grayer look closer to the ground and less so where the roof overhang provides protection. The North end has some large limestone boulders and planters arranged around the pad with tall pampas grass. The planters provide casual seating before events and during outside receptions. The entire area was sodded with lush St. Augustine grass and split rail fences were added to enclose the barn area. The corrugated metal roof was a special order material that immediately rusted after being exposed to moisture. The layer of rust protects the metal from the elements.
Interior
The board & batten theme was carried throughout most of the interior with the timbers left natural to show off the circular saw texture. All of the tongue & groove decking was shipped in advance to allow the local painter to pre-stain it with a dark brown transparent stain that is a beautiful background to the light color Eastern White Pine timbers.
“Everything was unique in this project” said Project Manager John Ricketson. “The setting on a small demonstration farm close to Ocala, the multipurpose design, the circular saw texture on the timbers.”
The Hermans are very proud of their farm’s outcome. Richard sent a note to Randy Giles, owner of Hearthstone: “The Barn is fantastic, not a single problem, period. Next month, we have Jo Dee Messina coming in to help with a fundraiser for a local center for abused kids. Folks love the farm, ...... but that barn gets all of the attention. I would encourage you to use me as a reference for your sales team, feel free to extend my cell phone to any prospective purchasers.”

Sponsored
Columbus, OH
Free consultation for landscape design!
Peabody Landscape Group
Franklin County's Reliable Landscape Design & Contracting
 Safferstone Interiors
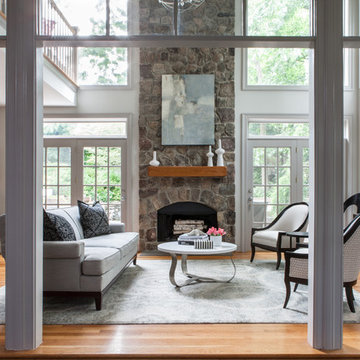
Dennis and Joe have a large, light-filled house. New construction meant lofted space and open floor plans with traditional styling. Running a busy dental practice by day and engaged in a rich social life by night, this couple needed a professional to take the lead on making their house a home.
That’s my cue!
They wanted to take risks, and stay away from “matchy-matchy”. We gussied up a plain ol’ TV room and gave it a healthy dose of luxury.
Our plan was initially inspired by an abstract painting hanging over their stone fireplace. We brought in their love of the outdoors to make things cozy and used family furniture whenever possible for nostalgia and comfort.
I took their love for one-of-a-kind objects and started making a design plan, aiming to solve their biggest frustration: the family room. They had a tortured relationship with a “forgotten family room,” a great space that was spacious and bright, but not at all cozy or joyful, and certainly not “them.”
I wanted to create a cozy space functional for everyday curling up with puppies and watching TV after dinner, yet chic enough for hosting the pre-dinner kitchen overflow and cocktails during parties.
I went looking for contrasting textures and materials. I wanted to balance patterns and scale, and use non-traditional colors as neutrals to create an overall sense of “BAM!”
Dennis and Joe loved the nod to the classics juxtaposed with new and different globally-inspired pieces. For this project our design aesthetic can be described as Middle Eastern/tribal meets mid-century modern. We played to their sensible side with proportion and balance, and stayed as far away from boring/bleh as we could.
From there we moved on to other spaces.. We added colorful pillows and sheer drapery to finish off their formal living room. We kept an inherited bedroom set from Dennis’ Mom and added color, draperies, and pillows to overhaul the guest bedroom.
Their project was not a rip-and-replace, we weren’t starting from scratch with a blank piece of paper.
Rather, our goal was to take what was already there and make it better, more like them. Using functionality first, we focused on giving the house a soothing, joyful aesthetic. We upped the chic factor by a gajillion and helped them find their ‘happy’ at home. See more Safferstone stuff at www.safferstone.com. Connect with us on Facebook, get inspired on Pinterest, and share modern musings on life & design on Instagram. Or, send us a love note at hello@safferstone.com.
Photo: Angie Seckinger
 Wow Great Place
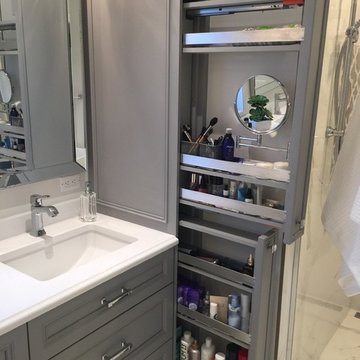
How cool is this? We designed a pull-out tower, in three sections, beside "her" sink, to give the homeowner handy access for her make-up and hair care routine. We even installed the mirror exactly for her height! The sides of the pull-out were done in metal, to maximize the interior width of the shelves, and we even customized it so that the widest items she wanted to store in here would fit on these shelves!
 Ellen Grasso & Sons, LLC
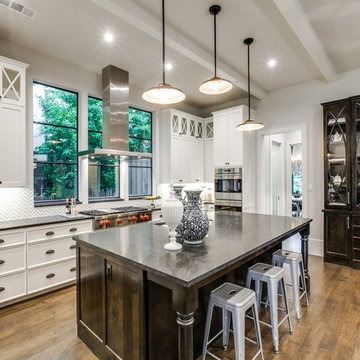
Transitional Kitchen that opens up to large dining and family room areas.
Countertops are polished soap stone slabs.
Kitchen backsplash is monarch white carrara with white thassos strips - tile from The Tile Bar
Sub-Zero Refrigerator and Wolf Vent Hood and cooktop
 TKS Design Group
Download our free ebook, Creating the Ideal Kitchen. DOWNLOAD NOW
This client was referred to us from a past client. They are a busy 2-career household with young children and enjoy entertaining friends and family in their home. They have a beautiful open concept home but unfortunately the kitchen was not fitting for the rest of the home. They were not quite sure what to do with the space. We talked about trying to refresh it or do more of a minor remodel, but in the end they decided a full gut would get them to where they wanted to be.
One problem was there was no place for guests to hang out other than the large and awkward banquette area. The brick wall and tiled hood area were feeling a bit dated and tired. The space was just not functional for their lifestyle. There was no prep space near the cooktop and no landing area for items coming out of the ovens or refrigerator, plus a big dead zone in the center of the room.
Banquettes, like the one they previously had in the space, are great for small spaces, but when they get really large like this one, it makes getting in and out of the seating area awkward and uncomfortable. Plus, there was room for a large table, so we eliminated the awkward built in.
We started by removing the faux brick wall between the kitchen and back entry. We relocated the entry to the garage over a couple feet in order to get every last inch out of the new kitchen. We also made the decision to close up the primary window that faced the pretty ho hum brick wall of the neighbor’s house. There was plenty of light coming in from the seating area, so we just didn’t feel the window was adding much to the room.
Construction went smoothy. There was a bit of rework with electrical, flooring and HVAC, but in the end, we think it was well worth it.
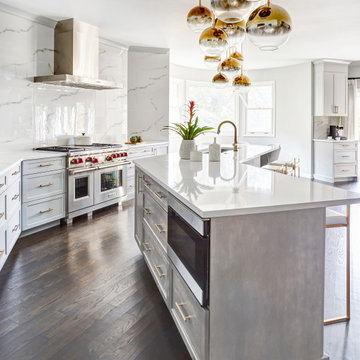
The clients really wanted a sleek contemporary look, and we originally had planned for a full height slab backsplash, but due to it’s size, it was a budget buster. Instead, we got creative and settled on large format porcelain tiles that have a similar feel but were a fraction of the cost. We made sure the wall was plumb and level so that the fit and finish would mimic that of slab material.
The final space was quite a change. A large prep sink sits directly across from the new pro-style range with plenty additional prep space on the large island. The refrigerator and ovens now have miles of landing space, and a nice tight work triangle makes cooking a breeze.
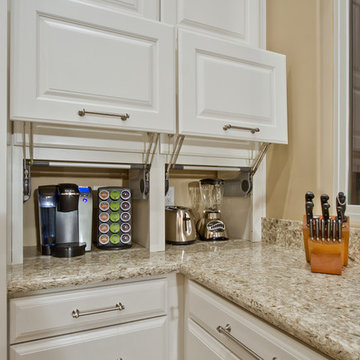
Since we wanted a more contemporary feel, not many wall cabinets were included. Instead, we outfitted some of the drawers for dish storage with a peg system. Two large pantries flanking the refrigerator hold baking supplies and small appliances. Large drawers by the cooktop hold pots and pans, and an appliance garage tucked away to the left of the range hides away miscellaneous items. The large island also houses a microwave drawer and tons of storage, most of which is drawers offering maximum convenience.
The island now seats 5-6 people comfortably along with the new table in the seating area which can seat up to 8. Entertaining will be a breeze in this space. With such a clean backdrop, we knew we would need some drama with the lighting, so we chose two sets of staggered pendants, which we adjusted for the right visual balance above the island.
We also included a small coffee station to the right of the main kitchen, which helps keep the coffee clutter out of the kitchen proper. Two tones of complimentary gray are featured in this kitchen. The perimeter is a light gray that reads almost white. The island is a gray stain that adds some depth and interest with the visible wood texture. The countertops are clean white quartz, and the hardware, barstools and light fixtures add warm brass tones. I see lots of cooking and entertaining with family and friends in the near future in this bright and airy new space.
Designed by: Susan Klimala, CKD, CBD
Photography by: Michael Kaskel
For more information on kitchen and bath design ideas go to: www.kitchenstudio-ge.com

Sponsored
Delaware, OH

Buckeye Basements, Inc.
Central Ohio's Basement Finishing ExpertsBest Of Houzz '13-'21
 Abda Custom Window Fashions
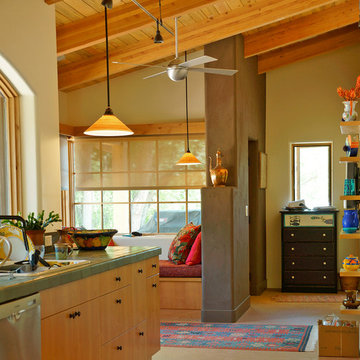
The sun can be overwhelming at times with the brightness and high temperatures. Shades are also a great way to block harmful ultra-violet rays to protect your hardwood flooring, furniture and artwork from fading. There are different types of shades that were engineered to solve a specific dilemma.
We work with clients in the Central Indiana Area. Contact us today to get started on your project. 317-273-8343
 CMI Inc.
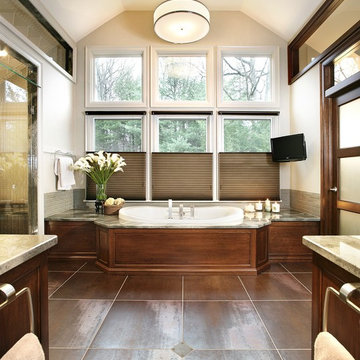
Design 1 chose CMI for her window treatments in her ASID 2010 Bronze Award winning Residential Bathroom Design Photography Peter Rymwid Architectural Photographer
 WL Kitchen & Home
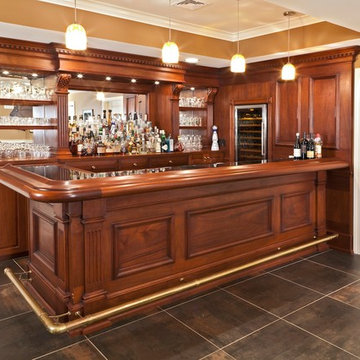
Home bar - mid-sized l-shaped home bar idea in New York with recessed-panel cabinets, medium tone wood cabinets and wood countertops
34