
Search results for "Bonus start up" in Home Design Ideas
 R. B. Schwarz, Inc.
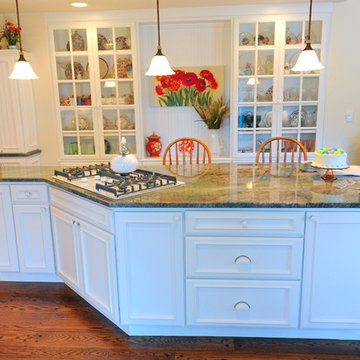
The new island boasts lots of storage and is a center gathering place. We relocated the cook top to the island and included a hidden downdraft vent. The island also includes a warming drawer and a pop up mixer station. The island can seat 4 people comfortably while meals are being prepared.
Photo Credit: Marc Golub
 Landforms
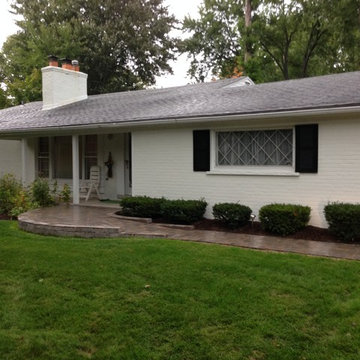
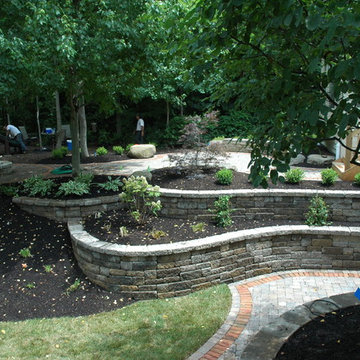
This existing client in Farmington Hills asked us to redesign and install a new front walkway for his home. It had to go compliment the style of the home and be barrier free. So his guest would not have to step up to the porch. We created this beautiful paver ramp. It starts flat at the driveway and gradually slopes up to the front porch. Landforms Inc.
 Valentini Kids Furniture Brooklyn NY
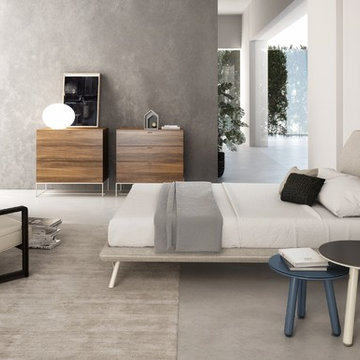
Modern Platform Bed / Bedroom Set Linea by Huppe Up Line
Made in Canada
Linea by Up Huppe is a new modern bedroom set with up-to-date European design and finest made in Canada quality. The Linea Bed is entirely upholstered in Fabric, Leatherette or genuine Leather available in a variety of colors. The Headboard is a bit curved, providing not only a superb look, but also extra comfort. The whole bed is supported by tubular steel legs lacquered in a matt color up to your choice. The Linea Bed as well as the optional casegoods are completely finished from all sides, allowing to place any piece of this bedroom set even in the center of your room. All the pieces within the Linea collection are made of wood veneer and solid Walnut, that can be ordered according to your choice in one of six available wood stain finishes. The interiors of the bedroom case goods are made of Birch that is also finished to protect your even the most delicate clothes. Moreover, the drawers are equipped with soft-closing hardware. Optional Nightstands, Dressers and Chests can be ordered either on short wooden legs or same as bed high steel metal legs.
Features:
Designed by Up Huppe
Bed is upholstered in fabric, eco-leather or leather of different colors
Metal legs available in a variety of matt lacquered colors
Case-goods structure is available in six walnut finishes
Case-goods are finished all around and equipped with self-clothing slow motion slides
Bed only requires a mattress that sits on a wooden platform with slats or panels
The starting price is for the Linea Queen size bed in Light Natural Walnut finish, Black #324 Lacquer and PL #060 Fabric Upholstery.
Dimensions:
Queen Size Bed: W67.5" x D94.8" x H40"
King Size Bed: W85" x D94.8" x H40"
1-Drawer Nightstand: W24" x D19" x H18"
2-Drawer Nightstand (wooden legs): W24" x D19" x H19"
2-Drawer Nightstand (metal base): W24" x D19" x H23.5"
6-Drawer Dresser (wooden legs): W70" x D19" x H24"
6-Drawer Dresser (metal base): W70" x D19" x H31"
3-Drawer Chest (wooden legs): W36" x D19" x H29"
3-Drawer Chest (metal base): W36" x D19" x H36.3"
5-Drawer Chest (wooden legs): W36" x D19" x H45.5"
5-Drawer Chest (metal base): W36" x D19" x H52.5"
Horizontal Mirror: W48" x D1.5" x H23"
Floor Mirror: W25" x D1.5" x H77"
Find the right local pro for your project
 Shade And Shutter Systems, Inc
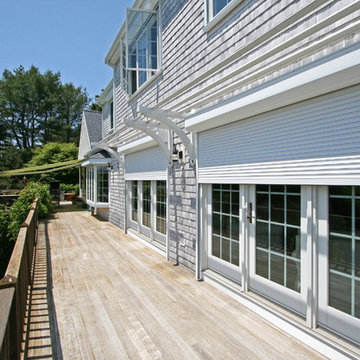
Rolling Shutters are the ultimate solution when you want to protect what’s behind your windows and doors. With Rolling Shutters, enjoy peace of mind knowing that your home has a sturdy layer of hurricane protection and storm protection. Rolling shutters shield against wind-blown debris, sand blasting and water penetration. Strong, secure, and durable, our Rolling Hurricane Shutters are proven to reduce energy and maintenance costs while making your home more comfortable to live in.
Hurricane Shutters
Hurricane Shutters are the premier protection against snow and ice storms, driving rain, high winds, and flying debris. We have huge selection of Hurricane Protection products for all types of applications. We specialize in new construction, retrofit projects and custom applications designed around more complex installations.
Hurricane Shutters protect your windows and doors from water penetration and breakage during hurricanes and Nor’easters bringing you comfort and protection. Even when you are not physically at the location of the storm, rolling shutters can offer you peace of mind. Homes and businesses not equipped with rolling shutters may experience glass breakage and door failures during high winds. Ultimately, those openings in the structure’s envelope can cause complete devastation to the home or business. Once the air pressure enters a building, no matter the type of construction, the likelihood of other windows and doors failing rises. If the pressure grows beyond a certain point, walls and and roof components begin to fail.
Security Shutters
Security Shutters are one of the best ways to discourage intruders from attempting to enter your home or business. This deterrent measure is just where rolling shutters start. While in the down position, rolling shutters can be locked in place by a motor, a gear, a keyed switch or by a separate locking device.
Rolling Shutters have been used as security shutters all over the world for decades with incredible success. Sometimes labeled as metal shutters and metal security shutters, they all have subtle differences, and the differences can’t be seen with the rolling shutter in the down position.
Security Shutters typically have end-retention pins that lock into the guide rails from the top. These pins are located throughout the entire curtain and are protected from manipulation while the curtain is in the close position.
Storm Shutters
Storm Shutters are the broad category of Storm Protection products. Of course, they come in all types of sizes, features and functionality. We have a full line of rolling shutters, hinged storm shutters and storm panels for you to to explore on our website or we would love for you to swing by one of our showrooms to see live demo models.
Storm Shutters are specifically engineered and designed for high hinds, flying debris protection and ultimately given a rating for Hurricane Protection. A little known fact: The most damaging type of wind value is not the force of the wind blowing directly on your home. This force is called positive pressure, and typically, many believe this is the strongest force against their home or business. Believe it or not, the negative pressure, or, the air passing by your windows and doors, has far greater power. Many low-grade storm shutters and hurricane protection products fail under this pressure.
Solar Shutters
Solar Shutters have a double wall construction and filled with a specialized polyurethane foam designed to increase R-factor and deflect solar penetration. Many rolling shutters can perform this function, but not all are created equal. The energy efficiency of exterior rolling shutters is up to 95% more effective than interior solar shades.
Solar Shutters have many unique and positive “side effects” from their dense foam-filled curtain profile. Many homeowners have taken advantage of energy savings by using these types of rolling shutters in both the summer and winter seasons. Reducing heating and air conditioning expenses throughout the entire year is not always our first thought, but many home and business owners have expressed massive savings. Not only do they block up to 90% of heat gain and loss, they also provide incredible noise control opportunities.
Privacy Shutters
Privacy Shutters are a great way to close of areas of your home or business from others. Some rolling shutters are equipped with perforations allowing ambient light to pass through when needed.
Privacy Shutters have many uses and are creatively used throughout the world in homes and businesses for all kinds of reasons. Close off food preparation areas, work shops, stock rooms, gun safes, closets, liquor cabinets and bars. Some business owners use rolling shutters to close off the outside world after working hours, to protect the last few employees as they finish money counts, paperwork, and prepare bank deposits.
If you have any questions or need additional information, our Product Specialists are available 800-522-1599
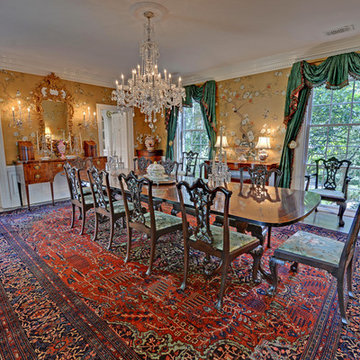
 Envision Web
Stuart Wade, Envision Virtual Tours
The second-largest and most developed of Georgia's barrier islands, St. Simons is approximately twelve miles long and nearly three miles wide at its widest stretch (roughly the size of Manhattan Island in New York). The island is located in Glynn County on Georgia's coast and lies east of Brunswick (the seat of Glynn County), south of Little St. Simons Island and the Hampton River, and north of Jekyll Island. The resort community of Sea Island is separated from St. Simons on the east by the Black Banks River. Known for its oak tree canopies and historic landmarks, St. Simons is both a tourist destination and, according to the 2010 U.S. census, home to 12,743 residents.
Early History
The earliest
St. Simons Island Village
record of human habitation on the island dates to the Late Archaic Period, about 5,000 to 3,000 years ago. Remnants of shell rings left behind by Native Americans from this era survive on many of the barrier islands, including St. Simons. Centuries later, during the period known by historians as the chiefdom era, the Guale Indians established a chiefdom centered on St. Catherines Island and used St. Simons as their hunting and fishing grounds. By 1500 the Guale had established a permanent village of about 200 people on St. Simons, which they called Guadalquini.
Beginning in 1568, the Spanish attempted to create missions along the Georgia coast. Catholic missions were the primary means by which Georgia's indigenous Native American chiefdoms were assimilated into the Spanish colonial system along the northern frontier of greater Spanish Florida. In the 1600s St. Simons became home to two Spanish missions: San Buenaventura de Guadalquini, on the southern tip of the island, and Santo Domingo de Asao (or Asajo), on the northern tip. Located on the inland side of the island were the pagan refugee villages of San Simón, the island's namesake, and Ocotonico. In 1684 pirate raids left the missions and villages largely abandoned.
Colonial History
As
Fort Frederica
early as 1670, with Great Britain's establishment of the colony of Carolina and its expansion into Georgia territory, Spanish rule was threatened by the English. The Georgia coast was considered "debatable land" by England and Spain, even though Spain had fully retreated from St. Simons by 1702. Thirty-one years later General James Edward Oglethorpe founded the English settlement of Savannah. In 1736 he established Fort Frederica, named after the heir to the British throne, Frederick Louis, prince of Wales, on the west side of St. Simons Island to protect Savannah and the Carolinas from the Spanish threat.
Between 1736 and 1749 Fort Frederica was the hub of British military operations along the Georgia frontier. A town of the same name grew up around the fort and was of great importance to the new colony. By 1740 Frederica's population was 1,000. In 1736 the congregation of what would become Christ Church was organized within Fort Frederica as a mission of the Church of England. Charles Wesley led the first services. In 1742 Britain's decisive victory over Spain in the Battle of Bloody Marsh, during the War of Jenkins' Ear, ended the Spanish threat to the Georgia coast. When the British regimen disbanded in 1749, most of the townspeople relocated to the mainland. Fort Frederica went into decline and, except for a short time of prosperity during the 1760s and 1770s under the leadership of merchant James Spalding, never fully recovered. Today the historic citadel's tabby ruins are maintained by the National Park Service.
Plantation Era
By the start of the American Revolution (1775-83), Fort Frederica was obsolete, and St. Simons was left largely uninhabited as most of its residents joined the patriot army. Besides hosting a small Georgia naval victory on the Fort Frederica River, providing guns from its famous fort for use at Fort Morris in Sunbury, and serving as an arena for pillaging by privateers and British soldiers, the island played almost no role in the war.
Following the war, many of the townspeople, their businesses destroyed, turned to agriculture. The island was transformed into fourteen cotton plantations after acres of live oak trees were cleared for farm land and used for building American warships, including the famous USS Constitution, or "Old Ironsides." Although rice was the predominant crop along the neighboring Altamaha River, St. Simons was known for its production of long-staple cotton, which soon came to be known as Sea Island cotton.
Between
Ebos Landing
the 1780s and the outbreak of the Civil War (1861-65), St. Simons's plantation culture flourished. The saline atmosphere and the availability of cheap slave labor proved an ideal combination for the cultivation of Sea Island cotton. In 1803 a group of Ebo slaves who survived the Middle Passage and arrived on the west side of St. Simons staged a rebellion and drowned themselves. The sacred site is known today as Ebos Landing.
One of the largest owners of land and slaves on St. Simons was Pierce Butler, master of Hampton Point Plantation, located on the northern end of the island. By 1793 Butler owned more than 500 slaves, who cultivated 800 acres of cotton on St. Simons and 300 acres of rice on Butler's Island in the Altamaha River delta. Butler's grandson, Pierce Mease Butler, who at the age of sixteen inherited a share of his grandfather's estate in 1826, was responsible for the largest sale of human beings in the history of the United States: in 1859, to restore his squandered fortune, he sold 429 slaves in Savannah for more than $300,000. The British actress and writer Fanny Kemble, whose tumultuous marriage to Pierce ended in divorce in 1849, published an eyewitness account of the evils of slavery on St. Simons in her book Journal of a Residence on a Georgian Plantation in 1838-1839 (1863).
Another
Retreat Plantation
large owner of land and slaves on St. Simons was Major William Page, a friend and employee of Pierce Butler Sr. Before purchasing Retreat Plantation on the southwestern tip of the island in 1804, Page managed the Hampton plantation and Butler's Island. Upon Page's death in 1827, Thomas Butler King inherited the land together with his wife, Page's daughter, Anna Matilda Page King. King expanded his father-in-law's planting empire on St. Simons as well as on the mainland, and by 1835 Retreat Plantation alone was home to as many as 355 slaves.
The center of life during the island's plantation era was Christ Church, Frederica. Organized in 1807 by a group of island planters, the Episcopal church is the second oldest in the Diocese of Georgia. Embargoes imposed by the War of 1812 (1812-15) prevented the parishioners from building a church structure, so they worshiped in the home of John Beck, which stood on the site of Oglethorpe's only St. Simons residence, Orange Hall.
The first Christ Church building, finished on the present site in 1820, was ruined by occupying Union troops during the Civil War. In 1884 the Reverend Anson Dodge Jr. rebuilt the church as a memorial to his first wife, Ellen. The cruciform building with a trussed gothic roof and stained-glass windows remains active today as Christ Church.
Civil War and Beyond
The
St. Simons Island Lighthouse
outbreak of the Civil War in 1861 put a sudden end to St. Simons's lucrative plantation era. In January of that year, Confederate troops were stationed at the south end of the island to guard the entrance to Brunswick Harbor. Slaves from Retreat Plantation, owned by Thomas Butler King, built earthworks and batteries. Plantation residents were scattered—the men joined the Confederate army and their families moved to the mainland. Cannon fire was heard on the island in December 1861, and Confederate troops retreated in February 1862, after dynamiting the lighthouse to keep its beacon from aiding Union troops. Soon thereafter, Union troops occupied the island, which was used as a camp for freed slaves. By August 1862 more than 500 former slaves lived on St. Simons, including Susie King Taylor, who organized a school for freed slave children. But in November the ex-slaves were taken to Hilton Head, South Carolina, and Fernandina, Florida, leaving the island abandoned.
After the Civil War the island never returned to its status as an agricultural community. The plantations lay dormant because there were no slaves to work the fields. After Union general William T. Sherman's January 1865 Special Field Order No. 15 —a demand that former plantations be divided and distributed to former slaves—was overturned by U.S. president Andrew Johnson less than a year later, freedmen and women were forced to work as sharecroppers on the small farms that dotted the land previously occupied by the sprawling plantations.
By
St. Simons Lumber Mills
1870 real economic recovery began with the reestablishment of the timber industry. Norman Dodge and Titus G. Meigs of New York set up lumber mill operations at Gascoigne Bluff, formerly Hamilton Plantation. The lumber mills provided welcome employment for both blacks and whites and also provided mail and passenger boats to the mainland. Such water traffic, together with the construction of a new lighthouse in 1872, designed by architect Charles B. Cluskey, marked the beginning of St. Simons's tourism industry. The keeper of the lighthouse created a small amusement park, which drew many visitors, as did the seemingly miraculous light that traveled from the top of the lighthouse tower to the bottom. The island became a summer retreat for families from the mainland, particularly from Baxley, Brunswick, and Waycross.
The island's resort industry was thriving by the 1880s. Beachfront structures, such as a new pier and grand hotel, were built on the southeastern end of the island and could be accessed by ferry. Around this time wealthy northerners began vacationing on the island.
Twentieth Century
The
St. Simons Island Pier and Village
opening in 1924 of the Brunswick–St. Simons Highway, today known as the Torras Causeway, was a milestone in the development of resorts in the area. St. Simons's beaches were now easily accessible to locals and tourists alike. More than 5,000 automobiles took the short drive from Brunswick to St. Simons via the causeway on its opening day, paving the way for convenient residential and resort development.
In 1926 automotive pioneer Howard Coffin of Detroit, Michigan, bought large tracts of land on St. Simons, including the former Retreat Plantation, and constructed a golf course, yacht club, paved roads, and a residential subdivision. Although the causeway had brought large numbers of summer people to the island, St. Simons remained a small community with only a few hundred permanent residents until the 1940s.
The
St. Simons Island
outbreak of World War II (1941-45) brought more visitors and residents to St. Simons. Troops stationed at Jacksonville, Florida; Savannah; and nearby Camp Stewart took weekend vacations on the island, and a new naval air base and radar school became home to even more officers and soldiers. The increased wartime population brought the island its first public school. With a major shipyard for the production of Liberty ships in nearby Brunswick, the waters of St. Simons became active with German U-boats. In April 1942, just off the coast, the Texas Company oil tanker S. S. Oklahoma and the S. S. Esso Baton Rouge were torpedoed by the Germans, bringing the war very close to home for island residents.
Due in large part to the military's improvement of the island's infrastructure during the war, development on the island boomed in the 1950s and 1960s. More permanent homes and subdivisions were built, and the island was no longer just a summer resort but also a thriving community. In 1950 the Methodist conference and retreat center Epworth by the Sea opened on Gascoigne Bluff. In 1961 novelist Eugenia Price visited St. Simons and began work on her first works of fiction, known as the St. Simons Trilogy. Inspired by real events on the island, Price's trilogy renewed interest in the history of Georgia's coast, and the novelist herself relocated to the island in 1965 and lived there for thirty-one years. St. Simons is also home to contemporary Georgia writer Tina McElroy Ansa.
Since
Epworth by the Sea
1980 St. Simons's population has doubled. The island's continued status as a vacation destination and its ongoing development boom have put historic landmarks and natural areas at risk. While such landmarks as the Fort Frederica ruins and the Battle of Bloody Marsh site are preserved and maintained by the National Park Service, and while the historic lighthouse is maintained by the Coastal Georgia Historical Society, historic Ebos Landing has been taken over by a sewage treatment plant.
Several coastal organizations have formed in recent years to save natural areas on the island. The St. Simons Land Trust, for example, has received donations of large tracts of land and plans to protect property in the island's three traditional African American neighborhoods. Despite its rapid growth and development, St. Simons remains one of the most beautiful and important islands on the Georgia coast.
 Sosna Inc
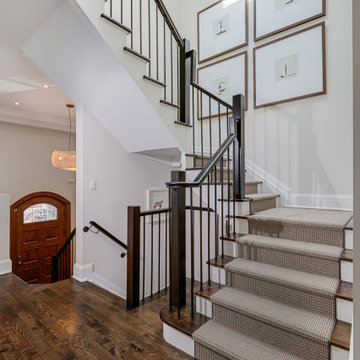
Our clients, a family of professionals with 2 young kids, approached us to renovate their early 2000’s Toronto home to make it better suit the needs of their family. Although they were happy with the Kitchen layout, they requested that we update the existing cabinetry, and add additional cabinetry for increased storage. In the Laundry Room, they needed a storage solution for cleaning materials, and an updated laundry sink. They wanted the Basement to be a comfortable family space to spend time together, and for the kids to have a space to play.
The Kitchen cabinets were dated and starting to fall apart, and the Master En-Suite was dated and awkwardly shaped, with a tight walk-in shower.
In the Basement, the HVAC bulkhead was awkward and unsightly, and the space was not ideal for the kids to play, due to outdated carpeting, and a lack of storage space for their toys.
We spent time getting to know our clients to design a space that optimized functionality and comfort for their family.
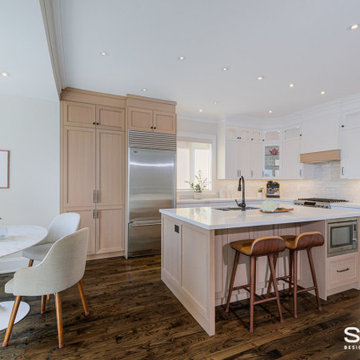
In the Kitchen, we kept the existing layout, but added a tall cabinet for pantry and broom storage. A new island was built with a space to accommodate a built-in microwave, to keep it from cluttering the countertop. The new white oak tall cabinets and island cabinets were complimented by light coloured marble-looking quartz countertops and the handmade subway tile backsplash for a fresh, updated look.
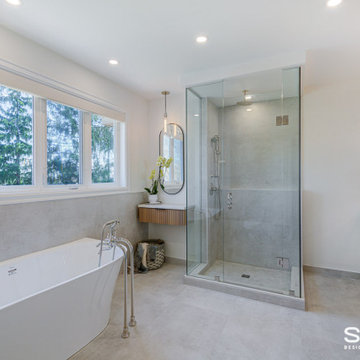
In the Master Ensuite, we replaced the large, dated deck-mounted tub with a semi-freestanding tub, tucked nicely into the corner. The extra space this created allowed us to add a walk-in shower without the awkward angle that had existed prior to the renovation. The new walk-in shower featured a ceiling mounted showerhead, and a useful ledge for toiletries. We even had enough space to add a bonus make-up table to match the new double vanity. Both were custom built to be floating for a modern look, and easier maintenance.
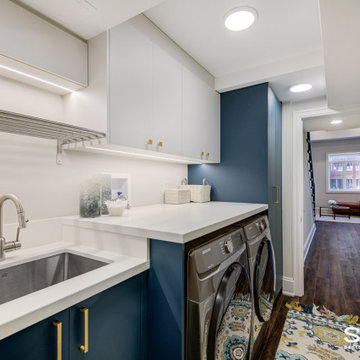
In the Laundry Room, we installed the washer and dryer side by side, instead of stacked. This allowed for a long working countertop and upper storage cabinets that were custom built. Additionally, a hanging rack installed above the sink is perfect for drying small items, and the adjustable shelves and dividers in the custom built cabinetry will provide plenty of convenient space to store cleaning materials.
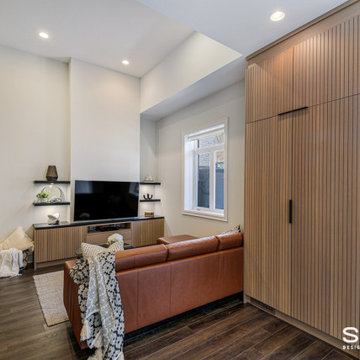
In the Basement, we widened the bulkhead to allow us to center the wall-mounted TV, and added custom media cabinets with floating shelves to accommodate electronics.
The space was made more comfortable for the kids to play with new vinyl heated flooring, and tall cabinets with adjustable shelves, dividers, and deep drawers to keep all of their toys organized.
All of these updates provided our clients with a home that fits their family’s needs and lifestyle.
If your home isn’t functional for your family, contact us to learn more. We’re the Renovator You Can Count On!
 safe ZOnea
In 2026, DIY home design and renovation will become easier than ever. Free mobile apps like Houzz, Homestyler, and Planner 5D will put professional tools in everyone’s pocket, letting users visualize layouts, test colors, and estimate costs before buying materials. Experts predict that over 50% of homeowners will use apps to plan upgrades. It will save money and reduce costly mistakes. Even now, about 54% prefer mobile tools.
Why Mobile Apps are Changing Home Renovation
DIY renovation has changed a lot in recent years. Homeowners don’t have to rely on sketches or guesswork anymore. Thanks to AR, AI, and 3D renderings, apps can show exactly how furniture and cabinets will fit. By 2026, many of these tools will be free - and packed with features that rival expensive software. With just a smartphone, anyone can try out layouts, test colors, and even create detailed floor plans.
The Tech Behind Modern Design Apps
Most renovation apps now leverage AI to generate design suggestions. They are based on your space and preferences. Upload a photo of your room. The algorithms will check the sizes, lighting, and features. Then, they’ll suggest furniture layouts or color schemes. Some apps use your phone’s camera and sensor. They make accurate measurements, so you won’t need tape measures or notepads.
Top Free Apps Transforming DIY Projects
Houzz continues to lead the pack with its massive photo library and ability to connect users with local contractors. The platform now gives AI design suggestions. It looks at your style preferences across millions of professional spaces.
For anyone serious about planning their next project, exploring comprehensive resources helps narrow down what works. It’s just like in iGaming, where review platforms like Slotzilla help gamblers to find casinos with user-friendly tools, bonus rounds, and progressive jackpots that will work for them.
Planner 5D shines with realistic 3D renderings and a huge furniture catalog, letting you switch between 2D plans and 3D walkthroughs - even in VR. Room Planner helps you design practical layouts. You can easily arrange furniture and check dimensions. It offers real-time 3D views and features items from real brands.
Apps for Specific Renovation Tasks
Not every project needs full 3D renderings - sometimes you just want to try paint colors or test tile patterns. ColorSnap by Sherwin-Williams uses AR to show colors on your actual walls and even matches shades from photos. Magicplan makes creating floor plans easy by measuring rooms with your phone as you walk around. Both apps help plan renovations and communicate ideas without the guesswork.
Budget Tracking and Project Management
Renovation apps do more than make spaces look good - managing budgets and timelines is just as important. HomeZada even uses AI to predict your budget and track material prices, so DIYers don’t get hit with surprise costs. Trello is a lifesaver - set deadlines, track progress, and share updates with anyone helping on the project.
How Apps Reflect 2026 Design Trends
This year’s popular apps reflect the largest home design trends. Colorful rooms are on the rise. Zillow shows a 149% increase in listings. Plus, apps like Houzz let users test bold shades before making a choice. Cozy reading nooks are also on the rise, showing up in nearly half of listings. Renovation apps now provide templates. They include tips for shelves and lighting. This helps create cozy, thoughtful spaces.
Here’s a quick comparison of what different free apps offer:
App name
Best feature
Learning curve
Platform
Houzz
25M+ inspiration photos
Easy
iOS, Android
Planner 5D
Photorealistic 3D renders
Moderate
iOS, Android, Web
Room Planner
Accurate measurements
Easy
iOS, Android
Magicplan
Auto floor plan creation
Easy
iOS, Android
Natural materials and earthy tones will lead design trends in 2026. Warm neutrals will take over from the grey-and-white minimalism of the last ten years.
The AI Revolution in Home Design
AI is no longer just a gimmick in renovation apps. Chat features can suggest furniture layouts, color palettes, and materials for your budget. It’s like having a designer on call. Renovate AI turns photos of your room into multiple style ideas in seconds, from mid-century to rustic farmhouse. It’s great for brainstorming and getting past the “I don’t know what I want” stage.
Practical Tips for Using Renovation Apps
Getting the most from design apps requires a strategic approach. Here are essential steps every DIYer should follow:
Start by gathering inspiration. Look through photo libraries on Houzz or Pinterest. Then, dive into detailed planning.
Don’t rely solely on screen colors; get actual paint chips and fabric swatches.
Save multiple design versions. Create variations of your plan to compare options side-by-side.
This workflow helps you avoid common mistakes. It leads to better design choices before you buy anything.
When Apps Aren’t Enough
Digital tools can’t do everything. Big structural changes, electrical work, or plumbing always need a pro. Apps are great for planning and talking with contractors, but they can’t replace expertise. And always check textures in real life - that sofa might look perfect on screen, but feel different.
The Future of DIY Renovation
In 2026, renovation apps will become smarter. They’ll have voice control and better AR. Improved AI will make DIY design feel more like professional services. Creating beautiful, functional spaces is easier than ever. For homeowners, it’s important to use apps that match local materials and building codes. The biggest benefit is confidence - seeing your design in 3D makes projects far less intimidating.
Sponsored
Sunbury, OH

J.Holderby - Renovations
Franklin County's Leading General Contractors - 2X Best of Houzz!
 Sosna Inc
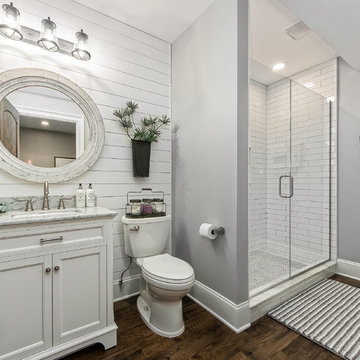
Our clients, a family of professionals with 2 young kids, approached us to renovate their early 2000’s Toronto home to make it better suit the needs of their family. Although they were happy with the Kitchen layout, they requested that we update the existing cabinetry, and add additional cabinetry for increased storage. In the Laundry Room, they needed a storage solution for cleaning materials, and an updated laundry sink. They wanted the Basement to be a comfortable family space to spend time together, and for the kids to have a space to play.
The Kitchen cabinets were dated and starting to fall apart, and the Master En-Suite was dated and awkwardly shaped, with a tight walk-in shower.
In the Basement, the HVAC bulkhead was awkward and unsightly, and the space was not ideal for the kids to play, due to outdated carpeting, and a lack of storage space for their toys.
We spent time getting to know our clients to design a space that optimized functionality and comfort for their family.
In the Kitchen, we kept the existing layout, but added a tall cabinet for pantry and broom storage. A new island was built with a space to accommodate a built-in microwave, to keep it from cluttering the countertop. The new white oak tall cabinets and island cabinets were complimented by light coloured marble-looking quartz countertops and the handmade subway tile backsplash for a fresh, updated look.
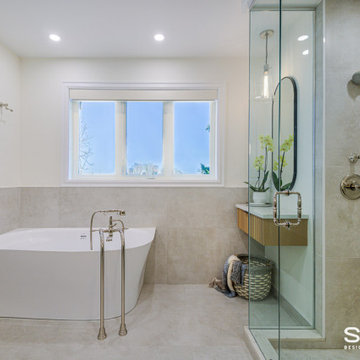
In the Master Ensuite, we replaced the large, dated deck-mounted tub with a semi-freestanding tub, tucked nicely into the corner. The extra space this created allowed us to add a walk-in shower without the awkward angle that had existed prior to the renovation. The new walk-in shower featured a ceiling mounted showerhead, and a useful ledge for toiletries. We even had enough space to add a bonus make-up table to match the new double vanity. Both were custom built to be floating for a modern look, and easier maintenance.
In the Laundry Room, we installed the washer and dryer side by side, instead of stacked. This allowed for a long working countertop and upper storage cabinets that were custom built. Additionally, a hanging rack installed above the sink is perfect for drying small items, and the adjustable shelves and dividers in the custom built cabinetry will provide plenty of convenient space to store cleaning materials.
In the Basement, we widened the bulkhead to allow us to center the wall-mounted TV, and added custom media cabinets with floating shelves to accommodate electronics.
The space was made more comfortable for the kids to play with new vinyl heated flooring, and tall cabinets with adjustable shelves, dividers, and deep drawers to keep all of their toys organized.
All of these updates provided our clients with a home that fits their family’s needs and lifestyle.
If your home isn’t functional for your family, contact us to learn more. We’re the Renovator You Can Count On!
 Tile Doctor Ltd
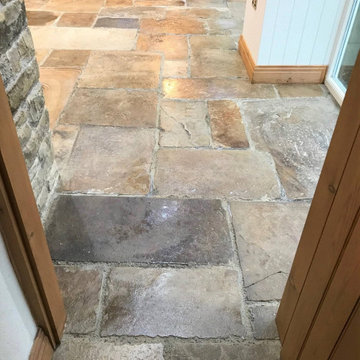
We had been to maintain this Sandstone floor about two years previously at a property in the pretty area of Windermere in the English Lake District. The client had run out of our Tile Doctor Neutral Tile Cleaner that we left after completing the job and had started using a standard cleaner instead (a well-known ecological cleaner). Unfortunately, this product has a 5% non-ionic surfactant in its chemical structure, which will strip a coat of stone sealer off the surface within 6 months, once that topcoat has been removed the sealed surface is only 50% as strong as it should be.
Readers of this article should be aware that even washing up liquid which is a degreaser will strip sealers although it will take many months of regular use before you will start to notice an issue. Stronger bleach-based cleaning products such as Flash and Domestos will cause instant damage to stone sealer which will often go an off-white colour as a result. So, the importance of using the right cleaner is imperative. Having used our services on this floor previously he client knew what to expect and was happy to go ahead with our quote.
My first task would be to clean the floor and completely remove what was left of the old sealer to ensure the floor would have a consistent appearance. On this occasion I used a strong 1:3 dilution of Tile Doctor Pro-Clean worked into the floor with a Black buffing pad fitted to a rotary buffing machine. The Sandstone floor was then rinsed with water, scrubbed again and then the waste extracted using a wet vacuum.
This was followed with acid rinse using a 1:5 dilution of Tile Doctor Grout Clean-Up, this is a Phosphoric Acid (not a Brick Acid). After being scrubbed into the tile it was rinsed off the floor as before using water and the wet vacuum. This process further cleans the stone and neutralises the floor after the use of the strong alkaline Pro-Clean used earlier.
Before leaving for the day I gave the floor one final rinse with water and then dried the floor as much as possible with the wet vacuum. The floor was now clean and free of sealer and left to fully dry off overnight.
I came back the following morning and started by testing the floor with the moisture meter. I always do this as I know from experience how important it is to ensure the floor is dry before applying a sealer.
Happy the Sandstone was dry I then proceed to apply the first of what would be four coats of sealer. For this I used Tile Doctor Seal and Go which leaves a nice low sheen finish. This product is specially formulated blend of acrylic polymers that provides will protect the floor from ingrained dirt and staining; it will make the floor easy to clean and has the added advantage of being water based so it doesn’t leave a solvent smell as it dries.
The client was left another complimentary bottle of Tile Doctor Neutral cleaner and hopefully the seal will last a long longer the 2nd time around. The client was pleased the floor had been restored and vowed to use nothing but Tile Doctor products on it in the future.
Heidi Taylor
South Cumbria Tile Doctor
 Sosna Inc
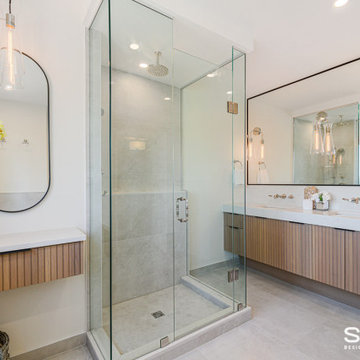
Our clients, a family of professionals with 2 young kids, approached us to renovate their early 2000’s Toronto home to make it better suit the needs of their family. Although they were happy with the Kitchen layout, they requested that we update the existing cabinetry, and add additional cabinetry for increased storage. In the Laundry Room, they needed a storage solution for cleaning materials, and an updated laundry sink. They wanted the Basement to be a comfortable family space to spend time together, and for the kids to have a space to play.
The Kitchen cabinets were dated and starting to fall apart, and the Master En-Suite was dated and awkwardly shaped, with a tight walk-in shower.
In the Basement, the HVAC bulkhead was awkward and unsightly, and the space was not ideal for the kids to play, due to outdated carpeting, and a lack of storage space for their toys.
We spent time getting to know our clients to design a space that optimized functionality and comfort for their family.
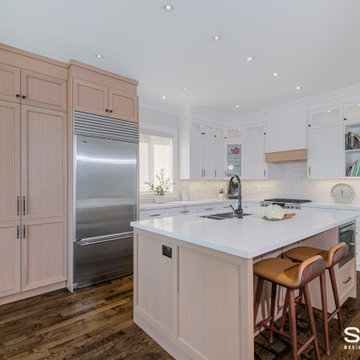
In the Kitchen, we kept the existing layout, but added a tall cabinet for pantry and broom storage. A new island was built with a space to accommodate a built-in microwave, to keep it from cluttering the countertop. The new white oak tall cabinets and island cabinets were complimented by light coloured marble-looking quartz countertops and the handmade subway tile backsplash for a fresh, updated look.
In the Master Ensuite, we replaced the large, dated deck-mounted tub with a semi-freestanding tub, tucked nicely into the corner. The extra space this created allowed us to add a walk-in shower without the awkward angle that had existed prior to the renovation. The new walk-in shower featured a ceiling mounted showerhead, and a useful ledge for toiletries. We even had enough space to add a bonus make-up table to match the new double vanity. Both were custom built to be floating for a modern look, and easier maintenance.
In the Laundry Room, we installed the washer and dryer side by side, instead of stacked. This allowed for a long working countertop and upper storage cabinets that were custom built. Additionally, a hanging rack installed above the sink is perfect for drying small items, and the adjustable shelves and dividers in the custom built cabinetry will provide plenty of convenient space to store cleaning materials.
In the Basement, we widened the bulkhead to allow us to center the wall-mounted TV, and added custom media cabinets with floating shelves to accommodate electronics.
The space was made more comfortable for the kids to play with new vinyl heated flooring, and tall cabinets with adjustable shelves, dividers, and deep drawers to keep all of their toys organized.
All of these updates provided our clients with a home that fits their family’s needs and lifestyle.
If your home isn’t functional for your family, contact us to learn more. We’re the Renovator You Can Count On!
 Sosna Inc
Our clients, a family of professionals with 2 young kids, approached us to renovate their early 2000’s Toronto home to make it better suit the needs of their family. Although they were happy with the Kitchen layout, they requested that we update the existing cabinetry, and add additional cabinetry for increased storage. In the Laundry Room, they needed a storage solution for cleaning materials, and an updated laundry sink. They wanted the Basement to be a comfortable family space to spend time together, and for the kids to have a space to play.
The Kitchen cabinets were dated and starting to fall apart, and the Master En-Suite was dated and awkwardly shaped, with a tight walk-in shower.
In the Basement, the HVAC bulkhead was awkward and unsightly, and the space was not ideal for the kids to play, due to outdated carpeting, and a lack of storage space for their toys.
We spent time getting to know our clients to design a space that optimized functionality and comfort for their family.
In the Kitchen, we kept the existing layout, but added a tall cabinet for pantry and broom storage. A new island was built with a space to accommodate a built-in microwave, to keep it from cluttering the countertop. The new white oak tall cabinets and island cabinets were complimented by light coloured marble-looking quartz countertops and the handmade subway tile backsplash for a fresh, updated look.
In the Master Ensuite, we replaced the large, dated deck-mounted tub with a semi-freestanding tub, tucked nicely into the corner. The extra space this created allowed us to add a walk-in shower without the awkward angle that had existed prior to the renovation. The new walk-in shower featured a ceiling mounted showerhead, and a useful ledge for toiletries. We even had enough space to add a bonus make-up table to match the new double vanity. Both were custom built to be floating for a modern look, and easier maintenance.
In the Laundry Room, we installed the washer and dryer side by side, instead of stacked. This allowed for a long working countertop and upper storage cabinets that were custom built. Additionally, a hanging rack installed above the sink is perfect for drying small items, and the adjustable shelves and dividers in the custom built cabinetry will provide plenty of convenient space to store cleaning materials.
In the Basement, we widened the bulkhead to allow us to center the wall-mounted TV, and added custom media cabinets with floating shelves to accommodate electronics.
The space was made more comfortable for the kids to play with new vinyl heated flooring, and tall cabinets with adjustable shelves, dividers, and deep drawers to keep all of their toys organized.
All of these updates provided our clients with a home that fits their family’s needs and lifestyle.
If your home isn’t functional for your family, contact us to learn more. We’re the Renovator You Can Count On!
 Sosna Inc
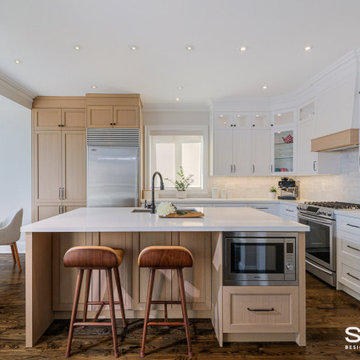
Our clients, a family of professionals with 2 young kids, approached us to renovate their early 2000’s Toronto home to make it better suit the needs of their family. Although they were happy with the Kitchen layout, they requested that we update the existing cabinetry, and add additional cabinetry for increased storage. In the Laundry Room, they needed a storage solution for cleaning materials, and an updated laundry sink. They wanted the Basement to be a comfortable family space to spend time together, and for the kids to have a space to play.
The Kitchen cabinets were dated and starting to fall apart, and the Master En-Suite was dated and awkwardly shaped, with a tight walk-in shower.
In the Basement, the HVAC bulkhead was awkward and unsightly, and the space was not ideal for the kids to play, due to outdated carpeting, and a lack of storage space for their toys.
We spent time getting to know our clients to design a space that optimized functionality and comfort for their family.
In the Kitchen, we kept the existing layout, but added a tall cabinet for pantry and broom storage. A new island was built with a space to accommodate a built-in microwave, to keep it from cluttering the countertop. The new white oak tall cabinets and island cabinets were complimented by light coloured marble-looking quartz countertops and the handmade subway tile backsplash for a fresh, updated look.
In the Master Ensuite, we replaced the large, dated deck-mounted tub with a semi-freestanding tub, tucked nicely into the corner. The extra space this created allowed us to add a walk-in shower without the awkward angle that had existed prior to the renovation. The new walk-in shower featured a ceiling mounted showerhead, and a useful ledge for toiletries. We even had enough space to add a bonus make-up table to match the new double vanity. Both were custom built to be floating for a modern look, and easier maintenance.
In the Laundry Room, we installed the washer and dryer side by side, instead of stacked. This allowed for a long working countertop and upper storage cabinets that were custom built. Additionally, a hanging rack installed above the sink is perfect for drying small items, and the adjustable shelves and dividers in the custom built cabinetry will provide plenty of convenient space to store cleaning materials.
In the Basement, we widened the bulkhead to allow us to center the wall-mounted TV, and added custom media cabinets with floating shelves to accommodate electronics.
The space was made more comfortable for the kids to play with new vinyl heated flooring, and tall cabinets with adjustable shelves, dividers, and deep drawers to keep all of their toys organized.
All of these updates provided our clients with a home that fits their family’s needs and lifestyle.
If your home isn’t functional for your family, contact us to learn more. We’re the Renovator You Can Count On!
 Tile Doctor Ltd
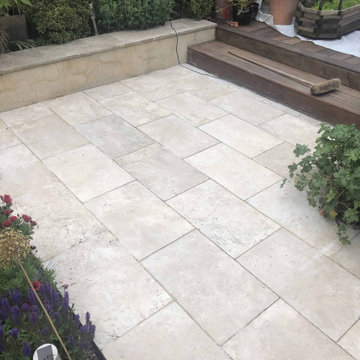
The picture shows an Travertine patio that was installed at a property in Hackney E5 around ten years ago and it had never been sealed. Over the year’s pollution and weather etc had taken its toll on the stone leaving the travertine stained with lichen, dull and grey as opposed to their original white/cream colour. Had the patio been sealed it would have provided some protection from the elements.
I conducted an initial visit where I tested several products to see what would be the most effective and establish what was required. Using that knowledge, I followed up with a written quote which was accepted, and a date arranged to complete the work.
We have adopted new working practices since the COVID-19 epidemic so we can work safely inside or outside but given the excellent weather this year this was an ideal and much easier to maintain social distancing.
During day 1 on site I started by sweeping away loose stones and other debris you typically find on patios. Then Tile Doctor Patio and Brick Driveway cleaner was applied neat to the stone and left for two hours. This is a very strong product designed for use by professionals which cuts through the dirt and was ideal for this situation. There are certain precautions you do need to take when using it such as wearing PPE and you must keep it away from ponds etc.
Using water to lubricate, the solution was then scrubbed into the stone using a coarse 200-grit pad fitted to a rotary machine and followed up with a lot of rinsing and extracting with water and a wet vacuum.
To refine the surface after the coarse Travertine the 200-grit pad I followed with 400, 800 and then 1500-grit burnishing pads in sequence rinsing with water and extracting after each pad was applied. This process is known as burnishing and closes the pores in the stone giving it a polished appearance. By this point the Travertine looked way better and we were starting to get the smooth finish back.
The weather held so the following morning a 3000-grit polishing pad was applied dry to the stone using only a little water. This brings up the appearance of the stone even further and has the added advantage of leaving it dry and ready for sealing.
The client wanted a natural appearance so two coats of Tile Doctor Ultra Seal were applied to seal the stone. Ultra-Seal is an impregnating sealer that soaks into the stone, protecting it from within yet without changing the appearance of the stone leaving a completely natural look.
The client very happy with job and now proud so show off her revamped patio. They hadn’t realised that the patio should have looked like this from the start. For aftercare I recommended they use Tile Doctor Stone Soap, many day to day cleaning products you find in supermarkets can strip off a sealer so if your using something else do check the label first.
Jackson Davis
East London Tile Doctor


 safe ZOnea
Every year, the same thing happens. The first real snowfall arrives, demand for de-icing materials spikes overnight, and the businesses that waited too long find themselves scrambling for supply at the worst possible moment. Facility managers, property owners, contractors, and municipalities all depend on a steady supply of salt and ice melt to keep their properties safe and operational through winter. The ones who plan ahead sail through. The ones who don't pay more, wait longer, and take on real risk.
Sourcing de-icing materials well is not complicated, but it does require thinking ahead and understanding the options. The choices you make about what to buy, how to buy it, and who to buy it from have a direct effect on your costs, your reliability, and your ability to keep people safe when conditions turn dangerous. This article lays out what matters.
Why Your Choice of Supplier Matters More Than You Think
It is easy to treat de-icing material as a commodity, something you grab whenever you need it without much thought about where it comes from. That works fine until the moment it doesn't, usually in the middle of a storm when everyone needs supply at once and the casual sources have run dry. At that point, the relationships you built before the season become the difference between staying stocked and being stuck.
Reliable supply is the whole game in winter operations. A property that runs out of ice melt during a storm faces safety hazards, liability exposure, and disruption, none of which can wait for a back-ordered shipment. This is why establishing relationships with dependable rock salt suppliers before the season starts is one of the smartest moves a facility manager or contractor can make. It locks in supply, often locks in better pricing, and removes a major source of mid-winter stress.
The lesson here is to treat sourcing as a planning decision rather than a last-minute errand. The businesses that come through winter smoothly are almost always the ones that secured their supply chain early, chose suppliers who could actually deliver when it counted, and never had to gamble on finding material during a shortage. Reliability bought in advance is far cheaper than scarcity paid for in a crisis.
Bagged or Bulk: Matching the Material to the Job
One of the first practical decisions is whether to buy de-icing material in bags or in bulk, and the right answer depends entirely on the operation. Each format has clear advantages, and many operations end up using both for different purposes.
Bagged material offers convenience, control, and easy storage. It is simple to handle, easy to distribute to different locations or crews, straightforward to store without special equipment, and convenient for spot application by hand. It suits smaller properties, businesses without bulk storage, and situations where portion control and tidiness matter. Bulk material, on the other hand, tends to make sense for large operations that go through high volumes, where buying in quantity lowers the per-unit cost and the operation has the equipment and space to store and handle it. The tradeoff is between the convenience and flexibility of bags and the volume economics of bulk.
For many operations, the right approach is a mix: bulk for the high-volume core of the work and bags for flexibility, spot treatment, and locations where bulk handling is impractical. The key is to match the format to how the material will actually be stored, moved, and applied, rather than defaulting to one or the other out of habit. Thinking this through in advance avoids both the waste of over-buying bulk you can't handle and the expense of relying entirely on bags for a large operation.
Rock Salt Is Not Your Only Option
Rock salt, or sodium chloride, is the workhorse of winter de-icing for good reason. It is effective, widely available, and cost-efficient, which makes it the default choice for most operations most of the time. But it has limits, and understanding the alternatives helps you choose the right material for the conditions you actually face.
The most important limitation is temperature. Rock salt becomes less effective as temperatures drop, and in genuinely cold conditions it can struggle to do the job at all. This is where alternatives come in. Calcium chloride, for instance, works at much lower temperatures than rock salt and acts quickly, which makes it valuable when conditions are severe or when fast melting matters. Operations that face hard freezes or need dependable performance in extreme cold often keep calcium chloride for sale on hand for exactly those situations, using it alongside rock salt rather than instead of it.
The practical approach is to understand the conditions your property faces and stock accordingly. For many operations, rock salt handles the bulk of the work while a faster, colder-rated material like calcium chloride covers the extreme days when ordinary salt falls short. Matching the material to the temperature and the urgency of the situation is what separates an operation that stays ahead of winter from one that is constantly reacting to it.
Securing Your Supply Before the Season
Knowing what to buy is only half the equation. The other half is making sure you can actually get it when you need it, which means securing your supply before winter arrives rather than after it has already started. Timing is one of the most underrated factors in winter operations.
The logic is simple. Demand for de-icing materials is highly seasonal and spikes sharply during storms, when everyone needs supply simultaneously. Prices and availability both move against the buyer at exactly those moments. By contrast, planning ahead, estimating your needs and arranging supply before the season, puts you in a far stronger position. Working with established rock salt suppliers ahead of time means your material is accounted for before the rush, often at better pricing and with the confidence that it will be there when the first storm hits.
This kind of planning also lets you think clearly rather than react under pressure. You can estimate your seasonal needs based on your property and past winters, decide on the right mix of materials and formats, and arrange storage in advance. Operations that do this consistently spend less, worry less, and never find themselves making frantic calls during a storm. The effort of planning ahead is modest, and the payoff in reliability and cost savings is substantial.
Storing and Handling What You Buy
Securing supply is not much use if the material degrades before you can use it, which makes proper storage and handling an important and often overlooked part of the equation. De-icing materials are sensitive to moisture, and poor storage can turn a good supply into a clumped, hardened mess that is difficult to apply.
The fundamentals are straightforward. Keep material dry and protected from moisture, since salt and ice melt readily absorb water and can harden if exposed. Store it in a way that suits the format, whether that means a proper bulk storage area or a dry space for stacked bags. Keep it accessible, so crews can get to it quickly when a storm hits and time is short. And handle it with the right equipment for the format and volume, which protects both the material and the people working with it. None of this is complicated, but neglecting it can undermine even a well-planned supply.
Good storage practices protect the investment you made in securing supply early. There is little point in arranging your materials ahead of the season only to have them degrade before use. Treating storage and handling as part of the overall plan, rather than an afterthought, ensures that the material you secured is actually usable when the moment comes. It is the final link in a supply chain built to perform under winter conditions.
Estimating How Much You Actually Need
One question trips up operations of every size: how much de-icing material to buy. Order too little and you risk running short during a storm. Order too much and you tie up money and storage space in material you may not use. Getting the estimate reasonably right is a meaningful part of sourcing well.
Several factors shape the answer. The size and type of the areas you treat, sidewalks, lots, entrances, and drive lanes, set the baseline for how much material each application consumes. The local climate matters too, since colder regions and those with frequent snowfall go through far more material than milder ones. Application frequency depends on how often storms hit and how quickly surfaces need to be cleared, which varies with the kind of property and the expectations of the people who use it. And the type of material plays a role, since different products are applied at different rates.
Past experience is often the best guide. Operations that track what they used in previous winters, adjusted for the size of the property and the severity of the season, can estimate their needs with reasonable confidence. For newer operations without that history, it helps to plan conservatively and to work with a supplier who can replenish stock reliably, so that a low estimate does not turn into a mid-storm shortage.
The goal is not perfect precision but a sound, slightly cautious estimate paired with a dependable supply relationship. That combination lets an operation keep enough material on hand to handle the season without over-committing to volume it cannot store or use. Thinking this through before winter, rather than guessing during it, is one more way that planning ahead pays off when the snow starts to fall.
The Bottom Line
Sourcing de-icing materials well comes down to a few straightforward principles: plan ahead, choose reliable suppliers before the season, match your materials and formats to your actual needs and conditions, and store what you buy properly. The operations that follow these principles move through winter with confidence, while those that improvise pay more and take on needless risk.
Winter is predictable in one respect: it arrives every year, and demand for de-icing material spikes the moment it does. The businesses that prepare for that reality, rather than being surprised by it, are the ones that keep their properties safe, their costs controlled, and their operations running no matter what the season throws at them. A little foresight before the first snowfall pays off through every storm that follows.
 Tuscanbasins
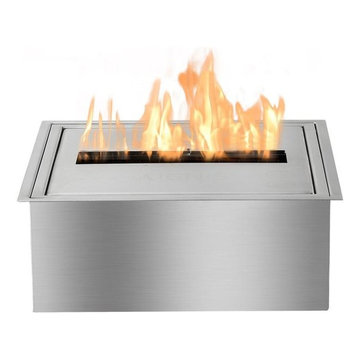
Go earth-friendly by ditching your existing wood-burning fireplace and using this EB1212 Ethanol Fireplace Burner Insert instead. Just stick this insert into your existing fireplace and start burning eco-friendly ethanol instead of wood. Help the planet breathe easier while also eliminating the mess, soot, and fuss of using a wood-burning unit. This sleek-looking insert holds up to 5 liters of fuel and it burns around 8 hours between fills, so it will keep you toasty warm and comfy all day long. This double-layered unit has an approximate output of 11,500 BTUs, so it can sufficiently heat an average-sized space, and it comes with a bonus damper tool. Dimensions: 12" x 12" x 4 1/2".
FEATURES:
Ventless - no chimney, no gas or electric lines required
Easy or no maintenance required
Capacity: 5 Liters
Approximate burn time - 8 - 16 hours per refill
Approximate BTU output: ~ 11500
Double Layer
Dimensions: 12" x 12" x 4 1/2"
Product Weight: 14.5 Pounds
3-year manufacturer's warranty
DOWNLOADS:
RECOMMENDED FUEL:
Ethanol fuel burns cleanly and does not produce the soot, smoke, or mess that is normally associated with a wood-burning fireplace. This ethanol fireplace fuel is made from 100% alcohol without the use of any oil at all. Ethanol is produced from renewable agriculture products, like barley, grains, sunflowers, corn, wheat, and potatoes, and manufactured in an earth-friendly process that does not harm the environment.
Ignis Ethanol Fuel - 3, 6, 12, or 24 Pack
 Windows Dressed Up
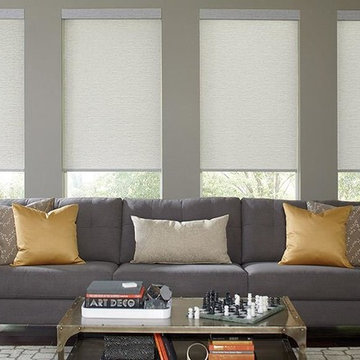
Living rooms decor - Light gray roman roller shades or roman roller blinds look nice in this living room design with the gray sofa and white and gray area rug. Living room home interior ideas include selecting what kind of window treatments go best with the living room furniture and wall paint colors. Blackout roman shades, top down bottom up shades, motorized shades, cordless roman shades? Home decorators have a lot of choices in window treatment ideas to select the right one.
Windows Dressed Up in Denver is also is your store for custom curtains, drapes, valances, custom roman shades, valances and cornices. We also make custom bedding - comforters, duvet covers, throw pillows, bolsters and upholstered headboards. Custom curtain rods & drapery hardware too. Hunter Douglas, Graber and Lafayette Interior Fashions.
Lafayette Interior Fashions custom roman roller shade photo. Living room ideas.
 Sosna Inc
Our clients, a family of professionals with 2 young kids, approached us to renovate their early 2000’s Toronto home to make it better suit the needs of their family. Although they were happy with the Kitchen layout, they requested that we update the existing cabinetry, and add additional cabinetry for increased storage. In the Laundry Room, they needed a storage solution for cleaning materials, and an updated laundry sink. They wanted the Basement to be a comfortable family space to spend time together, and for the kids to have a space to play.
The Kitchen cabinets were dated and starting to fall apart, and the Master En-Suite was dated and awkwardly shaped, with a tight walk-in shower.
In the Basement, the HVAC bulkhead was awkward and unsightly, and the space was not ideal for the kids to play, due to outdated carpeting, and a lack of storage space for their toys.
We spent time getting to know our clients to design a space that optimized functionality and comfort for their family.
In the Kitchen, we kept the existing layout, but added a tall cabinet for pantry and broom storage. A new island was built with a space to accommodate a built-in microwave, to keep it from cluttering the countertop. The new white oak tall cabinets and island cabinets were complimented by light coloured marble-looking quartz countertops and the handmade subway tile backsplash for a fresh, updated look.
In the Master Ensuite, we replaced the large, dated deck-mounted tub with a semi-freestanding tub, tucked nicely into the corner. The extra space this created allowed us to add a walk-in shower without the awkward angle that had existed prior to the renovation. The new walk-in shower featured a ceiling mounted showerhead, and a useful ledge for toiletries. We even had enough space to add a bonus make-up table to match the new double vanity. Both were custom built to be floating for a modern look, and easier maintenance.
In the Laundry Room, we installed the washer and dryer side by side, instead of stacked. This allowed for a long working countertop and upper storage cabinets that were custom built. Additionally, a hanging rack installed above the sink is perfect for drying small items, and the adjustable shelves and dividers in the custom built cabinetry will provide plenty of convenient space to store cleaning materials.
In the Basement, we widened the bulkhead to allow us to center the wall-mounted TV, and added custom media cabinets with floating shelves to accommodate electronics.
The space was made more comfortable for the kids to play with new vinyl heated flooring, and tall cabinets with adjustable shelves, dividers, and deep drawers to keep all of their toys organized.
All of these updates provided our clients with a home that fits their family’s needs and lifestyle.
If your home isn’t functional for your family, contact us to learn more. We’re the Renovator You Can Count On!
Sponsored
Columbus, OH
Free consultation for landscape design!

Peabody Landscape Group
Franklin County's Reliable Landscape Design & Contracting
 Sosna Inc
Our clients, a family of professionals with 2 young kids, approached us to renovate their early 2000’s Toronto home to make it better suit the needs of their family. Although they were happy with the Kitchen layout, they requested that we update the existing cabinetry, and add additional cabinetry for increased storage. In the Laundry Room, they needed a storage solution for cleaning materials, and an updated laundry sink. They wanted the Basement to be a comfortable family space to spend time together, and for the kids to have a space to play.
The Kitchen cabinets were dated and starting to fall apart, and the Master En-Suite was dated and awkwardly shaped, with a tight walk-in shower.
In the Basement, the HVAC bulkhead was awkward and unsightly, and the space was not ideal for the kids to play, due to outdated carpeting, and a lack of storage space for their toys.
We spent time getting to know our clients to design a space that optimized functionality and comfort for their family.
In the Kitchen, we kept the existing layout, but added a tall cabinet for pantry and broom storage. A new island was built with a space to accommodate a built-in microwave, to keep it from cluttering the countertop. The new white oak tall cabinets and island cabinets were complimented by light coloured marble-looking quartz countertops and the handmade subway tile backsplash for a fresh, updated look.
In the Master Ensuite, we replaced the large, dated deck-mounted tub with a semi-freestanding tub, tucked nicely into the corner. The extra space this created allowed us to add a walk-in shower without the awkward angle that had existed prior to the renovation. The new walk-in shower featured a ceiling mounted showerhead, and a useful ledge for toiletries. We even had enough space to add a bonus make-up table to match the new double vanity. Both were custom built to be floating for a modern look, and easier maintenance.
In the Laundry Room, we installed the washer and dryer side by side, instead of stacked. This allowed for a long working countertop and upper storage cabinets that were custom built. Additionally, a hanging rack installed above the sink is perfect for drying small items, and the adjustable shelves and dividers in the custom built cabinetry will provide plenty of convenient space to store cleaning materials.
In the Basement, we widened the bulkhead to allow us to center the wall-mounted TV, and added custom media cabinets with floating shelves to accommodate electronics.
The space was made more comfortable for the kids to play with new vinyl heated flooring, and tall cabinets with adjustable shelves, dividers, and deep drawers to keep all of their toys organized.
All of these updates provided our clients with a home that fits their family’s needs and lifestyle.
If your home isn’t functional for your family, contact us to learn more. We’re the Renovator You Can Count On!
 Sosna Inc
Our clients, a family of professionals with 2 young kids, approached us to renovate their early 2000’s Toronto home to make it better suit the needs of their family. Although they were happy with the Kitchen layout, they requested that we update the existing cabinetry, and add additional cabinetry for increased storage. In the Laundry Room, they needed a storage solution for cleaning materials, and an updated laundry sink. They wanted the Basement to be a comfortable family space to spend time together, and for the kids to have a space to play.
The Kitchen cabinets were dated and starting to fall apart, and the Master En-Suite was dated and awkwardly shaped, with a tight walk-in shower.
In the Basement, the HVAC bulkhead was awkward and unsightly, and the space was not ideal for the kids to play, due to outdated carpeting, and a lack of storage space for their toys.
We spent time getting to know our clients to design a space that optimized functionality and comfort for their family.
In the Kitchen, we kept the existing layout, but added a tall cabinet for pantry and broom storage. A new island was built with a space to accommodate a built-in microwave, to keep it from cluttering the countertop. The new white oak tall cabinets and island cabinets were complimented by light coloured marble-looking quartz countertops and the handmade subway tile backsplash for a fresh, updated look.
In the Master Ensuite, we replaced the large, dated deck-mounted tub with a semi-freestanding tub, tucked nicely into the corner. The extra space this created allowed us to add a walk-in shower without the awkward angle that had existed prior to the renovation. The new walk-in shower featured a ceiling mounted showerhead, and a useful ledge for toiletries. We even had enough space to add a bonus make-up table to match the new double vanity. Both were custom built to be floating for a modern look, and easier maintenance.
In the Laundry Room, we installed the washer and dryer side by side, instead of stacked. This allowed for a long working countertop and upper storage cabinets that were custom built. Additionally, a hanging rack installed above the sink is perfect for drying small items, and the adjustable shelves and dividers in the custom built cabinetry will provide plenty of convenient space to store cleaning materials.
In the Basement, we widened the bulkhead to allow us to center the wall-mounted TV, and added custom media cabinets with floating shelves to accommodate electronics.
The space was made more comfortable for the kids to play with new vinyl heated flooring, and tall cabinets with adjustable shelves, dividers, and deep drawers to keep all of their toys organized.
All of these updates provided our clients with a home that fits their family’s needs and lifestyle.
If your home isn’t functional for your family, contact us to learn more. We’re the Renovator You Can Count On!
 Sosna Inc
Our clients, a family of professionals with 2 young kids, approached us to renovate their early 2000’s Toronto home to make it better suit the needs of their family. Although they were happy with the Kitchen layout, they requested that we update the existing cabinetry, and add additional cabinetry for increased storage. In the Laundry Room, they needed a storage solution for cleaning materials, and an updated laundry sink. They wanted the Basement to be a comfortable family space to spend time together, and for the kids to have a space to play.
The Kitchen cabinets were dated and starting to fall apart, and the Master En-Suite was dated and awkwardly shaped, with a tight walk-in shower.
In the Basement, the HVAC bulkhead was awkward and unsightly, and the space was not ideal for the kids to play, due to outdated carpeting, and a lack of storage space for their toys.
We spent time getting to know our clients to design a space that optimized functionality and comfort for their family.
In the Kitchen, we kept the existing layout, but added a tall cabinet for pantry and broom storage. A new island was built with a space to accommodate a built-in microwave, to keep it from cluttering the countertop. The new white oak tall cabinets and island cabinets were complimented by light coloured marble-looking quartz countertops and the handmade subway tile backsplash for a fresh, updated look.
In the Master Ensuite, we replaced the large, dated deck-mounted tub with a semi-freestanding tub, tucked nicely into the corner. The extra space this created allowed us to add a walk-in shower without the awkward angle that had existed prior to the renovation. The new walk-in shower featured a ceiling mounted showerhead, and a useful ledge for toiletries. We even had enough space to add a bonus make-up table to match the new double vanity. Both were custom built to be floating for a modern look, and easier maintenance.
In the Laundry Room, we installed the washer and dryer side by side, instead of stacked. This allowed for a long working countertop and upper storage cabinets that were custom built. Additionally, a hanging rack installed above the sink is perfect for drying small items, and the adjustable shelves and dividers in the custom built cabinetry will provide plenty of convenient space to store cleaning materials.
In the Basement, we widened the bulkhead to allow us to center the wall-mounted TV, and added custom media cabinets with floating shelves to accommodate electronics.
The space was made more comfortable for the kids to play with new vinyl heated flooring, and tall cabinets with adjustable shelves, dividers, and deep drawers to keep all of their toys organized.
All of these updates provided our clients with a home that fits their family’s needs and lifestyle.
If your home isn’t functional for your family, contact us to learn more. We’re the Renovator You Can Count On!
43