
Search results for "Box properly" in Home Design Ideas
 YORK ENTERPRISES LLC
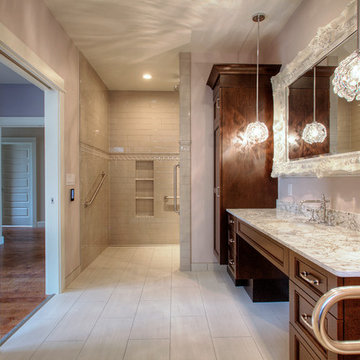
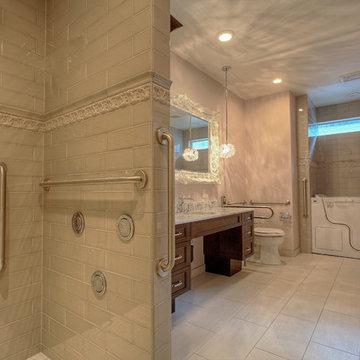
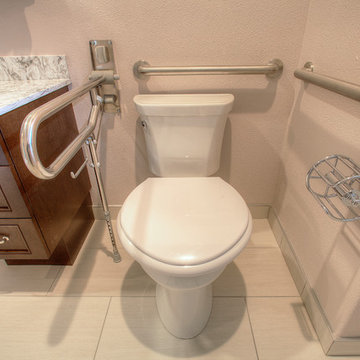
We altered a master bathroom to create a spa like accessible bathroom. The toilet was relocated from it’s tight space to the right of the vanity, where a linen closet used to be, allowed for proper clearance and bar placement. One of the grab bars folds up when not in use. The former toilet area became a beautiful barrier free shower with an infinity drain along the far wall. The shower has a rain head and a Kohler Artifacts hand shower. The six shower spray heads are hooked to a thermostatic valve controlled by software that can be set via an app or control pad. It was a challenge to fit the multiple shower heads’ plumbing, the thermostatic valve box and it’s electrical in the walls with the backer the multiple grab bars required. We had to coordinate the subcontractors in this area so the backer was not disturbed and all of the systems had the space they needed. The tile in the shower has two accents, a chair rail tile over an ornate accent tile. Three niches in the wall have the quartz countertop material as the shelf. To accommodate the infinity drain, the shower floor has additional backer to support the weight of an occupied wheelchair. We removed the existing shower and installed a SanSpa wheelchair transfer bathtub with air massage. The linen closet hides the shower plumbing access. The molding at the top of the cabinet hides the wifi receiver that is needed for the shower controls. A large ornate mirror hangs at an angle above the vanity so the homeowner can be seated and use the mirror. The stunning statement countertop is Avalanche quartz from Pental. This remodel was a challenge to craft the structure behind the beauty, that allowed a master bath to evolve into a completely wheelchair accessible spa retreat.
 Vetter Architects
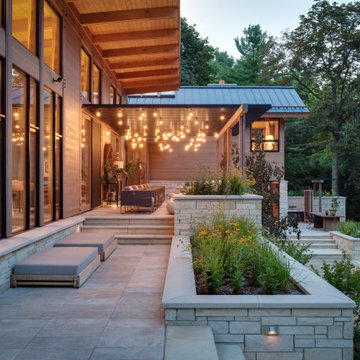
The owners requested a Private Resort that catered to their love for entertaining friends and family, a place where 2 people would feel just as comfortable as 42. Located on the western edge of a Wisconsin lake, the site provides a range of natural ecosystems from forest to prairie to water, allowing the building to have a more complex relationship with the lake - not merely creating large unencumbered views in that direction. The gently sloping site to the lake is atypical in many ways to most lakeside lots - as its main trajectory is not directly to the lake views - allowing for focus to be pushed in other directions such as a courtyard and into a nearby forest.
The biggest challenge was accommodating the large scale gathering spaces, while not overwhelming the natural setting with a single massive structure. Our solution was found in breaking down the scale of the project into digestible pieces and organizing them in a Camp-like collection of elements:
- Main Lodge: Providing the proper entry to the Camp and a Mess Hall
- Bunk House: A communal sleeping area and social space.
- Party Barn: An entertainment facility that opens directly on to a swimming pool & outdoor room.
- Guest Cottages: A series of smaller guest quarters.
- Private Quarters: The owners private space that directly links to the Main Lodge.
These elements are joined by a series green roof connectors, that merge with the landscape and allow the out buildings to retain their own identity. This Camp feel was further magnified through the materiality - specifically the use of Doug Fir, creating a modern Northwoods setting that is warm and inviting. The use of local limestone and poured concrete walls ground the buildings to the sloping site and serve as a cradle for the wood volumes that rest gently on them. The connections between these materials provided an opportunity to add a delicate reading to the spaces and re-enforce the camp aesthetic.
The oscillation between large communal spaces and private, intimate zones is explored on the interior and in the outdoor rooms. From the large courtyard to the private balcony - accommodating a variety of opportunities to engage the landscape was at the heart of the concept.
Overview
Chenequa, WI
Size
Total Finished Area: 9,543 sf
Completion Date
May 2013
Services
Architecture, Landscape Architecture, Interior Design
 C.E. Pontz Sons
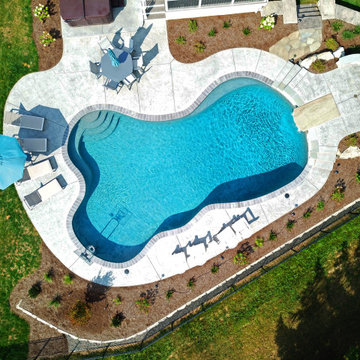
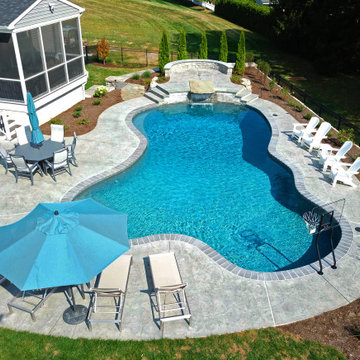
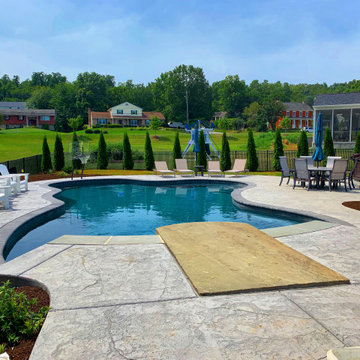
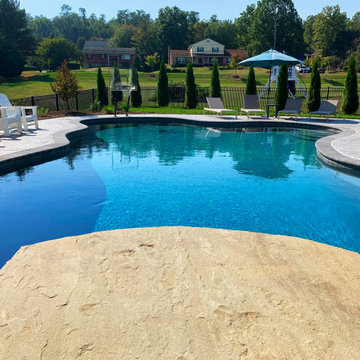
The fall has snuck up on us rather quick but not before we had a final summer day to show off this amazing outdoor living project we just recently completed. This outdoor living project included pricing to excavation and installation of a ledge rock retaining wall around the perimeter of the property. The wall included the step area, large retaining walls, proper drainage behind the wall, and wall caps. After the wall was installed we constructed the sitting wall and natural stone ‘dive rock’. the sitting wall was constructed on concrete footings, with concrete block core, faced with natural stone veneer matching stone used on pool, and capped with 2″ natural flagstone. The dive rock was set on existing pool beam and concrete slab poured behind pool beam. Installation of the landscape, grading, seeding, sodding, and landscape lighting was completed around the pool area. All plants and trees were installed in new landscape beds with mulch, decorative river stone was installed between the fence and wall across back of pool area, and all disturbed areas outside of fence were graded and seeded. All lawn areas inside of the fence were sodded. A broken flagstone path was installed from concrete patio to steps in wall, and a low natural limestone boulder wall for raised planter at egress window was also installed. A low voltage LED lighting system (FX Luxor Zoning/Dimming/Color) was installed with under cap lights installed in sitting wall (Zoning/Dimming/Color) and in existing stair treads (Zoning/Dimming) to screen porch, up lights/wash lights installed on select trees (Zoning/Dimming/Color), and path lights (Zoning) installed at concrete steps, along back of patio, and wall steps. Additional drainage including adding a drain box for the Sump pump outlet pipe and adding an underground pipe to the downspout near the pool equipment and fence gate was also installed.
Find the right local pro for your project
 C.E. Pontz Sons
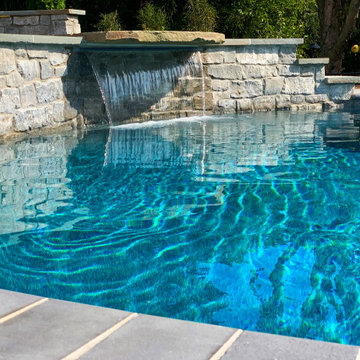
The fall has snuck up on us rather quick but not before we had a final summer day to show off this amazing outdoor living project we just recently completed. This outdoor living project included pricing to excavation and installation of a ledge rock retaining wall around the perimeter of the property. The wall included the step area, large retaining walls, proper drainage behind the wall, and wall caps. After the wall was installed we constructed the sitting wall and natural stone ‘dive rock’. the sitting wall was constructed on concrete footings, with concrete block core, faced with natural stone veneer matching stone used on pool, and capped with 2″ natural flagstone. The dive rock was set on existing pool beam and concrete slab poured behind pool beam. Installation of the landscape, grading, seeding, sodding, and landscape lighting was completed around the pool area. All plants and trees were installed in new landscape beds with mulch, decorative river stone was installed between the fence and wall across back of pool area, and all disturbed areas outside of fence were graded and seeded. All lawn areas inside of the fence were sodded. A broken flagstone path was installed from concrete patio to steps in wall, and a low natural limestone boulder wall for raised planter at egress window was also installed. A low voltage LED lighting system (FX Luxor Zoning/Dimming/Color) was installed with under cap lights installed in sitting wall (Zoning/Dimming/Color) and in existing stair treads (Zoning/Dimming) to screen porch, up lights/wash lights installed on select trees (Zoning/Dimming/Color), and path lights (Zoning) installed at concrete steps, along back of patio, and wall steps. Additional drainage including adding a drain box for the Sump pump outlet pipe and adding an underground pipe to the downspout near the pool equipment and fence gate was also installed.
 Anthony Shields and Sons Inc.
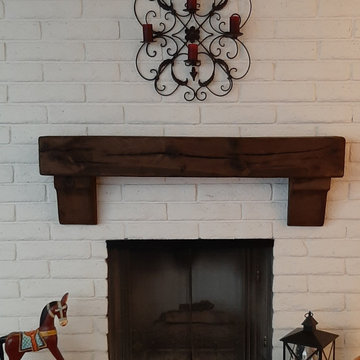
Beautiful reclaimed distressed wood mantel with wooden corbels. Every beam is different and will differ from the photos but will be as similar as possible. Each beam has its little imperfections which actually give it character.
Installation:
The mantel comes with a Notched mounting system, it is suitable for fireplaces that will be installed on finished and brick walls. For brick walls : there is an extra 10$ fee for the additional hardware needed for proper installation. You can find out more about the Notched Mounting System on our website : https://anthonyshieldsandsons.com/pages/mounting-options
If you have any questions about your mantel's installation, contact us.
We have many different wood finishes available to you. Most are original to us and nobody else offers them.
The shipping fees in this listing are an estimate, please contact us for a custom shipping quote.
If you need help or have any questions regarding an upcoming order, do not hesitate to write to us!
 Charlie Allen Renovations, Inc.
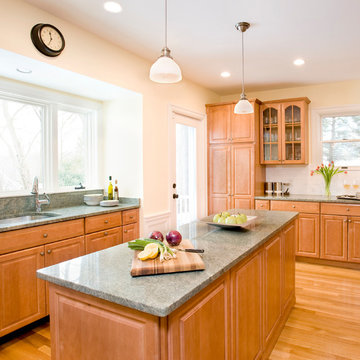
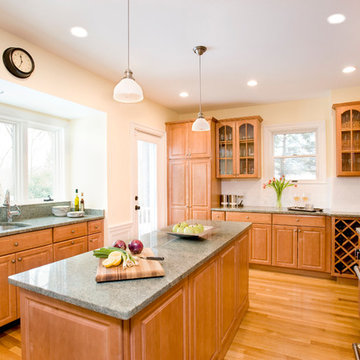
For a small family in the Boston suburbs, their modest sized home was just the right size. But with some smart changes, they wondered if it could be more enjoyable. Working with architect Joseph S. Artley, we came up with a number of solutions:
• To make the kitchen a more comfortable work and gathering space, a bay window was removed and the kitchen itself bumped out slightly to allow for the introduction of an expansive island, as well as additional countertop and cabinetry.
• The first floor half-bathroom was relocated to the end of the entry hall. This allowed us to connect the kitchen with what had been a three-season porch.
• That three-season porch was properly heated and remodeled as a sunny breakfast nook: the perfect spot for the family to gather in the mornings.
• Near the entry to the breakfast nook, an existing electrical box could not be moved. To conceal it, we suggested an oversized family bulletin board, which we provided as a gift to the homeowners. Now, it offers a great spot to catch up on the day’s activities and enjoy some family artwork while heading in for breakfast.
• This family loves to read and they asked for custom built in bookshelves in the living room that would look original to the home and match existing shelving on the other side of the room.
• The den is a favorite spot for the family to watch movies and play games, but the room, which had also been a three season porch prior to an earlier renovation, was drafty in the winter and hot in the summer. We introduced new, energy efficient windows and insulation throughout, resulting in a much more inviting and cozy room.
Today, after barely increasing the footprint of the home, the family has a new breakfast room, a usable den, a larger and more inviting kitchen, and a better-situated first-floor bath. Lots of simple fixes = a much happier space for the whole family.
Photos by Shelly Harrison
 C.E. Pontz Sons
The fall has snuck up on us rather quick but not before we had a final summer day to show off this amazing outdoor living project we just recently completed. This outdoor living project included pricing to excavation and installation of a ledge rock retaining wall around the perimeter of the property. The wall included the step area, large retaining walls, proper drainage behind the wall, and wall caps. After the wall was installed we constructed the sitting wall and natural stone ‘dive rock’. the sitting wall was constructed on concrete footings, with concrete block core, faced with natural stone veneer matching stone used on pool, and capped with 2″ natural flagstone. The dive rock was set on existing pool beam and concrete slab poured behind pool beam. Installation of the landscape, grading, seeding, sodding, and landscape lighting was completed around the pool area. All plants and trees were installed in new landscape beds with mulch, decorative river stone was installed between the fence and wall across back of pool area, and all disturbed areas outside of fence were graded and seeded. All lawn areas inside of the fence were sodded. A broken flagstone path was installed from concrete patio to steps in wall, and a low natural limestone boulder wall for raised planter at egress window was also installed. A low voltage LED lighting system (FX Luxor Zoning/Dimming/Color) was installed with under cap lights installed in sitting wall (Zoning/Dimming/Color) and in existing stair treads (Zoning/Dimming) to screen porch, up lights/wash lights installed on select trees (Zoning/Dimming/Color), and path lights (Zoning) installed at concrete steps, along back of patio, and wall steps. Additional drainage including adding a drain box for the Sump pump outlet pipe and adding an underground pipe to the downspout near the pool equipment and fence gate was also installed.
Sponsored
Columbus, OH
Free consultation for landscape design!

Peabody Landscape Group
Columbus' Reliable Landscape Design & Contracting
 Charlie Allen Renovations, Inc.
For a small family in the Boston suburbs, their modest sized home was just the right size. But with some smart changes, they wondered if it could be more enjoyable. Working with architect Joseph S. Artley, we came up with a number of solutions:
• To make the kitchen a more comfortable work and gathering space, a bay window was removed and the kitchen itself bumped out slightly to allow for the introduction of an expansive island, as well as additional countertop and cabinetry.
• The first floor half-bathroom was relocated to the end of the entry hall. This allowed us to connect the kitchen with what had been a three-season porch.
• That three-season porch was properly heated and remodeled as a sunny breakfast nook: the perfect spot for the family to gather in the mornings.
• Near the entry to the breakfast nook, an existing electrical box could not be moved. To conceal it, we suggested an oversized family bulletin board, which we provided as a gift to the homeowners. Now, it offers a great spot to catch up on the day’s activities and enjoy some family artwork while heading in for breakfast.
• This family loves to read and they asked for custom built in bookshelves in the living room that would look original to the home and match existing shelving on the other side of the room.
• The den is a favorite spot for the family to watch movies and play games, but the room, which had also been a three season porch prior to an earlier renovation, was drafty in the winter and hot in the summer. We introduced new, energy efficient windows and insulation throughout, resulting in a much more inviting and cozy room.
Today, after barely increasing the footprint of the home, the family has a new breakfast room, a usable den, a larger and more inviting kitchen, and a better-situated first-floor bath. Lots of simple fixes = a much happier space for the whole family.
Photos by Shelly Harrison
 YORK ENTERPRISES LLC
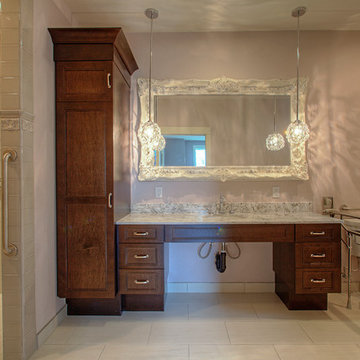
We altered a master bathroom to create a spa like accessible bathroom. The toilet was relocated from it’s tight space to the right of the vanity, where a linen closet used to be, allowed for proper clearance and bar placement. One of the grab bars folds up when not in use. The former toilet area became a beautiful barrier free shower with an infinity drain along the far wall. The shower has a rain head and a Kohler Artifacts hand shower. The six shower spray heads are hooked to a thermostatic valve controlled by software that can be set via an app or control pad. It was a challenge to fit the multiple shower heads’ plumbing, the thermostatic valve box and it’s electrical in the walls with the backer the multiple grab bars required. We had to coordinate the subcontractors in this area so the backer was not disturbed and all of the systems had the space they needed. The tile in the shower has two accents, a chair rail tile over an ornate accent tile. Three niches in the wall have the quartz countertop material as the shelf. To accommodate the infinity drain, the shower floor has additional backer to support the weight of an occupied wheelchair. We removed the existing shower and installed a SanSpa wheelchair transfer bathtub with air massage. The linen closet hides the shower plumbing access. The molding at the top of the cabinet hides the wifi receiver that is needed for the shower controls. A large ornate mirror hangs at an angle above the vanity so the homeowner can be seated and use the mirror. The stunning statement countertop is Avalanche quartz from Pental. This remodel was a challenge to craft the structure behind the beauty, that allowed a master bath to evolve into a completely wheelchair accessible spa retreat.
 ODS Architecture
A 6,000 square foot 2-story new home complex in Milpitas was designed to facilitate the owners’ large business parties and gatherings, to have rooms for the kids to come back to upstairs, and a ground floor master suite with a huge walk-in closet. Several separate structures make up the dwelling: The main house, 3-car garage with carport for overflow parking, and a separate entertainment and recreation building separated by a courtyard from the main house.
The business activities include gatherings in the hundreds of people, so parking was maximized and guests can flow in through a separate gate to party in the courtyard and recreation building. Inside this structure is a wet bar, billiard room, workout gym and home theater. The main house ground floor has formal and informal living rooms, open kitchen and master suite with views and expansive windows in every direction. The house is sited on the crestline of a hill with views of the San Francisco Bay and private golf course below. The indoor-outdoor aspect of the house is further accentuated with outside living and dining areas.
High ceilings and expansive glass walls dissolve the sense of enclosure taking advantage of the site’s openness and privacy. The owner’s suite is downstairs in anticipation of aging-in-place, and upstairs there are three bedrooms and four bathrooms plus a sitting area lounge and casual TV loft area.
The house sits on one acre at the top of a low hill range overlooking Milpitas. The city was very cognizant of the importance of keeping a low profile at this crestline and required extensive story poles and photo evidence of the proper height and siting so as not to be seen from certain selected vantage points.
GENERAL CONTRACTOR: JCD Builders Inc.
LANDSCAPE DESIGN: Morf Chang Landscape Architecture / ODS Architecture
PHOTOGRAPHS: Paul Dyer Photography
 C.E. Pontz Sons
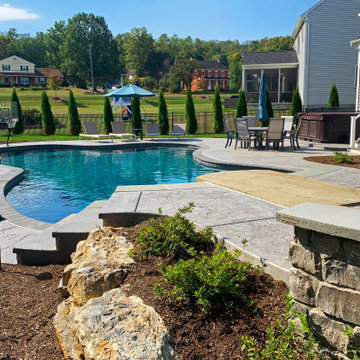
The fall has snuck up on us rather quick but not before we had a final summer day to show off this amazing outdoor living project we just recently completed. This outdoor living project included pricing to excavation and installation of a ledge rock retaining wall around the perimeter of the property. The wall included the step area, large retaining walls, proper drainage behind the wall, and wall caps. After the wall was installed we constructed the sitting wall and natural stone ‘dive rock’. the sitting wall was constructed on concrete footings, with concrete block core, faced with natural stone veneer matching stone used on pool, and capped with 2″ natural flagstone. The dive rock was set on existing pool beam and concrete slab poured behind pool beam. Installation of the landscape, grading, seeding, sodding, and landscape lighting was completed around the pool area. All plants and trees were installed in new landscape beds with mulch, decorative river stone was installed between the fence and wall across back of pool area, and all disturbed areas outside of fence were graded and seeded. All lawn areas inside of the fence were sodded. A broken flagstone path was installed from concrete patio to steps in wall, and a low natural limestone boulder wall for raised planter at egress window was also installed. A low voltage LED lighting system (FX Luxor Zoning/Dimming/Color) was installed with under cap lights installed in sitting wall (Zoning/Dimming/Color) and in existing stair treads (Zoning/Dimming) to screen porch, up lights/wash lights installed on select trees (Zoning/Dimming/Color), and path lights (Zoning) installed at concrete steps, along back of patio, and wall steps. Additional drainage including adding a drain box for the Sump pump outlet pipe and adding an underground pipe to the downspout near the pool equipment and fence gate was also installed.
 YORK ENTERPRISES LLC
We altered a master bathroom to create a spa like accessible bathroom. The toilet was relocated from it’s tight space to the right of the vanity, where a linen closet used to be, allowed for proper clearance and bar placement. One of the grab bars folds up when not in use. The former toilet area became a beautiful barrier free shower with an infinity drain along the far wall. The shower has a rain head and a Kohler Artifacts hand shower. The six shower spray heads are hooked to a thermostatic valve controlled by software that can be set via an app or control pad. It was a challenge to fit the multiple shower heads’ plumbing, the thermostatic valve box and it’s electrical in the walls with the backer the multiple grab bars required. We had to coordinate the subcontractors in this area so the backer was not disturbed and all of the systems had the space they needed. The tile in the shower has two accents, a chair rail tile over an ornate accent tile. Three niches in the wall have the quartz countertop material as the shelf. To accommodate the infinity drain, the shower floor has additional backer to support the weight of an occupied wheelchair. We removed the existing shower and installed a SanSpa wheelchair transfer bathtub with air massage. The linen closet hides the shower plumbing access. The molding at the top of the cabinet hides the wifi receiver that is needed for the shower controls. A large ornate mirror hangs at an angle above the vanity so the homeowner can be seated and use the mirror. The stunning statement countertop is Avalanche quartz from Pental. This remodel was a challenge to craft the structure behind the beauty, that allowed a master bath to evolve into a completely wheelchair accessible spa retreat.
 YORK ENTERPRISES LLC
We altered a master bathroom to create a spa like accessible bathroom. The toilet was relocated from it’s tight space to the right of the vanity, where a linen closet used to be, allowed for proper clearance and bar placement. One of the grab bars folds up when not in use. The former toilet area became a beautiful barrier free shower with an infinity drain along the far wall. The shower has a rain head and a Kohler Artifacts hand shower. The six shower spray heads are hooked to a thermostatic valve controlled by software that can be set via an app or control pad. It was a challenge to fit the multiple shower heads’ plumbing, the thermostatic valve box and it’s electrical in the walls with the backer the multiple grab bars required. We had to coordinate the subcontractors in this area so the backer was not disturbed and all of the systems had the space they needed. The tile in the shower has two accents, a chair rail tile over an ornate accent tile. Three niches in the wall have the quartz countertop material as the shelf. To accommodate the infinity drain, the shower floor has additional backer to support the weight of an occupied wheelchair. We removed the existing shower and installed a SanSpa wheelchair transfer bathtub with air massage. The linen closet hides the shower plumbing access. The molding at the top of the cabinet hides the wifi receiver that is needed for the shower controls. A large ornate mirror hangs at an angle above the vanity so the homeowner can be seated and use the mirror. The stunning statement countertop is Avalanche quartz from Pental. This remodel was a challenge to craft the structure behind the beauty, that allowed a master bath to evolve into a completely wheelchair accessible spa retreat.
Sponsored
Columbus, OH
Free consultation for landscape design!
Peabody Landscape Group
Columbus' Reliable Landscape Design & Contracting
 C.E. Pontz Sons
The fall has snuck up on us rather quick but not before we had a final summer day to show off this amazing outdoor living project we just recently completed. This outdoor living project included pricing to excavation and installation of a ledge rock retaining wall around the perimeter of the property. The wall included the step area, large retaining walls, proper drainage behind the wall, and wall caps. After the wall was installed we constructed the sitting wall and natural stone ‘dive rock’. the sitting wall was constructed on concrete footings, with concrete block core, faced with natural stone veneer matching stone used on pool, and capped with 2″ natural flagstone. The dive rock was set on existing pool beam and concrete slab poured behind pool beam. Installation of the landscape, grading, seeding, sodding, and landscape lighting was completed around the pool area. All plants and trees were installed in new landscape beds with mulch, decorative river stone was installed between the fence and wall across back of pool area, and all disturbed areas outside of fence were graded and seeded. All lawn areas inside of the fence were sodded. A broken flagstone path was installed from concrete patio to steps in wall, and a low natural limestone boulder wall for raised planter at egress window was also installed. A low voltage LED lighting system (FX Luxor Zoning/Dimming/Color) was installed with under cap lights installed in sitting wall (Zoning/Dimming/Color) and in existing stair treads (Zoning/Dimming) to screen porch, up lights/wash lights installed on select trees (Zoning/Dimming/Color), and path lights (Zoning) installed at concrete steps, along back of patio, and wall steps. Additional drainage including adding a drain box for the Sump pump outlet pipe and adding an underground pipe to the downspout near the pool equipment and fence gate was also installed.
 C.E. Pontz Sons
The fall has snuck up on us rather quick but not before we had a final summer day to show off this amazing outdoor living project we just recently completed. This outdoor living project included pricing to excavation and installation of a ledge rock retaining wall around the perimeter of the property. The wall included the step area, large retaining walls, proper drainage behind the wall, and wall caps. After the wall was installed we constructed the sitting wall and natural stone ‘dive rock’. the sitting wall was constructed on concrete footings, with concrete block core, faced with natural stone veneer matching stone used on pool, and capped with 2″ natural flagstone. The dive rock was set on existing pool beam and concrete slab poured behind pool beam. Installation of the landscape, grading, seeding, sodding, and landscape lighting was completed around the pool area. All plants and trees were installed in new landscape beds with mulch, decorative river stone was installed between the fence and wall across back of pool area, and all disturbed areas outside of fence were graded and seeded. All lawn areas inside of the fence were sodded. A broken flagstone path was installed from concrete patio to steps in wall, and a low natural limestone boulder wall for raised planter at egress window was also installed. A low voltage LED lighting system (FX Luxor Zoning/Dimming/Color) was installed with under cap lights installed in sitting wall (Zoning/Dimming/Color) and in existing stair treads (Zoning/Dimming) to screen porch, up lights/wash lights installed on select trees (Zoning/Dimming/Color), and path lights (Zoning) installed at concrete steps, along back of patio, and wall steps. Additional drainage including adding a drain box for the Sump pump outlet pipe and adding an underground pipe to the downspout near the pool equipment and fence gate was also installed.

 TOC design & construction inc.
DESIGNED BY TOC design
CONSTRUCTION BY TOC design & Construction inc.
PHOTOS BY : Tania Scardellato
I was fortunate to have a young family approach me in desperate need to renovate there only 3 piece bathroom. This space was In dire need of a remodel, with old brown wall to wall tiles and a dated bulky yellow brown single sink vanity.
Storage was a must, lighting a necessity, and proper accessibility to the shower bath area.
We had a tight budget to respect, but a full gut of this bathroom was required. And a good thing too, once we started doing the demolition we noticed that mildew and rotting floors and walls had accumulated throughout the years. Doing it right the first time is no joke when dealing with water and electrical issues.
We discarded all reminisce of old and built from scratch, new walls, new plumbing, new electrical ,new insulation and a new window, a new fan that actually exhausted outside ( I say this laughing as you would be amazed at how many fans are installed but don’t exhaust outside, and you the client would never know unless you go inside the attic space.
Once all the hard stuff was done, the rest is just a matter of smart design. If you have a small bathroom here are some tips to guide you.
10 tips for making a small bathroom feel larger
Is your tiny bathroom cramping your functionality and style, leaving you longing for the enormous bathrooms gracing the pages of design magazines? Even if your bathroom is a fraction of the size, all it takes is some design savvy to make the most of the space you have. Consider these 10 smart tips that will help your bathroom look, feel and function like those larger contenders.
1-Get creative with corners
Space is at a premium in small bathrooms, so it's important to maximize every inch. Corners, for example, provide extra space for shelving, storage units and even hooks. Get creative and install unique design solutions that are not only functional, but also eye-catching. If you love the airiness of floating cabinets, add baskets or decorative boxes under for extra storage. If you are installing floating cabinets insure that they are installed securely to studs or plywood at wall.
2- Let solid colors shine
Busy patterns have a shrinking effect and make small bathrooms seem even smaller. Conversely, light natural hues make a space feel more open. If you're itching to get creative with design, experiment with textures but keep overpowering patterns to a minimum. Tone on tone is the best to achieve this.
3 - Maximize your bathtub
A bathtub takes up a significant portion of the room, but modern, compact options with curved basins, can make the tub feel larger when in use, all while conserving space.
4 - Select a smaller faucet
A faucet is jewelry for the bathroom. And just as accessories can overpower an outfit, a big bulky faucet isn't flattering in a small bath. Single-handle designs conserve counter space, while a wall-mount installation frees it up all together and can create quite the wow-factor, if the budget can accommodate the required changes to plumbing behind the wall.
5 - Make vanity storage simple
If you're in a storage war with your small bathroom, you're not alone in the battle. Toiletries and personal supplies without a place to call home only add clutter and chaos. Store smart with a space-saving vanity, the dual sink vanity shown here, looks quite simple, but in reality it has 4 sets of full extension drawers, and the vanity tower adds extra storage without overpowering the use of space.
6 - Show off the shower
Shower curtains may be pretty, but they interrupt the visual flow of a bathing space and make it feel significantly smaller. In bathrooms with small footprints, opt for a clear glass sliding shower door that doesn't require the clearance of one with a hinged design. Or as shown in this design and for fraction less expensive a half hinged panel installed on a fixed tempered glass panel. If you're embarking on a big remodel, create the illusion of more space by using same tile in the shower that's used throughout; instead of seeing them as two separate zones, the eye will read them as one.
7 - Discover the treasure of hidden storage
Work with a contractor, and you just might find some serious storage potential hidden behind your walls. Whether it's utilizing space between the studs for shallow shelving or a creating a small linen closet by annexing space from an adjacent room, even small additions can make a big difference.
8 - Focal Point
Tile is a beautiful, durable addition to any bathroom. For dainty spaces, consider installing tile at a diagonal to accentuate the focal point or as in this bathroom I used an oversized textured pattern to bring depth to the space at the window wall.
9 - Choose the right lights
Strategically install light to reflect and brighten a small bathroom to make it appear larger. Recessed lighting is an affordable solution for tiny rooms, offering ample light while taking up little space. Wall sconces alongside a mirror also reflect off the walls and make a room feel bright and airy. I always recommend going with LED lighting at 2800 to 3000K.
10 – Accessorize
This is your time to shine in your decorating skills, have fun with your towels, you can change the color scheme daily just by adding pops of color in your accessories, make sure to get items that serve a dual purpose, like baskets, boxes they can always be used as hampers, storing of towels and even a nice display for your guest.
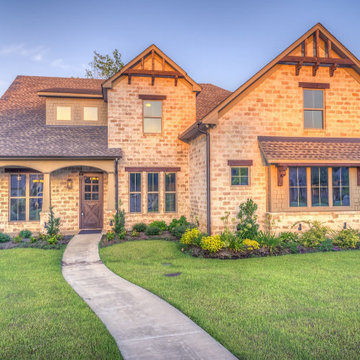
 Home Improvement
In the world of wigs, convenience and realism are two of the most sought-after qualities. Women want wigs that not only look natural but also require minimal effort to wear and style. Enter wear and go wigs combined with bleached knots—a powerful duo that transforms the wig-wearing experience. These wigs offer a flawless, natural hairline and are ready to wear immediately, making them ideal for busy lifestyles without sacrificing beauty.
What Are Wear and Go Wigs?
Wear and go wigs are pre-styled wigs designed for instant wear. Unlike traditional wigs that require lace trimming, knot bleaching, or customization, wear and go wigs come ready for action right out of the box.
Key Features:
- Pre-plucked hairline and baby hairs
- Glueless design with adjustable straps and combs for secure fit
- Available in various textures such as straight, curly, and wavy
- Made with 100% human hair for authentic look and feel
- Often pre-styled into trendy cuts and shapes
- Time Saver: Perfect for women with busy schedules who want instant glam
- User-Friendly: No professional installation needed—ideal for beginners
- Protective Styling: Allows your natural hair to rest and grow healthy
- Versatile: Can be styled further with heat tools or left as is
- Reusable: Durable with proper care, lasting several months
- Lightened knots on lace for a natural scalp appearance
- Available in lace front, full lace, and 360 lace varieties
- Made with high-quality 100% human hair
- Pre-plucked hairline often accompanies bleached knots
- Customizable with parting styles and baby hairs
- Ultra-Realistic: Mimics the natural scalp for an undetectable hairline
- Styling Freedom: Allows for multiple parting options and updos
- Comfortable: Breathable lace cap keeps the scalp cool
- Protective: Keeps your natural hair shielded from heat and damage
- Long-Lasting: When cared for properly, can maintain a fresh look for months
 The Fabricsmith
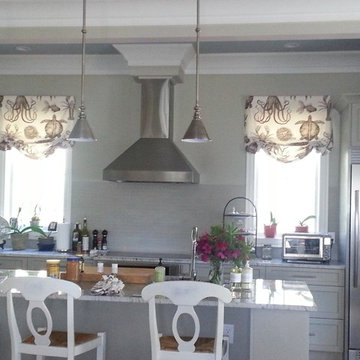
These stationary soft romans are outside mounted and hung higher than window frame to allow light into the room. We also wanted the top of the valance to be higher than the cabinet crown molding.
 MW Design Workshop
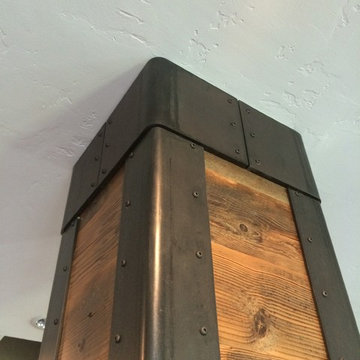
Column in reclaimed barn-wood and wrapped in blackened steel.
Photo - Josiah Zukowski
Large urban open concept and formal dark wood floor family room photo in Portland with a wall-mounted tv, gray walls, a standard fireplace and a metal fireplace
Large urban open concept and formal dark wood floor family room photo in Portland with a wall-mounted tv, gray walls, a standard fireplace and a metal fireplace
 TKS Design Group
Download our free ebook, Creating the Ideal Kitchen. DOWNLOAD NOW
Lakefront property in the northwest suburbs of Chicago is hard to come by, so when we were hired by this young family with exactly that, we were immediately inspired by not just the unusually large footprint of this 1950’s colonial revival but also the lovely views of the manmade lake it was sited on. The large 5-bedroom home was solidly stuck in the 1980’s, but we saw tons of potential. We started out by updating the existing staircase with a fresh coat of paint and adding new herringbone slate to the entry hall.
The powder room off the entryway also got a refresh - new flooring, new cabinets and fixtures. We ran the new slate right through into this space for some consistency. A fun wallpaper and shiplap trim add a welcoming feel and set the tone for the home.
Next, we tackled the kitchen. Located away from the rest of the first floor, the kitchen felt a little isolated, so we immediately began planning for how to better connect it to the rest of the first floor. We landed on removing the wall between the kitchen and dining room and designed a modified galley style space with separate cooking and clean up zones. The cooking zone consists of the refrigerator, prep sink and cooktop, along with a nice long run of prep space at the island. The cleanup side of the kitchen consists of the main sink and dishwasher. Both areas are situated so that the user can view the lake during prep work and cleanup!
One of the home’s main puzzles was how to incorporate the mudroom and area in front of the patio doors at the back of the house. We already had a breakfast table area, so the space by the patio doors was a bit of a no man’s land. We decided to separate the kitchen proper from what became the new mudroom with a large set of barn doors. That way you can quickly hide any mudroom messes but have easy access to the light coming in through the patio doors as well as the outdoor grilling station. We also love the impact the barn doors add to the overall space.
The homeowners’ first words to us were “it’s time to ditch the brown,” so we did! We chose a lovely blue pallet that reflects the home’s location on the lake which is also vibrant yet easy on the eye. Countertops are white quartz, and the natural oak floor works well with the other honey accents. The breakfast table was given a refresh with new chairs, chandelier and window treatments that frame the gorgeous views of the lake out the back.
We coordinated the slate mudroom flooring with that used in the home’s main entrance for a consistent feel. The storage area consists of open and closed storage to allow for some clutter control as needed.
Next on our “to do” list was revamping the dated brown bar area in the neighboring dining room. We eliminated the clutter by adding some closed cabinets and did some easy updates to help the space feel more current. One snag we ran into here was the discovery of a beam above the existing open shelving that had to be modified with a smaller structural beam to allow for our new design to work. This was an unexpected surprise, but in the end we think it was well worth it!
We kept the colors here a bit more muted to blend with the homeowner’s existing furnishings. Open shelving and polished nickel hardware add some simple detail to the new entertainment zone which also looks out onto the lake!
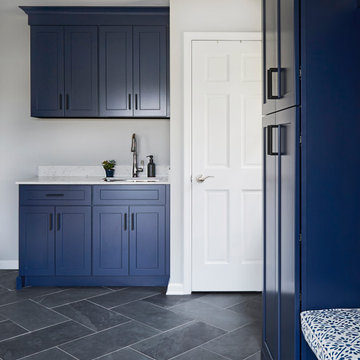
Next we tackled the upstairs starting with the homeowner’s son’s bath. The bath originally had both a tub shower and a separate shower, so we decided to swap out the shower for a new laundry area. This freed up some space downstairs in what used to be the mudroom/laundry room and is much more convenient for daily laundry needs.
We continued the blue palette here with navy cabinetry and the navy tile in the shower. Porcelain floor tile and chrome fixtures keep maintenance to a minimum while matte black mirrors and lighting add some depth the design. A low maintenance runner adds some warmth underfoot and ties the whole space together.
We added a pocket door to the bathroom to minimize interference with the door swings. The left door of the laundry closet is on a 180 degree hinge to allow for easy full access to the machines. Next we tackled the master bath which is an en suite arrangement. The original was typical of the 1980’s with the vanity outside of the bathroom, situated near the master closet. And the brown theme continued here with multiple shades of brown.
Our first move was to segment off the bath and the closet from the master bedroom. We created a short hall from the bedroom to the bathroom with his and hers walk-in closets on the left and right as well as a separate toilet closet outside of the main bathroom for privacy and flexibility.
The original bathroom had a giant soaking tub with steps (dangerous!) as well as a small shower that did not work well for our homeowner who is 6’3”. With other bathtubs in the home, they decided to eliminate the tub and create an oversized shower which takes up the space where the old tub was located. The double vanity is on the opposite wall and a bench is located under the window for morning conversations and a place to set a couple of towels.
The pallet in here is light and airy with a mix of blond wood, creamy porcelain and marble tile, and brass accents. A simple roman shade adds some texture and it’s top-down mechanism allows for light and privacy.
This large whole house remodel gave our homeowners not only the ability to maximize the potential of their home but also created a lovely new frame from which to view their fabulous lake views.
Designed by: Susan Klimala, CKD, CBD
Photography by: Michael Kaskel
For more information on kitchen and bath design ideas go to: www.kitchenstudio-ge.com
16