
Search results for "Check fit" in Home Design Ideas

 Legendary Escapes Pools
Nautical-themed hybrid swimming pool with raised spa, sunshelf, slide, grotto, and pizza oven
(September 2013) – Ask the Pool Guy and his team at Legendary Escapes recently unveiled the newest Legendary Escape, a stunning nautical-themed hybrid swimming pool. The hand-carved concrete waterfall, rock slide, and grotto are the focal point of this incredible project, and designer and builder Al Curtis has truly outdone himself this time. Behind the waterfall sits a grotto that seats 8-10 people comfortably. The waterfall, slide, and grotto area come complete with intricate details and additions that perfectly play into the project’s theme. An immense amount of creativity, talent, and skill is required to take ordinary materials like vinyl and concrete and turn them into the outstanding backyards that Curtis creates, but these details allow his creativity to shine in a different light. Curtis immerses himself completely in just one or two projects at a time, which allows him the opportunity to add those intricate details that take his extraordinary projects to the next level. Some of the details in the grotto area of this hybrid project include real ship portholes that open and close, as well as carvings and lanterns to add visual interest inside of the grotto.
The project also includes a raised spillover spa and a sunshelf with a bubbling water feature. The sunshelf has steps leading into the main body of the pool, giving swimmers an easy entry point if they don’t feel the urge to jump off the top of the waterfall or take a ride down the hand-carved, hand-tiled slide. The shelf has just enough water to allow shallow wading or lounging, and the pebbled finish provides a perfect place to set a lounge chair without worrying about damaging the vinyl liner. With the spa nearby, this whole end of the pool is perfect for relaxing, talking, or watching the kids while they swim.
This incredible hybrid swimming pool also includes a poolside pizza oven, so fresh, stone-fired pizza is never far away. The brick oven can cook a pizza in about 90 seconds, and produces authentic, outstanding pizzas. The homeowners have spent years perfecting their pizza crust and sauce recipes, as well as growing their own tomatoes and basil. The pizza oven adds another element of their own personality, and makes this project even more perfect for them. With a built-in countertop, it’s easy to get a couple of pies going at one time, or to prep ingredients for personal pizzas.
The homeowners are very family-oriented and love to have friends and family over to their home. During the construction process, the Legendary Escapes crew met several friends and family members who stopped in for some quality time and to check out the progress of the pool. The finished product is a perfect place for entertaining, and it feels very comfortable and welcoming. With the sunshelf, spa, grotto, poolside seating, and the pool itself, there are plenty of different places to sit or soak and have conversations or splash around.
Curtis is incredibly proud of this project, and he has high hopes for it. He was recently named a Master of Design by Pool & Spa News for a hybrid swimming pool he built in Brighton, MI. This new, nautical hybrid pool fits in beautifully with his portfolio, but also stands out as extraordinary. The team at Legendary Escapes anticipates positive feedback and recognition for this project, and looks forward to building more swimming pools that push the envelope and wow clients and fans.
 Tile Doctor Ltd
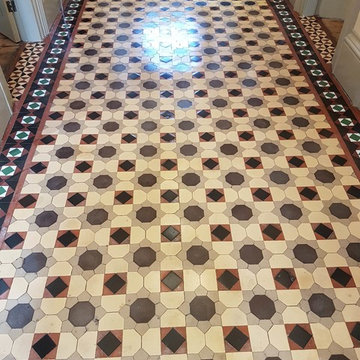
I recently re-visited a Victorian period property in the Leeds suburb of Headingley which had an unusually large tiled entrance hall which we believe to be as old as the property itself. I say re-visited as I actually gave this floor a deep clean and reseal around five years ago; it’s always nice to be asked to return to a job as it shows the customers was very happy with the work. However, with five years of wear and tear the sealer had worn down and the floor was now starting to trap dirt, also it had lost the attractive shine added by the sealer and the owner felt it was time to have it done again. Additionally, the owner had recently had the whole house decorated and wanted the floor to look its best and match the fresh appearance of the property.
Sealers do wear off with use and so it is inevitable that the tiles will need to be cleaned and sealed again with time. Given it hadn’t had a professional clean and seal for five years the floor wasn’t looking too bad as you can see from the picture, it was just a bit dull in the high traffic areas such as along the centre. I’ve certainly seen a lot worse.
Initially I wasn’t 100% sure on which cleaning method l was going to use on this floor. Originally l thought about using a coarse 200-grit burnishing pad to take off a couple of layers of sealer and then re-apply 2 more coats. However, the finish on the floor wasn’t even across the width of the hallway and l felt using that approach wouldn’t resolve that. Additionally, a lot of tiles were pitted and a burnishing pad would struggle to get into the holes. So instead I decided to completely strip the floor and re-seal it which would ensure a uniform finish across the floor.
I used a strong 50:50 dilution of Tile Doctor Pro-Clean on the tiles and scrubbed it in with a black floor pad which removed the old sealer and ingrained dirt. The large floor pads are not very effective in the corners and edges, so I used a 6-inch red buffing pad fitted to a hand buffer for those. The floor was rinsed with water and the soil extracted using a wet vacuum. After inspecting the floor some areas were retreated with a repeat of the same process.
After a final rinse and extraction of the soiled water the floor was left to dry overnight.
The next day after first checking the floor was dry with a damp meter it was sealed with four coats of Tile Doctor Seal and Go. This is a water based sealer that gives a lovely sheen and allows the colours to shine through as well as letting the floor breath, which is important in properties of this age that usually do not have a damp proof membrane.
I was very pleased with the finished result as the pictures show and glad that l had chosen to do a deep clean and not just apply more coats of sealer. The client was over the moon.
Nigel Stoker
North West Yorkshire Tile Doctor
 Tile Doctor Ltd
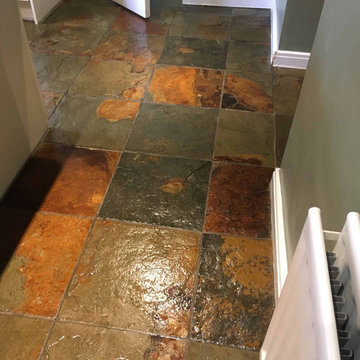
Except for general cleaning this multi-coloured slate floor had not been professionally cleaned since installation eleven years prior. Any sealer that had once been applied to the slate had long since worn off and dirt was now ingrained in the pores of the stone causing it to look dull and un-attractive. The property was in the lovely town of Staines Upon Thames, obviously situated on the banks of the River Thames and a popular place to live for London commuters.
I visited site to take a closer look at the floor and provide the client with an accurate price for renovating the stone. It turns out that the client had used all sorts of different household cleaners in an attempt to get the floor clean. Unfortunately, they were probably making the situation worse as these strong cleaning products would have actually stripped the sealant off the stone leaving it open to dirt. I carried out a test clean for them and they were very pleased to see how the floor could look. We agreed a price for the work and arranged a suitable date to carry out the work.
Cleaning a Multi-Coloured Slate Tiled Kitchen Floor
My first task was to strip off what was left of the old sealer and deep clean the stone using a dilution of Tile Doctor Remove and Go mixed 50:50 with Tile Doctor Pro-Clean. This powerful cocktail was applied to the floor and left to soak in for ten minutes before being scrubbed in using a rotary machine fitted with a black scrubbing pad.
The grout was hand scrubbed using more of the cleaning solution along the grout lines until I was happy the floor was as clean as it possibly could be. The floor was rinsed with water and the soil extracted by using the wet vacuum.
Once the floor was clear the Slate was inspected, and any stubborn areas were spot treated using the same process as before. After a final rinse and extraction, the floor was dried as much as possible using the wet vacuum and left to dry off overnight.
Sealing a Multi-Coloured Slate Tiled Kitchen Floor
I came back the next day and checked the moisture levels of the tiles using a damp meter. The floor had dried well so I had a green light for applying a new sealer. For this I used four Coats of Tile Doctor Seal and Go, allowing each coat to dry before applying the next. This product works really well on Slate and gave the tiles a nice sheen finish, the fresh sealer will also make maintenance cleaning far easier in the future.
The client was very happy with the result, the floor now looks great and the natural colours of the stone is so much more evident. For aftercare I recommended they throw away all those supermarket products and use Tile Doctor Neutral Tile Cleaner which is a pH neutral product that won’t prematurely erode the new sealer with use.
Jonathan Oldham
South Middlesex Tile Doctor
Find the right local pro for your project
 Tile Doctor Ltd
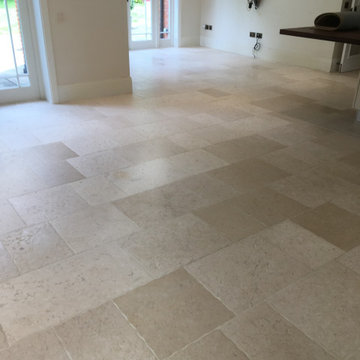
Our client had inherited this Travertine floor when purchasing in a lovely street in Walton-On-Thames, close by was the River Thames which runs all the way into London. The new owners were unhappy with the floor in that it did not look very clean, and they were keen to get this rectified. I arranged a site visit to survey the floor and see what could be done to restore its appearance.
The floor itself was in good physical condition, however, it was apparent from the level of dirt ingrained in the stone that it had not been maintained very well by the previous owner. I carried out a small test clean which came out well and they could see straight away what the floor should look really like! They were happy with my renovation quote and we agreed a mutually convenient time where I could work in relation to the COVID guidelines.
The Travertine floor was scrubbed using a mixture of Tile Doctor Pro Clean and Remove and Go. These are heavy duty cleaning products designed for use on tile and stone can be combined to form a powerful cleaning/stripping solution which is left to dwell on the floor surface. After a short while the solution was worked into the stone using a rotary machine fitted with a black scrubbing pad.
This cleaning recipe works extremely well breaking down dirt, stains, and grease in the stone. Following a machine scrub and a more manual hand scrub of the grout lines, we then pressure rinsed the soil away and then it was extracted using an industrial wet vacuum. In a couple of areas, it was necessary to repeat the process to ensure it was completely clean. Once we were satisfied that the stone was fresh and clean, the floor was left to dry off overnight, so it would be ready for sealing the following day.
After drying overnight, the floor was checked with a damp meter to make sure it was dry. Once reassured I started with the application of the fresh sealer to the floor using Tile Doctor Colour Grow Sealer which is a colour enhancing sealer that works from within by soaking into the pores of the stone. Several coats were applied allowing each one to dry before applying the next. This sealer does not provide a glossy finish, just a nice natural sheen. This brought back the contrast and natural colours in the stone, whilst adding protection to stone for many years to come.
The client was very happy with the work we carried out, the floor had come up much better than they had expected, and it really made a difference to the lovely kitchen space. The floor looked like new. I recommended the regular use of Tile Doctor Stone Soap for future cleaning which will keep the floor in great condition and ensure the longevity of the newly applied sealant.
Jonathan Oldham
South Middlesex Tile Doctor
 Legendary Escapes Pools
Nautical-themed hybrid swimming pool with raised spa, sunshelf, slide, grotto, and pizza oven
(September 2013) – Ask the Pool Guy and his team at Legendary Escapes recently unveiled the newest Legendary Escape, a stunning nautical-themed hybrid swimming pool. The hand-carved concrete waterfall, rock slide, and grotto are the focal point of this incredible project, and designer and builder Al Curtis has truly outdone himself this time. Behind the waterfall sits a grotto that seats 8-10 people comfortably. The waterfall, slide, and grotto area come complete with intricate details and additions that perfectly play into the project’s theme. An immense amount of creativity, talent, and skill is required to take ordinary materials like vinyl and concrete and turn them into the outstanding backyards that Curtis creates, but these details allow his creativity to shine in a different light. Curtis immerses himself completely in just one or two projects at a time, which allows him the opportunity to add those intricate details that take his extraordinary projects to the next level. Some of the details in the grotto area of this hybrid project include real ship portholes that open and close, as well as carvings and lanterns to add visual interest inside of the grotto.
The project also includes a raised spillover spa and a sunshelf with a bubbling water feature. The sunshelf has steps leading into the main body of the pool, giving swimmers an easy entry point if they don’t feel the urge to jump off the top of the waterfall or take a ride down the hand-carved, hand-tiled slide. The shelf has just enough water to allow shallow wading or lounging, and the pebbled finish provides a perfect place to set a lounge chair without worrying about damaging the vinyl liner. With the spa nearby, this whole end of the pool is perfect for relaxing, talking, or watching the kids while they swim.
This incredible hybrid swimming pool also includes a poolside pizza oven, so fresh, stone-fired pizza is never far away. The brick oven can cook a pizza in about 90 seconds, and produces authentic, outstanding pizzas. The homeowners have spent years perfecting their pizza crust and sauce recipes, as well as growing their own tomatoes and basil. The pizza oven adds another element of their own personality, and makes this project even more perfect for them. With a built-in countertop, it’s easy to get a couple of pies going at one time, or to prep ingredients for personal pizzas.
The homeowners are very family-oriented and love to have friends and family over to their home. During the construction process, the Legendary Escapes crew met several friends and family members who stopped in for some quality time and to check out the progress of the pool. The finished product is a perfect place for entertaining, and it feels very comfortable and welcoming. With the sunshelf, spa, grotto, poolside seating, and the pool itself, there are plenty of different places to sit or soak and have conversations or splash around.
Curtis is incredibly proud of this project, and he has high hopes for it. He was recently named a Master of Design by Pool & Spa News for a hybrid swimming pool he built in Brighton, MI. This new, nautical hybrid pool fits in beautifully with his portfolio, but also stands out as extraordinary. The team at Legendary Escapes anticipates positive feedback and recognition for this project, and looks forward to building more swimming pools that push the envelope and wow clients and fans.
 Tile Doctor Ltd
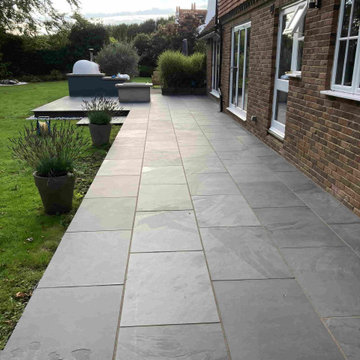
Our client in the villager of Pembury was feeling really deflated after having a Slate Patio laid adjacent to the full length of her house, however the builder had not applied the sealer correctly creating a mess which ruined the appearance of the stone.
Unfortunately, it is not that unusual to be contacted about this sort of situation, applying a sealer is not as easy as manufactures make out. There are lots of factors to consider, choosing the right sealer, is the stone damp, how do you know if you have applied too much, and it often catches tradesmen out. I was able to reassure them that with the right combination of products and equipment the problem could be rectified.
The first job was to strip off the old sealer which was done using a product called Tile Doctor Remove and Go. The name of this product pretty much says it all and once applied to the stone it is left to soak in for ten to twenty minutes before being scrubbed in with a rotary machine fitted with an abrasive burnishing pad.
Tile Doctor Remove and Go is a multi-purpose stripper which will remove most coatings and sealers, including epoxy grout haze which is another common problem we encounter when tradesmen have not cleaned up properly after grouting. It is also good for removing heavy build ups of grease. I used several burnishing pads of different grits going from coarse to smooth on this patio, rinsing and extracting the soil after each pad.
It was a large area, so this process took up most of the day on its own, fortunately I use a van mounted high pressure cleaning and extraction system to remove the soil which is very efficient and leaves the stone bright clean and reasonably dry afterwards. This ensures the process can be carried out with minimal mess.
It was a nice warm summers day and although cloudy we didn’t get any rain overnight, so after checking the forecast I was able to return the next day and apply a fresh sealer to the Slate.
My client wanted a natural look, so I used Tile Doctor Ultra Seal. This product is a no-sheen, natural-look, impregnating sealer which is formulated to provide maximum stain protection. These impregnating sealers work by penetrating the stone, occupying its pores, and thus preventing dirt from residing there.
The client was so happy and relieved to see the results on what a very expensive patio and commented she was eager to get the first barbecue of the season underway.
We recommended that a regular with the jet wash should keep the patio in good condition and in a few years time we could return to reapply the sealer for them.
Michael Conlon
South Kent Tile Doctor
 Legendary Escapes Pools
Nautical-themed hybrid swimming pool with raised spa, sunshelf, slide, grotto, and pizza oven
(September 2013) – Ask the Pool Guy and his team at Legendary Escapes recently unveiled the newest Legendary Escape, a stunning nautical-themed hybrid swimming pool. The hand-carved concrete waterfall, rock slide, and grotto are the focal point of this incredible project, and designer and builder Al Curtis has truly outdone himself this time. Behind the waterfall sits a grotto that seats 8-10 people comfortably. The waterfall, slide, and grotto area come complete with intricate details and additions that perfectly play into the project’s theme. An immense amount of creativity, talent, and skill is required to take ordinary materials like vinyl and concrete and turn them into the outstanding backyards that Curtis creates, but these details allow his creativity to shine in a different light. Curtis immerses himself completely in just one or two projects at a time, which allows him the opportunity to add those intricate details that take his extraordinary projects to the next level. Some of the details in the grotto area of this hybrid project include real ship portholes that open and close, as well as carvings and lanterns to add visual interest inside of the grotto.
The project also includes a raised spillover spa and a sunshelf with a bubbling water feature. The sunshelf has steps leading into the main body of the pool, giving swimmers an easy entry point if they don’t feel the urge to jump off the top of the waterfall or take a ride down the hand-carved, hand-tiled slide. The shelf has just enough water to allow shallow wading or lounging, and the pebbled finish provides a perfect place to set a lounge chair without worrying about damaging the vinyl liner. With the spa nearby, this whole end of the pool is perfect for relaxing, talking, or watching the kids while they swim.
This incredible hybrid swimming pool also includes a poolside pizza oven, so fresh, stone-fired pizza is never far away. The brick oven can cook a pizza in about 90 seconds, and produces authentic, outstanding pizzas. The homeowners have spent years perfecting their pizza crust and sauce recipes, as well as growing their own tomatoes and basil. The pizza oven adds another element of their own personality, and makes this project even more perfect for them. With a built-in countertop, it’s easy to get a couple of pies going at one time, or to prep ingredients for personal pizzas.
The homeowners are very family-oriented and love to have friends and family over to their home. During the construction process, the Legendary Escapes crew met several friends and family members who stopped in for some quality time and to check out the progress of the pool. The finished product is a perfect place for entertaining, and it feels very comfortable and welcoming. With the sunshelf, spa, grotto, poolside seating, and the pool itself, there are plenty of different places to sit or soak and have conversations or splash around.
Curtis is incredibly proud of this project, and he has high hopes for it. He was recently named a Master of Design by Pool & Spa News for a hybrid swimming pool he built in Brighton, MI. This new, nautical hybrid pool fits in beautifully with his portfolio, but also stands out as extraordinary. The team at Legendary Escapes anticipates positive feedback and recognition for this project, and looks forward to building more swimming pools that push the envelope and wow clients and fans.
Sponsored
Westerville, OH

Custom Home Works
Franklin County's Award-Winning Design, Build and Remodeling Expert
 Tile Doctor Ltd
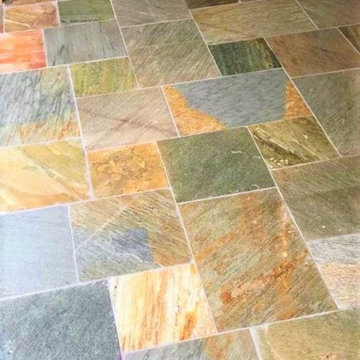
The tiles pictured are Chinese Slate which were laid in the Kitchen of a house in Chepstow around nine years ago. The town of Chepstow is located on the Welsh side of the River Seven and has the River Wye running through it.
The floor had not been professionally cleaned and sealed since installation. During this time the old sealer had mostly worn off allowing dirt to get into the pores of the stone leaving it looking dull, uninviting and dirty. The grout lines had also collected dirt and many of the lines had darkened.
I discussed with the client the process to get the floor cleaned and restored and demonstrated the effectiveness of the process on a small test area. They were impressed and were happy to go ahead with my quote, so we scheduled in the work which would take two days.
To get the floor clean and remove what was left of the old sealer I first made the floor wet and then added a strong dilution of Tile Doctor Pro-Clean mixed with Tile Doctor Remove and Go to give it extra power. This cleaning cocktail was left to soak into the tiles for ten minutes before being scrubbed in with a black scrubbing pad fitted to a rotary machine and by hand where necessary. This combination works well on really dirty floors such as this.
The scrubbing action released the years of dirt from the pores of the Slate and it wasn’t long before the cleaning solution turned black. This was then extracted off the floor using a wet vacuum. We then gave the floor a thorough inspection. There were one or two areas that were particularly stubborn, so these areas were retreated using the same process and the grout scrubbed by hand using more Tile Doctor Pro Clean.
The floor was then given another rinse with water and then dried as much as possible with the wet vacuum. This got the floor dry, but it would need to be completely dry before sealing so it was then left to dry off fully overnight.
I came back the next day to seal the floor first checking the moisture level of the stone by taking readings with a damp meter to ensure it was dry. I chose to use Tile Doctor Colour Grow for the sealer as the colour enhancing formula would be the best product to bring out the natural colours in the Chinese slate. Colour Grow is an impregnating sealer which will provides durable protection as well as allowing the surface to breath. Three coats were applied, allowing each to dry before applying the next one.
The client was so happy, so much that she said it looked better than when first laid!
I discussed aftercare with her and recommended the use of Tile Doctor Neutral Tile Cleaner, it’s pH balanced so it won’t prematurely erode the sealer which can be the problem with stronger products you find in supermarkets. It comes in concentrated form so one bottle lasts a long time.
Paul Wales
Monmouthshire Tile Doctor
 Legendary Escapes Pools
Nautical-themed hybrid swimming pool with raised spa, sunshelf, slide, grotto, and pizza oven
(September 2013) – Ask the Pool Guy and his team at Legendary Escapes recently unveiled the newest Legendary Escape, a stunning nautical-themed hybrid swimming pool. The hand-carved concrete waterfall, rock slide, and grotto are the focal point of this incredible project, and designer and builder Al Curtis has truly outdone himself this time. Behind the waterfall sits a grotto that seats 8-10 people comfortably. The waterfall, slide, and grotto area come complete with intricate details and additions that perfectly play into the project’s theme. An immense amount of creativity, talent, and skill is required to take ordinary materials like vinyl and concrete and turn them into the outstanding backyards that Curtis creates, but these details allow his creativity to shine in a different light. Curtis immerses himself completely in just one or two projects at a time, which allows him the opportunity to add those intricate details that take his extraordinary projects to the next level. Some of the details in the grotto area of this hybrid project include real ship portholes that open and close, as well as carvings and lanterns to add visual interest inside of the grotto.
The project also includes a raised spillover spa and a sunshelf with a bubbling water feature. The sunshelf has steps leading into the main body of the pool, giving swimmers an easy entry point if they don’t feel the urge to jump off the top of the waterfall or take a ride down the hand-carved, hand-tiled slide. The shelf has just enough water to allow shallow wading or lounging, and the pebbled finish provides a perfect place to set a lounge chair without worrying about damaging the vinyl liner. With the spa nearby, this whole end of the pool is perfect for relaxing, talking, or watching the kids while they swim.
This incredible hybrid swimming pool also includes a poolside pizza oven, so fresh, stone-fired pizza is never far away. The brick oven can cook a pizza in about 90 seconds, and produces authentic, outstanding pizzas. The homeowners have spent years perfecting their pizza crust and sauce recipes, as well as growing their own tomatoes and basil. The pizza oven adds another element of their own personality, and makes this project even more perfect for them. With a built-in countertop, it’s easy to get a couple of pies going at one time, or to prep ingredients for personal pizzas.
The homeowners are very family-oriented and love to have friends and family over to their home. During the construction process, the Legendary Escapes crew met several friends and family members who stopped in for some quality time and to check out the progress of the pool. The finished product is a perfect place for entertaining, and it feels very comfortable and welcoming. With the sunshelf, spa, grotto, poolside seating, and the pool itself, there are plenty of different places to sit or soak and have conversations or splash around.
Curtis is incredibly proud of this project, and he has high hopes for it. He was recently named a Master of Design by Pool & Spa News for a hybrid swimming pool he built in Brighton, MI. This new, nautical hybrid pool fits in beautifully with his portfolio, but also stands out as extraordinary. The team at Legendary Escapes anticipates positive feedback and recognition for this project, and looks forward to building more swimming pools that push the envelope and wow clients and fans.
 HOME REMODELING INC.
A kitchen remodel is a project that involves changing the layout, fixtures, and finishes of your kitchen. It can be a small project, such as painting the cabinets and replacing the hardware, or a major project, such as tearing down walls and installing new appliances.
Here are some of the things that you might do during a kitchen remodel:
Change the layout of the kitchen. This could involve moving walls, relocating plumbing and electrical fixtures, and adding or removing cabinets.
Install new cabinets and countertops. Cabinets and countertops are the two most important elements of a kitchen, so choosing the right ones is important. There are many different styles and materials to choose from, so you can find something that fits your taste and budget.
Kitchen remodel countertops
Install new appliances. If your appliances are old or outdated, you may want to replace them with new ones. There are many different appliances to choose from, so you can find ones that meet your needs and budget.
Kitchen remodel appliances
Install new flooring. The flooring in your kitchen should be durable and easy to clean. There are many different flooring types, such as tile, hardwood, and laminate.
Kitchen remodel flooring
Install new lighting. Good lighting is essential in a kitchen. You can add task lighting under cabinets and over the sink and ambient lighting in the ceiling.
Kitchen remodel lighting
Add a backsplash. A backsplash is a decorative tile or panel behind the stove and sink. It can add a touch of personality to your kitchen.
Kitchen remodel backsplash
A kitchen remodel can be a big investment, but it can also be a very rewarding experience. If you are thinking about remodeling your kitchen, it is important to do your research and plan your project carefully.
Here are some additional tips for kitchen remodels:
Set a budget and stick to it. Knowing how much you can afford to spend on your remodel before you start is important. Once you have a budget, get quotes from several contractors to ensure you get the best price.
Get permits. Some kitchen remodels require permits. Be sure to check with your local building department to see if you need any permits before you start your project.
Be patient. Kitchen remodels can take several weeks or even months to complete. Be patient, and don't try to rush the process.
I hope this gives you a general idea of what a kitchen remodel is all about. If you have any specific questions, please feel free to ask.
 Tile Doctor Ltd
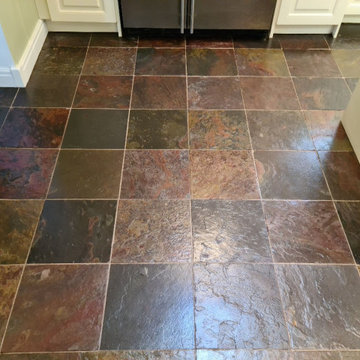
The pictures above are of a 12 metre squared Chinese slate floor in the kitchen of a property in Harrogate which had been laid ten years prior. You can see from the photographs that the grout had darkened and the slate itself had lost a lot of its character and colour.
Sealers typically last between three to five years so by now there was little protection left and so dirt had become trapped in the pores of the stone and grout making it difficult to keep clean. It was now overdue a deep clean and the application of a fresh seal.
I went over to survey the floor and provide a quote for stripping off what was left of the original sealer, cleaning the floor, and then resealing. I had been recommended by a previous customer so happy with my track record and the price I quoted, they asked me to do the work. They had received a quote from another firm which as it turned out was a lot more expensive than mine.
Given there was little sealer left to remove I decided to start by scrubbing the floor with a strong concentration of Tile Doctor Pro-Clean which was left to soak into the slate for ten minutes. Then I worked the solution in with a rotary machine fitted with a black scrubbing pad. Pro-Clean is a very versatile product that will strip the sealer off a floor when used in a strong dilution with water, it will also remove deep seated dirt too.
Due to the riven nature of the tiles however I found the black pad was struggling to reach into the crevices of the tile so to achieve the desired result I resorted to scrubbing the floor on my hands and knees with a scrubbing brush. Its important that the floor is as clean as it possibly can be before sealing otherwise you simply lock the dirt in and it will never look clean.
The floor was left to dry off overnight and I returned the next day to apply the new sealer. First, I checked to ensure that the floor was fully dry using a damp meter. The sealer would not cure properly if the floor damp and this can detract from the finished appearance.
I was happy with the readings, so I started to apply the first coat of Tile Doctor Seal and Go which I felt was the best product sealing Slate. The stone needed four coats; each one being left to dry before applying the next. Seal and Go is a stain resistant sealer which results in a low sheen silky appearance, it is good on surfaces such as the Chinese Slate which tend to be more porous and being water based it does not leave a smell as it dries.
The client was very happy with the result and mentioned to me that it had never looked that good even when new.
For aftercare cleaning I recommended the use of Tile Doctor Neutral Tile Cleaner which will keep the floor in the best condition. This is a pH neutral cleaner which can be used daily and won’t compromise the newly laid sealer like many of the stronger products you find in supermarkets.
Nigel Stoker
North West Yorkshire Tile Doctor
 Talon Construction Inc.
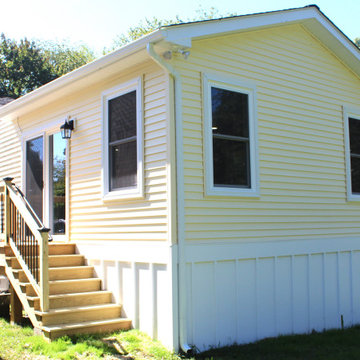
Designing and building a kitchen addition is a complex process that involves multiple steps and considerations. Here is a general outline to help you get started on your kitchen addition project:
Define Your Goals and Budget:
• Determine the purpose of the kitchen addition. Is it for more cooking space, a dining area, or a combination of both?
• Establish a realistic budget for your project. Consider all costs, including construction, permits, materials, and furnishings.
Hire a Design Professional:
• Seek the services of a design build company who specializes in kitchen additions.
• Discuss your vision, needs, and budget with the design professional to create a design concept.
Site Evaluation:
• Assess the existing space and structural condition of your home to ensure it can support the addition.
• Consider factors like zoning regulations, setbacks, and building codes.
Design Development:
• Collaborate with your design professional to refine the concept, including the layout, size, and architectural style.
• Choose materials, finishes, and fixtures that fit your design and budget.
Obtain Permits:
• Consult with your local design build contractor to determine the necessary permits and approvals.
• Prepare and submit all required documents, including architectural drawings and engineering plans.
Create Construction Documents:
• Work with your design build professional to develop detailed construction drawings and specifications.
• These documents will serve as a guide for contractors during construction.
Hire a design build contractor:
• Check references, credentials, and licenses before selecting a contractor.
• Sign a detailed contract that outlines the scope of work, timeline, and payment schedule.
Construction Phase:
• Demolition: If needed, remove any existing structures or walls.
• Foundation: Construct the foundation for the addition.
• Framing: Build the structural framework of the addition.
• Plumbing, Electrical, and HVAC: Install or update utilities as required.
• Insulation: Ensure proper insulation for energy efficiency.
• Drywall and Finish Work: Complete the walls and ceilings.
• Flooring and Cabinetry: Install flooring and kitchen cabinets.
• Appliances and Fixtures: Add appliances, plumbing fixtures, and lighting.
• Paint and Finish: Apply paint and finishes to achieve the desired look.
• Final Inspection: Schedule inspections to ensure compliance with building codes.
Final Inspections and Approvals:
• Arrange for final inspections to ensure the addition meets all safety and code requirements.
• Obtain any necessary certificates of occupancy or compliance.
Move In and Enjoy:
• Once all inspections and approvals are received, you can move into your new kitchen addition and start enjoying it.
Remember that every kitchen addition project is unique, so adapt this outline to your specific needs and circumstances. Consulting with professionals and obtaining the required permits and inspections is crucial to a successful and safe project.
 Tile Doctor Ltd
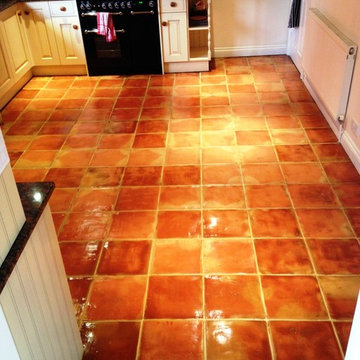
Terracotta may be one of the most aesthetically pleasing types of tiled floor, but as many of our customers will tell you can be particularly difficult to keep clean. This is due to the naturally high porosity of clay, which allows dirt to become very easily trapped. Quite commonly this situation is made worse by a lack of an adequate sealer to block the intrusion of muck. Of course, poor quality cleaning products also make it difficult for property owners to keep their Terracotta tiles clean, and a combination of the two problems can leave these floors looking a lot like this one, located in the kitchen of a house in the beautiful Forest of Dean.
The property owner was keen to have me restore some character to her dull Terracotta tiles. It was proving increasingly difficult for her to keep them clean due to the reasons described before, and the grout had also become very dirty. So, the customer turned to me for some professional assistance.
While these Terracotta tiles had been sealed previously it had, over time, lost its ability to protect the stone against ingrained dirt. To remove the old excess sealer my product of choice was the heavy duty soil remover and stripper, Tile Doctor Remove & Go, which I applied liberally across the surface and scrubbed in to the tile used a rotary machine fitted with a scrubbing pad. This also helped to remove the trapped dirt and left the stone looking fresher.
Once the old sealer was removed – to be replaced with a fresh sealer once cleaning was complete – I was free to focus on the troublesome grout lines with Tile Doctor Pro Clean, an alkaline cleaner that reliably breaks down dirt. When cleaning the grout, I opted to use a handheld grout brush that allowed for more precise, careful application of the product.
As per usual, the floor was given a good rinse and left to dry for 24 hours.
Upon returning to the property I checked the floor was completely dry, ready for sealing. My process for sealing actually involved the application of two different kinds of sealer; initially I applied a single coat of Tile Doctor Colour Grow which has soaks into the pores of the tile and has the added bonus of enhancing its natural colours.
Once this had dried I then applied ix coats of Tile Doctor Seal and Go, a product which forms a durable layer of protection of the surface of the tiles and at the same time provides a lovely sheen finish.
The combination of the two sealers will certainly offer a long-term solution to the ingrained dirt problem, and the appearance-enhancing properties in the products really helped to transform the tiles from dull and dirty to lively and eye-catching. Nonetheless, before departing the property, I also left my very pleased customer with some cleaning advice for the future.
Paul Wales
Monmouthshire Tile Doctor

 Tile Doctor Ltd
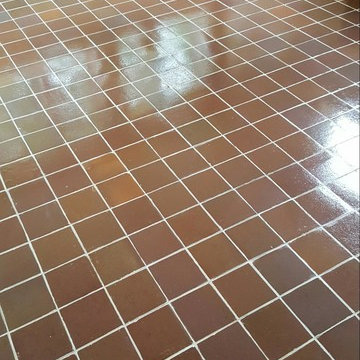
It’s always a good idea to double-check any tile cleaning advice you receive with a professional. Sometimes advice can be inaccurate and cause more problems than good. Such was the case with this customer, who lives in the small town of Appleton near Warrington. He had been advised by his builder to use brick acid to remove carpet glue from a newly discovered Quarry tiled floor. Taking the advice, he had washed the floor several times with a solution of brick acid diluted with water. But while this seemed to successfully remove the carpet glue, it also severely discoloured the grout lines, leaving the entire floor looking grubby and unappealing.
The customer was just about to go on holiday, and asked me to see what could be done to restore the floor’s appearance while he was gone. With the house to myself, I got to work.
My first job was to strip the floor property to remove old sealers present on the tile using a strong dilution of our high alkaline cleaner, Tile Doctor Pro Clean. We use this cleaner on all types of tile and natural stone due to its versatility and consistency.
I spread the solution onto the floor and left to dwell for twenty minutes before scrubbing with a black pad fitted to a floor rotary machine. This process also removed the years of dirt and dust that had penetrated through the recently removed carpet. I also paid attention to the grout lines giving them a good scrub with a stiff grout brush, but the acid staining proved to be impossible to remove completely.
While I’m not sure exactly how long the floor had been covered by carpet, it’s safe to say a deep clean had been long, long overdue. Once I had cleaned the floor to a high standard, I used a wet-vac to remove the now dirty cleaning solution from the floor, before leaving it to dry off completely overnight.
Upon my return to the property the next day, I tested to make sure the floor was dry enough to seal, which is important as excess moisture can cloud the sealer and damage its performance.
Once satisfied, I applied one coat of Tile Doctor Colour Grow, which is our impregnating sealer designed to really bring out the natural colours in the tile, followed by two coats of Tile Doctor Seal and Go to give the tiles a stain resistant, low-sheen finish.
After this was dry I coloured the grout lines with a matching Tile Doctor Grout Colourant to cover and hide the damage the acid had caused to the grout lines. Finally, I gave the floor three more coats of Seal and Go to add the finishing touches.
My customer returned from holiday to find a completely transformed floor. Looking at the before and after photos, it is easy to see why he was more than happy with the result! Another satisfied customer.
Alastair Robb
West Cheshire Tile Doctor
 Talon Construction Inc.
Designing and building a kitchen addition is a complex process that involves multiple steps and considerations. Here is a general outline to help you get started on your kitchen addition project:
Define Your Goals and Budget:
• Determine the purpose of the kitchen addition. Is it for more cooking space, a dining area, or a combination of both?
• Establish a realistic budget for your project. Consider all costs, including construction, permits, materials, and furnishings.
Hire a Design Professional:
• Seek the services of a design build company who specializes in kitchen additions.
• Discuss your vision, needs, and budget with the design professional to create a design concept.
Site Evaluation:
• Assess the existing space and structural condition of your home to ensure it can support the addition.
• Consider factors like zoning regulations, setbacks, and building codes.
Design Development:
• Collaborate with your design professional to refine the concept, including the layout, size, and architectural style.
• Choose materials, finishes, and fixtures that fit your design and budget.
Obtain Permits:
• Consult with your local design build contractor to determine the necessary permits and approvals.
• Prepare and submit all required documents, including architectural drawings and engineering plans.
Create Construction Documents:
• Work with your design build professional to develop detailed construction drawings and specifications.
• These documents will serve as a guide for contractors during construction.
Hire a design build contractor:
• Check references, credentials, and licenses before selecting a contractor.
• Sign a detailed contract that outlines the scope of work, timeline, and payment schedule.
Construction Phase:
• Demolition: If needed, remove any existing structures or walls.
• Foundation: Construct the foundation for the addition.
• Framing: Build the structural framework of the addition.
• Plumbing, Electrical, and HVAC: Install or update utilities as required.
• Insulation: Ensure proper insulation for energy efficiency.
• Drywall and Finish Work: Complete the walls and ceilings.
• Flooring and Cabinetry: Install flooring and kitchen cabinets.
• Appliances and Fixtures: Add appliances, plumbing fixtures, and lighting.
• Paint and Finish: Apply paint and finishes to achieve the desired look.
• Final Inspection: Schedule inspections to ensure compliance with building codes.
Final Inspections and Approvals:
• Arrange for final inspections to ensure the addition meets all safety and code requirements.
• Obtain any necessary certificates of occupancy or compliance.
Move In and Enjoy:
• Once all inspections and approvals are received, you can move into your new kitchen addition and start enjoying it.
Remember that every kitchen addition project is unique, so adapt this outline to your specific needs and circumstances. Consulting with professionals and obtaining the required permits and inspections is crucial to a successful and safe project.
 Talon Construction Inc.
Designing and building a kitchen addition is a complex process that involves multiple steps and considerations. Here is a general outline to help you get started on your kitchen addition project:
Define Your Goals and Budget:
• Determine the purpose of the kitchen addition. Is it for more cooking space, a dining area, or a combination of both?
• Establish a realistic budget for your project. Consider all costs, including construction, permits, materials, and furnishings.
Hire a Design Professional:
• Seek the services of a design build company who specializes in kitchen additions.
• Discuss your vision, needs, and budget with the design professional to create a design concept.
Site Evaluation:
• Assess the existing space and structural condition of your home to ensure it can support the addition.
• Consider factors like zoning regulations, setbacks, and building codes.
Design Development:
• Collaborate with your design professional to refine the concept, including the layout, size, and architectural style.
• Choose materials, finishes, and fixtures that fit your design and budget.
Obtain Permits:
• Consult with your local design build contractor to determine the necessary permits and approvals.
• Prepare and submit all required documents, including architectural drawings and engineering plans.
Create Construction Documents:
• Work with your design build professional to develop detailed construction drawings and specifications.
• These documents will serve as a guide for contractors during construction.
Hire a design build contractor:
• Check references, credentials, and licenses before selecting a contractor.
• Sign a detailed contract that outlines the scope of work, timeline, and payment schedule.
Construction Phase:
• Demolition: If needed, remove any existing structures or walls.
• Foundation: Construct the foundation for the addition.
• Framing: Build the structural framework of the addition.
• Plumbing, Electrical, and HVAC: Install or update utilities as required.
• Insulation: Ensure proper insulation for energy efficiency.
• Drywall and Finish Work: Complete the walls and ceilings.
• Flooring and Cabinetry: Install flooring and kitchen cabinets.
• Appliances and Fixtures: Add appliances, plumbing fixtures, and lighting.
• Paint and Finish: Apply paint and finishes to achieve the desired look.
• Final Inspection: Schedule inspections to ensure compliance with building codes.
Final Inspections and Approvals:
• Arrange for final inspections to ensure the addition meets all safety and code requirements.
• Obtain any necessary certificates of occupancy or compliance.
Move In and Enjoy:
• Once all inspections and approvals are received, you can move into your new kitchen addition and start enjoying it.
Remember that every kitchen addition project is unique, so adapt this outline to your specific needs and circumstances. Consulting with professionals and obtaining the required permits and inspections is crucial to a successful and safe project.

 TATCOR DESIGN BUILD
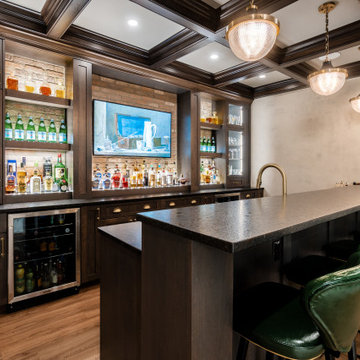
WOODLYNNS EDGE " Live edge slab table and woodwork " This highly figured, Spalted and Curly Maple live edge dining table is extraordinary and rare. It is about 5.5 feet long and 3 feet wide. The sapwood spalted coloring is met by amazing curling, which appears as 3 dimensional waves or flames of fire. Enjoy this unique piece of artwork, imported from Pennsylvania fallen trees.
Sponsored
Delaware, OH

Buckeye Basements, Inc.
Central Ohio's Basement Finishing ExpertsBest Of Houzz '13-'21
 Tile Doctor Ltd
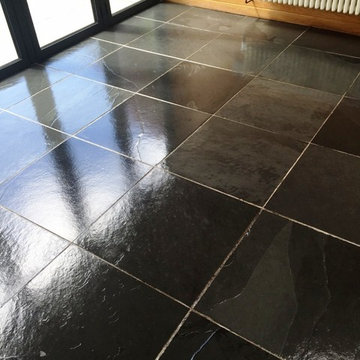
Tenuous link I know but I worked on this semi riven Black Brazilian Slate Tiles in the kitchen and dining room of a house in the seaside town of Thornton-Cleveleys around the time of the Rio Olympics. I love working on Slate as although it’s appearance can degrade without proper maintenance due to a build-up of dirt I knew they would look fantastic by the time I had finished.
The tile itself had lost its rich black colour and the grout lines had become stained, leaving the floor as a whole looking very unattractive. Out of interest honed Slate has a smooth, refined texture whereas the riven Slate has a rougher, more natural texture, and this can make it more difficult to keep clean. Needless to say, the customer was keen to have the tiles restored to looking their best.
To restore the appearance of the Slate, I cleaned the floor and removed what remained of the old sealer off using Tile Doctor Remove and Go. This was scrubbed into the floor using a scrubbing pad fitted to a rotary machine. The floor was then rinsed with water, and the process repeated where necessary to tackle particularly stubborn areas of dirt.
As mentioned previously, the grout lines were in a particularly bad state, and would need special cleaning attention. I cleaned carefully with a strong 5-to-1 dilution of Tile Doctor Pro Clean with water, which is our high alkaline cleaner. The cleaning solution was scrubbed I’m using a stiff handheld grout brush, with the grout lines looking immediately cleaner. When I was satisfied that the grout lines had been restored to the best possible condition, I gave the floor a thorough rinse using the wet pickup function of a wet wax machine to get the floor as dry as possible and then left the whole floor to dry off overnight.
Upon my return to the property I ran some quick damp tests to check that the floor was completely dry. This is important as any excess moisture would have prevented me from sealing the tiles, since it can cloud the sealer and damage it performance.
Previously I discussed sealer options with the customer and they stated that they would prefer a Satin finish, so I applied a sealer called Tile Doctor Seal and Go, our topical sealer which will both protect the Slate from dirt and stains, and also gave it the desired finish. As you can see from the below photographs, the rich, dark shades in the Slate were really enhanced.
The customer was very pleased with the finished result, but was also concerned about keeping the Slate clean in the long-term. For regular cleaning I advised the customer to use a pH neutral cleaner for aftercare called Tile Doctor Neutral Cleaner. As a pH neutral cleaner, it will not erode the sealer compared to acidic cleaners you so often find in supermarkets.
Russell Taylor
Lancashire Tile Doctor
 Legendary Escapes Pools
Nautical-themed hybrid swimming pool with raised spa, sunshelf, slide, grotto, and pizza oven
(September 2013) – Ask the Pool Guy and his team at Legendary Escapes recently unveiled the newest Legendary Escape, a stunning nautical-themed hybrid swimming pool. The hand-carved concrete waterfall, rock slide, and grotto are the focal point of this incredible project, and designer and builder Al Curtis has truly outdone himself this time. Behind the waterfall sits a grotto that seats 8-10 people comfortably. The waterfall, slide, and grotto area come complete with intricate details and additions that perfectly play into the project’s theme. An immense amount of creativity, talent, and skill is required to take ordinary materials like vinyl and concrete and turn them into the outstanding backyards that Curtis creates, but these details allow his creativity to shine in a different light. Curtis immerses himself completely in just one or two projects at a time, which allows him the opportunity to add those intricate details that take his extraordinary projects to the next level. Some of the details in the grotto area of this hybrid project include real ship portholes that open and close, as well as carvings and lanterns to add visual interest inside of the grotto.
The project also includes a raised spillover spa and a sunshelf with a bubbling water feature. The sunshelf has steps leading into the main body of the pool, giving swimmers an easy entry point if they don’t feel the urge to jump off the top of the waterfall or take a ride down the hand-carved, hand-tiled slide. The shelf has just enough water to allow shallow wading or lounging, and the pebbled finish provides a perfect place to set a lounge chair without worrying about damaging the vinyl liner. With the spa nearby, this whole end of the pool is perfect for relaxing, talking, or watching the kids while they swim.
This incredible hybrid swimming pool also includes a poolside pizza oven, so fresh, stone-fired pizza is never far away. The brick oven can cook a pizza in about 90 seconds, and produces authentic, outstanding pizzas. The homeowners have spent years perfecting their pizza crust and sauce recipes, as well as growing their own tomatoes and basil. The pizza oven adds another element of their own personality, and makes this project even more perfect for them. With a built-in countertop, it’s easy to get a couple of pies going at one time, or to prep ingredients for personal pizzas.
The homeowners are very family-oriented and love to have friends and family over to their home. During the construction process, the Legendary Escapes crew met several friends and family members who stopped in for some quality time and to check out the progress of the pool. The finished product is a perfect place for entertaining, and it feels very comfortable and welcoming. With the sunshelf, spa, grotto, poolside seating, and the pool itself, there are plenty of different places to sit or soak and have conversations or splash around.
Curtis is incredibly proud of this project, and he has high hopes for it. He was recently named a Master of Design by Pool & Spa News for a hybrid swimming pool he built in Brighton, MI. This new, nautical hybrid pool fits in beautifully with his portfolio, but also stands out as extraordinary. The team at Legendary Escapes anticipates positive feedback and recognition for this project, and looks forward to building more swimming pools that push the envelope and wow clients and fans.
 Legendary Escapes Pools
Nautical-themed hybrid swimming pool with raised spa, sunshelf, slide, grotto, and pizza oven
(September 2013) – Ask the Pool Guy and his team at Legendary Escapes recently unveiled the newest Legendary Escape, a stunning nautical-themed hybrid swimming pool. The hand-carved concrete waterfall, rock slide, and grotto are the focal point of this incredible project, and designer and builder Al Curtis has truly outdone himself this time. Behind the waterfall sits a grotto that seats 8-10 people comfortably. The waterfall, slide, and grotto area come complete with intricate details and additions that perfectly play into the project’s theme. An immense amount of creativity, talent, and skill is required to take ordinary materials like vinyl and concrete and turn them into the outstanding backyards that Curtis creates, but these details allow his creativity to shine in a different light. Curtis immerses himself completely in just one or two projects at a time, which allows him the opportunity to add those intricate details that take his extraordinary projects to the next level. Some of the details in the grotto area of this hybrid project include real ship portholes that open and close, as well as carvings and lanterns to add visual interest inside of the grotto.
The project also includes a raised spillover spa and a sunshelf with a bubbling water feature. The sunshelf has steps leading into the main body of the pool, giving swimmers an easy entry point if they don’t feel the urge to jump off the top of the waterfall or take a ride down the hand-carved, hand-tiled slide. The shelf has just enough water to allow shallow wading or lounging, and the pebbled finish provides a perfect place to set a lounge chair without worrying about damaging the vinyl liner. With the spa nearby, this whole end of the pool is perfect for relaxing, talking, or watching the kids while they swim.
This incredible hybrid swimming pool also includes a poolside pizza oven, so fresh, stone-fired pizza is never far away. The brick oven can cook a pizza in about 90 seconds, and produces authentic, outstanding pizzas. The homeowners have spent years perfecting their pizza crust and sauce recipes, as well as growing their own tomatoes and basil. The pizza oven adds another element of their own personality, and makes this project even more perfect for them. With a built-in countertop, it’s easy to get a couple of pies going at one time, or to prep ingredients for personal pizzas.
The homeowners are very family-oriented and love to have friends and family over to their home. During the construction process, the Legendary Escapes crew met several friends and family members who stopped in for some quality time and to check out the progress of the pool. The finished product is a perfect place for entertaining, and it feels very comfortable and welcoming. With the sunshelf, spa, grotto, poolside seating, and the pool itself, there are plenty of different places to sit or soak and have conversations or splash around.
Curtis is incredibly proud of this project, and he has high hopes for it. He was recently named a Master of Design by Pool & Spa News for a hybrid swimming pool he built in Brighton, MI. This new, nautical hybrid pool fits in beautifully with his portfolio, but also stands out as extraordinary. The team at Legendary Escapes anticipates positive feedback and recognition for this project, and looks forward to building more swimming pools that push the envelope and wow clients and fans.
91