
Search results for "Cleaning process" in Home Design Ideas
 Marble Doctors LLC
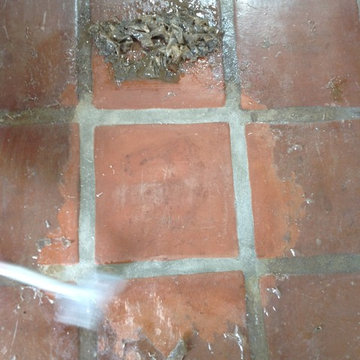
 these are the first couple of tiles we started on with our stripper removal process. To get an idea what exactly was on this floor, we did a sample. You can see the dirt all stuck in the sealer which happened to be a High Gloss Finish with a white wash, which was obviously long overdue for refinishing by Marble Doctors Restoration Services.
 VIOSKI
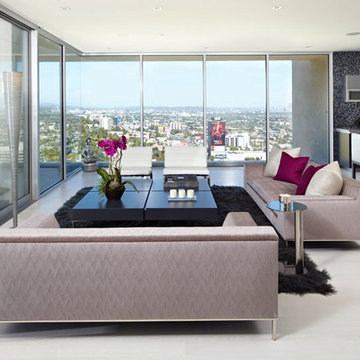
This stunning modern lookout features VIOSKI Tre II Sofas. With their modern charisma and clean lines, the Tre II Sofas add elegance and simplicity. They are the smallest of the VIOSKI Sofa Collection and can be customized to fit any space. Masterfully handcrafted in California. Extraordinary quality and comfort.
 Tile Doctor Ltd
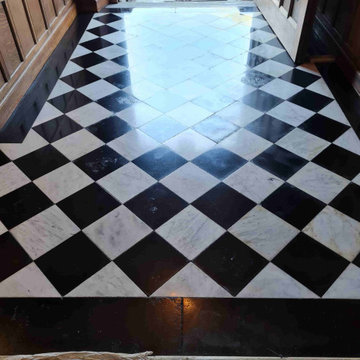
This Black and White Marble tiled hallway floor at a Grade II listed property in the village of Tattenhall has quite a history. The building was constructed in 1865 and at one time it has been the home to the high sheriff of Cheshire, and the family home of Edith Wignall the daughter of Sir Henry Tate the founder of the sugar company Tate and Lyle.
In more recent years the property had been used as a council building and even a nursing home for the elderly. After a long history of decline it has now been restored to a lavish family mansion however the marble floor had suffered over the years and still need attention. The current owner had been in touch as they wanted it restoring and basically brought back to life.
As it turns out I had already planned to go to Tattenhall the following week to work on another listed building which was formerly the village bank. After discussing the Marble floor over the phone, I agreed a date and time to pop over from the bank and inspect the floor in detail. I can provide a rough quote from photographs, which has been especially useful recently, but it’s far better for all concerned if I’m able to properly survey the floor first.
The Marble floor consisted of Black and White Mable tiles laid in a diamond pattern, it wasn’t a very large area perhaps 9 square metres in total. The tiles were well worn as described but also stained and scratched. I would see they would need a deep burnish and polish to bring them back to life and then protected with a fresh sealer. Following on from that visit I was able to provide an accurate quote which was accepted, and a date agreed for my return.
The first job was to protect the surrounding heavy wooden panelling with masking film. The floor was very heavily stained yellow with deep scratches, to remove these I would have to grind the marble back until a clean fresh tile was left. To start I used a 200-grit coarse pad fitted to a weighted buffing machine, the abrasive action of the pad was lubricated with water. After inspection I found that the staining and scratches were still there, so I needed to use stronger pads, so I worked my way through a set of very coarse milling pads starting at a 50, 100 and finishing with a 200-grit pad. Again, water was used to lubricate, and the resultant slurry was removed by a powerful wet vacuum and washed down between each pad.
The milling pads had the desired effect, and I was then able to bring back the polished appearance of the Marble surface using a set of finer burnishing pads with the same process. The 400 and 800-grit pads helped to clean and remove the fine scratches left by the milling pads and then the next 1500-grit pad started to build the shine back on the marble tile.
After finishing with 1500-grit pad I washed the Marble with Tile Doctor Stone Soap and vacuumed up the residue with the wet vacuum. I left an industrial blower in place overnight to dry out the floor ready for the next morning when it would be sealed.
The next morning, I used the last of the four burnishing pads which is a very fine 3000-grit to polish the floor further. This last pad is applied dry with just a spray of water to create a high gloss finish.
When I was happy, I sealed the floor with two coats of Tile Doctor Colour Grow which is an impregnating sealer that soaks into the fine pores of the Marble to protect it from within. This product also improves colour and after application it was left to soak into the tile for five minutes before polishing off and then leaving it to dry.
The last step was to I buff the floor with a white pad. The finish was impressive, and the family were very happy with the work we had carried out. For aftercare I recommended they use Stone Soap as its designed for the regular cleaning of sealed and polished stone, as well as cleaning it also helps build the patina.
Alastair Robb
West Cheshire TIle Doctor
Find the right local pro for your project
 Tile Doctor Ltd
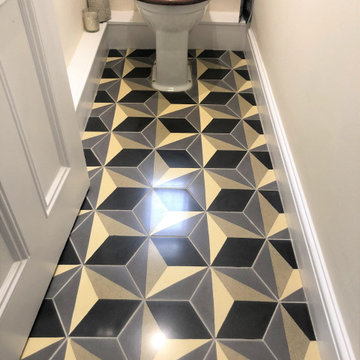
These photographs were taken of a bathroom and WC in a property in Histon The client had just had these modern Encaustic tiles laid a couple of months prior. The owner had never been happy with the final look of them and from the markings on the surface it looked like had been damaged in storage or left outside and neglected. They are a pretty unusual design so I can only assume the tiler thought their appearance was perfectly normal at the time of installation.
I was confident I could improve the appearance of the tiles and gave the client a quote for the work. Whilst she didn’t want to spend more money on her new floor, she did want it to look as it should, so rather reluctantly she agreed to go ahead.
Histon is next to Impington, they are small villages in Cambridgeshire, over the years the two villages have grown and have entwined together. Many villagers in fact do not know where one village starts and the other ends. The have 6 pubs in total!
I wasn’t sure what had been applied to the tiles so after adding protective tape to the wooden skirting I gave them a deep clean with Tile Doctor Remove and Go which was worked into the tiles with a black scrubbing pad. Then to renovate the surface and remove the markings I honed the surface with 400-grit and then 800-grit burnishing pad using water to lubricate the process and rinsing and extracting the soil away after each pad with the wet vacuum.
There were two areas that needed work so whilst one area was drying, I was able to get to work on the second and then return to the first later to apply a sealer. My product of choice for this floor was Tile Doctor Colour Grow which is an impregnating sealer which improves the colour and works by penetrating the pores of the tile and protecting it from within. I applied three coats allowing each one to dry before applying the next. The bathroom now looked as it should have done from the beginning.
My client was very happy with the improvement and left the following 5-Star review.
I only had my floor tiles fitted a few months or so ago and was so disappointed with them. I called Tom and within a few hours, he had transformed them! They look absolutely fantastic! Great value for money as well!
I recommended that in order to maintain the tiles, she should use Tile Doctor Neutral Cleaner, this is a pH neutral cleaner which will keep the floor without harming the sealer. Many tile cleaning products are only designed for Ceramic or Porcelain tiles and are too strong for use on sealed floors where they will strip the sealer off with time.
Tom Conlon
Cambridge Tile Doctor
 Tile Doctor Ltd
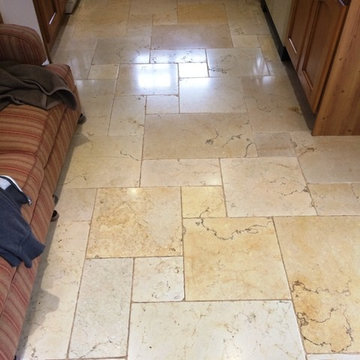
These Marble tiles were installed at a lovely property in North Ferriby by another tile company who although has done a great job laying the floor had neglected to provide the owner with any kind of post-installation maintenance.
Thus the tiles, which covered a large kitchen and hallway area, appeared dull and certainly not up to the standard that could be achieved with the right methods. Funnily enough, the tile company had told the property owner that the stone would need to be sealed, but did not offer to carry out the process themselves.
After conducting their own research, the property owner contacted her local Tile Doctor to see what could be done. I came round to inspect the floor and recommended the floor was polished through a process known as burnishing, followed by the application of a sealer to provide durable protection for the stone.
Burnishing involves the application of diamond encrusted pads with different levels of grit. At Tile Doctor we work with a four pad system that allows us to gradually refine the polish on suitable tiled floors, including Marble and Limestone.
I started the process by applying a Coarse grit burnishing pad across the entire floor lubricated with a little water, the 17 inch pads fit a rotary floor buffing machine and so are relatively straight forward to use but do take time. Following this, I worked my way through the burnishing system, repeating the process with Medium, Fine and Very Fine grit burnishing pads to achieve a brilliant, consistent shine. The floor is given a quick rinse between pads in-order to remove the resultant slurry before starting with the next pad.
The second part of the restoration was to seal the floor to protect the stone against future dirt, stains and damage, which is more common in busy areas of a house like the kitchen. I opted to seal the Marble tiles with two coats of Tile Doctor Ultra Seal.
This is a premium, no-sheen sealer that leaves the Marble with a more natural looking polished appearance. As a solvent-based, penetrating sealer it gets deep into the pores of the stone to protect against stains and ingrained dirt, especially in food preparation areas. To finish off I used the very fine diamond pad just to guarantee the brilliant shine you can see in the photos.
The property owners were exceptionally pleased with the results achieved and will undoubtedly be glad that their lovely Marble tiled flooring is now protected for long-term use. Another satisfied client.
Ronnie Phipps
East Yorkshire Tile Doctor
 Tile Doctor Ltd
Polished stone floors will lose their shine over time depending on the amount of wear and cleaning products used and this Travertine Tiled Floor in Lower Woodrow had basically experienced this problem. The solution is to burnish the floor with diamond encrusted pads, a process that will remove any dirt and bring back the polish.
We started by smothering the floor is a mild dilution of Tile Doctor Pro-Clean and left it to dwell for ten minutes. We then scrubbed the grout lines using a stiff grout brush to get the grout clean. Next we fitted a course diamond burnishing pad to a rotary machine and slowly burnished each and every tile. We then extracted the slurry using a wet vacuum and rinsed. We continued this procedure with the medium, fine and very fine pads rinsing in-between until the shine had been restored. We then left the floor overnight to dry.
Upon our return we sealed the floor using Tile Doctor Colour Grow which is an impregnating sealer that soaks into he pores of the stone protecting it from within and enhancing the natural colours in the stone. Once the seal had dried I used a white buffing pad attached to the rotary machine and buffed the travertine to a nice shine.
Stuart Ford
Wiltshire Tile Doctor
 N-Hance
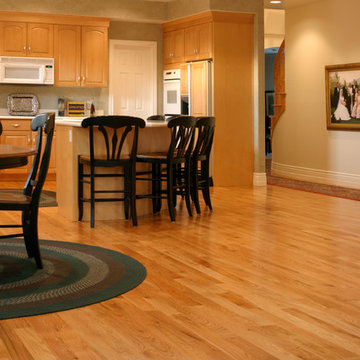
The Basic Cabinet Renewal proces leaves no dust, mess or odor and in many cases the job is completed in just one day. We remove the grease and dirt build up that can make wood look flat and lifeless over time. The renewal process thoroughly cleans the surface, removes old coatings, repairs damaged areas with less mess and applies an elegant finish. At 1/3rd the cost of refacing and 1/5th the cost of replacement, you'll love the brilliant results and the cost savings.
All of our processes use our Lightspeed Plus® refinishing process which cures instantly with a powerful U.V. light. Our process requires no sanding and all our solutions are virtually odorless – so there’s No Dust. No Mess. No Odor®. With Lightspeed, expect a beautifully refinished kitchen with little to no down time.


 Tile Doctor Ltd
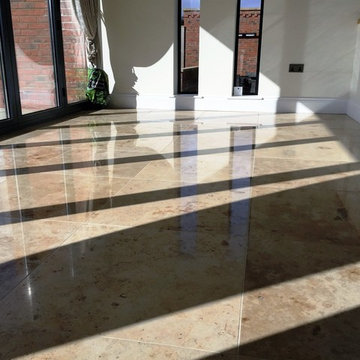
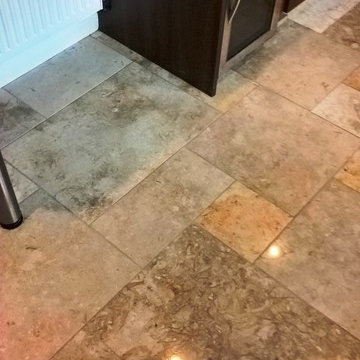
The photographs below are of a Polished limestone floor that had been installed in the Kitchen of a house in Cheltenham approximately eight years prior. The polish and sealer had worn off over that time allowing dirt to become ingrained into the pores of the stone making it difficult to clean.
This is a common problem with all types of porous stone and tile which need to be sealed to maintain their appearance. Sealers do wear down over time with use however and need to be maintained, this is why Tile Doctor have created a maintenance program whereby we pop by every 12 months to give the floor a light clean and top-up the sealer, it only takes a few hours, but it keeps your sealer in good condition.
Cheltenham by the way is a lovely town situated on the edge of the Cotswolds which is an area of Outstanding Natural Beauty. It has a racecourse and is well known for the mineral springs which were discovered here in 1716.
My first job was to protect the wooden kitchen units from any splashes by covering them some cotton sheets. Next, I set about restoring the Limestone’s appearance using a set of Burnishing Pads which is a form of polishing which involves the sequential application of four diamond encrusted pads of different grit levels.
The first pad applied is a Coarse 400 grit pad which is applied to the floor with a buffing machine and lubricated with water. This process grinds away the top layer of dirt and staining from the stone, along with any old sealer, the floor is then rinsed to remove the soil that is generated. I then move through the system, applying the Medium and then Fine pads using less and less water as you go but rinsing in-between and extracting the water with a wet-vac machine.
Once I was happy with the stone I scrubbed the grout lines to remove any soiling that the pads had failed to pick up. The floor was then given a final rinse and the wet vacuum used to extract as much moisture as possible. The floor was then left to dry out completely overnight.
The next day I gave the floor a polish with the Very Fine 3,000 grit diamond burnishing pad, this is applied using a technique we call a “spray burnish” due to the fact that very little water is used during its application.
The next step was to seal the stone using for which I used Tile Doctor Colour Grow which is an impregnating sealer that protects the stone from within by occupying its pores. Colour Grow also has the added benefit of intensifying the natural colours in the stone. The floor was then left to dry for an hour before I gave it one final dry polish using the Very Fine burnishing pad.
My customer was very happy with the final result and made the comment that they thought the floor looked brand new.
Malcolm Crowther
Gloucester Tile Doctor
 Urbanology Designs
A captivating transformation in the coveted neighborhood of University Park, Dallas
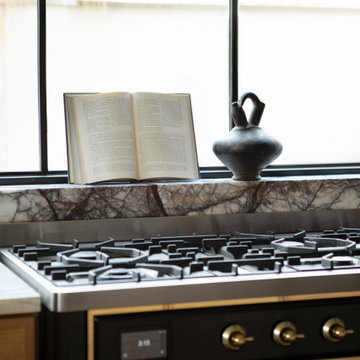
The heart of this home lies in the kitchen, where we embarked on a design endeavor that would leave anyone speechless. By opening up the main kitchen wall, we created a magnificent window system that floods the space with natural light and offers a breathtaking view of the picturesque surroundings. Suspended from the ceiling, a steel-framed marble vent hood floats a few inches from the window, showcasing a mesmerizing Lilac Marble. The same marble is skillfully applied to the backsplash and island, featuring a bold combination of color and pattern that exudes elegance.
Adding to the kitchen's allure is the Italian range, which not only serves as a showstopper but offers robust culinary features for even the savviest of cooks. However, the true masterpiece of the kitchen lies in the honed reeded marble-faced island. Each marble strip was meticulously cut and crafted by artisans to achieve a half-rounded profile, resulting in an island that is nothing short of breathtaking. This intricate process took several months, but the end result speaks for itself.
To complement the grandeur of the kitchen, we designed a combination of stain-grade and paint-grade cabinets in a thin raised panel door style. This choice adds an elegant yet simple look to the overall design. Inside each cabinet and drawer, custom interiors were meticulously designed to provide maximum functionality and organization for the day-to-day cooking activities. A vintage Turkish runner dating back to the 1960s, evokes a sense of history and character.
The breakfast nook boasts a stunning, vivid, and colorful artwork created by one of Dallas' top artist, Kyle Steed, who is revered for his mastery of his craft. Some of our favorite art pieces from the inspiring Haylee Yale grace the coffee station and media console, adding the perfect moment to pause and loose yourself in the story of her art.
The project extends beyond the kitchen into the living room, where the family's changing needs and growing children demanded a new design approach. Accommodating their new lifestyle, we incorporated a large sectional for family bonding moments while watching TV. The living room now boasts bolder colors, striking artwork a coffered accent wall, and cayenne velvet curtains that create an inviting atmosphere. Completing the room is a custom 22' x 15' rug, adding warmth and comfort to the space. A hidden coat closet door integrated into the feature wall adds an element of surprise and functionality.
This project is not just about aesthetics; it's about pushing the boundaries of design and showcasing the possibilities. By curating an out-of-the-box approach, we bring texture and depth to the space, employing different materials and original applications. The layered design achieved through repeated use of the same material in various forms, shapes, and locations demonstrates that unexpected elements can create breathtaking results.
The reason behind this redesign and remodel was the homeowners' desire to have a kitchen that not only provided functionality but also served as a beautiful backdrop to their cherished family moments. The previous kitchen lacked the "wow" factor they desired, prompting them to seek our expertise in creating a space that would be a source of joy and inspiration.
Inspired by well-curated European vignettes, sculptural elements, clean lines, and a natural color scheme with pops of color, this design reflects an elegant organic modern style. Mixing metals, contrasting textures, and utilizing clean lines were key elements in achieving the desired aesthetic. The living room introduces bolder moments and a carefully chosen color scheme that adds character and personality.
The client's must-haves were clear: they wanted a show stopping centerpiece for their home, enhanced natural light in the kitchen, and a design that reflected their family's dynamic. With the transformation of the range wall into a wall of windows, we fulfilled their desire for abundant natural light and breathtaking views of the surrounding landscape.
Our favorite rooms and design elements are numerous, but the kitchen remains a standout feature. The painstaking process of hand-cutting and crafting each reeded panel in the island to match the marble's veining resulted in a labor of love that emanates warmth and hospitality to all who enter.
In conclusion, this tastefully lux project in University Park, Dallas is an extraordinary example of a full gut remodel that has surpassed all expectations. The meticulous attention to detail, the masterful use of materials, and the seamless blend of functionality and aesthetics create an unforgettable space. It serves as a testament to the power of design and the transformative impact it can have on a home and its inhabitants.
Project by Texas' Urbanology Designs. Their North Richland Hills-based interior design studio serves Dallas, Highland Park, University Park, Fort Worth, and upscale clients nationwide.
 Vintage Cellars & Saunas
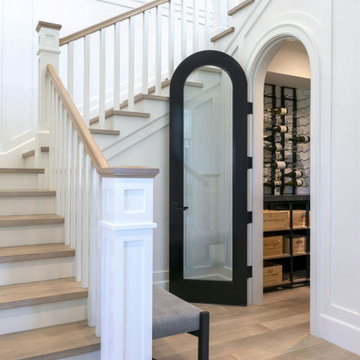
Under the stairs closet? Boring. Now how about an under the stairs wine cellar ?
Unassuming can be gold, and that is exactly what this custom wine cellar is. Designing, Building, and Installing an under the stairs wine cellar is a fantastic way to utilize an otherwise uninteresting location in your home.
Here in Newport Beach, Orange County, California, this homeowner did just that. Even though small, this glass door / glass front wine cellar / glass wine room / glass wine vault holds upwards of 480 bottles with ease.
The design build team at Vintage Cellars worked closely with this client to create a hybrid style wine cellar design in metal, wood, and glass. Contemporary and modern flair accent this traditional design.
Triple deep metal wine racks line the top of this wine room, circling the walls with their ability to display wines horizontally and label forward. At waist height, a thin marble countertop sits above a completely custom, three tiered system of metal and wood storage for original wooden cases by Noe Design Co. Everything is on full display here.
Behind the wine racking / wine rack / wine racks, the wall is adorned with white subway tile which makes the modern black wine racks really pop and appeal to the eye.
The door entering this wine room / wine cellar / wine vault / under the stairs wine cellar / glass wine room / modern wine cellar / contemporary wine cellar / modern wine room / contemporary wine room consists of metal and glass.
Wine Cellars like this can be found all over Orange County, in areas like Newport Coast, Coto De Caza, Corona Del Mar, Balboa Island, Emerald Bay, Huntington Beach, Laguna Beach, Laguna Niguel, Laguna Hills, Dana Point, San Clemente, Ladera Ranch, Irvine, San Juan Capistrano, Aliso Viejo, Mission Viejo, Lake Forest, Costa Mesa, Big Canyon, Bighorn, Laguna Woods, Shady Canyon, Beacon Hill, Ocean Ranch, Laguna Sur, Niguel Hills, Hillcrest Estates, Bluebird Canyon, Emerald Terrace, Smithcliffs, Downtown, Park Avenue Estates, Temple Hills, Arch Beach Heights, Top of the World, Spyglass hill, and more.
Call Vintage Cellars today to begin your design, build and install process of your own custom wine cellar!
Dana Point, Orange County, California is home to many gorgeous custom wine cellars. This contemporary glass front wine wall is a beautiful example of just that. Located just off of the living room in this modern home, this custom wine wall exudes simplicity and elegance.
Vintage Cellars worked directly with this homeowner to design, build, and install a small wine wall with a glass front, metal wine racks, and stone backing - all the usual suspects for a trendy and artistic showpiece cellar.
Holding up to 180 bottles, this glass wine wall utilizes triple deep metal wine pegs drilled directly into the stone wall behind. The pegs hold each wine bottle horizontally so that bottles and their labels are on full display. Through the middle of the cellar, three stone platforms hold oversized bottles upright, though this is truly only a display feature. Serious wine connoisseurs always store their most prized wines horizontally, ensuring that corks remain wet and the bottles are able to be aged gracefully.
The Design Build team at Vintage Cellars decided that the best utilization of the space for cooling would be to recess the cooling unit directly into the ceiling. Especially in custom wine walls / custom wine cellars / custom wine rooms / custom wine closets / glass wine wall / glass wine cellar / glass wine room / modern wine room / modern wine cellar / modern wine walls like this where space is limited, it is often best to hide it out of sight. The glass here is single pane, which makes for a very clean and modern / contemporary look.
Even though it undoubtedly looks more elegant most of the time, we often recommend dual paned thermally insulated glass for maximum cooling capability and insulation capability.
The decor of this home matches its architecture perfectly. modern / contemporary / coastal chic. The combination of wood, stone, glass and the seamless transition inside to outside makes this coastal living home truly unique and quite the showpiece in of itself.
With so many different kinds of wine racks / wine racking / wine cellar designs and styles, you can really go in any and every direction in the discovery and design phase of a custom wine cellar project. The Custom wine cellar builder custom wine cellar builders team at Vintage Cellars make the entire process exciting, informative, and smooth from start to finish.
Vintage Cellars has built gorgeous custom wine cellars and wine storage rooms across the United States and World for over 32 years. We are your go-to business for anything wine cellar and wine storage related! Whether you're interested in a wine closet, wine racking, custom wine racks, a custom wine cellar door, or a cooling system for your existing space, Vintage Cellars has you covered!
We carry all kinds of wine cellar cooling and refrigeration systems, incuding: Breezaire, CellarCool, WhisperKool, Wine Guardian, CellarPro and Commercial systems.
We also carry many types of Wine Refrigerators, Wine Cabinets, and wine racking types, including La Cache, Marvel, N'Finity, Transtherm, Vinotheque, Vintage Series, Credenza, Walk in wine rooms, Climadiff, Riedel, Fontenay, and VintageView.
Vintage Cellars also does work in many styles, including Contemporary and Modern, Rustic, Farmhouse, Traditional, Craftsman, Industrial, Mediterranean, Mid-Century, Industrial and Eclectic.
Some locations we cover often include: Agora Hills, Alameda, Albany, Alhambra, Aliso Viejo, Altadena, Anaheim, Angwin, Arcadia, Aromas, Arroyo Grande, Atascadero, Atherton, Avila Beach, Balboa Terrace, Bel Air, Belmont, Belvedere, Benton, Berkeley, Bermuda Dunes, Beverly Hills, Big Sur, Bolinas, Boyle Heights, Bradbury, Bradley, Brea, Brentwood, Bridgeport, Brisbane, Buellton, Buena Park, Burbank, Burlingame, Calabasas, Calistoga, Cambria, Canoga Park, Cardiff, Carlsbad, Carmel, Carmel By The Sea, Carmel Valley, Carnelian Bay, Carpinteria, Casmalia, Castroville, Cathedral City, Cayucos, Chatsworth, Chualar, City of LA, City of SF, Coachella, Coleville, Colma, Corona Del Mar, Coronado, Coronado Island, Corte Madera, Costa Mesa, Coto De Caza, Creston, Crystal Cove, Cupertino, Cypress, Danville, Deer Park, Del Mar, Diablo, Duarte, Eagle Rock, East Palo Alto, East Pasadena, Echo Park, El Granada, El Monte, Emeryville, Encinitas, Encino, Fairfax, Foster City, Fountain Valley, Fremont, Fullerton, Garden Grove, Glendale, Golden Gate Park, Goleta, Gonzales, Granada Hills, Granite Bay, Greenbrae, Greenfield, Grover Beach, Guadalupe, Half Moon Bay, Hancock Park, Harmony, Hidden Hills, Hillsborough, Hollywood, Hollywood Hills, Huntington Beach, Indian Wells, Indio, Industry, Inner Richmond, Inverness, Irvine, Jolon, June Lake, Kentfield, King City, La Canada Flintridge, La Habra, La Honda, La Jolla, La Palma, La Quinta, Ladera Heights, Laguna Beach, Laguna Hills, Laguna Niguel, Laguna Woods, Lake Balboa, Lake Forest, Lake Tahoe, Lake View Terrace, Larkspur, Laurel Canyon, Lee Vining, Lockwood, Lompoc, Long Beach, Los Alamitos, Los Alamos, Los Altos, Los Altos Hills, Los Angeles, Los Gatos, Los Olivos, Los Osos, Malibu, Mammoth Lakes, Manhattan Beach, Marin, Marina, Marshall, Mayflower Village, Menlo Park, Mill Valley, Millbrae, Mission Hills, Mission Viejo, Mono, Monrovia, Montara, Montebello, Monterey, Monterey Park, Morro Bay, Moss Beach, Moss Landing, Mountain View, Napa, New Cuyama, Newark, Newport Beach, Newport Coast, Nicasio, Nipomo, North Hills, Northridge, Novato, Oakland, Oakville, Ocean Beach, Oceano, Orange, Orange County, Pacific Grove, Pacific Palisades, Pacoima, Palm Desert, Palm Springs, Palo Alto, Palos Verdes, Panorama City, Pasadena, Paso Robles, Pebble Beach, Pescadero, Piedmont, Pismo Beach, Placentia, Point Reyes Station, Pope Valley, Portola Valley, Presidio, Presidio Heights, Rancho Mirage, Rancho Santa Fe, Rancho Santa Margarita, Redondo Beach, Redwood City, Reseda, Rosemead, Russian Cliff, Rutherford, Saint Helena, Salinas, San Anselmo, San Ardo, San Bruno, San Carlos, San Clemente, San Diego, San Fernando, San Francisco, San Gabriel, San Gregorio, San Jose, San Juan Capistrano, San Leandro, San Lorenzo, San Lucas, San Luis Obispo, San Marino, San Mateo, San Miguel, San Rafael, San Simeon, Santa Ana, Santa Barbara, Santa Clara, Santa Clarita, Santa Margarita, Santa Maria, Santa Monica, Santa Ynez, Saratoga, Sausalito, Sea Cliff, Seal Beach, Seaside, Shadow Hills, Shandon, Sherman Oaks, Sierra Madre, Silver Lake, Solana Beach, Soledad, Solvang, Sonoma, South El Monte, South Pasadena, South San Gabriel, Spreckels, Squaw Valley, St Helena, Stanford, Stanton, Stinson Beach, Stough Park, Studio City, Summerland, Sun Valley, Sunland, Sunnyvale, Sylmar, Tahoe City, Tahoe Vista, Tarzana, Temple City, Templeton, Thousand Oaks, Thousand Palms, Tiburon, Toluca Lake, Topanga, Topaz, Torrey Pines, Tujanga, Tustin, Union City, Valencia, Verdugo Mountains, Vernon, Villa Park, Walnut, Walnut Creek, West Puente Valley, Westminster, Westwood, Whittier, Woodside, Yorba Linda, Yountville
San Diego Wine Cellars, Rancho Santa Fe Wine Cellars, Beverly Hills Wine Cellars, Bel Air Wine Cellars, Orange County Wine Cellars, Newport Beach Wine Cellars, San Francisco Wine Cellars, Napa Wine Cellars, Sonoma Wine Cellars, Los Angeles Wine Cellars, Santa Barbara Wine Cellars, Palm Desert Wine Cellars, La Jolla Wine Cellars, Del Mar Wine Cellars, Coronado Wine Cellars, Pacific Palisades Wine Cellars, Malibu Wine Cellars, Santa Monica Wine Cellars, Brentwood Wine Cellars, Laguna Wine Cellars, Crystal Cove Wine Cellars, Hollywood Wine Cellars, Bay Area Wine Cellars, South Bay Wine Cellars, LA Wine Cellars, SD Wine Cellars, OC Wine Cellars, SF Wine Cellars, Huntington Beach Wine Cellars, Carlsbad Wine Cellars, Palos Verdes Wine Cellars, Paso Robles Wine Cellars, Encinitas Wine Cellars, Manhattan Beach Wine Cellars, Marin Wine Cellars, Tiburon Wine Cellars, Coto De Caza Wine Cellars, Thousand Oaks Wine Cellars, Cardiff Wine Cellars, RSF Wine Cellars, San Marino Wine Cellars, Ladera Heights Wine Cellars, Westwood Wine Cellars, Hillsborough Wine Cellars, Luxury Wine Cellars, Custom Wine Cellars, High End Wine Cellars, Estate Wine Cellars, Modern Wine Cellars, Contemporary Wine Cellars, Rustic Wine Cellars, Traditional Wine Cellars
Contact Vintage Cellars today with any of your Wine Cellar needs!
(800) 876-8789
Vintage Cellars
904 Rancheros Drive
San Marcos, California 92069
(800) 876-8789
Traditional
Shabby Chic
Scandanavian
Contemporary
Modern
Beach
Desert
Transitional
Asian
Coastal
Rustic
Mediterranean
French Country
Farmhouse
Eclectic
Craftsman
Tropical
Southwestern
 Berry Outdoor Living, Inc.
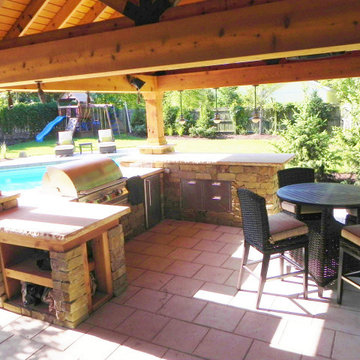
Homeowners with kids and active life wanting progressive style to facilitate outdoor living. We fused the traditional neighborhood and home style with a contemporary feel offering an upscale, clean, defined look and the result was awesome!
Landscape Architect and Landscape Designer Values:
Any given Landscape Architect or Landscape Designer may have a different approach, but Landscape Designer and Landscape Contractor, Brett Berry of Berry Outdoor Living creates living areas that feel connected to the home. As a Landscape Designer and Landscape Contractor working with a Landscape Architect, we try to create the space so it feels relaxed. It should feel like it's been in place with the home for years and not an "add-on".
As a Landscape Contractor that merges old and new construction into the landscape design, the goal is to build a space people want to spend time, whether at the bar of the outdoor kitchen, fire pit, patio, or covered porch. When a space becomes a large part of the homeowners' daily life, a Landscape Architect or Landscape Designer, or Landscape Contractor, knows a project has been completed with excellence. I work closely with a Landscape Architect through the design process to ensure the space has the correct "feel".
A Landscape Architect and Landscape Designer must design the space to flow from the inside of the home out. The patio and outdoor living space feels like an extension of the home, or another "room" of the home and feels wrapped with fresh, low-maintenance landscaping.
In Kansas City patio, and landscaping design, there is a clear trend toward a cleaner, more defined look influenced by a more modern era viewpoint that values a non-cluttered look and feel. So, as a Landscape Contractor, in our circle of clients, we've seen a definite shift toward cleaner, artisan-crafted backyards and fewer "boxy", shrub-heavy yards. A Landscape Architect with a keen sense designs this effect.
landscape modern landscape Kansas city berry landscape photos, Houzz landscape design ideas pictures remodel décor, Houzz landscape design photos, Houzz outdoor photos, outdoor landscape design photos, Houzz outdoor photos, Houzz landscape design ideas pictures remodel décor outdoor photos, landscape design outdoor photos, Houzz pictures landscape, landscape back yard, landscape residential, landscape contractor, landscape design, landscape designer, landscaper, landscaping, landscape architect, landscape contractor, landscape photos, modern landscape photos, Staker landscape photos, Kansas City landscape photos, landscape photos back yard, landscape photos residential, landscape design ideas pictures, landscape pictures, landscape design ideas residential, landscape design ideas Staker residence, Houzz landscape photos, Houzz landscape pictures, Houzz landscape, Houzz landscape design ideas pictures, Houzz landscape design ideas pictures Staker residence
 Stone Action
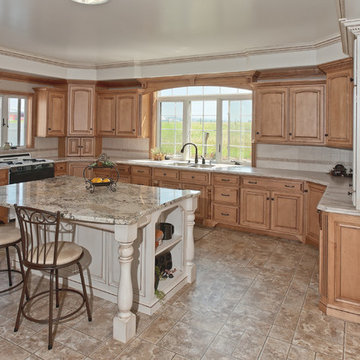
This kitchen was fabricated by Lapptops and the cabinets were done by King's Woodwork!
http://lapptops.net/
The island in this kitchen features Ice Brown (Alaska White) granite which blends well with the cabinets and floors.
Search "bordeaux" granite, see more granite of this family or other stone options: http://www.stoneaction.com
Learn more about granite to see if it’s right for you:
Granite countertops can last a lifetime. It contains no harmful chemicals and do not emit harmful radiation or gasses. Granite is heat resistant and is one of the most heat-resistant countertops on the market. You can place a hot pan out of the oven directly onto the countertop surface. Experts do recommend the use of a trivet when using appliances that emit heat for long periods of time, such as crockpots. Since the material is so dense, there is a small possibility heating one area of the top and not the entire thing, could cause the countertop to crack.
Granite is scratch resistant. You can cut on it, but it will dull your knives! Granite scores a seven on Moh’s hardness scale.
Granite countertops are considered to be a low maintenance countertop surface. The likelihood of needing to be repaired or resurfaced is low. Granite is a porous material. Most fabricators will apply a sealer to granite countertops before they are installed which will protect them from absorbing liquids too quickly. Many sealers last more than 10 years before needing to be reapplied. When they do need to be reapplied, it is something that most homeowners can do on their own as the process is similar to cleaning. Darker granites are very dense and sometimes don’t even require a sealer.
When it comes to pricing, there are a lot of variables such as edge profile, total square footage, backsplash, etc. Don’t be fooled by the stereotype that all granite is expensive. Lower-range granites will cost less than high-range laminate. Though granite countertops are not considered “low range” in pricing, there are a lot of affordable options.
If you are looking for something truly unique, consider an exotic granite. Some quarries are not easily accessible and/or only able to be quarried for short periods of time throughout the year. If these circumstances exist in a quarry with gorgeous stone, the price will be driven upward.
You won’t find a lot of solid patterns or bright colors, but both do exist. Also, watch for a large range of color and pattern within the same color of stone. It’s always a good idea to view the exact slab(s) that will be fabricated for your kitchen to make sure they are what you expected to see from the sample. Another factor is that many exotic types of granite have huge flowing waves, and a small sample will not be an accurate representation of the whole slab.
Granite countertops are very resistant to chemicals. Acids and bases will not harm the material.
 Attic Wizard
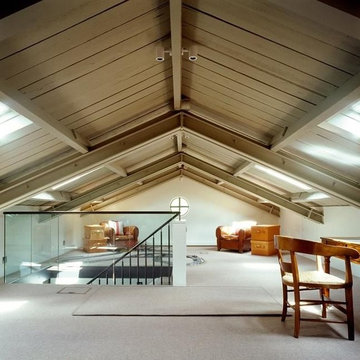
When you need attic cleaning services in Agoura Hills, Attic Wizard has the professional experience and work ethic to make sure the job is done right. We are fully licensed and insured, and all our attic cleanup services, as well as everything else we do, is guaranteed. Our main goal is that you are satisfied at the end of the process.
Attic Cleaning Service in Agoura Hills, CA - http://www.atticwizard.com/

Sponsored
Columbus, OH

Hope Restoration & General Contracting
Columbus Design-Build, Kitchen & Bath Remodeling, Historic Renovations
 Twelve Stones Designs, LLC
The owners of this kitchen had spent the money to upgrade the finishes in their kitchen upon building the home 12 years ago, but after living in the space for several years they realized how nonfunctional the layout really was. The (then) two preschool aged children had grown into busy, hungry teenagers with many friends who also liked to hang out at the house. So the family needed a more functional kitchen with better traffic flow, space for daily activities revolving around the kitchen at different times of day, and a kitchen that could accommodate cooking for and serving large groups. Furthermore, the dark, traditional finishes no longer reflected the homeowners’ style. They requested a brighter, more relaxed, coastal style that reflected their love of the seaside cities they like to visit.
Originally, the kitchen was U-shaped with a narrow island in the middle. The island created narrow aisles that bottle-necked at the dishwasher, refrigerator, and cooktop areas. There was a pass-through from the foyer into the kitchen, but the owners never liked that the pass-through was also located so close to the powder room. The awkward proximity was unappealing and made guests feel uncomfortable.
The kitchen’s storage was made up of lots of narrow cabinets, apothecary drawers, clipped corner units, and very few drawers. It lacked useful storage for the larger items the family used on a daily basis. And the kitchen’s only pantry was small closet that had only builder-grade, narrow shelving with no illumination to be able to see the contents inside.
Overall, the kitchen’s lighting plan was poorly executed. Only six recessed cans illuminated the entire kitchen and nook areas. The under cabinet lighting was not evenly distributed either. In fact, the builder had mis-placed the under cabinet lighting around the decorative pilasters which made for choppy, dark cubbies. Further, the builder didn’t include any lighting over the sink or the bar area, which meant whoever was doing the dishes was always in their own shadow. That, coupled with the steep overhang of the game room above made the bar area feel like a dim, cavernous space that wasn’t inviting or task oriented. The kitchen looked out into the main living space, but the raised bar and a narrow wall (which held the only large cabinet in the kitchen) created more of a barrier than a relationship to the living room or breakfast nook. In fact, one couldn’t even see the breakfast nook from the cooktop or sink areas due to its orientation. The raised bar top was too narrow to comfortably sit to either dine at or chat from due to the lack of knee space. The the homeowners confided that the kitchen felt more like a dark, dirty prison than place where the family, or their guests, wanted to gather and commune.
The clients' needs and desires were:
➢ to create a kitchen that would be a space the family loved to be in; to relate to the adjacent spaces all around, and to have better flow for entertaining large groups
➢ to remove the walls between the breakfast nook and living area and to be able to utilize the natural light from the windows in both those areas
➢ to incorporate a functional chopping block for prepping fresh food for home cooked meals, an island with a large sink and drain board, 2 pull out trash cans, and seating for at least the 2 teens to eat or do homework
➢ to design a kitchen and breakfast nook with an airy, coastal, relaxed vibe that blended with the rest of the house's coastal theme
➢ to integrate a layered lighting plan which would include ample general illumination, specific task lighting, decorative lighting, and lots of illuminated storage
➢ to design a kitchen with not only more storage for all the husband’s kitchen gadgets and collection of oils and spices, but smart storage, including a coffee/breakfast bar and a place to store and conceal the toaster oven and microwave
➢ to find a way to utilize the large open space between the kitchen, pantry area, and breakfast nook
Twelve Stones Designs achieved the owner's goals by:
➢ removing the walls between the kitchen and living room to allow the natural light to filter in from the adjacent rooms and to create a connection between the kitchen, nook, and living spaces for a sense of unity and communion
➢ removing the existing pantry and designing 3 large pantry style cabinets with LED tape lights and rollout drawers to house lots of kitchen appliances, gadgets, and tons of groceries. We also took the cabinets all the way up to the 9’ ceiling for additional storage for seasonal items and bulk storage.
➢ designing 2 islands - 1 with a gorgeous black walnut chopping block that houses a drawer for chopping and carving knives and a custom double pull out trash unit for point of use utilization - and 1 that houses the dishwasher, a large Blanco Gourmet sink with integrated drain board, woven baskets for fresh root vegetables and kitchen towels, plenty of drawer storage for kitchen items, and bar seating for up to 4 diners.
➢ closing off the space between the kitchen and the powder room to create a beautiful new private alcove for the powder room as well as adding some decorative storage. This also gave us space to include more tall storage near the new range for precision placement of the husband’s extensive oil and spice collection as well as a location for a combo-steam oven the wife wanted for baking and cooking healthy meals.
The project is enhanced functionally by:
➢ incorporated USB and standard receptacles for the kids’ laptops and phone charging in the large island
➢ designing the small island to include additional open shelving for items used on a daily basis such as a variety of bowls, plates, and colanders. This set up also works well for the husband who prefers to “plate” his dinners in restaurant-style fashion before presenting them to the table.
➢ the integration of specific storage units, such as double stacked cutlery drawers, a custom spice pull-out, a Kuerig coffee and tea pod drawer, and custom double stacked utensil drawers
➢ moving the refrigerator to the old oven location - this eliminated the bottle neck as well as created a better relationship to the eating table. It also utilizes the floor space between the pantry, nook, and kitchen
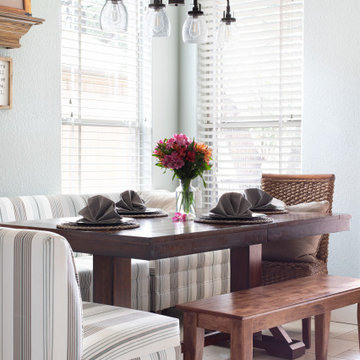
➢ creating a banquet style breakfast nook - this banquette seating not only doubles the amount of seating for large gatherings but it better utilizes the odd space between the kitchen and the previous nook area. It also helps to create a distinct pathway from the mudroom room through the pantry area, kitchen, nook, and living room.
➢ the coffee/breakfast bar area which includes the perfect location for the concealed microwave and toaster oven, convenient storage for the coffee pods and tea accoutrements. Roll-out drawers below also house the smoothie maker, hot water kettle, and a plethora of smoothie-making ingredients such as protein powders, smoothie additives, etc. Furthermore, the drawers below the Keurig house measuring utensil, cutlery, baking supplies and tupperware storage.
➢ incorporating lots of wide drawers and pullouts to accommodate large cookware.
➢ utilizing as much vertical space as possible by building storage to the ceiling which accommodates the family’s abundant amount of serving platters, baking sheets, bakeware, casserole dishes, and additional cutting boards.
The project is enhanced aesthetically by:
➢ new 5-piece Versailles pattern porcelain tile that now seamlessly joins the entire down stairs area together creating a bright, cohesiveness feeling instead of choppy separated spaces - it also adds a coastal feeling
➢ designing a cabinet to conceal the microwave and toaster oven
➢ the coastal influenced light fixtures over the nook table and island
➢ the sandy colors of the Langdon Cambria countertops. The swirling pattern and sparkling quartz pieces remind the homeowner of black-and-tan sandy beaches
➢ the striped banquet seating whose creamy white background and blue-green stripes were the inspiration for the cabinet and wall colors.
➢ All the interior doors were painted black to coordinate with the blacks and grays in the backsplash tile and countertop. This also adds a hint of tailored formality to an otherwise casual space.
➢ the use of WAC's Oculux small aperture LED units for the overhead lighting complimented with Diode LED strips for task lighting under the cabinets and inside the pantry and glass wall cabinets. All of the lighting applications are on separate dimmer switches.
Innovative uses of materials or construction methods by Realty Restoration LLC:
➢ Each 1-1/2” x 3” block of reclaimed end-grain black walnut that makes up the center island chopping block was hand milled and built in the shop. It was designed to look substantial and proportional to the surrounding elements, executed by creating the 4 inch tall top with a solid wood chamfered edge band.
➢ The metal doors on either side of the vent hood were also custom designed for this project and built in the Realty Restoration LLC shop. They are made 1x2, 11-gauge mild steel with ribbed glass. Weighing 60 lbs a piece, heavy duty cabinet hinges were added to support the weight of the door and keep them from sagging.
➢ Under-cabinet receptacles were added along the range wall in order to have a clean, uninterrupted backsplash.
Design obstacles to overcome:
➢ Because we were removing the demising walls between the kitchen and living room, we had to find a way to plumb and vent the new island. We did this by tunneling through the slab (the slab had post tension cables which prevented us from just trenching) to run a new wet vent through a nearby structural wall. We pulled the existing hot and cold lines between upper floor joists and ran them down the structural wall as well and up through a conduit in the tunnel.
➢ Since we were converting from wall overs to a gas range it allowed us to utilize the 220 feed for the wall ovens to provide a new sub panel for all the new kitchen circuits
➢ Due to framing deficiencies inherited from the original build there was a 1-1/2” differential in the floor-to-ceiling height over a 20 foot span; by utilizing the process of cutting and furring coupled with the crown moulding details on the cabinet elevations we were able to mask the problem and provide seamless transitions between the cabinet components.
Evidence of superior craftsmanship:
➢ uniquely designed, one-of-a-kind metal “X” end panels on the large island. The end panels were custom made in the Realty Restoration LLC shop and fitted to the exact dimensions of the island. The welding seams are completely indistinguishable - the posts look like they are cut from a single sheet of metal
➢ square metal posts on the small island were also custom made and designed to compliment and carry through the metal element s throughout the kitchen
➢ the beautiful, oversized end panels on the pantry cabinets which give the breakfast nook a tailored look
➢ integrating a large format 5 piece Versailles tile pattern to seamlessly flow from the existing spaces into the new kitchen space
➢ By constructing a custom cabinet that jogged around a corner we could not remodel (housing the entry way coat closet) we were able to camouflage the adjacent wall offset within the upper and lower cabinets. By designing around the existing jog in the structural walls we accomplished a few things: we were able to find the space to house, and hide, the microwave and toaster oven yet still have a clean cohesive appearance from the kitchen side. Additionally, the owners were able to keep their much needed coat closet and we didn’t have to increase the budget with unnecessary structural work.

 TKS Design Group
Free ebook, Creating the Ideal Kitchen. DOWNLOAD NOW
One of my very favorite parts of the design process is space planning and considering all the possible floor plan solutions at the beginning stages of the project. What works for one person as a solution may not be the best solution for the next. What you think you want going into the process, may change once all the space planning options are considered. This was exactly the case for this family. They thought they really wanted an island configuration.
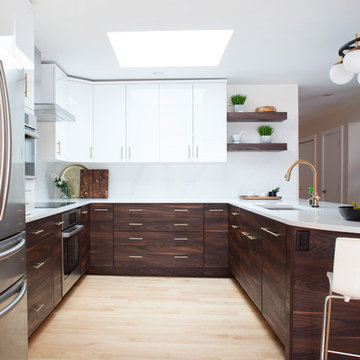
Once we figured out the flow of the work triangle and saw how great a large peninsula would work for the family, we proceeded along those lines. The peninsula not only works great for food prep, it also allows more of a traditional table seating versus an island with everyone lined up in a row — not so great for daily dinner conversation.
To the right of that is a counter depth fridge and a speed oven which gives some flexibility with cooking and reheating smaller meals instead of having to heat the entire oven. An induction cooktop with its easy to clean surface keeps the space looking clean and tidy. Induction heats very quickly to high temperatures so is also wonderful to cook on. To the right of cooktop is a long stretch of countertop perfect for prep space.
Storage was very important to the homeowners. We took our time discussing where spice pull outs and tray dividers would be located, how the corner storage would be addressed and the location of the other items such as trash and recycling cans. We worked as many drawers as possible into the space, as I always recommend drawers over doors and/or roll outs as they offer the most flexibility and ease of use. Customizing these details is time well spent as having a place for everything and everything in its place, just like Mom said, really is the key to a functional and professionally designed kitchen.
The talls and wall cabinets are white acrylic which combined with the white marble look quartz countertops and full height backsplash keep the room feeling light, bright and airy. The wood toned base cabinets are made of a textured laminate that has the look of wood but is a very easy to maintain product. Brushed gold metal on the hardware, faucet and chandelier add a warm touch and ties into the blond maple flooring. The neighboring breakfast room was also remodeled as part of the project and houses a small coffee station.
Designed by: Susan Klimala, CKBD
Photography by: Kari Firak
For more information on kitchen and bath design ideas go to: www.kitchenstudio-ge.com
 Advance Design Studio, Ltd.
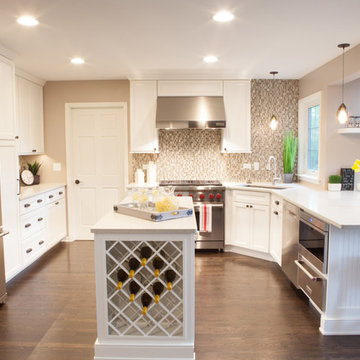
When Tom and Michelle Stien decided to remodel their kitchen, they chose Advance Design Studio to make it happen. They were looking for an innovative design that would open up an awkward wall, and we're hoping to remove some half walls that closed off their family room. "Of all the people we had come and give us quotes for our project, ADS/Scott, was the only one who came in with an idea right off the bat for what we could do. His knowledge of design and code was evident from the start," said the Stiens.
The new design increased the seating area with a large peninsula, and the cooking area was expanded to accommodate Tom's cooking skills. A warming drawer was incorporated beneath a nearly hidden microwave drawer, along with a clever pull out for increased pantry storage. A built in message board area was custom designed for kids art and family communication. Roll out trays grace every base cabinet for easy pull out storage and a single floating shelf ties the contemporary kitchen design together. Starlight quartz countertops create ease of clean up, and the look is finished off with sharp gray and white mosaic backsplash tiles.
The Stiens really liked a clean modern look, so the new crisp transitional kitchen design incorporated bright white shaker cabinetry from Medallion with gray and metal accents along with a modern feel. "Scott's presentation of what we could expect with ADS was clear and concise. He gave us a great deal of confidence in how the project would be handled".
Homeowners are frequently concerned about project budgets that get quickly get out of control. "Scott's quote was well thought out, organized and offered options based on our budget," said Michelle. "I was worried about the project budget changing as we went through the process, but they did a good job managing the situation and minimized change orders as much as possible."
When asked about their overall experience with their kitchen renovation he Stien's said; "Scott, Justin, Matt and Jason were great! They were all very friendly, personable, responsible and trustworthy. Advance Design definitely met and exceeded our expectations. Remodeling is a very challenging process to endure, but ADS minimized discomfort and inconvenience as much as possible and kept on schedule. The end result was well worth the investment in time and money."
Designer: Scott Christensen
Photographer: Joe Nowak


 Paintzen, Inc.
Everyone needs a little space of their own. Whether it’s a cozy reading nook for a busy mom to curl up in at the end of a long day, a quiet corner of a living room for an artist to get inspired, or a mancave where die-hard sports fans can watch the game without distraction. Even Emmy-award winning “This Is Us” actor Sterling K. Brown was feeling like he needed a place where he could go to be productive (as well as get some peace and quiet). Sterling’s Los Angeles house is home to him, his wife, and two of their two sons – so understandably, it can feel a little crazy.
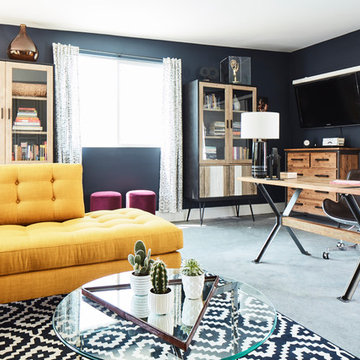
Sterling reached out to interior designer Kyle Schuneman of Apt2B to help convert his garage into a man-cave / office into a space where he could conduct some of his day-to-day tasks, run his lines, or just relax after a long day. As Schuneman began to visualize Sterling’s “creative workspace”, he and the Apt2B team reached out Paintzen to make the process a little more colorful.
The room was full of natural light, which meant we could go bolder with color. Schuneman selected a navy blue – one of the season’s most popular shades (especially for mancaves!) in a flat finish for the walls. The color was perfect for the space; it paired well with the concrete flooring, which was covered with a blue-and-white patterned area rug, and had plenty of personality. (Not to mention it makes a lovely backdrop for an Emmy, don’t you think?)
Schuneman’s furniture selection was done with the paint color in mind. He chose a bright, bold sofa in a mustard color, and used lots of wood and metal accents throughout to elevate the space and help it feel more modern and sophisticated. A work table was added – where we imagine Sterling will spend time reading scripts and getting work done – and there is plenty of space on the walls and in glass-faced cabinets, of course, to display future Emmy’s in the years to come. However, the large mounted TV and ample seating in the room means this space can just as well be used hosting get-togethers with friends.
We think you’ll agree that the final product was stunning. The rich navy walls paired with Schuneman’s decor selections resulted in a space that is smart, stylish, and masculine. Apt2B turned a standard garage into a sleek home office and Mancave for Sterling K. Brown, and our team at Paintzen was thrilled to be a part of the process.
 Advance Design Studio, Ltd.
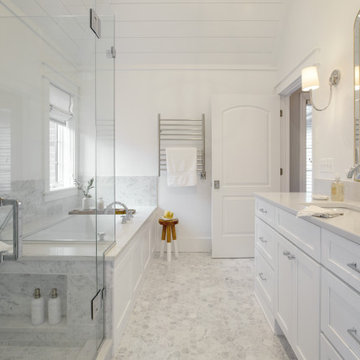
Our Lakewood clients came to Advance Design dreaming of a home spa with fresh, clean, elegant details. The design process was important, as our clients had found polished nickel sconces that set the tone for the design. Our designer moved the toilet to the other side of the existing layout to open up the space and let more light in. Once the layout was set and the 3D illustrations completed, our clients were sold.
The finished product is better than our clients ever imagined. They achieved a five-star master bath feel in the comfort of their own home. The fresh and clean vibe is evident in the master bath vanity, with Sea Salt Maple Cabinets from Medallion. These bright white cabinets are complemented by the Calacatta Quartz countertop with undermount sinks and stainless-steel Kohler faucets.
Hexagon Firenze Carrara Honed tile covers the floor, and shower floor adding stunning texture. A large glass shower is lined by 4 x 12” Firenze Carrara Polished tile that matches the flooring. The stainless-steel shower fixtures from Rohl are truly unique. Gold accents in the mirror and pendant light fixture contrast the bright white colors of the tub and walls. It wouldn’t be surprising to see this bathroom in a five-star hotel.
 Edgewater Design Group
As written in Northern Home & Cottage by Elizabeth Edwards
Sara and Paul Matthews call their head-turning home, located in a sweet neighborhood just up the hill from downtown Petoskey, “a very human story.” Indeed it is. Sara and her husband, Paul, have a special-needs son as well as an energetic middle-school daughter. This home has an answer for everyone. Located down the street from the school, it is ideally situated for their daughter and a self-contained apartment off the great room accommodates all their son’s needs while giving his caretakers privacy—and the family theirs. The Matthews began the building process by taking their thoughts and
needs to Stephanie Baldwin and her team at Edgewater Design Group. Beyond the above considerations, they wanted their new home to be low maintenance and to stand out architecturally, “But not so much that anyone would complain that it didn’t work in our neighborhood,” says Sara. “We
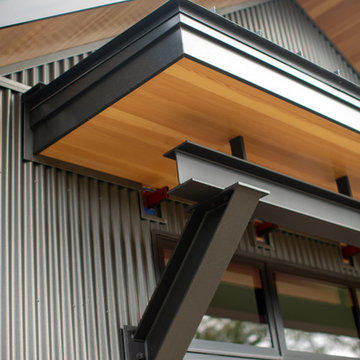
were thrilled that Edgewater listened to us and were able to give us a unique-looking house that is meeting all our needs.” Lombardy LLC built this handsome home with Paul working alongside the construction crew throughout the project. The low maintenance exterior is a cutting-edge blend of stacked stone, black corrugated steel, black framed windows and Douglas fir soffits—elements that add up to an organic contemporary look. The use of black steel, including interior beams and the staircase system, lend an industrial vibe that is courtesy of the Matthews’ friend Dan Mello of Trimet Industries in Traverse City. The couple first met Dan, a metal fabricator, a number of years ago, right around the time they found out that their then two-year-old son would never be able to walk. After the couple explained to Dan that they couldn’t find a solution for a child who wasn’t big enough for a wheelchair, he designed a comfortable, rolling chair that was just perfect. They still use it. The couple’s gratitude for the chair resulted in a trusting relationship with Dan, so it was natural for them to welcome his talents into their home-building process. A maple floor finished to bring out all of its color-tones envelops the room in warmth. Alder doors and trim and a Doug fir ceiling reflect that warmth. Clearstory windows and floor-to-ceiling window banks fill the space with light—and with views of the spacious grounds that will
become a canvas for Paul, a retired landscaper. The couple’s vibrant art pieces play off against modernist furniture and lighting that is due to an inspired collaboration between Sara and interior designer Kelly Paulsen. “She was absolutely instrumental to the project,” Sara says. “I went through
two designers before I finally found Kelly.” The open clean-lined kitchen, butler’s pantry outfitted with a beverage center and Miele coffee machine (that allows guests to wait on themselves when Sara is cooking), and an outdoor room that centers around a wood-burning fireplace, all make for easy,
fabulous entertaining. A den just off the great room houses the big-screen television and Sara’s loom—
making for relaxing evenings of weaving, game watching and togetherness. Tourgoers will leave understanding that this house is everything great design should be. Form following function—and solving very human issues with soul-soothing style.
45