
Search results for "Cleaning process" in Home Design Ideas

 Mosaboxx
Nothing brings a room together quite like the exotic motifs of vintage Turkish kilim rugs. This oriental / Moroccan style area rug. A rustic, authentic look is perfect for adding a unique look in your floors. It has the power to completely change the character of a room. Soft underfoot, shed-free and easy to care.
The rug features a combination of exotic hand woven tribal patterns, arrays of rich tones, braided tassel finish and flat pile shag texture which gives a bohemian flair to your home. Power hand loomed from 100% natural wool, this rug is exceptionally durable, hard-wearing, luxuriously soft, and easy to maintain.
We've got just the rug for you, whatever your décor. Our traditional rugs underwent a meticulous process done by the hands of nomads in Turkey where the craft has been shared between generations. They are hand-woven using pure natural wool, hand-spun and hand-twisted most of the time, then dyed using all natural vegetable dyes.
Rug Info
Colors: Pink, Brown, Orange, Blue
Size: 2.4x3.5 ft / 71x104
Material: Wool
Design: Moroccan Berber Tribal Kelim
Features: Natural, organic, eco-friendly dyes
Construction: Hand-Woven
Cleaning instructions: dry cleaning or hand washing. No machine washing. Professional cleaning is recommended.
 Do Arch LLC
Our Process
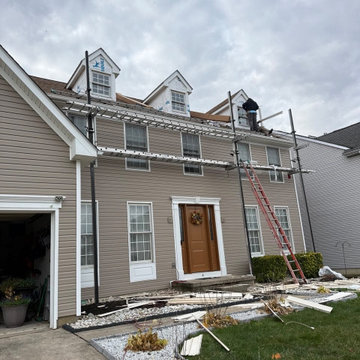
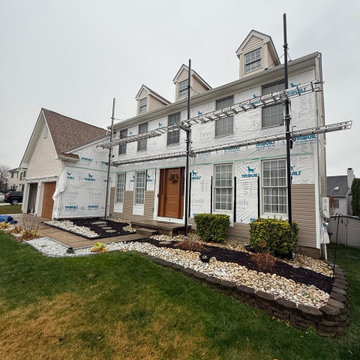
Every siding project we complete follows a structured, detail-focused approach to ensure long-term performance and a clean, high-end finish:
1. Preparation & Protection
We begin by protecting all surrounding areas, including landscaping, walkways, and entry points. This ensures a safe and clean job site from start to finish.
2. Removal of Existing Siding
The old siding is carefully removed and disposed of. During this stage, we inspect the underlying structure for any signs of damage or moisture issues.
3. Surface Inspection & Repairs
We address any compromised sheathing or framing as needed to create a solid, secure base for the new installation.
4. Weather Barrier Installation
A proper moisture barrier is installed to improve energy efficiency and protect the home from water intrusion.
5. Siding Installation
We install Double 4.5" Encore Dutch Lap siding in Natural Clay with precision, ensuring straight lines, tight seams, and consistent spacing throughout.
6. Trim, Shutters & Moldings
All shutters and exterior moldings are carefully reinstalled and aligned, maintaining the home’s original character while enhancing the updated look.
7. Final Detailing & Cleanup
We complete all finishing touches, conduct a full quality check, and leave the property clean and ready to enjoy.
 JRP Design & Remodel
Our clients are seasoned home renovators. Their Malibu oceanside property was the second project JRP had undertaken for them. After years of renting and the age of the home, it was becoming prevalent the waterfront beach house, needed a facelift. Our clients expressed their desire for a clean and contemporary aesthetic with the need for more functionality. After a thorough design process, a new spatial plan was essential to meet the couple’s request. This included developing a larger master suite, a grander kitchen with seating at an island, natural light, and a warm, comfortable feel to blend with the coastal setting.
Demolition revealed an unfortunate surprise on the second level of the home: Settlement and subpar construction had allowed the hillside to slide and cover structural framing members causing dangerous living conditions. Our design team was now faced with the challenge of creating a fix for the sagging hillside. After thorough evaluation of site conditions and careful planning, a new 10’ high retaining wall was contrived to be strategically placed into the hillside to prevent any future movements.
With the wall design and build completed — additional square footage allowed for a new laundry room, a walk-in closet at the master suite. Once small and tucked away, the kitchen now boasts a golden warmth of natural maple cabinetry complimented by a striking center island complete with white quartz countertops and stunning waterfall edge details. The open floor plan encourages entertaining with an organic flow between the kitchen, dining, and living rooms. New skylights flood the space with natural light, creating a tranquil seaside ambiance. New custom maple flooring and ceiling paneling finish out the first floor.
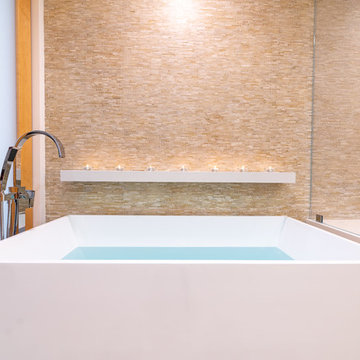
Downstairs, the ocean facing Master Suite is luminous with breathtaking views and an enviable bathroom oasis. The master bath is modern and serene, woodgrain tile flooring and stunning onyx mosaic tile channel the golden sandy Malibu beaches. The minimalist bathroom includes a generous walk-in closet, his & her sinks, a spacious steam shower, and a luxurious soaking tub. Defined by an airy and spacious floor plan, clean lines, natural light, and endless ocean views, this home is the perfect rendition of a contemporary coastal sanctuary.
PROJECT DETAILS:
• Style: Contemporary
• Colors: White, Beige, Yellow Hues
• Countertops: White Ceasarstone Quartz
• Cabinets: Bellmont Natural finish maple; Shaker style
• Hardware/Plumbing Fixture Finish: Polished Chrome
• Lighting Fixtures: Pendent lighting in Master bedroom, all else recessed
• Flooring:
Hardwood - Natural Maple
Tile – Ann Sacks, Porcelain in Yellow Birch
• Tile/Backsplash: Glass mosaic in kitchen
• Other Details: Bellevue Stand Alone Tub
Photographer: Andrew, Open House VC
Find the right local pro for your project
 Tile Doctor Ltd
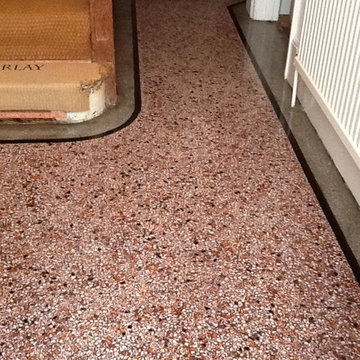
This Terrazzo tiled hallway at a property in Northampton was in a really bad state. It was heavily soiled and suffered from glue marks where the original carpet covering it had been removed. Additionally, there was some damage to the edges of the doorway, and a large crack in the floor running across the width of the hallway.
Terrazzo is an interesting material, originally produced in Italy, that consists mainly of concrete with segments of marble and other stone interspersed and held together with a resin. Since Terrazzo is formed in this way, I explained to the customer that I would fill the crack along the floor and the small holes around the edges with concrete, before then using tile paint to match in the colours as best as possible. This would be the most cost-effective solution, which was ideal since the customer had a limited budget for the repairs.
Before beginning the restoration, I tested a small area using a diamond encrusted burnishing pad, thereby giving the customer an indication of the type of results that could be achieved. With the customer pleased by the results, the job was booked in for the following week.
To begin, Tile Doctor Remove & Go was applied to the floor and was left to dwell for ten minutes to soften the carpet glue and break down any old sealer. This was then scrubbed in to the tiles with a pad fitted to a rotary machine. To remove the remaining residue and marks in the particularly stubborn areas, I used a manual hand scraper. The entire floor was then wet vaxed to soak up the soiled cleaner and leave the area clean for burnishing.
This was followed by the use of Tile Doctor diamond encrusted burnishing pads to polish the tiles, starting with a coarse grit pad, followed by wet vaxing and repeating the process with a medium grit pad and finally the fine grit pad to achieve the desired effect. I then installed a turbo dryer to dry the floor.
I returned to the property once the floor was dry and carried out the repairs which had been discussed earlier with the customer (filling the holes and cracks in the floor with concrete), cleaning off any concrete residue before I finished for the day.
Upon my return to the property the next day, I refined the polish on the floor even further by applying the extra fine grit burnishing pad.
To finish off the three day restoration, I sealed the Terrazzo tiles using two coats of Tile Doctor Colour Grow sealer. As an impregnating sealer, Colour Grow soaks into the pores of the stone, protecting it from ingrained dirt. Colour Grow also contains colour intensifying properties, allowing it to enhance the naturally occurring shades in the stone, and therefore stopping it from appearing dull.
This floor certainly was in a bad state, with damage as well as dirt to deal with, but I’m pleased to say that the work went a long way in transforming its appearance, leaving a very happy customer.
Phil Vissian
Northamptonshire Tile Doctor
 Lena Puntus | Interior Design & 3D Visualization
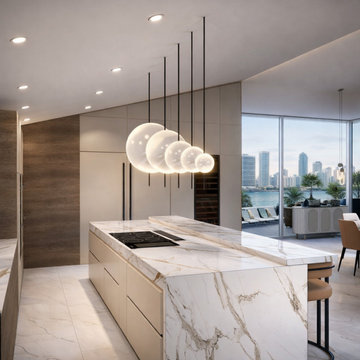
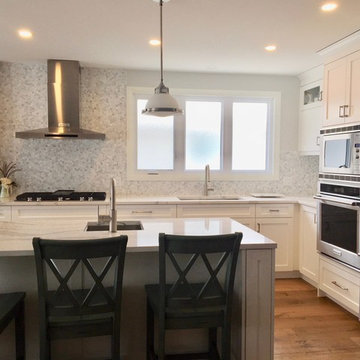
Kitchen renovation project in Miami developed in collaboration with a local designer. The project involved redesigning a private residential kitchen to meet kosher kitchen requirements while creating a clean, modern interior.
 fine art of design
fine art of design is a full service design and construction company. fine art of design is founded on the principle that achieving timeless design is a deliberate process. Through concept, design and meticulous craftsmanship, the art of placement is where every design begins and ends. We work towards creating beautiful and unique spaces that meet our clients’ lifestyles and brings our clients dreams to reality.
 Katz Novoa Architects
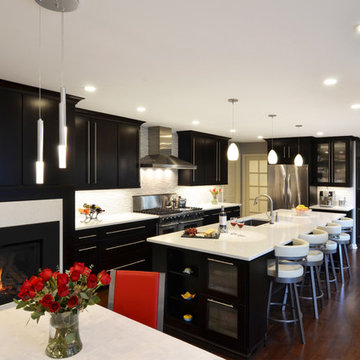
Three years after completing the first phase of our Clients’ home renovation we were summoned again to
redesign their Kitchen. The charge was to create a sleek, “Metro” Kitchen and a dynamic flow between it
and the adjacent Sitting Room. The Client, who works from home for a Fortune 500 Corporation, also
requested a desk area at which to do her job.
Transforming the “Eighties, “White-washed- Southwest-Country” styled Kitchen required a complete
stripping to the studs, reconfiguring the position of appliances and cabinetry, eliminating a wall and
peninsula that separated the Kitchen from the Sitting Room, and a complete make-over of the brick-oven-
like fireplace.
The process yielded a stunning and efficient working Kitchen which features a coffee station, wine bar,
full height pantries, a seamless flow to the Sitting Room and, to our Clients’ delight, a little office space
tucked behind a pocketing French door.

Sponsored
Columbus, OH

Hope Restoration & General Contracting
Columbus Design-Build, Kitchen & Bath Remodeling, Historic Renovations
 Inspired Closets Baton Rouge
Do you ever think about DIYing your closet renovation, but you’re just not sure it’ll turn out the way you want?
This is where we found our recent client, Amanda, and her husband, Terry.
DIY Dreamers
The couple was in the middle of renovating their master bath when Amanda went down a Pinterest ‘rabbit hole.’
There in her endless scrolling, she was mesmerized by photos of beautiful master closets…efficient master closets…organized master closets…inspired master closets.
Amanda began thinking…If she and Terry were already redoing their master bath, it only made sense to renovate their ensuite closet at the same time.
They could even DIY it and save a little bit of money, too. Right?
Amanda took measurements, researched closet organization systems online, and prepared to become a closet DIY warrior.
But a little thought was holding her back.
It wasn’t that she didn’t think they could do it themselves.
Could they survive the stress of the renovation process?
What if they ended up hating the result?
What if they ended up hating each other in the process?
That’s when Amanda found us and decided to explore a different option.
A Professional Job – At the Same Price
Our Designer Felicity arrived for a consultation, worked up a complete closet renovation plan, explained our signature stress-free installation process, and gave the couple a price.
The number ended up rivaling the final DIY cost.
Amanda and Terry were sold (and relieved).
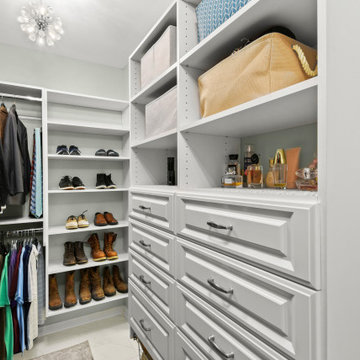
The couple’s professional closet renovation & end-to-end installation took place over just 2 days last summer.
They now have custom floor-to-ceiling closet organization – and new weight off of their shoulders that only comes with a clean, organized space.
We later returned to revamp their daughter Savannah’s closet a few weeks later.
Before you DIY your closet revamp, give us a quick call. We’d love to show you what we can do.
Request a free consultation to get started on your dream closet here: https://www.inspiredclosets.com/locations/baton-rouge/contact/
 Inspired Closets Baton Rouge
Do you ever think about DIYing your closet renovation, but you’re just not sure it’ll turn out the way you want?
This is where we found our recent client, Amanda, and her husband, Terry.
DIY Dreamers
The couple was in the middle of renovating their master bath when Amanda went down a Pinterest ‘rabbit hole.’
There in her endless scrolling, she was mesmerized by photos of beautiful master closets…efficient master closets…organized master closets…inspired master closets.
Amanda began thinking…If she and Terry were already redoing their master bath, it only made sense to renovate their ensuite closet at the same time.
They could even DIY it and save a little bit of money, too. Right?
Amanda took measurements, researched closet organization systems online, and prepared to become a closet DIY warrior.
But a little thought was holding her back.
It wasn’t that she didn’t think they could do it themselves.
Could they survive the stress of the renovation process?
What if they ended up hating the result?
What if they ended up hating each other in the process?
That’s when Amanda found us and decided to explore a different option.
A Professional Job – At the Same Price
Our Designer Felicity arrived for a consultation, worked up a complete closet renovation plan, explained our signature stress-free installation process, and gave the couple a price.
The number ended up rivaling the final DIY cost.
Amanda and Terry were sold (and relieved).
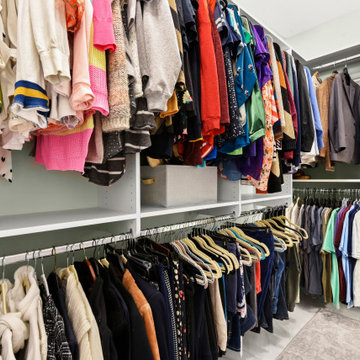
The couple’s professional closet renovation & end-to-end installation took place over just 2 days last summer.
They now have custom floor-to-ceiling closet organization – and new weight off of their shoulders that only comes with a clean, organized space.
We later returned to revamp their daughter Savannah’s closet a few weeks later.
Before you DIY your closet revamp, give us a quick call. We’d love to show you what we can do.
Request a free consultation to get started on your dream closet here: https://www.inspiredclosets.com/locations/baton-rouge/contact/
 Do Arch LLC
Our Process
Every siding project we complete follows a structured, detail-focused approach to ensure long-term performance and a clean, high-end finish:
1. Preparation & Protection
We begin by protecting all surrounding areas, including landscaping, walkways, and entry points. This ensures a safe and clean job site from start to finish.
2. Removal of Existing Siding
The old siding is carefully removed and disposed of. During this stage, we inspect the underlying structure for any signs of damage or moisture issues.
3. Surface Inspection & Repairs
We address any compromised sheathing or framing as needed to create a solid, secure base for the new installation.
4. Weather Barrier Installation
A proper moisture barrier is installed to improve energy efficiency and protect the home from water intrusion.
5. Siding Installation
We install Double 4.5" Encore Dutch Lap siding in Natural Clay with precision, ensuring straight lines, tight seams, and consistent spacing throughout.
6. Trim, Shutters & Moldings
All shutters and exterior moldings are carefully reinstalled and aligned, maintaining the home’s original character while enhancing the updated look.
7. Final Detailing & Cleanup
We complete all finishing touches, conduct a full quality check, and leave the property clean and ready to enjoy.
 BMR BelMax Remodeling
Master Bathroom Remodeling in Maple Glen, PA: A Stunning Transformation by BMR Belmax Remodeling
At BMR Belmax Remodeling, we pride ourselves on delivering exceptional remodeling services that combine elegance, functionality, and personalized design. One of our recent projects involved a master bathroom remodeling in Maple Glen, PA, where we transformed a dated bathroom into a luxurious retreat. This comprehensive bathroom renovation in Maple Glen, PA showcases our commitment to craftsmanship and attention to detail, leaving our client thrilled with the results.
A Vision for the Perfect Master Bathroom
Our client envisioned a serene and modern master bathroom that would elevate the aesthetics and functionality of their space. They sought a design that offered a balance of contemporary style and practicality, incorporating sleek fixtures, premium materials, and improved lighting. We collaborated closely with the client to bring their vision to life, ensuring that every detail met their expectations. The result was a master bathroom that perfectly aligned with their lifestyle and design preferences.
Key Features of the Master Bathroom Remodel
Our team tackled every aspect of this master bathroom remodeling project with precision and care. Here’s a breakdown of the upgrades and improvements we completed:
1. Plumbing Reconfiguration
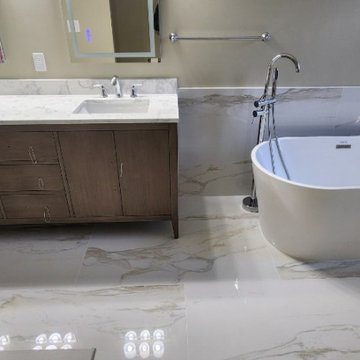
To accommodate the updated design, we reconfigured the bathroom’s plumbing to support a sleek, smaller vanity and a stylish freestanding bathtub. This change not only optimized the layout but also created a more open and inviting feel.
2. Upgraded Bathroom Fixtures
The client opted for high-quality bathroom fixtures to enhance the space’s overall look and functionality. We installed a modern bathtub faucet, a new toilet, and other premium fixtures that seamlessly complemented the updated design.
3. Enhanced Lighting and Electrical Work
Lighting was a crucial element of this remodel. We installed new electrical wiring to accommodate lighted mirrors, which added a touch of sophistication and practicality. Additional lighting was installed above the mirrors to ensure optimal brightness for daily grooming routines, and a new exhaust fan was added to improve ventilation and maintain air quality.
4. Large-Format Tile Installation
To achieve a luxurious and contemporary look, we used 24″x48″ large-format tiles for the walls in the bathtub area and on the flooring. These tiles created a clean, seamless aesthetic, with fewer grout lines to maintain and a striking visual impact. The client was particularly impressed with the elegance and durability of this choice.
5. Freestanding Bathtub Installation
A standout feature of this remodel was the addition of a stunning freestanding bathtub. Positioned as a focal point of the bathroom, it offered both aesthetic appeal and a relaxing space for unwinding after a long day.
A Seamless Process and Impressive Results
The project was completed in just eight working days, thanks to our efficient project management and skilled team of professionals. From the initial consultation to the final walkthrough, we ensured clear communication with the client to address their questions and keep them updated on progress.
Our streamlined process involved careful planning, precise execution, and meticulous attention to detail. This approach not only delivered a beautiful transformation but also minimized disruptions for the client, ensuring a stress-free remodeling experience.
Why Choose BMR Belmax Remodeling?
This master bathroom remodeling in Maple Glen, PA exemplifies the quality and care that define our work. Here are some reasons why homeowners trust us for their bathroom renovation needs:
Expert Craftsmanship: Our team is skilled in delivering high-quality finishes and innovative solutions tailored to your preferences.
Personalized Designs: We work closely with you to create a space that aligns with your style, needs, and budget.
Premium Materials: We use top-tier materials to ensure durability, functionality, and aesthetic appeal.
Efficient Project Management: Our well-coordinated approach ensures that projects are completed on time without compromising quality.
Customer Satisfaction: We prioritize your satisfaction, striving to exceed your expectations in every aspect of the project.
Client Satisfaction and Lasting Value
The client was overjoyed with their newly remodeled master bathroom, expressing appreciation for the seamless process and stunning results. They particularly loved the enhanced lighting, the luxurious feel of the large-format tiles, and the functionality of the upgraded features. The renovation not only improved the bathroom’s aesthetics but also added significant value to their home.
Transform Your Bathroom with BMR Belmax Remodeling
If you’re considering a bathroom renovation in Maple Glen, PA, BMR Belmax Remodeling is here to help. Whether you’re looking for a complete master bathroom transformation or specific upgrades, we bring expertise, creativity, and a commitment to excellence to every project.
Contact us today to schedule a consultation and let us bring your dream bathroom to life. With BMR Belmax Remodeling, your ideal space is closer than you think!
 BLU Interiors: Chelsea Dunbar
Photo Credit: Willett Photography http://www.willettphoto.com
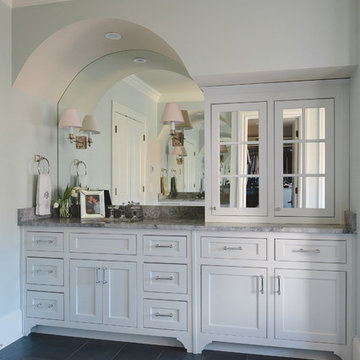
The home is located in Atlanta, GA and was a complete ground up project. We worked with the very talented architect Rodolfo Castro. We worked closely with him and the clients to achieve the right interior layout as well as the furniture plan. As far as the interior design, we helped with the selections of the various finishes (flooring, bathroom tiles, paint colors for both interior and exterior, hardware, furniture and light fixtures). Working with great vendors such as Francois & Co. for the kitchen hood and the fireplace, Specialty Tile, Circa Lighting, Century Furniture, and many other wonderful local vendors. This helped us achieve the perfect atmosphere and architectural detail in the space. The clients were very involved in the selection process and so it helped that they had great taste! It was a great project from concept to the finished design.
 VIOSKI
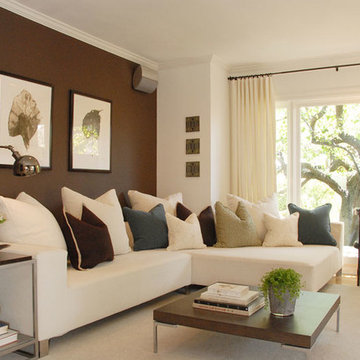
The VIOSKI Nicholas I Sectional has been customized to fit this beautiful Hollywood Hills retreat designed by Annette English. Custom pillows accent the natural rich palette of this modern living space. In perfect harmony with nature, the outdoors are masterfully brought indoors. VIOSKI Nicholas Side Tables add clean lines and elegance.

Sponsored
Columbus, OH
Hope Restoration & General Contracting
Columbus Design-Build, Kitchen & Bath Remodeling, Historic Renovations
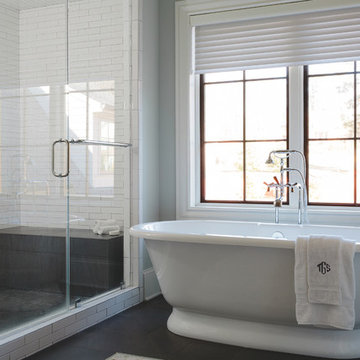 BLU Interiors: Chelsea Dunbar
Photo Credit: Willett Photography http://www.willettphoto.com
The home is located in Atlanta, GA and was a complete ground up project. We worked with the very talented architect Rodolfo Castro. We worked closely with him and the clients to achieve the right interior layout as well as the furniture plan. As far as the interior design, we helped with the selections of the various finishes (flooring, bathroom tiles, paint colors for both interior and exterior, hardware, furniture and light fixtures). Working with great vendors such as Francois & Co. for the kitchen hood and the fireplace, Specialty Tile, Circa Lighting, Century Furniture, and many other wonderful local vendors. This helped us achieve the perfect atmosphere and architectural detail in the space. The clients were very involved in the selection process and so it helped that they had great taste! It was a great project from concept to the finished design.
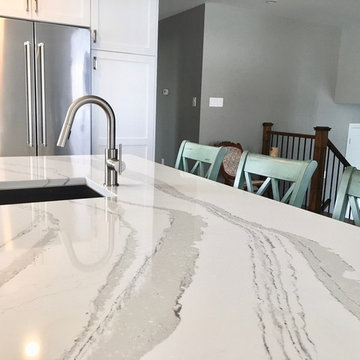 fine art of design
fine art of design is a full service design and construction company. fine art of design is founded on the principle that achieving timeless design is a deliberate process. Through concept, design and meticulous craftsmanship, the art of placement is where every design begins and ends. We work towards creating beautiful and unique spaces that meet our clients’ lifestyles and brings our clients dreams to reality.
 Ideal Garage Solutions
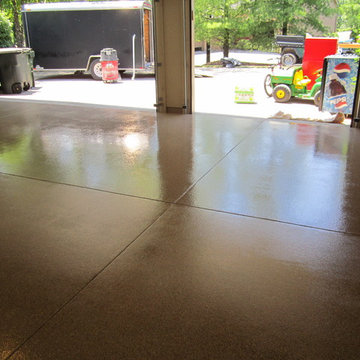
Garage Floor Coatings Complete!! Looks amazing. Not to mention durable and easy to clean!
Example of a classic garage design in Cincinnati
Example of a classic garage design in Cincinnati
 TaylorPro Design and Remodeling, Inc.
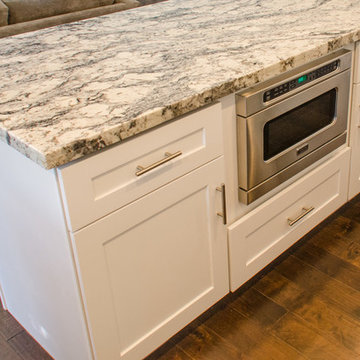
"We decided to do a complete remodel of our kitchen after the pipe burst in our kitchen. We picked Taylor Pro to work with after getting extensive quotes and looked at many reviews. Easy to work with, always on time, and cleaned up everyday. The TaylorPro crew installed everything from new cabinets and hardware, plumbing, appliances, and contracted painters, granite installer, and flooring for us. They raised our kitchen ceiling by six inches, installed new lighting, and fixed the area of damaged wall in the kitchen and dining room. Any issues we ran into during this long process were fixed immediately by Kerry or his team. The crew was friendly, punctual and cleaned up on a daily basis as well as an in-depth cleaning at the end of the remodel. We got our up dream kitchen and are so happy the way the dining room and family room look with new paint, lighting fixtures, and flooring. Although it was tough to be without a kitchen, the end result was more than worth it!"
~ Adam L, Client
Cabinets by Kitchen Emporium, Jenn-Air appliances, hardwood floors by Joe's Hardwood, granite backsplash, under cabinet lighting, rectangular sink, corner cabinet, glass cabinet, lazy susan.
Photo by: Kerry W. Taylor
Sponsored
Columbus, OH
Hope Restoration & General Contracting
Columbus Design-Build, Kitchen & Bath Remodeling, Historic Renovations
 JRP Design & Remodel
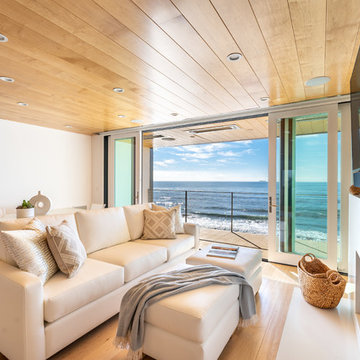
Our clients are seasoned home renovators. Their Malibu oceanside property was the second project JRP had undertaken for them. After years of renting and the age of the home, it was becoming prevalent the waterfront beach house, needed a facelift. Our clients expressed their desire for a clean and contemporary aesthetic with the need for more functionality. After a thorough design process, a new spatial plan was essential to meet the couple’s request. This included developing a larger master suite, a grander kitchen with seating at an island, natural light, and a warm, comfortable feel to blend with the coastal setting.
Demolition revealed an unfortunate surprise on the second level of the home: Settlement and subpar construction had allowed the hillside to slide and cover structural framing members causing dangerous living conditions. Our design team was now faced with the challenge of creating a fix for the sagging hillside. After thorough evaluation of site conditions and careful planning, a new 10’ high retaining wall was contrived to be strategically placed into the hillside to prevent any future movements.
With the wall design and build completed — additional square footage allowed for a new laundry room, a walk-in closet at the master suite. Once small and tucked away, the kitchen now boasts a golden warmth of natural maple cabinetry complimented by a striking center island complete with white quartz countertops and stunning waterfall edge details. The open floor plan encourages entertaining with an organic flow between the kitchen, dining, and living rooms. New skylights flood the space with natural light, creating a tranquil seaside ambiance. New custom maple flooring and ceiling paneling finish out the first floor.
Downstairs, the ocean facing Master Suite is luminous with breathtaking views and an enviable bathroom oasis. The master bath is modern and serene, woodgrain tile flooring and stunning onyx mosaic tile channel the golden sandy Malibu beaches. The minimalist bathroom includes a generous walk-in closet, his & her sinks, a spacious steam shower, and a luxurious soaking tub. Defined by an airy and spacious floor plan, clean lines, natural light, and endless ocean views, this home is the perfect rendition of a contemporary coastal sanctuary.
PROJECT DETAILS:
• Style: Contemporary
• Colors: White, Beige, Yellow Hues
• Countertops: White Ceasarstone Quartz
• Cabinets: Bellmont Natural finish maple; Shaker style
• Hardware/Plumbing Fixture Finish: Polished Chrome
• Lighting Fixtures: Pendent lighting in Master bedroom, all else recessed
• Flooring:
Hardwood - Natural Maple
Tile – Ann Sacks, Porcelain in Yellow Birch
• Tile/Backsplash: Glass mosaic in kitchen
• Other Details: Bellevue Stand Alone Tub
Photographer: Andrew, Open House VC
 Sosna Inc
The family's once-loved home had become a source of frustration. Their kitchen, a space meant for gathering and creating, felt cramped and outdated. Limited storage and poor organization made meal prep a tedious task, and entertaining guests a logistical nightmare. The laundry room, often overlooked, was equally problematic. Its cramped layout and lack of storage made laundry day a chore, and the noise of the washing machine echoed through the living room.
To compound the issue, the absence of dedicated office spaces made working from home a constant struggle. One makeshift office was squeezed into the dining room, while another was relegated to the basement.
The family was hesitant to embark on a major renovation, fearing the challenges and uncertainties that come with such a project. Finding a reliable contractor, ensuring timely completion, and worrying about potential shoddy workmanship were all valid concerns.
We understood their anxieties and were committed to providing a smooth and stress-free experience. Our team crafted a design that addressed each of their concerns, transforming their home into a functional and stylish space.
We reimagined the laundry room, creating a custom storage solution and incorporating a stackable washer and dryer. The open hallway to the living room was enclosed, creating a spacious closet with ample storage. The laundry room now seamlessly connected to the kitchen, simplifying the grocery unloading process.
A former juliette balcony was converted into a dedicated office space, providing a peaceful and productive work-from-home environment.
The dated and cluttered ensuite bathroom received a luxurious makeover. A clever pull-out storage system in the shower wall and a spacious niche provided much-needed organization.
While every renovation project has its challenges, this one was remarkably smooth. The only significant hurdle was some additional structural work required in the basement to support the new office space. Our experienced team handled this efficiently, minimizing any disruption.
The final result is a home that truly reflects the family's personality and lifestyle. The laundry room, now a cheerful and organized space with soft green cabinets, patterned floor tiles, and gold accents, showcases our attention to detail.
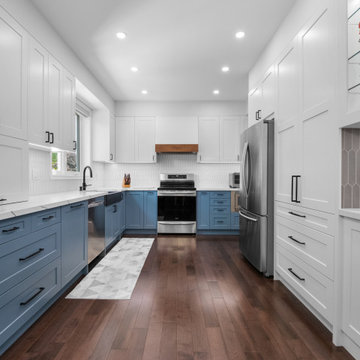
The kitchen is a stunning centerpiece, featuring a striking combination of blue and white cabinets, dark hardwood floors, and a sleek white backsplash. The adjacent beverage bar, with its glass-fronted upper cabinets, provides an elegant space for entertaining.
The ensuite bathroom is a spa-like retreat, with large-format marble tiles, a black vanity, and chrome fixtures creating an atmosphere of understated luxury.
The renovation has had a profound impact on the family's daily life. Ample storage throughout the house has banished clutter, making it easier to maintain a tidy home. The seamless flow from the laundry room to the kitchen has streamlined the grocery unloading process, and the dedicated office spaces have transformed the work-from-home experience.
Beyond the physical transformation, it was the shared moments and laughter that made this project truly special. The family's enthusiasm and good humor were contagious. One of the clients, with his big personality, even starred in a walk-through video of the finished project, showcasing his infectious joy.
From choosing tiles to navigating unexpected challenges, the entire process was filled with warmth and collaboration. Even their four-year-old son, initially shy, warmed up to our site leader, Gus, nicknaming him "Gus the Bus," a moniker that endeared him to the entire team.

 Kitchen Design Concepts
We originally remodeled this 1939 Preston Hollow home in 2004, but after 15 years it needed a bit of an aesthetic update for our homeowners. Enter our Revive process. We take a kitchen (or bathroom) where the overall layout is already functional, but it still seems to be looking dated. We bring it back to life with new colors and some materials to really amp up the look.
The homeowners wanted a "lighter and brighter" space which we achieved by painting the perimeter cabinets a crisp grey/white color and having 2cm Bianco Carrara Honed Marble counter installed on the perimeter as well as a majority of the splash. We did remove one open shelf cabinet and installed floating shelves in its place to create a fun accent wall. There we installed Handmade 8×8 Cement Tiles in Laurent Gray from Renaissance Tile.
56