
Search results for "Compression" in Home Design Ideas
 nicks building supply
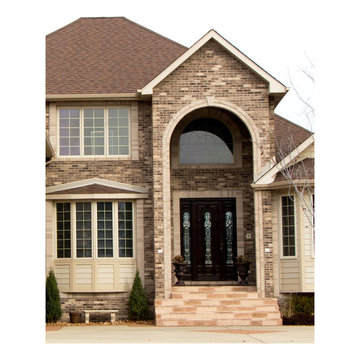
Solid Mahogany 8 Foot Tall Door
Model: N-525 Majestic With N-525 Majestic Sidelights
This beautiful 8 foot tall door like all doors Built by Nicksbuilding.com can be customizable to your needs & likes-
Glass Type: Majestic insulated decorative glass with patina caming (other glass choices available)
Wood Species: Solid Brazilian Mahogany Wood Door (no veneers)
Door Size: 3'0" x 8'0" (other heights & widths available)
Jamb Size: Customizable (priced with 4 9/16" jamb)
Door Swing: Customizable (Left hand or Right hand)
Sidelight Size: 11" - 14" (12 inch sidelight is standard)
Lock Prep included. Left or Right Handing. Single or Double Bore. 2 1/8" diameter hole, 2 3/4" backset, 5 1/2" spread. 3 point locking system upgrade available. (outswing door and ADA approved threshold available)
Door System is Pre-hung with Solid Mahogany Jambs, 2" Brick-molding, Adjustable Continuous Bronze Threshold,
Your Choice of Commercial Grade Ball-Bearing Hinge Finishes, Q-Lon compression Weather-stripping and Rubber Door Sweep.
** Pre-Hung ** Our Pre-Hung Door Systems are "NOT" Kits! Shipped truly and completely pre-hung with hinges mortised to door and pre-installed in the Jamb for the easiest installation possible. This will save you Time and Money. No extra work needed for the carpenter. Ready to install into the doorway.
Priced Unfinished - Optional UV Furniture Grade Finishing Available
call - 219-663-2279
Web: www.nicksbuilding,com
 Choate + Hertlein Architects
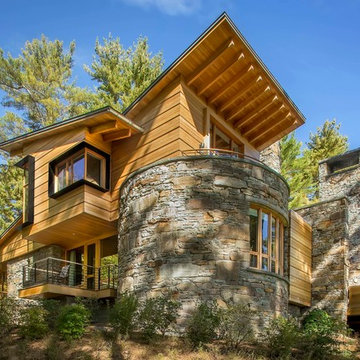
A rustic-modern house designed to grow organically from its site, overlooking a cornfield, river and mountains in the distance. Indigenous stone and wood materials were taken from the site and incorporated into the structure, which was articulated to honestly express the means of construction. Notable features include an open living/dining/kitchen space with window walls taking in the surrounding views, and an internally-focused circular library celebrating the home owner’s love of literature.
Phillip Spears Photographer
 Neumann & Rudy Architecture
**I. Spatial Composition & Architectural Volume**
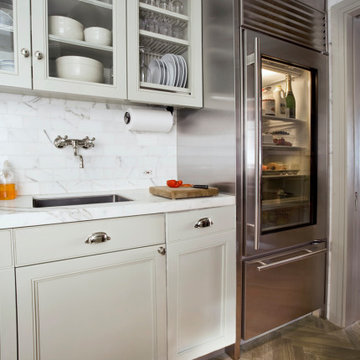
This is a galley-adjacent service zone — most likely a scullery or butler's pantry annexed to a primary kitchen — and its power derives from compression rather than expanse. The composition is organized along a single working wall that terminates abruptly in a full-height stainless volume, creating a deliberate collision of cabinetry rhythm and monolithic mass. The upper millwork establishes the governing geometry: a run of glazed-front wall cabinets with recessed shaker-profile stiles and rails, capped by a substantial crown assembly that reads as architectural cornice rather than applied trim. Within the second bay, the designer has inserted a period-correct plate rack with fluted vertical dividers and open glassware shelving, converting storage into ordered display and introducing a fine-grain vertical striation that counterpoints the broader panel field below. The base run answers with inset drawer fronts and applied-molding door panels, its cabinetry set on a shallow toe recess that lets the volume appear to float rather than plinth. The sightline is intentionally foreshortened: the eye travels the countertop plane eastward, is arrested by the refrigerator's tall stainless slab, then released through a sliver of hallway and door casing at the far right — a compressed reveal that implies circulation beyond and prevents the corridor from reading as a dead end. Ceiling height is inferred rather than shown, the cabinetry's soffit-scaled crown suggesting generous vertical proportion held in check by the room's narrow footprint.
**II. Materiality, Color & Texture**
The palette is a study in achromatic warmth, restrained to four principal materials and disciplined in its saturation. Cabinetry is finished in a soft greige-white — a putty-leaning off-white with faint green-grey undertone — applied in a low-sheen eggshell that absorbs rather than reflects, allowing the millwork profiles to be read through shadow rather than gloss. The backsplash is a honed marble subway field, laid in running bond with tight joints; its veining is delicate, feathered, and grey-toned, providing textural incident without pattern assertion. This continues seamlessly into the countertop, a thick marble slab with a squared eased edge and an integrated undermount trough sink, the material continuity from horizontal to vertical plane reinforcing the wall as a single stone-clad surface. Against this cool mineral field, the stainless steel refrigerator introduces an industrial register — brushed, directional, faintly grey-violet in its reflected light — while polished nickel hardware (bin pulls, cup pulls, knobs, and a wall-mounted bridge faucet with cross handles) supplies punctuating specular highlights at a consistent scale. The floor is the room's tonal anchor: white oak in a herringbone lay, fumed or grey-washed to a driftwood tone that reveals open grain and medullary ray figure. Small warm accents — a butcher-block cutting board with worn patina, amber glass bottles, a persimmon-toned bowl, the pale green of a champagne label — function as chromatic acupuncture within an otherwise desaturated field.
**III. Lighting, Atmosphere & Style Profile**
Illumination is layered and largely concealed. Ambient daylight enters obliquely from the left, raking across the marble backsplash at a low angle that mobilizes the honed surface's subtle relief and casts the cabinet door profiles into legible shadow. Undercabinet linear lighting washes the countertop and backsplash with a warm, low-kelvin pool, while the refrigerator's interior glazing performs as an unexpected internal lantern — a glowing vitrine that punctures the stainless slab and becomes the composition's focal luminance. This device is the image's most sophisticated gesture: it recasts a utilitarian appliance as an illuminated cabinet of curiosities, echoing the glass-front upper millwork on the opposite wall and completing a diagonal dialogue of lit transparency across the room. The resulting atmosphere is quiet, tempered, and quietly bourgeois — an interior of custodial calm rather than spectacle. Stylistically, the project synthesizes as a **contemporary Anglo-American scullery vernacular**: classical inset millwork and plate-rack joinery inherited from the pre-war service kitchen, reinterpreted through professional-grade stainless equipment, honed rather than polished stone, and a wire-brushed herringbone floor. Call it Refined Utilitarianism — a design position in which historical typology supplies the grammar, industrial hardware supplies the punctuation, and the near-monochrome palette allows craft, profile, and light to carry the entire expressive burden.
Find the right local pro for your project
 Rupp Family Builders, Inc.
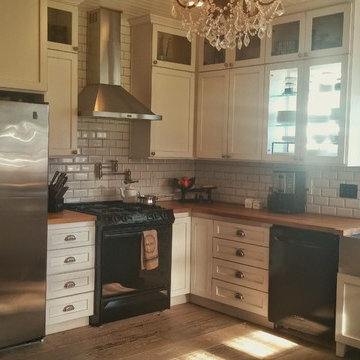
Farmhouse Kitchen with butcher block countertops from Ikea, stainless farm sink from Overstock.com and crystal chandelier from Home Depot. Shaker style cabinets were purchased unpainted then were painted with Annie Sloan chalkpaint and distressed. Very budget conscious homewner saved $ wherever possible and found quality products that were ata a discount and put them all together to complete the desired look!
 Benham Design Concepts
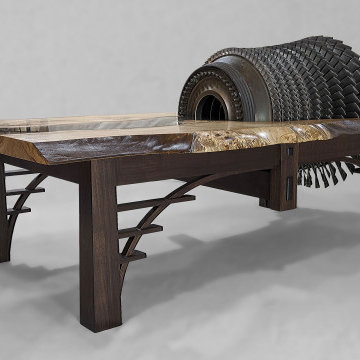
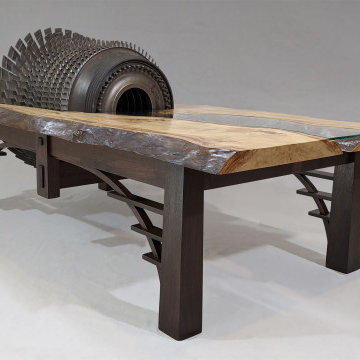
This coffee table has been one of the more unique pieces I had the pleasure of designing and building. The piece of machinery in the center of the table is a compression chamber from a jet engine out of a Bowing 727. The client that commissioned this project wanted a unique way to display the engine. After a few design iterations, we came up with a coffee table where a glass river flows out of the jet engine.
The base is made from walnut that is dyed to match some of the other millwork in the house. I reinforced the base with a hidden steel frame to help support the engine's weight. I used one of my favorite design elements to make it look like a bridge; even though the water is flowing over the top of the bridge instead of underneath it, I think the element helps tie the theme together.
The top is made from a live edge cottonwood slab, which had some beautiful burls in it. The cottonwood tree was felled here in Colorado and provided by a local arborist, who helped slab the tree and dry the wood. The glass was waterjet cut to follow the grain in the wood and wrap around the shape of the burl. I then carefully inlaid it into the top of the slab.
To get it in position at the client's place, I built a custom crate to strap the engine in and then used a mobile engine hoist/crane to place it into the back of the truck. The crate was notched specifically to sit on a dolly so it could be rolled around. I took the crane apart and loaded it into the truck with the table. Once on-site, we reassembled the crane to get it out of the truck and wheeled the engine inside over a makeshift ramp to get over any steps and thresholds. I disassembled the crane, brought it inside, and reassembled it to lift the engine in place onto the base. Then, I added the cottonwood slabs and slid the glass into place. I then reversed the process and took apart the crane to get back outside and into the back of the truck. I felt pretty proud that I pulled off a nicely choreographed bit of engineering to get it into its final resting place.
 Benham Design Concepts
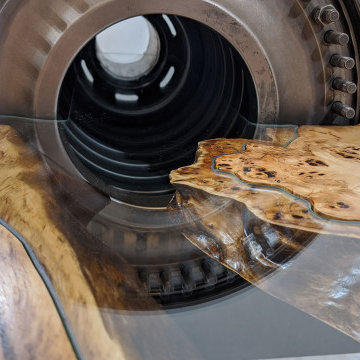
This coffee table has been one of the more unique pieces I had the pleasure of designing and building. The piece of machinery in the center of the table is a compression chamber from a jet engine out of a Bowing 727. The client that commissioned this project wanted a unique way to display the engine. After a few design iterations, we came up with a coffee table where a glass river flows out of the jet engine.
The base is made from walnut that is dyed to match some of the other millwork in the house. I reinforced the base with a hidden steel frame to help support the engine's weight. I used one of my favorite design elements to make it look like a bridge; even though the water is flowing over the top of the bridge instead of underneath it, I think the element helps tie the theme together.
The top is made from a live edge cottonwood slab, which had some beautiful burls in it. The cottonwood tree was felled here in Colorado and provided by a local arborist, who helped slab the tree and dry the wood. The glass was waterjet cut to follow the grain in the wood and wrap around the shape of the burl. I then carefully inlaid it into the top of the slab.
To get it in position at the client's place, I built a custom crate to strap the engine in and then used a mobile engine hoist/crane to place it into the back of the truck. The crate was notched specifically to sit on a dolly so it could be rolled around. I took the crane apart and loaded it into the truck with the table. Once on-site, we reassembled the crane to get it out of the truck and wheeled the engine inside over a makeshift ramp to get over any steps and thresholds. I disassembled the crane, brought it inside, and reassembled it to lift the engine in place onto the base. Then, I added the cottonwood slabs and slid the glass into place. I then reversed the process and took apart the crane to get back outside and into the back of the truck. I felt pretty proud that I pulled off a nicely choreographed bit of engineering to get it into its final resting place.
 Benham Design Concepts
This coffee table has been one of the more unique pieces I had the pleasure of designing and building. The piece of machinery in the center of the table is a compression chamber from a jet engine out of a Bowing 727. The client that commissioned this project wanted a unique way to display the engine. After a few design iterations, we came up with a coffee table where a glass river flows out of the jet engine.
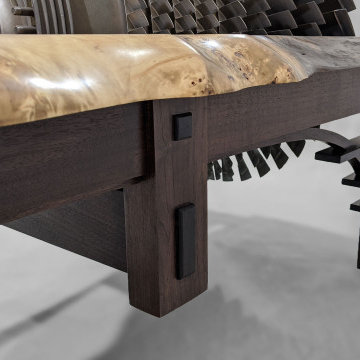
The base is made from walnut that is dyed to match some of the other millwork in the house. I reinforced the base with a hidden steel frame to help support the engine's weight. I used one of my favorite design elements to make it look like a bridge; even though the water is flowing over the top of the bridge instead of underneath it, I think the element helps tie the theme together.
The top is made from a live edge cottonwood slab, which had some beautiful burls in it. The cottonwood tree was felled here in Colorado and provided by a local arborist, who helped slab the tree and dry the wood. The glass was waterjet cut to follow the grain in the wood and wrap around the shape of the burl. I then carefully inlaid it into the top of the slab.
To get it in position at the client's place, I built a custom crate to strap the engine in and then used a mobile engine hoist/crane to place it into the back of the truck. The crate was notched specifically to sit on a dolly so it could be rolled around. I took the crane apart and loaded it into the truck with the table. Once on-site, we reassembled the crane to get it out of the truck and wheeled the engine inside over a makeshift ramp to get over any steps and thresholds. I disassembled the crane, brought it inside, and reassembled it to lift the engine in place onto the base. Then, I added the cottonwood slabs and slid the glass into place. I then reversed the process and took apart the crane to get back outside and into the back of the truck. I felt pretty proud that I pulled off a nicely choreographed bit of engineering to get it into its final resting place.
 Benham Design Concepts
This coffee table has been one of the more unique pieces I had the pleasure of designing and building. The piece of machinery in the center of the table is a compression chamber from a jet engine out of a Bowing 727. The client that commissioned this project wanted a unique way to display the engine. After a few design iterations, we came up with a coffee table where a glass river flows out of the jet engine.
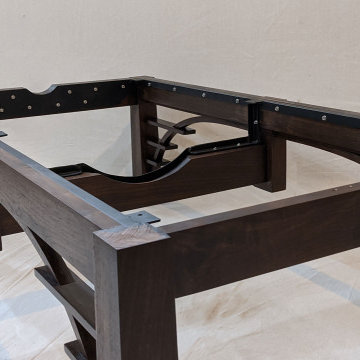
The base is made from walnut that is dyed to match some of the other millwork in the house. I reinforced the base with a hidden steel frame to help support the engine's weight. I used one of my favorite design elements to make it look like a bridge; even though the water is flowing over the top of the bridge instead of underneath it, I think the element helps tie the theme together.
The top is made from a live edge cottonwood slab, which had some beautiful burls in it. The cottonwood tree was felled here in Colorado and provided by a local arborist, who helped slab the tree and dry the wood. The glass was waterjet cut to follow the grain in the wood and wrap around the shape of the burl. I then carefully inlaid it into the top of the slab.
To get it in position at the client's place, I built a custom crate to strap the engine in and then used a mobile engine hoist/crane to place it into the back of the truck. The crate was notched specifically to sit on a dolly so it could be rolled around. I took the crane apart and loaded it into the truck with the table. Once on-site, we reassembled the crane to get it out of the truck and wheeled the engine inside over a makeshift ramp to get over any steps and thresholds. I disassembled the crane, brought it inside, and reassembled it to lift the engine in place onto the base. Then, I added the cottonwood slabs and slid the glass into place. I then reversed the process and took apart the crane to get back outside and into the back of the truck. I felt pretty proud that I pulled off a nicely choreographed bit of engineering to get it into its final resting place.
 Benham Design Concepts
This coffee table has been one of the more unique pieces I had the pleasure of designing and building. The piece of machinery in the center of the table is a compression chamber from a jet engine out of a Bowing 727. The client that commissioned this project wanted a unique way to display the engine. After a few design iterations, we came up with a coffee table where a glass river flows out of the jet engine.
The base is made from walnut that is dyed to match some of the other millwork in the house. I reinforced the base with a hidden steel frame to help support the engine's weight. I used one of my favorite design elements to make it look like a bridge; even though the water is flowing over the top of the bridge instead of underneath it, I think the element helps tie the theme together.
The top is made from a live edge cottonwood slab, which had some beautiful burls in it. The cottonwood tree was felled here in Colorado and provided by a local arborist, who helped slab the tree and dry the wood. The glass was waterjet cut to follow the grain in the wood and wrap around the shape of the burl. I then carefully inlaid it into the top of the slab.
To get it in position at the client's place, I built a custom crate to strap the engine in and then used a mobile engine hoist/crane to place it into the back of the truck. The crate was notched specifically to sit on a dolly so it could be rolled around. I took the crane apart and loaded it into the truck with the table. Once on-site, we reassembled the crane to get it out of the truck and wheeled the engine inside over a makeshift ramp to get over any steps and thresholds. I disassembled the crane, brought it inside, and reassembled it to lift the engine in place onto the base. Then, I added the cottonwood slabs and slid the glass into place. I then reversed the process and took apart the crane to get back outside and into the back of the truck. I felt pretty proud that I pulled off a nicely choreographed bit of engineering to get it into its final resting place.
 Charleston Furniture
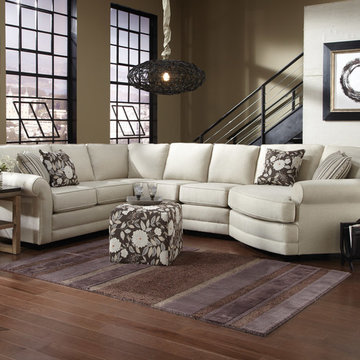
Custom Brantley Sectional Sofa by England Furniture
It's what's on the inside that counts. That's our motto here at England. This is why we build all of our furniture here in the U.S.A. out of quality materials. And we think quality and design go hand in hand. We offer more than 450 fabrics for you to select from, so you can design the piece of furniture that is perfect for your home. And you'll have your custom furniture delivered in 42 days or less!
This casual styled sectional sofa will dress your home with an elegant flair that is also relaxed with a look that speaks to comfort. The soft seat cushions will provide you with a relaxed place to sit with family and friends while the design offers a clean and tailored design. The cushions will seat 5-6 people with a cuddler on the end that is ideal for movie watching at the end of the day. This sectional is complete with exposed wood feet and rounded arms.
The manufacturer of this item is so proud of its cushions that it backs them with a 10 year manufacturer warranty. In addition to being fully reversible, which helps extend fabric life, this item's loose cushions also include built-in air vents to ease the process of escaping air when a cushion is sat upon, ultimately extending the life of the foam.
This collection was crafted on the value - It's what's inside that counts. Backed by a manufacturer lifetime frame warranty, this item is created from engineered hard wood, a manufactured wood made from multi-layer plywood that provides strength at an outstanding value. The engineered hard wood is then precision cut for interlocking accuracy and reinforced at points that receive the most wear.
Each seat cushion on this item comes with a specially engineered, self-healing zipper. On occasion, the daily stress that is placed on furniture can cause a cushion's zipper to pop, allowing the foam to compress incorrectly when the cushion is sat upon. This collection's self-healing zippers prevent that from happening. If for some reason a cushion's zipper should pop, merely un-zip and re-zip the piece, and watch as the zipper fixes itself.
Since 1964, this item's manufacturer has been crafting American made upholstered furniture in the foothills of East Tennessee. When other furniture suppliers decided to take their manufacturing oversees, this group's manufacturer remained in the US, offering American made furniture with a wide selection of American made fabric options.
 Tile Doctor Ltd
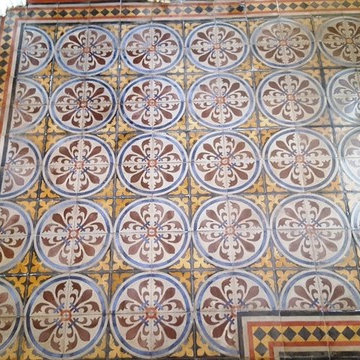
This very old Encaustic tiled flooring was uncovered at a property in Chester when the present owners started to undertake renovation. They removed the carpets and vinyl tiles from the hallway, revealing the Encaustic tiles to find that they were in truly horrific condition. This included being covered by heavy dirt, dust and, in some parts, by a sticky black bitumen.
Encaustic tiles are made out of compressed cement, and were commonly used in properties built during the Edwardian and Victorian period. This gives us a good idea of just how old these tiles are – but the owners were keen to see what Tile Doctor could do to restore their condition.
The black bitumen was my main concern when it came to cleaning the tiles. To remove this, along with all the other dirt and dust, our powerful cleaner for heavy soil buildup, known as Tile Doctor Remove and Go, was applied.
The product, which is also effective for removing adhesive and paint stains, was worked into the tiles then left to dwell for thirty minutes, before being scrubbed with a black pad fitted to a rotary machine. The resulting cleaning residue was soaked up with a wet vac machine. This cleaning process was repeated once more over to get the tiles as clean as possible, before leaving them to dry overnight.
The next day, damp readings were taken to make sure the floor was dry enough to seal. It’s essential to take damp readings before sealing – especially with old tiled floors that may not have a damp proof membrane installed – as even the slightest amount of excess moisture can damage the performance of the sealer.
Two types of sealer were used in this situation. First to be applied was a single coat of Tile Doctor Colour Grow, an impregnating, colour intensifying sealer which enhances the best shades in the tiles. Following this, four coats of Tile Doctor Seal and Go were applied. This is a topical sealer, which means it builds a layer of protection on the surface of the floor, while also providing an aesthetically pleasing low-sheen finish.
The customer was over the moon at the end result. At first the floor looked to be with a lost cause, but with the right cleaning methods and products it has been a restored to a standard where it almost appears new. Another satisfied customer!
Alastair Robb
West Cheshire Tile Doctor
 building Lab, inc.
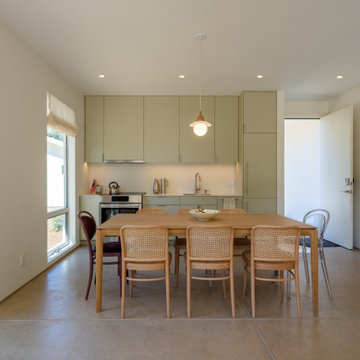
Modern ADU: open kitchen and dining.
building Lab is a design build firm specialized in modern architecture.
Large minimalist concrete floor and gray floor great room photo in San Francisco with white walls
Large minimalist concrete floor and gray floor great room photo in San Francisco with white walls
 Dunlevie Interiors
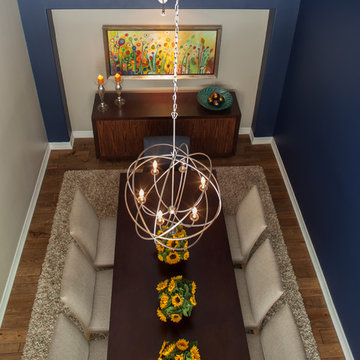
Intimate dining space with lots of drama. (Halaby Photography)
Inspiration for a mid-sized contemporary dark wood floor enclosed dining room remodel in Orange County with blue walls and no fireplace
Inspiration for a mid-sized contemporary dark wood floor enclosed dining room remodel in Orange County with blue walls and no fireplace

 Ralene Simmons Interiors
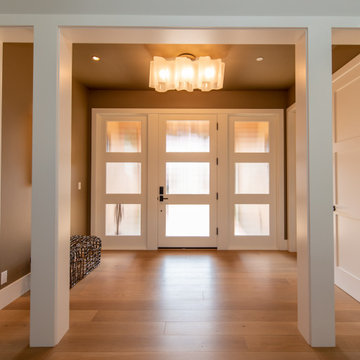
Home offices are very personal spaces. While they need to fulfill an important functional role, they are also often filled with meaningful personal items. This office is furnished beautifully with an elegant desk, holds substantial storage, with a backdrop of delicate natural textures in the rug reminiscent of a garden, crisp linen drapes on a brass french return curtain rod, and the beginnings of a gallery wall.
 Jane Ellison
This home in Napa off Silverado was rebuilt after burning down in the 2017 fires. Architect David Rulon, a former associate of Howard Backen, known for this Napa Valley industrial modern farmhouse style. Composed in mostly a neutral palette, the bones of this house are bathed in diffused natural light pouring in through the clerestory windows. Beautiful textures and the layering of pattern with a mix of materials add drama to a neutral backdrop. The homeowners are pleased with their open floor plan and fluid seating areas, which allow them to entertain large gatherings. The result is an engaging space, a personal sanctuary and a true reflection of it's owners' unique aesthetic.
Inspirational features are metal fireplace surround and book cases as well as Beverage Bar shelving done by Wyatt Studio, painted inset style cabinets by Gamma, moroccan CLE tile backsplash and quartzite countertops.

 Dale Cohen Designstudio
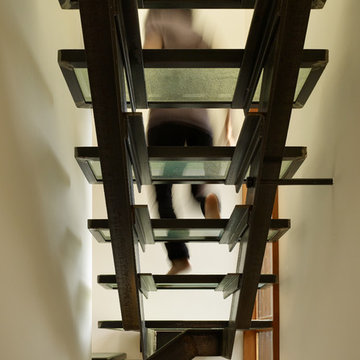
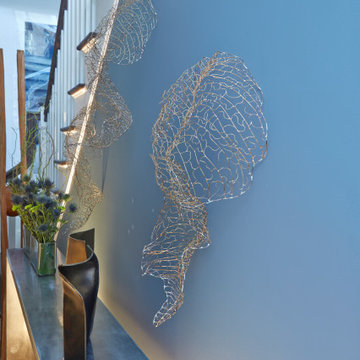
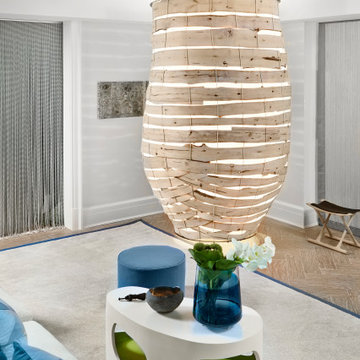
Dale was chosen to participate in the 2013 Hampton Designer Showhouse, sponsored by Traditional Home Magazine, because she has built a reputation for precise, elegant, and livable design work in Manhattan. The challenge of the showhouse, essentially a blank canvas with an imaginary client, was not beyond her. The room she was given is the Terrace Level Lounge; she chose a program to embrace a burgeoning art collection, and devise areas of repose to enjoy the work. And Ms. Cohen’s early training as a painter and photographer clearly are clearly a great asset in this particular room. Her method is to analyze the room as an architectural proposition. A Yale Architectural School graduate, she is able to cast a few intelligent moves to make the room a stage rather than a hallway. Creating a platform for her creative collaboration and designing the Monumental Lantern with artist John Houshmand.
The seating areas are a series of compressed compositions with shapes and forms of chairs, a Minotti sofa, a Valerie Goodman Gallery coffee table, and the Holland and Sherry geometric throw pillows that evoke the early modernist paintings of Jean Arp. Accented by ceiling panels covered in a Maharam wallpaper. Her next big move was enrolling the work of artist and furniture maker John Houshmand. Ms. Cohen thrives on creative collaboration and designing the Monumental Lantern that with Houshmand, that she boldly placed in one entire corner of the room. Few designers would welcome a giant rough sawn luminaire but Ms. Cohen’s early apprenticeship with Richard Serra is evident in this wonderful juxtaposition of scale. Ms. Cohen’s reputation as a brave designer has been established with the inclusion of Houshmand’s piece.
Ms. Cohen’s method is to analyze the room as an architectural proposition. A Yale Architectural School graduate, she is able to cast a few intelligent moves to make the room a stage rather than a hallway. The stairway was divided into two events, one behind a scrim and the other revealed. This gave the sitting area a theatrical backdrop as well as choreographing a Hollywood-style entrance for the visitor walking down the stairs. In fact Ms. Cohen uses a series of fabric backdrops throughout the space to denote different spatial conditions.
The color palette, if said aloud, is the prototypical Hamptons beach house cheery; though Ms. Cohen’s take is altogether different. With a sea blue as her base, she treats the envelope of the space with tinted whites and grays, and just as you are comfortable with this resolve she infuses the space with drops of chartreuse. The optic shock of an electric green is a sign of strength in Ms. Cohen’s tool box. The result is a perfect balance of whimsy and sophistication.
Whimsy, bravery, and compositional sophistication will not be evident or sufficient without Ms. Cohen’s razor sharp rigor. Her attention to detail is what makes one want to sit in the Fritz Hansen chair, under the reading light, with cashmere throw at its side. Ms. Cohen’s embrace of the luxury of detail is what makes for valuable moments in the design world and what sets her work apart.
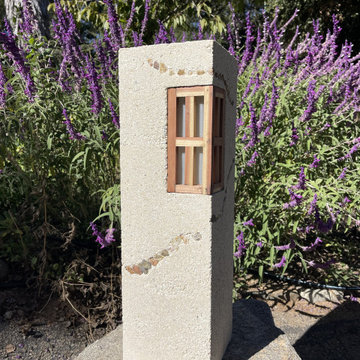
 Modern Zen Garden
Rammed earth lantern.
"Illuminate Your Space with Elegance and Earthiness:
Welcome to a world where lighting transcends mere functionality to become a masterpiece of
artistry and nature's embrace. Our exclusive collection of rammed earth lanterns is designed
to captivate the discerning tastes of high-end connoisseurs, offering a harmony of earthly
textures and artisanal craftsmanship.
Each lantern in our collection is a testament to the time-honored tradition of rammed earth
construction, where raw materials are transformed into stunning works of functional art. These
lanterns bring the raw beauty of the earth into your living spaces, creating a seamless
connection between your home and the natural world.
Crafted by skilled artisans, our rammed earth lanterns are not just lighting fixtures; they are
statements of luxury and sophistication. Their organic textures, warm earthy tones, and soft,
ambient glow add a touch of serenity and refinement to any environment. Whether it's your
living room, garden, or a high-end restaurant, these lanterns will transform the ambiance,
elevating it to a level of unadulterated elegance.
In a world where authenticity and environmental consciousness are highly valued, our
rammed earth lanterns represent the pinnacle of sustainability and artistic expression.
Discover a unique fusion of ancient building techniques and contemporary design in each
meticulously created piece. Elevate your surroundings and inspire conversations about the
fusion of luxury and nature.
Illuminate your world with rammed earth lanterns - a symbol of opulence, craftsmanship, and
an unbreakable bond with the Earth. Let the radiance of high-end artistry transform your space
into a sanctuary of style and substance. Embrace the future of luxurious lighting with the
timeless essence of the past. Experience the magic of rammed earth lanterns, exclusively for
those who demand nothing but the best."
This introduction combines the concepts of artistry, earthiness, luxury, and sustainability to
attract high-end markets to your rammed earth lanterns.
What is Rammed Earth?
Rammed earth is an ancient construction technique that seamlessly blends the raw beauty of
the Earth with architectural ingenuity. It involves compressing layers of natural raw materials, such
as earth, chalk, lime, or gravel, to create sturdy, durable walls or structures. The result is a stunning
display of the Earth's colors and textures, providing not only a harmonious connection to the
natural world but also exceptional thermal mass properties for energy efficiency.
• This time-honored building method, dating back thousands of years, continues to capture the
imagination of modern architects, environmentalists, and those with a deep appreciation for
sustainable living. Rammed earth structures are renowned for their organic appeal, as the layers of
earth form unique patterns, creating a visual masterpiece in every piece of architecture.
• At “Rammed Earth Graden”, we've harnessed the artistry of rammed earth to craft exquisite
lanterns that not only illuminate your space but also infuse it with the timeless essence of this
extraordinary building technique. Explore our exclusive collection to experience the magic of
rammed earth in a new light
 Dale Cohen Designstudio
Dale was chosen to participate in the 2013 Hampton Designer Showhouse, sponsored by Traditional Home Magazine, because she has built a reputation for precise, elegant, and livable design work in Manhattan. The challenge of the showhouse, essentially a blank canvas with an imaginary client, was not beyond her. The room she was given is the Terrace Level Lounge; she chose a program to embrace a burgeoning art collection, and devise areas of repose to enjoy the work. And Ms. Cohen’s early training as a painter and photographer clearly are clearly a great asset in this particular room. Her method is to analyze the room as an architectural proposition. A Yale Architectural School graduate, she is able to cast a few intelligent moves to make the room a stage rather than a hallway. Creating a platform for her creative collaboration and designing the Monumental Lantern with artist John Houshmand.
The seating areas are a series of compressed compositions with shapes and forms of chairs, a Minotti sofa, a Valerie Goodman Gallery coffee table, and the Holland and Sherry geometric throw pillows that evoke the early modernist paintings of Jean Arp. Accented by ceiling panels covered in a Maharam wallpaper. Her next big move was enrolling the work of artist and furniture maker John Houshmand. Ms. Cohen thrives on creative collaboration and designing the Monumental Lantern that with Houshmand, that she boldly placed in one entire corner of the room. Few designers would welcome a giant rough sawn luminaire but Ms. Cohen’s early apprenticeship with Richard Serra is evident in this wonderful juxtaposition of scale. Ms. Cohen’s reputation as a brave designer has been established with the inclusion of Houshmand’s piece.
Ms. Cohen’s method is to analyze the room as an architectural proposition. A Yale Architectural School graduate, she is able to cast a few intelligent moves to make the room a stage rather than a hallway. The stairway was divided into two events, one behind a scrim and the other revealed. This gave the sitting area a theatrical backdrop as well as choreographing a Hollywood-style entrance for the visitor walking down the stairs. In fact Ms. Cohen uses a series of fabric backdrops throughout the space to denote different spatial conditions.
The color palette, if said aloud, is the prototypical Hamptons beach house cheery; though Ms. Cohen’s take is altogether different. With a sea blue as her base, she treats the envelope of the space with tinted whites and grays, and just as you are comfortable with this resolve she infuses the space with drops of chartreuse. The optic shock of an electric green is a sign of strength in Ms. Cohen’s tool box. The result is a perfect balance of whimsy and sophistication.
Whimsy, bravery, and compositional sophistication will not be evident or sufficient without Ms. Cohen’s razor sharp rigor. Her attention to detail is what makes one want to sit in the Fritz Hansen chair, under the reading light, with cashmere throw at its side. Ms. Cohen’s embrace of the luxury of detail is what makes for valuable moments in the design world and what sets her work apart.

 John
JohnCoco coir is a versatile and sustainable growing medium that is gaining popularity among gardeners. Made from the fibrous husk of coconuts, it’s an eco-friendly alternative to peat moss and can greatly enhance the quality of your soil. In gardening, it is often utilized in systems like Coco Coir Hydroponic, where it helps create an efficient water and nutrient delivery system.
What is Coco Coir?
Coco coir is a natural fiber extracted from coconut husks. It has a neutral pH, excellent water retention, and is reusable, making it a favorite among gardeners who prefer organic and sustainable practices. It is available in different forms such as blocks, bricks, or loose coir, each requiring some preparation before use in gardening.
Benefits of Using Coco Coir in Gardening
Coco coir offers several advantages for gardening. Here are the benefits of using coco coir in gardening:
Holds up to 10 times its weight in water, ensuring plants have consistent moisture.
Promotes oxygen flow to plant roots, leading to healthier root systems.
Coco coir is a renewable and eco-friendly alternative to peat moss.
It can be washed, rehydrated, and reused, reducing waste.
Naturally pH neutral, making it suitable for various plants without major adjustments.
Enhances the texture and moisture retention of garden soil.
How to Prepare Coco Coir for Planting
Preparing coco coir for planting involves a few essential steps. First, you need to hydrate the coir block, as it typically comes in a compressed form. Place the block in a large container and add warm water, allowing the block to expand and absorb the water. Once fully expanded, the coir should be fluffed up by breaking it apart with your hands or a tool to ensure it becomes loose and airy. After the coir has been fluffed, it is important to drain any excess water, as overly wet coir can lead to root suffocation. Finally, since coco coir is inert and does not contain nutrients, it’s a good idea to add organic compost or liquid fertilizer to enrich the coir before planting.
Do You Need to Soak Coco Coir Before Planting?
Yes, soaking coco coir before planting is necessary. Since it comes in a compressed form, it needs to be broken down and hydrated for proper use. The soaking process allows the coir to expand and release the fibers, making it usable as a growing medium. After soaking, the coir should be fluffed to ensure the water is evenly distributed. Draining any excess water is crucial because overly wet coir may impede plant root health.
How to Prepare Coco Peat for Planting
Coco peat, a fine, powdery form of coco coir, is highly beneficial for seed starting and improving water retention in soil. To prepare coco peat, it first needs to be hydrated, similar to how you prepare coir blocks. Slowly add water to the peat in a container and allow it to absorb and fluff up. Once hydrated, coco peat can be used on its own or mixed with other growing media such as perlite or vermiculite for added aeration and drainage. It is advisable to check the pH level of your final mix, as coco peat generally has a neutral pH, but adjustments may be necessary depending on the plants being grown.
Can You Use Just Coco Coir for Plants?
Yes, coco coir can be used by itself to grow plants, especially in hydroponic systems or as a seed-starting medium. However, because coco coir does not naturally contain nutrients, you will need to provide regular fertilizer to support plant growth. This makes it particularly suitable for plants grown in controlled environments, such as hydroponics, where nutrient solutions can be carefully managed. In traditional soil-based gardening, mixing coco coir with other organic materials like compost is recommended to provide essential nutrients and improve the overall soil structure.
How to Use Coco Coir in Hydroponics
Coco coir is widely used in hydroponic systems due to its water retention and aeration properties. To use coco coir in hydroponics, it first needs to be soaked and hydrated, as discussed earlier. Once the coir is fully prepared, it can be placed in the hydroponic system. Since coco coir does not contain natural nutrients, you will need to supply a balanced nutrient solution tailored for hydroponic plants. Regular monitoring of water and nutrient levels is essential to prevent nutrient imbalances or root rot. One of the benefits of coco coir in hydroponics is its reusability. After completing a growing cycle, the coir can be washed, rehydrated, and used again in future plantings.
Using Coco Coir as a Soil Amendment
Coco coir is also an excellent soil amendment, as it improves the texture and moisture retention of garden soil. To use coco coir in this way, mix loose coir with your existing garden soil at a ratio of one part coco coir to two parts soil. This will help retain moisture without compacting the soil, improving both water drainage and root growth. For optimal results, you can also add organic compost to the mix, ensuring that the nutrient levels are sufficient for plant growth. Coco coir works particularly well in raised beds, where it helps maintain proper soil structure over time.
Advantages of Using Coco Coir Over Peat Moss
While peat moss has been traditionally used as a growing medium, coco coir offers several advantages over it. Coco coir is a renewable resource, as it is a byproduct of coconut processing, while peat moss is harvested from peat bogs that take centuries to regenerate. Coco coir is also more durable, as it can be reused multiple times without breaking down, while peat moss disintegrates after a single use. Another key benefit is its neutral pH, whereas peat moss is more acidic and may require balancing to meet the needs of specific plants.
Conclusion
Coco coir is a highly versatile and sustainable growing medium that benefits both novice and experienced gardeners alike. Whether you are using it for hydroponics, as a soil amendment, or as a standalone medium for growing plants, knowing how to properly prepare and use it is key to maximizing its benefits. By following the steps detailed above, you can improve water retention, aeration, and overall plant health in your garden, all while contributing to eco-friendly gardening practices.
34