
Search results for "Contact reduces" in Home Design Ideas
 Green Home Systems
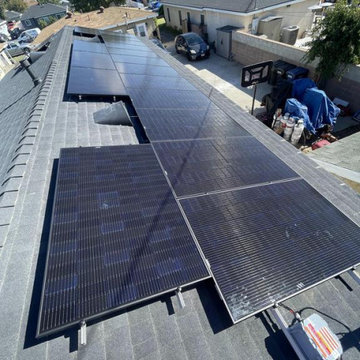
At Green Home Systems, we specialize in providing top quality solar solutions for residential and commercial customers throughout Southern California. We recently had the pleasure of working on a Panasonic & Enphase Solar Install project for one of our clients in Pico Rivera, CA - Steven T.
This 6.84 kW system was installed on a flat roof and included a SolarEdge inverter. Our expert installation team worked diligently to complete the project within just a couple weeks - and we delivered on-time results that our client was extremely satisfied with.
Steven T. chose Green Home Systems because of our craftsmanship and competitive financing options. After completion, the results were amazing! Not only did Steven increase the value of his home, but he also was able to reduce his carbon footprint while enjoying the benefits of backup power for his home.
When it comes to solar installations, you need experts that you can trust - and that's exactly what you'll find at Green Home Systems. Our team is experienced, knowledgeable, and dedicated to providing exceptional customer service every step of the way. We make sure all projects are completed on-time and within budget so that you can rest easy knowing your investment is in good hands.
At Green Home Systems, we understand how important it is to take care of our environment and reduce our carbon footprint whenever possible. That's why we strive to provide high quality solar solutions that are both affordable and reliable. We take great pride in helping our clients save money while making smart decisions for the planet.
If you're looking for trusted professionals who can provide top notch solar solutions in Pico Rivera or any other city throughout Southern California, look no further than Green Home Systems! Contact us today at (888) 721-7374 or visit us online at https://greenhomesystems.com to learn more about how we can help you save money while doing your part for the environment!
 Reico Kitchen & Bath
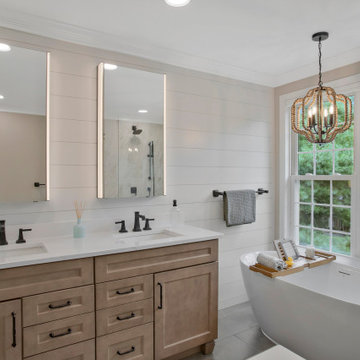
Bryon Berrier of Reico Kitchen and Bath in Timonium, MD collaborated with R Solomon Construction to design a transitional style inspired primary bathroom featuring Masterpiece cabinetry.
The cabinets feature the Bolton door style in Maple in a Translucent Driftwood finish, complemented by Silestone Etheral Haze quartz vanity tops.
Fixture selections for the bathroom are Kohler provided by GROF.
After remodeling the client's kitchen, Bryon was contacted to update the primary bathroom. "The original design had two separate rooms: one for the vanity and drop-in tub, and another for the shower and toilet, separated by a wall. We removed a wall to create a more open space, making the shower area feel less enclosed and used a free-standing tub to reduce crowding," Bryon explained.
"My favorite part is how well the materials coordinate and the use of Matte Black Hardware. I enjoyed working with the clients because they had a clear vision for the remodel and were easy to collaborate with.”
Photos courtesy of BTW Images.

 Smith & Noble
Make a style statement. Accent the room with a burst of color or a pop of pattern - at a fraction of the cost of fabric shades. Easy to measure for and install, the only challenge is choosing just one of our stylish materials. Clean, simple lines work well in any room style.
Find the right local pro for your project
 Reico Kitchen & Bath
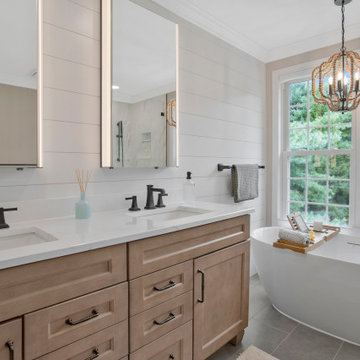
Bryon Berrier of Reico Kitchen and Bath in Timonium, MD collaborated with R Solomon Construction to design a transitional style inspired primary bathroom featuring Masterpiece cabinetry.
The cabinets feature the Bolton door style in Maple in a Translucent Driftwood finish, complemented by Silestone Etheral Haze quartz vanity tops.
Fixture selections for the bathroom are Kohler provided by GROF.
After remodeling the client's kitchen, Bryon was contacted to update the primary bathroom. "The original design had two separate rooms: one for the vanity and drop-in tub, and another for the shower and toilet, separated by a wall. We removed a wall to create a more open space, making the shower area feel less enclosed and used a free-standing tub to reduce crowding," Bryon explained.
"My favorite part is how well the materials coordinate and the use of Matte Black Hardware. I enjoyed working with the clients because they had a clear vision for the remodel and were easy to collaborate with.”
Photos courtesy of BTW Images.
 Reico Kitchen & Bath
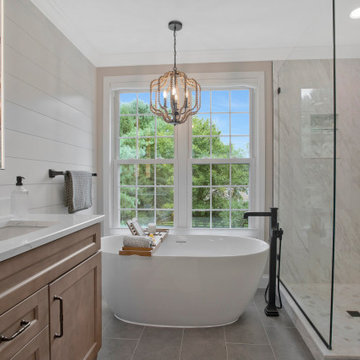
Bryon Berrier of Reico Kitchen and Bath in Timonium, MD collaborated with R Solomon Construction to design a transitional style inspired primary bathroom featuring Masterpiece cabinetry.
The cabinets feature the Bolton door style in Maple in a Translucent Driftwood finish, complemented by Silestone Etheral Haze quartz vanity tops.
Fixture selections for the bathroom are Kohler provided by GROF.
After remodeling the client's kitchen, Bryon was contacted to update the primary bathroom. "The original design had two separate rooms: one for the vanity and drop-in tub, and another for the shower and toilet, separated by a wall. We removed a wall to create a more open space, making the shower area feel less enclosed and used a free-standing tub to reduce crowding," Bryon explained.
"My favorite part is how well the materials coordinate and the use of Matte Black Hardware. I enjoyed working with the clients because they had a clear vision for the remodel and were easy to collaborate with.”
Photos courtesy of BTW Images.
 Reico Kitchen & Bath
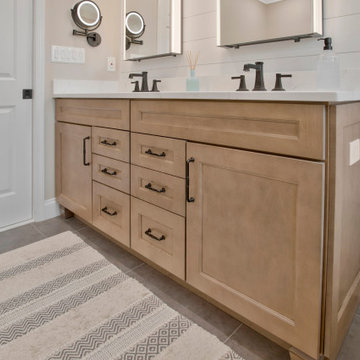
Bryon Berrier of Reico Kitchen and Bath in Timonium, MD collaborated with R Solomon Construction to design a transitional style inspired primary bathroom featuring Masterpiece cabinetry.
The cabinets feature the Bolton door style in Maple in a Translucent Driftwood finish, complemented by Silestone Etheral Haze quartz vanity tops.
Fixture selections for the bathroom are Kohler provided by GROF.
After remodeling the client's kitchen, Bryon was contacted to update the primary bathroom. "The original design had two separate rooms: one for the vanity and drop-in tub, and another for the shower and toilet, separated by a wall. We removed a wall to create a more open space, making the shower area feel less enclosed and used a free-standing tub to reduce crowding," Bryon explained.
"My favorite part is how well the materials coordinate and the use of Matte Black Hardware. I enjoyed working with the clients because they had a clear vision for the remodel and were easy to collaborate with.”
Photos courtesy of BTW Images.
 Reico Kitchen & Bath
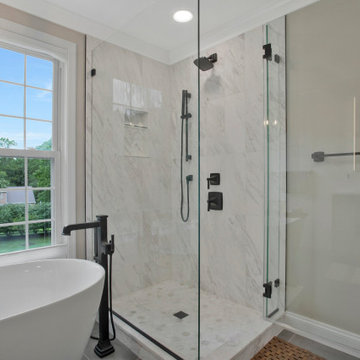
Bryon Berrier of Reico Kitchen and Bath in Timonium, MD collaborated with R Solomon Construction to design a transitional style inspired primary bathroom featuring Masterpiece cabinetry.
The cabinets feature the Bolton door style in Maple in a Translucent Driftwood finish, complemented by Silestone Etheral Haze quartz vanity tops.
Fixture selections for the bathroom are Kohler provided by GROF.
After remodeling the client's kitchen, Bryon was contacted to update the primary bathroom. "The original design had two separate rooms: one for the vanity and drop-in tub, and another for the shower and toilet, separated by a wall. We removed a wall to create a more open space, making the shower area feel less enclosed and used a free-standing tub to reduce crowding," Bryon explained.
"My favorite part is how well the materials coordinate and the use of Matte Black Hardware. I enjoyed working with the clients because they had a clear vision for the remodel and were easy to collaborate with.”
Photos courtesy of BTW Images.
Sponsored
Delaware, OH

Buckeye Basements, Inc.
Central Ohio's Basement Finishing ExpertsBest Of Houzz '13-'21
 Reico Kitchen & Bath
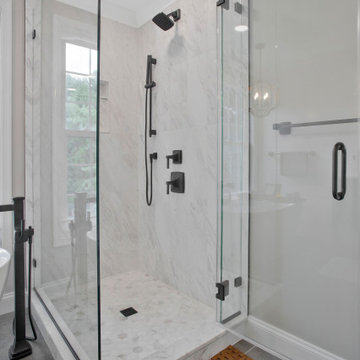
Bryon Berrier of Reico Kitchen and Bath in Timonium, MD collaborated with R Solomon Construction to design a transitional style inspired primary bathroom featuring Masterpiece cabinetry.
The cabinets feature the Bolton door style in Maple in a Translucent Driftwood finish, complemented by Silestone Etheral Haze quartz vanity tops.
Fixture selections for the bathroom are Kohler provided by GROF.
After remodeling the client's kitchen, Bryon was contacted to update the primary bathroom. "The original design had two separate rooms: one for the vanity and drop-in tub, and another for the shower and toilet, separated by a wall. We removed a wall to create a more open space, making the shower area feel less enclosed and used a free-standing tub to reduce crowding," Bryon explained.
"My favorite part is how well the materials coordinate and the use of Matte Black Hardware. I enjoyed working with the clients because they had a clear vision for the remodel and were easy to collaborate with.”
Photos courtesy of BTW Images.
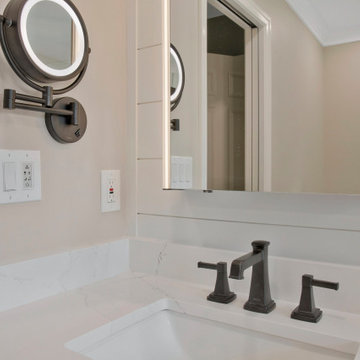 Reico Kitchen & Bath
Bryon Berrier of Reico Kitchen and Bath in Timonium, MD collaborated with R Solomon Construction to design a transitional style inspired primary bathroom featuring Masterpiece cabinetry.
The cabinets feature the Bolton door style in Maple in a Translucent Driftwood finish, complemented by Silestone Etheral Haze quartz vanity tops.
Fixture selections for the bathroom are Kohler provided by GROF.
After remodeling the client's kitchen, Bryon was contacted to update the primary bathroom. "The original design had two separate rooms: one for the vanity and drop-in tub, and another for the shower and toilet, separated by a wall. We removed a wall to create a more open space, making the shower area feel less enclosed and used a free-standing tub to reduce crowding," Bryon explained.
"My favorite part is how well the materials coordinate and the use of Matte Black Hardware. I enjoyed working with the clients because they had a clear vision for the remodel and were easy to collaborate with.”
Photos courtesy of BTW Images.
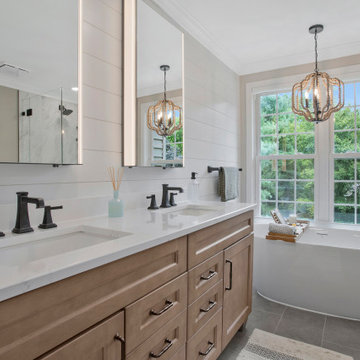 Reico Kitchen & Bath
Bryon Berrier of Reico Kitchen and Bath in Timonium, MD collaborated with R Solomon Construction to design a transitional style inspired primary bathroom featuring Masterpiece cabinetry.
The cabinets feature the Bolton door style in Maple in a Translucent Driftwood finish, complemented by Silestone Etheral Haze quartz vanity tops.
Fixture selections for the bathroom are Kohler provided by GROF.
After remodeling the client's kitchen, Bryon was contacted to update the primary bathroom. "The original design had two separate rooms: one for the vanity and drop-in tub, and another for the shower and toilet, separated by a wall. We removed a wall to create a more open space, making the shower area feel less enclosed and used a free-standing tub to reduce crowding," Bryon explained.
"My favorite part is how well the materials coordinate and the use of Matte Black Hardware. I enjoyed working with the clients because they had a clear vision for the remodel and were easy to collaborate with.”
Photos courtesy of BTW Images.
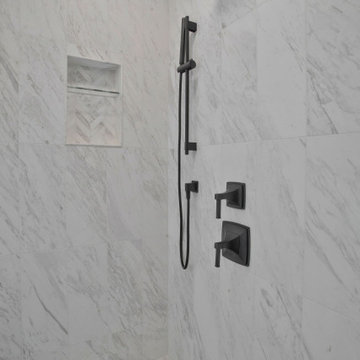 Reico Kitchen & Bath
Bryon Berrier of Reico Kitchen and Bath in Timonium, MD collaborated with R Solomon Construction to design a transitional style inspired primary bathroom featuring Masterpiece cabinetry.
The cabinets feature the Bolton door style in Maple in a Translucent Driftwood finish, complemented by Silestone Etheral Haze quartz vanity tops.
Fixture selections for the bathroom are Kohler provided by GROF.
After remodeling the client's kitchen, Bryon was contacted to update the primary bathroom. "The original design had two separate rooms: one for the vanity and drop-in tub, and another for the shower and toilet, separated by a wall. We removed a wall to create a more open space, making the shower area feel less enclosed and used a free-standing tub to reduce crowding," Bryon explained.
"My favorite part is how well the materials coordinate and the use of Matte Black Hardware. I enjoyed working with the clients because they had a clear vision for the remodel and were easy to collaborate with.”
Photos courtesy of BTW Images.
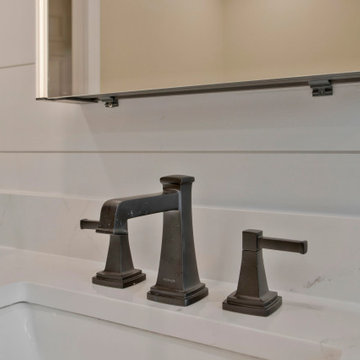 Reico Kitchen & Bath
Bryon Berrier of Reico Kitchen and Bath in Timonium, MD collaborated with R Solomon Construction to design a transitional style inspired primary bathroom featuring Masterpiece cabinetry.
The cabinets feature the Bolton door style in Maple in a Translucent Driftwood finish, complemented by Silestone Etheral Haze quartz vanity tops.
Fixture selections for the bathroom are Kohler provided by GROF.
After remodeling the client's kitchen, Bryon was contacted to update the primary bathroom. "The original design had two separate rooms: one for the vanity and drop-in tub, and another for the shower and toilet, separated by a wall. We removed a wall to create a more open space, making the shower area feel less enclosed and used a free-standing tub to reduce crowding," Bryon explained.
"My favorite part is how well the materials coordinate and the use of Matte Black Hardware. I enjoyed working with the clients because they had a clear vision for the remodel and were easy to collaborate with.”
Photos courtesy of BTW Images.
 180 RENOVATIONS
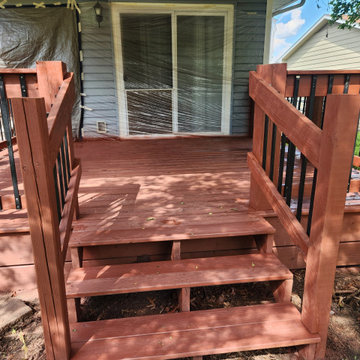
This deck staining project in Wichita, Kansas was completed to restore and protect an outdoor deck that had begun to fade and wear from constant exposure to the elements. Over time, sunlight, moisture, and seasonal changes can break down untreated wood, leading to discoloration, surface damage, and reduced durability.
At 180 Renovations, we focus on proper preparation to ensure long-lasting results. The deck was thoroughly cleaned and prepped to allow the stain to fully absorb into the wood for even coverage and maximum protection. We then applied a professional-grade stain designed to enhance the natural look of the deck while creating a protective barrier against UV exposure, moisture, and everyday use. The result is a refreshed, uniform finish that improves both appearance and longevity.
Routine deck staining is essential for maintaining the strength and lifespan of any outdoor structure. This project demonstrates how the right process can bring a deck back to life while protecting it for years to come. If your deck is fading, weathered, or overdue for maintenance, 180 Renovations provides reliable deck staining services in Wichita, Kansas. Contact us today to get started.

 Reico Kitchen & Bath
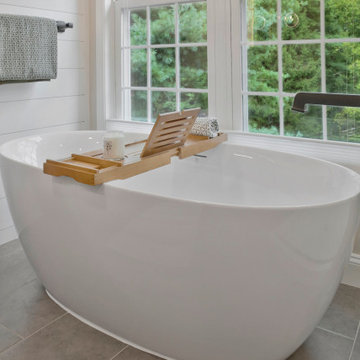
Bryon Berrier of Reico Kitchen and Bath in Timonium, MD collaborated with R Solomon Construction to design a transitional style inspired primary bathroom featuring Masterpiece cabinetry.
The cabinets feature the Bolton door style in Maple in a Translucent Driftwood finish, complemented by Silestone Etheral Haze quartz vanity tops.
Fixture selections for the bathroom are Kohler provided by GROF.
After remodeling the client's kitchen, Bryon was contacted to update the primary bathroom. "The original design had two separate rooms: one for the vanity and drop-in tub, and another for the shower and toilet, separated by a wall. We removed a wall to create a more open space, making the shower area feel less enclosed and used a free-standing tub to reduce crowding," Bryon explained.
"My favorite part is how well the materials coordinate and the use of Matte Black Hardware. I enjoyed working with the clients because they had a clear vision for the remodel and were easy to collaborate with.”
Photos courtesy of BTW Images.
 Zebra Stone Artisans. LLC
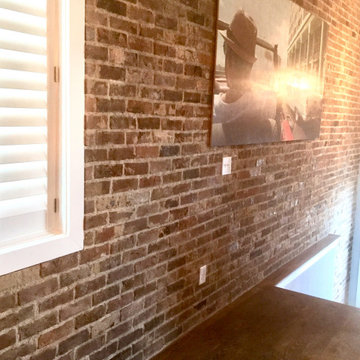
Brick veneer wall. Imagine what the original wall looked like before installing brick veneer over it. On this project, the homeowner wanted something more appealing than just a regular drywall. When she contacted us, we scheduled a meeting where we presented her with multiple options. However, when we look into the fact that she wanted something light weight to go over the dry wall, we thought an antique brick wall would be her best choice.
However, most antique bricks are plain red and not the color she had envisioned for beautiful living room. Luckily, we found this 200year old salvaged handmade bricks. Which turned out to be the perfect color for her living room.
These bricks came in full size and weighed quite a bit. So, in order to install them on drywall, we had to reduce the thickness by cutting them to half an inch. And in the cause cutting them, many did break. Since imperfection is core to the beauty in this kind of work, we were able to use all the broken bricks. Hench that stunningly beautiful wall.
Lastly, it’s important to note that, this rustic look would not have been possible without the right color of mortar. Had these bricks been on the original plantation house, they would have had that creamy lime look. However since you can’t find pure lime in the market, we had to fake the color of mortar to depick the original look.

 Mottram Architecture
Timber frame homes offer unique challenges during a remodel. What often makes them beautiful and attractive to most homeowners, also makes them challenging for space requirements.
Context: The lovely couple that owned this home were struggling with some interesting floor plan challenges that just didn't work for their family. The loved the beautiful timbers and woodwork of their home, but the dramatically sloping ceilings on the second floor, particularly in the bathroom, just didn't work for this 1 1/2 bath home. Needing to use the skylight to approach the toilet was a less then ideal scenario. Although the bathroom footprint was more then adequate, the sloped ceiling only made half of the space useable. Check out the Before/After post on our blog to see the photos of the house pre-renovation. As much as they loved all the wood features in their home, another challenge they had was light. The wood ceiling made everything inside the house darker, even with a fantastic array of south facing windows, there were spaces in the home that felt dark and small. When they contacted us they wanted to know how could they make their brighter and more inviting, were there solutions to the 2nd floor sloped ceiling issues, and if they were going to do all of this work, how could they make their home more comfortable and efficient. A nagging water leak in the upstairs bathroom spurred them into action and here is how we solved their dilemma.
Conclusion: First, we added a little dormer to the rear of the house so we could get full headroom in nearly all of the upstairs bathroom! Then we decided to extend that dormer one more timber bay over to create a walk in closet with natural light and plenty of space. Since we were contemplating energy efficiency, we resolved a nagging issue that is present in a lot of timber frame construction, air tightness. Commonly found in timber frame construction, fiberglass insulation is installed in the rafter bays and board ceilings are installed over top. Unfortunately, board ceilings are anything but air tight, and fiberglass insulation needs to be in an airtight cavity for maximum effectiveness. So we were able to solve two issues at the same time for this homeowner. We removed the board ceiling and fiberglass insulation, we dense packed the rafter bays with cellulose insulation, and installed sheetrock in place of the boards. The boards were salvaged for re-use by the homeowner, and the space and light quality was dramatically improved. Some may think that losing the board ceiling took something away from the space, but what you'll see in the pictures is that it highly accentuates the heavy timbers and really makes them stand out in a beautiful way. Now with this added airtightness, better insulation, and brighter space, the homeowner hardly runs their wood stove, and it's so quiet in the space, an added bonus from changing the insulation. It became necessary to also add a sheetrock ceiling to the living room to hide the plumbing from the new bathroom layout above. Changing this ceiling gave the homeowner some real quality lighting that was lacking in the living room before. The brighter ceiling and new lighting layout completely transforms the living room into a space you want to hang out, even though the layout didn't change at all. When the homeowner saw the finished spaces she said "I can't believe this is my house, I want to live in this house"
Energy Efficiency: I touched a little on the efficiency above, but like all projects done with Mottram Architecture, we always want to leave you with a little extra. Timber frame construction with board ceilings and fiberglass insulation are notoriously leaky! If you want to know what we think about fiberglass insulation, check our our blog post on Why Fiberglass Insulation Sucks. By installing cellulose insulation and covering it with sheetrock we were able to greatly reduce the heat flowing out of this home. It not only improves cashflow it improves the comfort level in the space. Who wants to sit in their living room and feel a draft? Let us remind you, we are not saying cellulose insulation is an air barrier, we use the sheetrock to help with that, but it does significantly reduce the air flow over fiberglass insulation. And when we reduce the airflow, we reduce the heat flow. And when we reduce the heat flow, we reduce the need to re-heat that drafty air from outside. When it comes to energy efficiency the first and best place to start is air infiltration. We greatly reduced the air infiltration with the new insulation, but we also added a hat and warm boots. What I mean by that is, we improved the insulation in the roof, and we installed insulation in the basement. Maybe it's a silly analogy, but when you think about keeping warm, we always start with the hat and boots! With sustainability in mind, the next project will be to add a deck to the front of this house with rain catchment barrels from the metal roof. They are planning to plant a garden in the spring and the rain catchment system will help to irrigate the new garden.
Builder: East Shore Builders
Photographer: Michael Eric Berube

 Zabitat, Door Glass Replacement
Because they’re protected between glass, Enclosed blinds retain their ‘like new’ look over time and with repeated use. They stay clean and free of damage from kids, pets, and anything else that might come into contact with your doorglass. No dusting, no tangled or dangling cords, and no crimped or dented blinds. The thermally sealed doorglass can be used in doors to meet ENERGY STAR criteria, giving you energy savings and long-term value, too. They reduce heat loss in the winter and solar heat gain in the summer. Our offering includes energy-saving Low-E glass options and impact-resistant, triple-glazed doorglass that safeguards against high winds, offers sound suppression, and reduces heat transmission. With our Light-Touch Blinds, a single-touch control lets you choose the perfect light or privacy level. The ergonomically considered design places the fingertip control within easy reach to tilt, raise, and lower blinds the entire length of the doorglass—with only the slightest movement required. Privacy channels on each side of the doorglass eliminate light gaps when the blinds are closed—no streetlight shadows or sunlight glare. Easy to clean, no dusting required. Light and Privacy Control. Four colors of Enclosed Blinds: Sand, Espresso, Slate Gray, and Silver Moon. With matching privacy channels and operators, the colors of your entry door blinds will always coordinate with your décor.
 Mottram Architecture
Timber frame homes offer unique challenges during a remodel. What often makes them beautiful and attractive to most homeowners, also makes them challenging for space requirements.
Context: The lovely couple that owned this home were struggling with some interesting floor plan challenges that just didn't work for their family. The loved the beautiful timbers and woodwork of their home, but the dramatically sloping ceilings on the second floor, particularly in the bathroom, just didn't work for this 1 1/2 bath home. Needing to use the skylight to approach the toilet was a less then ideal scenario. Although the bathroom footprint was more then adequate, the sloped ceiling only made half of the space useable. Check out the Before/After post on our blog to see the photos of the house pre-renovation. As much as they loved all the wood features in their home, another challenge they had was light. The wood ceiling made everything inside the house darker, even with a fantastic array of south facing windows, there were spaces in the home that felt dark and small. When they contacted us they wanted to know how could they make their brighter and more inviting, were there solutions to the 2nd floor sloped ceiling issues, and if they were going to do all of this work, how could they make their home more comfortable and efficient. A nagging water leak in the upstairs bathroom spurred them into action and here is how we solved their dilemma.
Conclusion: First, we added a little dormer to the rear of the house so we could get full headroom in nearly all of the upstairs bathroom! Then we decided to extend that dormer one more timber bay over to create a walk in closet with natural light and plenty of space. Since we were contemplating energy efficiency, we resolved a nagging issue that is present in a lot of timber frame construction, air tightness. Commonly found in timber frame construction, fiberglass insulation is installed in the rafter bays and board ceilings are installed over top. Unfortunately, board ceilings are anything but air tight, and fiberglass insulation needs to be in an airtight cavity for maximum effectiveness. So we were able to solve two issues at the same time for this homeowner. We removed the board ceiling and fiberglass insulation, we dense packed the rafter bays with cellulose insulation, and installed sheetrock in place of the boards. The boards were salvaged for re-use by the homeowner, and the space and light quality was dramatically improved. Some may think that losing the board ceiling took something away from the space, but what you'll see in the pictures is that it highly accentuates the heavy timbers and really makes them stand out in a beautiful way. Now with this added airtightness, better insulation, and brighter space, the homeowner hardly runs their wood stove, and it's so quiet in the space, an added bonus from changing the insulation. It became necessary to also add a sheetrock ceiling to the living room to hide the plumbing from the new bathroom layout above. Changing this ceiling gave the homeowner some real quality lighting that was lacking in the living room before. The brighter ceiling and new lighting layout completely transforms the living room into a space you want to hang out, even though the layout didn't change at all. When the homeowner saw the finished spaces she said "I can't believe this is my house, I want to live in this house"
Energy Efficiency: I touched a little on the efficiency above, but like all projects done with Mottram Architecture, we always want to leave you with a little extra. Timber frame construction with board ceilings and fiberglass insulation are notoriously leaky! If you want to know what we think about fiberglass insulation, check our our blog post on Why Fiberglass Insulation Sucks. By installing cellulose insulation and covering it with sheetrock we were able to greatly reduce the heat flowing out of this home. It not only improves cashflow it improves the comfort level in the space. Who wants to sit in their living room and feel a draft? Let us remind you, we are not saying cellulose insulation is an air barrier, we use the sheetrock to help with that, but it does significantly reduce the air flow over fiberglass insulation. And when we reduce the airflow, we reduce the heat flow. And when we reduce the heat flow, we reduce the need to re-heat that drafty air from outside. When it comes to energy efficiency the first and best place to start is air infiltration. We greatly reduced the air infiltration with the new insulation, but we also added a hat and warm boots. What I mean by that is, we improved the insulation in the roof, and we installed insulation in the basement. Maybe it's a silly analogy, but when you think about keeping warm, we always start with the hat and boots! With sustainability in mind, the next project will be to add a deck to the front of this house with rain catchment barrels from the metal roof. They are planning to plant a garden in the spring and the rain catchment system will help to irrigate the new garden.
Builder: East Shore Builders
Photographer: Michael Eric Berube
 Mottram Architecture
Timber frame homes offer unique challenges during a remodel. What often makes them beautiful and attractive to most homeowners, also makes them challenging for space requirements.
Context: The lovely couple that owned this home were struggling with some interesting floor plan challenges that just didn't work for their family. The loved the beautiful timbers and woodwork of their home, but the dramatically sloping ceilings on the second floor, particularly in the bathroom, just didn't work for this 1 1/2 bath home. Needing to use the skylight to approach the toilet was a less then ideal scenario. Although the bathroom footprint was more then adequate, the sloped ceiling only made half of the space useable. Check out the Before/After post on our blog to see the photos of the house pre-renovation. As much as they loved all the wood features in their home, another challenge they had was light. The wood ceiling made everything inside the house darker, even with a fantastic array of south facing windows, there were spaces in the home that felt dark and small. When they contacted us they wanted to know how could they make their brighter and more inviting, were there solutions to the 2nd floor sloped ceiling issues, and if they were going to do all of this work, how could they make their home more comfortable and efficient. A nagging water leak in the upstairs bathroom spurred them into action and here is how we solved their dilemma.
Conclusion: First, we added a little dormer to the rear of the house so we could get full headroom in nearly all of the upstairs bathroom! Then we decided to extend that dormer one more timber bay over to create a walk in closet with natural light and plenty of space. Since we were contemplating energy efficiency, we resolved a nagging issue that is present in a lot of timber frame construction, air tightness. Commonly found in timber frame construction, fiberglass insulation is installed in the rafter bays and board ceilings are installed over top. Unfortunately, board ceilings are anything but air tight, and fiberglass insulation needs to be in an airtight cavity for maximum effectiveness. So we were able to solve two issues at the same time for this homeowner. We removed the board ceiling and fiberglass insulation, we dense packed the rafter bays with cellulose insulation, and installed sheetrock in place of the boards. The boards were salvaged for re-use by the homeowner, and the space and light quality was dramatically improved. Some may think that losing the board ceiling took something away from the space, but what you'll see in the pictures is that it highly accentuates the heavy timbers and really makes them stand out in a beautiful way. Now with this added airtightness, better insulation, and brighter space, the homeowner hardly runs their wood stove, and it's so quiet in the space, an added bonus from changing the insulation. It became necessary to also add a sheetrock ceiling to the living room to hide the plumbing from the new bathroom layout above. Changing this ceiling gave the homeowner some real quality lighting that was lacking in the living room before. The brighter ceiling and new lighting layout completely transforms the living room into a space you want to hang out, even though the layout didn't change at all. When the homeowner saw the finished spaces she said "I can't believe this is my house, I want to live in this house"
Energy Efficiency: I touched a little on the efficiency above, but like all projects done with Mottram Architecture, we always want to leave you with a little extra. Timber frame construction with board ceilings and fiberglass insulation are notoriously leaky! If you want to know what we think about fiberglass insulation, check our our blog post on Why Fiberglass Insulation Sucks. By installing cellulose insulation and covering it with sheetrock we were able to greatly reduce the heat flowing out of this home. It not only improves cashflow it improves the comfort level in the space. Who wants to sit in their living room and feel a draft? Let us remind you, we are not saying cellulose insulation is an air barrier, we use the sheetrock to help with that, but it does significantly reduce the air flow over fiberglass insulation. And when we reduce the airflow, we reduce the heat flow. And when we reduce the heat flow, we reduce the need to re-heat that drafty air from outside. When it comes to energy efficiency the first and best place to start is air infiltration. We greatly reduced the air infiltration with the new insulation, but we also added a hat and warm boots. What I mean by that is, we improved the insulation in the roof, and we installed insulation in the basement. Maybe it's a silly analogy, but when you think about keeping warm, we always start with the hat and boots! With sustainability in mind, the next project will be to add a deck to the front of this house with rain catchment barrels from the metal roof. They are planning to plant a garden in the spring and the rain catchment system will help to irrigate the new garden.
Builder: East Shore Builders
Photographer: Michael Eric Berube
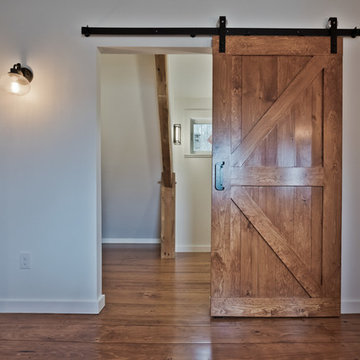 Mottram Architecture
Timber frame homes offer unique challenges during a remodel. What often makes them beautiful and attractive to most homeowners, also makes them challenging for space requirements.
Context: The lovely couple that owned this home were struggling with some interesting floor plan challenges that just didn't work for their family. The loved the beautiful timbers and woodwork of their home, but the dramatically sloping ceilings on the second floor, particularly in the bathroom, just didn't work for this 1 1/2 bath home. Needing to use the skylight to approach the toilet was a less then ideal scenario. Although the bathroom footprint was more then adequate, the sloped ceiling only made half of the space useable. Check out the Before/After post on our blog to see the photos of the house pre-renovation. As much as they loved all the wood features in their home, another challenge they had was light. The wood ceiling made everything inside the house darker, even with a fantastic array of south facing windows, there were spaces in the home that felt dark and small. When they contacted us they wanted to know how could they make their brighter and more inviting, were there solutions to the 2nd floor sloped ceiling issues, and if they were going to do all of this work, how could they make their home more comfortable and efficient. A nagging water leak in the upstairs bathroom spurred them into action and here is how we solved their dilemma.
Conclusion: First, we added a little dormer to the rear of the house so we could get full headroom in nearly all of the upstairs bathroom! Then we decided to extend that dormer one more timber bay over to create a walk in closet with natural light and plenty of space. Since we were contemplating energy efficiency, we resolved a nagging issue that is present in a lot of timber frame construction, air tightness. Commonly found in timber frame construction, fiberglass insulation is installed in the rafter bays and board ceilings are installed over top. Unfortunately, board ceilings are anything but air tight, and fiberglass insulation needs to be in an airtight cavity for maximum effectiveness. So we were able to solve two issues at the same time for this homeowner. We removed the board ceiling and fiberglass insulation, we dense packed the rafter bays with cellulose insulation, and installed sheetrock in place of the boards. The boards were salvaged for re-use by the homeowner, and the space and light quality was dramatically improved. Some may think that losing the board ceiling took something away from the space, but what you'll see in the pictures is that it highly accentuates the heavy timbers and really makes them stand out in a beautiful way. Now with this added airtightness, better insulation, and brighter space, the homeowner hardly runs their wood stove, and it's so quiet in the space, an added bonus from changing the insulation. It became necessary to also add a sheetrock ceiling to the living room to hide the plumbing from the new bathroom layout above. Changing this ceiling gave the homeowner some real quality lighting that was lacking in the living room before. The brighter ceiling and new lighting layout completely transforms the living room into a space you want to hang out, even though the layout didn't change at all. When the homeowner saw the finished spaces she said "I can't believe this is my house, I want to live in this house"
Energy Efficiency: I touched a little on the efficiency above, but like all projects done with Mottram Architecture, we always want to leave you with a little extra. Timber frame construction with board ceilings and fiberglass insulation are notoriously leaky! If you want to know what we think about fiberglass insulation, check our our blog post on Why Fiberglass Insulation Sucks. By installing cellulose insulation and covering it with sheetrock we were able to greatly reduce the heat flowing out of this home. It not only improves cashflow it improves the comfort level in the space. Who wants to sit in their living room and feel a draft? Let us remind you, we are not saying cellulose insulation is an air barrier, we use the sheetrock to help with that, but it does significantly reduce the air flow over fiberglass insulation. And when we reduce the airflow, we reduce the heat flow. And when we reduce the heat flow, we reduce the need to re-heat that drafty air from outside. When it comes to energy efficiency the first and best place to start is air infiltration. We greatly reduced the air infiltration with the new insulation, but we also added a hat and warm boots. What I mean by that is, we improved the insulation in the roof, and we installed insulation in the basement. Maybe it's a silly analogy, but when you think about keeping warm, we always start with the hat and boots! With sustainability in mind, the next project will be to add a deck to the front of this house with rain catchment barrels from the metal roof. They are planning to plant a garden in the spring and the rain catchment system will help to irrigate the new garden.
Builder: East Shore Builders
Photographer: Michael Eric Berube
8