
Search results for "Cracking" in Home Design Ideas

 London Stoneworks LLC
Designed by Heidekat Design
Example of a mid-sized transitional backyard stone patio design in Chicago with no cover
Example of a mid-sized transitional backyard stone patio design in Chicago with no cover


 HomeClick
Native Trails Farmhouse 30" NativeStone Kitchen Sink
Collection of kitchen and bar sinks may be lighter weight than traditional concrete sinks (by 40%!), but they are heavy-duty in the kitchen. Farmhouse 3018’s smooth glamour brings a fresh sense of durability and styling to this classic Farmhouse sink. And talk about versatility! Gorgeous as a traditional apron front, Farmhouse 3018 is also beautiful installed behind the cabinet, with no apron showing. Or create a real uprising by installing with the rim partially above the counter! This multitalented sensation is as suitable in a modern design as it is in a rustic country setting. Farmhouse 3018 is artisan crafted of NativeStone, an innovative, remarkably strong blend of cement and jute fiber that is surprisingly lightweight for concrete, extraordinarily heavy-duty in the kitchen, and refreshingly easy when it comes to clean-up.
Find the right local pro for your project

 Stellar Gray Fine Homes
Integral Colored Concrete Counter top, Mexican Talavera Tile,
Thomas Veneklasen Photography
Mid-sized southwest l-shaped concrete floor and beige floor eat-in kitchen photo in Phoenix with a double-bowl sink, raised-panel cabinets, concrete countertops, ceramic backsplash, stainless steel appliances, white walls, medium tone wood cabinets, multicolored backsplash and an island
Mid-sized southwest l-shaped concrete floor and beige floor eat-in kitchen photo in Phoenix with a double-bowl sink, raised-panel cabinets, concrete countertops, ceramic backsplash, stainless steel appliances, white walls, medium tone wood cabinets, multicolored backsplash and an island

 Huffman Architects
The bridge creates a covered walk and upper story connection to the main house.
Mark Herboth photography
Contemporary exterior home idea in Raleigh
Contemporary exterior home idea in Raleigh


 User
Large tuscan open concept travertine floor family room photo in Houston with beige walls, a corner fireplace and a wall-mounted tv


 Ginkgo Leaf Studio
The clients' chiminea sits on the edge of the patio.
Westhauser Photography
Design ideas for a mid-sized southwestern backyard concrete paver retaining wall landscape in Milwaukee.
Design ideas for a mid-sized southwestern backyard concrete paver retaining wall landscape in Milwaukee.

 Dancer Concrete Design
This client came to us looking for a space that would allow their children a place to hang out while still feeling at home. The versatility of finished concrete flooring works well to adapt to a variety of home styles, and works seamlessly with this Craftsman-style home. We worked with the client to decide that a darker reactive stain would really make the space feel warm, inviting, and comfortable. The look and feel of the floor with this stain selection would be similar to the pictures they provided of the look they were targeting when we started the selection process. The clients really embraced the existing cracks in the concrete, and thought they exhibited the character of the house – and we agree.
When our team works on residential projects, it is imperative that we keep everything as clean and mess-free as possible for the client. For this reason, our first step was to apply RAM Board throughout the house where our equipment would be traveling. Tape and 24″ plastic were also applied to the walls of the basement to protect them. The original floor was rather new concrete with some cracks. Our team started by filling the cracks with a patching product. The grinding process then began, concrete reactive stain was applied in the color Wenge Wood, and then the floor was sealed with our two step concrete densification and stain-guard process. The 5 step polishing process was finished by bringing the floor to a 800-grit level. We were excited to see how the space came together after the rest of construction, which was overseen by the contractor Arbor Homes, was complete. View the gallery below to take a look!
 Dancer Concrete Design
This client came to us looking for a space that would allow their children a place to hang out while still feeling at home. The versatility of finished concrete flooring works well to adapt to a variety of home styles, and works seamlessly with this Craftsman-style home. We worked with the client to decide that a darker reactive stain would really make the space feel warm, inviting, and comfortable. The look and feel of the floor with this stain selection would be similar to the pictures they provided of the look they were targeting when we started the selection process. The clients really embraced the existing cracks in the concrete, and thought they exhibited the character of the house – and we agree.
When our team works on residential projects, it is imperative that we keep everything as clean and mess-free as possible for the client. For this reason, our first step was to apply RAM Board throughout the house where our equipment would be traveling. Tape and 24″ plastic were also applied to the walls of the basement to protect them. The original floor was rather new concrete with some cracks. Our team started by filling the cracks with a patching product. The grinding process then began, concrete reactive stain was applied in the color Wenge Wood, and then the floor was sealed with our two step concrete densification and stain-guard process. The 5 step polishing process was finished by bringing the floor to a 800-grit level. We were excited to see how the space came together after the rest of construction, which was overseen by the contractor Arbor Homes, was complete. View the gallery below to take a look!

 Gappsi
Stucco is a popular building material that is mainly used in residential exterior siding. It is a combination of sand, Portland cement, limestone and sometimes water. Plaster can be applied to wood, block and concrete. When applying stucco to wood framing, it is usually attached to a wire lath that is attached to the structural framing. Wood framing must be protected by a water resistant moisture barrier such as, asphalt building paper or different types of building wraps before the wire lath and stucco are applied. New stucco should cure for thirty days before prime and paint are applied. A common problem found in stucco due to the trapped moisture that migrates towards the stucco surface, it sometimes carries mineral deposits within it. This can cause a discoloration and sometimes adhesion problems. New stucco can sometimes develop cracks during the curing process. As water is eliminated and the stucco hardens, hairline cracks tend to occur. Once you apply the primer and paint with a paint roller it typically fills the narrow cracks. The roller helps push the paint into the cracks. Larger stucco cracks require a stucco patch filler to bridge the gap. When painting new you must include a primer coat and one or two finishing coats. All paints and primers should be used for exterior surfaces.
 SUPERIOR CHIMNEY SERVICES CORPORATION
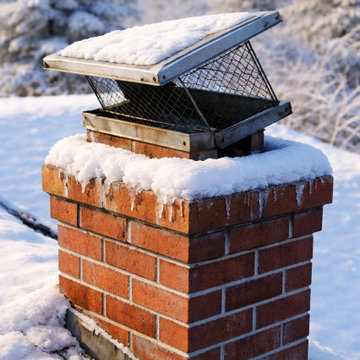
Is it crazy to think about chimney repairs in the winter? It’s cold and snowy outside and the rooftops are solid white, coated with a layer of ice. A homeowner called us with a concern about her home. She reported that a small stream of water was coming down the chimney and into the firebox. To keep the water from flooding the firebox, the homeowner placed a Tupperware container to collect the water. Not a good look. Can chimney repairs in the winter be done by a certified chimney technician?
Chimney Repairs in the Winter
Chimney repairs can be completed in the winter, although it depends on what type of chimney repair is needed. Let’s take a quick look at the different chimney repairs in our cold winter months.
Chimney Cap: If your chimney cap comes loose, or if the winter winds knocked it out of place or blew it off completely, our certified chimney technician can go up on the roof and take care of the chimney cap for you with a chimney cap replacement. Our technicians follow the guidelines for safety, especially in the winter months when roofing systems are the slipperiest.
Flashing: Flashing is the connector from the roofing system to the chimney. It is the barrier that protects water from finding its way into your home. However, if the flashing becomes loose or comes away from the roof and chimney, it is open season for the rain to come directly into your home and create chaos.
Chimney Crown: The chimney crown is the slab of cement that sits on top of the chimney and right below the chimney cap. Hairline cracks can form in the chimney crown allowing water, melted snow, to enter. Even the smallest hairline crack can cause the melted snow to find the weak spot on the chimney crown and make its way into your home.
Remember, hairline cracks can and will grow in width and length with the freeze thaw cycles. When the melted snow freezes at night, it expands inside of the crack. If the temperatures cooperate in the daytime, it melts the snow. But remember, it doesn’t necessarily dry out inside of the crack. It can remain moist and freeze again at night.
Chimney Tuckpointing: Tuckpointing the chimney can be done in the winter, but it certainly isn’t an easy process as we’re dealing with wet mortar. Cracks can create an entry point for melted snow to enter, further deteriorating the mortar.
Although it is not optimal to perform chimney repairs in the winter, Superior Chimney takes precautions to ensure a safe and effective repair. Now the homeowner can get rid of the streaming water in the firebox and enjoy the rest of the winter with a warm and dry fireplace.
Be sure to contact us today if you have a water leak in your fireplace. If you would like to have your chimney inspected and checked for water leaks coming this spring, contact us today to schedule it up in March. This way, you’ll be all set and not compete with others in the Spring.

 BathGems
This vanity's original design will give your bathroom the aesthetics that it deserves. Made out of Grade-A solid oak wood and featuring frame type construction, this vanity exudes a sense of durability. The 12 step hand applied Antique Ocean finish prevents cracking and fading while giving the vanity a rustic country living appeal. By choosing one of Cream Marble, Carrera White Marble, Travertine, Black Granite or Tropical Brown Granite counter tops a polished sparkle will brighten up your bathroom. There are also a multitude of other wood finishes available to choose from. By mixing and matching finishes and counter tops a vanity that bests fits your style can be created. Don't forget to look at the add ons such as the mirror and linen cabinet while you are at it.
Dimensions
Vanity
36"W x 23.5"D x 34.75"H
Optional Accessories
Mirror
26"W x 3.7"D x 41.5"H
Linen Cabinet
20.5"W x 16.25"D x 65"H
Features
Quality materials are important to the longevity of your bathroom vanity. Cheap vanities made with particle board or MDF tend to sag, warp, split, discolor, and expand over time. This is especially true in humid climates, such as the environment found in a normal bathroom. Since bathroom humidity is so common, bathroom vanities need to be extremely durable. They also need to be strong enough to endure lots of usage-based wear and tear. Vanities are typically made of MDF, birch, rubberwood, or natural oak. Generally, MDF is approximately 30 % the quality of oak, birch is 50% the quality of oak, and rubberwood is typically 90% the quality of oak, where "quality" is defined as the strength, integrity, and durability of the material. Solid oak is without question the strongest, most durable, and most resilient of all vanity materials. Only the highest-quality and best made vanities are manufactured from natural oak. Premier Collection
Vanities that are marked as Premier Collection are the best vanities in the industry where no expense has been spared. These are the best vanities money can buy made from small quantities of handpicked solid hard woods that are hand finished to perfection. To be considered part of the Premium Collection the vanity must get A+++ grades in: Wood used, Interior Construction, Counter Top, and Finish.
Wood Used:
Premier Collections uses Kiln dried wood in small batches to insure proper drying to prevent cracking and warping. All wood is cared for in great detail to prevent cracking and warping so that your vanity looks as good as they day it arrived for many years.
Vanity Tops:
Premier Collections vanities that have stone tops use a thicker stone, up to 3cm (1cm more than industry average), providing a more luxurious look. All of the vanities with stone tops are sealed to prevent watermarks and minor stains.
Construction:
Premium Collection vanities use hard wood box framed construction that provides strength and durability for decades. All vanities have working drawers with able storage made with slide ball bearing drawers and or soft close mounts. Center drawers are boxed and fitted around plumbing for additional storage.
Finish:
Premium Collection vanities are all hand stained, hand painted, using up to a 15 layer sealing and finishing process to avoid future fading, cracking, or peeling.
- Grade A, Solid kiln-dried Oak
- Double-Door cabinet with antique-style handles
- Choose from Cream Marble, Black Granite, Tropical Brown Granite, Carrera White Marble, or Travertine tops
- Comes with full sized 17" porcelain sink
- 100% solid timber construction
- Frame type construction featuring Old World joinery
- Hand applied varnish in 3 layers for added durability and warping prevention
- 12-step hand glaze finish to ensure cabinet won't peal, crack, or fade
- Pre-drilled for 8" faucet spread
- **Faucets Not Included**
Quality materials are important to the longevity of your bathroom vanity. Cheap vanities made with particle board or MDF tend to sag, warp, split, discolor, and expand over time. This is especially true in humid climates, such as the environment found in a normal bathroom. Since bathroom humidity is so common, bathroom vanities need to be extremely durable. They also need to be strong enough to endure lots of usage-based wear and tear. Vanities are typically made of MDF, birch, rubberwood, or natural oak. Generally, MDF is approximately 30 % the quality of oak, birch is 50% the quality of oak, and rubberwood is typically 90% the quality of oak, where "quality" is defined as the strength, integrity, and durability of the material. Solid oak is without question the strongest, most durable, and most resilient of all vanity materials. Only the highest-quality and best made vanities are manufactured from natural oak. Premier Collection
Vanities that are marked as Premier Collection are the best vanities in the industry where no expense has been spared. These are the best vanities money can buy made from small quantities of handpicked solid hard woods that are hand finished to perfection. To be considered part of the Premium Collection the vanity must get A+++ grades in: Wood used, Interior Construction, Counter Top, and Finish.
Wood Used:
Premier Collections uses Kiln dried wood in small batches to insure proper drying to prevent cracking and warping. All wood is cared for in great detail to prevent cracking and warping so that your vanity looks as good as they day it arrived for many years.
Vanity Tops:
Premier Collections vanities that have stone tops use a thicker stone, up to 3cm (1cm more than industry average), providing a more luxurious look. All of the vanities with stone tops are sealed to prevent watermarks and minor stains.
Construction:
Premium Collection vanities use hard wood box framed construction that provides strength and durability for decades. All vanities have working drawers with able storage made with slide ball bearing drawers and or soft close mounts. Center drawers are boxed and fitted around plumbing for additional storage.
Finish:
Premium Collection vanities are all hand stained, hand painted, using up to a 15 layer sealing and finishing process to avoid future fading, cracking, or peeling.
 SUPERIOR CHIMNEY SERVICES CORPORATION
To prepare your fireplace and chimney for winter, schedule a professional inspection and chimney cleaning. The temperatures are just about right to either fire up those logs or turn on the gas fireplace. Either way, you don’t want to miss out on a cozy night in front of the fireplace.
But why is it important to prepare your fireplace and chimney for winter? That’s what we going to talk about today, everything from the damper, to chimney cap to what to look out for and what to repair now. The team at Superior Chimney is ready to share practical tips for getting ready for the cold to start.
Why is it Important to Prepare the Fireplace for Winter?
Your fireplace works hard during the winter. Using your fireplace just on the weekends or everyday while you relax causes system stress behind the scenes regardless. While providing you warmth and comfort, the fire in the fireplace creates a byproduct called creosote, which is sticky and gives off a smokey smell. All winter long, this will be slowly building inside of the chimney walls. Now that’s what’s going on inside your home.
Outside, your chimney endures the elements every day with the snow, ice, freezing rain, and critters looking for a nice warm place to settle. All these things add up putting stress on the chimney structure.
Getting this done now will give you peace of mind and helps your system run efficiently. This way, heat stays in your living room where you want it.
Start with an Annual Chimney Inspection
The most important step to take now is to get a certified chimney inspection before you light your first fire. A certified technician can identify creosote buildup, cracked flue liners, damaged masonry and blockages that are hard to see from inside and outside the home.
The National Fire Protection Association standard for chimneys, fireplaces, and vents calls for chimneys to be inspected at least once a year and cleaned as needed for safe operation (NFPA 211).
The Chimney Safety Institute of America gives the same guidance, recommending that fireplaces, chimneys, and vents be inspected annually by a certified professional (CSIA).
Ventilation is a Breath of Fresh Air for Your Home
Proper ventilation allows your home to breathe. Your home relies on vents connected to the fireplace and natural gas appliances to carry harmful gases such as carbon monoxide safely outdoors.
During the winter, snow and ice can pile up around the vents. When that happens, pollutants have a harder time leaving the home.
Signs of a Blocked Chimney Vent
A blocked vent can cause symptoms such as headaches, nausea, fatigue, and dizziness. If symptoms go away once you or your family leave the house, that’s a sign of a blocked chimney vent, and it needs to be addressed right away. Be sure your carbon monoxide detectors are in working order and located on every level of your home.
Keep the Cold Air Out of Your Fireplace
Pay attention to the chimney effect, also called the stack effect, during winter. Warm air inside your home rises to meet the colder air outside. That cold air can rush down the chimney and into your home.
This pressure imbalance can also pull smoke back into the room when you light a fire. Keeping the damper closed whenever the fireplace is not working, is one of the best ways to stop cold drafts from entering your home.
Have You Tried to Preheat the Chimney Flue?
What? What is that? When you are ready to light the fireplace, warming the flue can help smoke travel up the chimney flue and out of your home. Light your gas starter without wood in there for a few minutes or a small bundle of kindling if you don’t have the convenience of a gas log starter. This will warm the air and cold chimney walls within the chimney flue so when the fire starts, it will go up and out of your home (Priming the system). Never roll up a sheet of newspaper, or any paper, and hold it up toward the open damper!
The New Critter Home?
For many animals, a chimney looks like a warm and safe place from the cold and freezing temperatures. Squirrels, raccoons, birds, bats, possum and other small creatures may try to nest inside.
How do you know if a critter made its way in? If you hear scratching, chirping, or the sounds of moving around in the chimney, or a foul smell call a certified chimney professional to inspect the chimney flue. A technician can safely remove the animals and check for any nesting material or structural damage it left behind.
Sometimes an animal can die inside the chimney. Typical first signs can be a strong odor, trouble venting smoke, seeing flesh flies or maggots. Any situation, you will want to call Superior Chimney at 877-244-6349 for help.
You may want to consider a tightly fitted stainless steel chimney cap with mesh sides is the best long term solution. It keeps wildlife out while still allowing smoke and gases to escape freely.
What are Common Chimney Repairs
Your chimney stands tall and is exposed to the weather all year long. In winter, snow builds up on the chimney crown and rain always finds its way into small crack in the chimney masonry. Anytime you have spalling or cracked bricks with or without missing or deteriorating mortar, you have a problem brewing with the chimney structure. When water from rain or snow freezes, it expands and widens the cracks. This process is known as the freeze and thaw cycle.
Water that enters the chimney can mix with creosote. That’s what creates a musty, smoky smell. A persistent odor from your fireplace is often an early sign that moisture is getting inside, so prompt repairs help protect your home.
Don’t Forget the Chimney Flashing
Metal step flashing seals the joint where your chimney meets the roof. Over time, it can loosen, rust, or pull away from the chimney.
Have a certified chimney professional inspect the flashing each year to confirm it remains watertight. Adding a waterproofing sealant to the masonry and a crown repair when needed gives your chimney lasting protection through the wettest months.
The Chimney from Bottom to Top
Each year when your chimney inspection is performed, the certified chimney technician will automatically check the firebox all the way up to the damper and out to the exterior chimney itself. The chimney technician will be looking for cracked or missing firebricks, gaps in the mortar joints, and loose pieces within the chimney walls especially if you do not have a chimney liner.
The chimney technician is searching for hairline cracks, damaged bricks, ineffective damper, damaged or missing chimney cap to name a few on the 14-point inspection. Because it is difficult for a homeowner to inspect on top of the roof or inside of the chimney as well as know exactly what to look for, it is best to have a trained, certified technician to do it for you. The technician will show you and the office staff will email you pictures so you have an understanding of what the technician has found.
Keep Fire Safety Essentials Nearby
A few simple tools make a fire experience safer for family, pets and guests.
Keep a sturdy metal fireplace screen in front of the opening to catch sparks and embers.
Place a fire extinguisher rated for household use in a safe, dry space. If you can have it near the fireplace, even better. Be sure to talk to family members or anyone else living in your home so they know where it is.
Test smoke alarms and carbon monoxide detectors monthly throughout the heating season.
Keep rugs, furniture, holiday decorations including Santa stockings at least three feet from the fireplace. This space gives you plenty of room to ensure the fire stays in the fireplace.
When it is time to clean out the ashes, wait until they have cooled down… at least until the next morning. Shovel them into a metal container with a tight lid and keep it outside away from your home.
Preparing a Gas Fireplace for Winter
Gas fireplaces need attention before starting it up too. Have a certified chimney technician check the burner, pilot assembly, gas connections, and venting system before you turn it on for the season. The chimney technician will continue to conduct a thorough cleaning and inspection from bottom to top according to the 14-point inspection.
As a homeowner, clean the protective glass front that’s attached or separate from the fireplace only once the unit is cool. Look for any soot buildup, which can be an indication that a burner or vent is experiencing a problem.
Frequently Asked Questions
How often should a chimney be inspected?
CSIA (the Chimney Safety Institute of America), NCSG (the National Chimney Sweep Guild), NFPA (the National Fire Protection Association) and IRC (International Residential Code) all specify a chimney inspection at least once a year. Cleaning is then scheduled based on how much buildup the technician finds.
Why does my fireplace smell bad in winter?
A strong odor can point to creosote mixed with moisture, a downdraft caused by the stack effect, or an animal in the chimney flue. A certified inspection can pinpoint the cause quickly.
Should I close the damper when the fireplace is off or cooled?
Yes, once the fire is completely out and the ashes are cool. A closed damper keeps warm air inside and cold air outside.
What is the best time of year to have my chimney cleaning?
Right now! Scheduling before the first cold snap gives you more appointment options and time for any repairs.
Do I need a chimney cap?
A chimney cap is critical to the function of your chimney. It keeps out rain, snow, debris and animals while allowing smoke to go up and out of your home properly. Every chimney needs a chimney cap for the same reasons every home needs a roof!
Get Your Fireplace Winter-Ready With Superior Chimney
A well maintained fireplace is one of the coziest parts of winter. With a yearly inspection, clear vents, a sturdy chimney cap, and sound masonry, you can enjoy every fire without unnecessary worry. Now that you know how to prepare your fireplace and chimney for winter, contact Superior Chimney today to schedule your inspection and sweeping, and enjoy a warm and comfortable season by the fire.
 SUPERIOR CHIMNEY SERVICES CORPORATION
The impact of temperature drop on the chimney can impact the structure and functionality of the chimney. As we have been experiencing in Chicago winters, temperatures have gone from 50 degrees down to 21 degrees during the day, with temperatures falling even further at night. What can you do as a homeowner to watch for, and when to bring in a certified technician from Superior Chimney.
External: Impact of Temperature Drop on the Chimney
Anytime there is a rapid temperature change, it causes the bricks, stones and mortar to expand and contract. These durable materials are still susceptible to thermal shock, especially when it gets wet from ice, rain or melting snow. Because of the drastic change in temperatures, this can cause hairline cracks to begin, and if it goes unnoticed, larger cracks in the masonry will form.
External: Freeze-Thaw Damage
Mortar, bricks and stones are porous materials, meaning that air and water enter the materials. Sometimes, it leaves or dries out, and other times it stays longer. When the temperatures drop below 32 degrees, any of the trapped water freezes and then expands. This can cause small cracks to start, deterioration of the mortar or spalling which is the flaking of the bricks to occur.
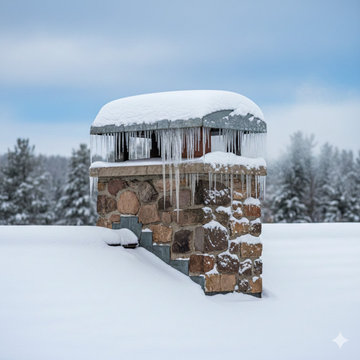
External: Ice Build Up on the Chimney Cap or Chimney Crown
When temperatures are 50 degrees and it rains, water accumulates everywhere, including the highest point on your house, the chimney. The chimney cap and chimney crown are always exposed to the harshest elements. When it rains and temperatures drop during the day or night, freezing occurs and can create ice buildup. This can cause the chimney crown to crack or the chimney cap to loosen.
Internal: Chimney Flue Lining
The temperature swing also affects the chimney flue liner. Some chimney flue liners are made from clay. These are especially susceptible to crack forming from the swing in temperatures. But what also happens whether you have a gas or wood burning fireplace is the formation of condensation which can occur when there is fast cooling after the fire in the fireplace is put out or turned off.
Bring out the Sun!
Well, yes, the sunshine melts the ice and snow, but when temperatures go down at night, what remains wet, will refreeze again. The repeated process places stress on the masonry, bricks and stone.
Chimney Inspections Work
A chimney inspection can help with both safety and preserving the structure of the chimney. When a chimney technician conducts an inspection, they will search for cracks in the bricks and mortar, any spalling or deterioration from the thermal shock and freeze thaw cycle. These areas will be marked for repairs if it gets any worse and before it becomes too expensive to repair.
We can’t forget the biggest intruder in the home: water. The chimney technician will also be checking for water leaks from the chimney flashing, the chimney crown, chimney cap or the efflorescence which is the white material that shows up on the chimney or fireplace.
These are just a couple of key areas that a chimney inspection completes. There are numerous other areas, and this can be found on Superior Chimney’s 14-point inspection guide.
Contact us today, and we’ll set you up for a chimney inspection with photo evidence so you have peace of mind with the safety and security of your home.
 Dancer Concrete Design
This client came to us looking for a space that would allow their children a place to hang out while still feeling at home. The versatility of finished concrete flooring works well to adapt to a variety of home styles, and works seamlessly with this Craftsman-style home. We worked with the client to decide that a darker reactive stain would really make the space feel warm, inviting, and comfortable. The look and feel of the floor with this stain selection would be similar to the pictures they provided of the look they were targeting when we started the selection process. The clients really embraced the existing cracks in the concrete, and thought they exhibited the character of the house – and we agree.
When our team works on residential projects, it is imperative that we keep everything as clean and mess-free as possible for the client. For this reason, our first step was to apply RAM Board throughout the house where our equipment would be traveling. Tape and 24″ plastic were also applied to the walls of the basement to protect them. The original floor was rather new concrete with some cracks. Our team started by filling the cracks with a patching product. The grinding process then began, concrete reactive stain was applied in the color Wenge Wood, and then the floor was sealed with our two step concrete densification and stain-guard process. The 5 step polishing process was finished by bringing the floor to a 800-grit level. We were excited to see how the space came together after the rest of construction, which was overseen by the contractor Arbor Homes, was complete. View the gallery below to take a look!
 Fixi Handyman Services
BRICK & DRYWALL REPAIR — HANDYMAN KATY TO HOUSTON, TX (77064)
Client: Doug
Location: Houston, TX 77064
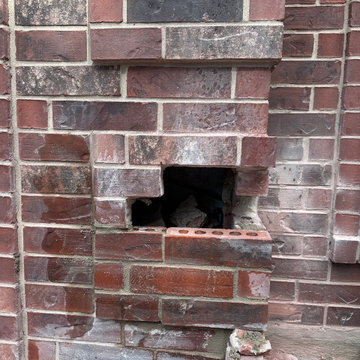
Scope of Work: Replacing 10 to 12 cracked front-facing bricks, plus drywall crack, nail pop, and garage ceiling seam repairs throughout the home
Settling shows up in two places: the brick out front and the ceilings inside. Doug had both.
Xavier and his co-worker started outside, carefully removing the damaged brick and mortar, setting replacement bricks, repointing the surrounding joints, and tooling the mortar to match the existing profile as closely as possible. Front-facing brickwork is unforgiving. Everyone who walks up to the house sees it.
Inside, they worked through roughly 8 joint and corner cracks, 4 to 6 nail pops, and 25 to 30 linear feet of seam cracking across the garage ceiling. Loose compound and failing tape removed, drywall re-secured where movement had pulled it, seams retaped, multiple coats of compound, sanded and blended, texture matched, then primed and painted to blend.
Doug, thank you for having us back. Repeat customers are the best review a crew can get.
And thank you for the 5-star review! Glad Xavier and the team took care of you.
Settling cracks in your brick or ceilings in Katy or Houston? Text a handyman a photo and we’ll respond same day.


 Tile Doctor Ltd
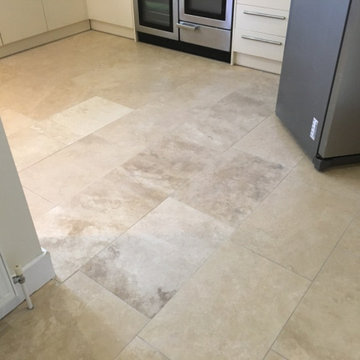
This client from Cobham contacted me in despair, she was quite concerned about her Travertine tiled floor which was cracking. She had the Kitchen and Dining room tiled with Travertine six years ago and recently several cracks had begun to appear in a long line crossing five tiles.
Several holes had also begun to appear and across the threshold to the kitchen from the dining area a serious lip had formed where a tile had risen above its neighbour causing a trip hazard.
After removing a tile from an unobtrusive area, I began to see where the issues lay. The tiler had dabbed the adhesive. This mean that instead of spreading the adhesive equally across the tile and floor they had splurged four lumps in each corner then set the tile down. This is poor working practice that will sooner or later become apparent. It means the areas were no adhesive was applied are eventually compromised resulting in cracking. This could take years or weeks to surface.
After some discussion we decided that I would remove and replace six tiles in total. The client was happy for me to go ahead and agreed a cost for the works to be done.
Returning the following week, firstly I had to remove the grout. This was done with a handheld Fein tool fitted with an oscillating blade. I thought this would be good experience from my son during the holidays, so I took him along and whilst I was working on the grout, he was able to gather the dust in a vacuum cleaner.
Next, I started to remove the cracked tiles with a chisel, starting from the cracks where the tiles would be weakest. This was noisy and messy work which required ear defenders and safety goggles. The process took several hours with the help of my son on general assistance duties. Once the tiles were removed this just left the remaining adhesive attached to the floor to get removed. This was the hardest part of the job, a lot of hammer and chisel work with as much dust gathered as possible to try and contain the mess. I had warned the customer that a considerable amount of mess would be produced and request that she should remove as much items as possible and to tape up her cupboards. Finally, I filled several holes in the sub floor so I would have a flat surface to lay the new tiles on. I left it there for the night to solidify.
Returning the next day, I began laying the replacement tiles down. Colour matching replacement tiles is a difficult task as Travertine is a natural product and colours vary greatly so these were a pretty good match.
Once the adhesive had set, I grouted in the newly laid tiles and once that was dry set about applying a sealer. For this I used two coats of Tile Doctor Ultra Seal which is an impregnating sealer that doesn’t alter the colour of the stone. This would ensure they were nicely protected and hopefully the client will not experience any further issues.
She was very happy with the result and was pleased the floor no long looked unsightly or posed a tripping hazard.
Rupert Mcleod
West Surrey Tile Doctor
6