
Search results for "Custom lessons" in Home Design Ideas

 Atelier Shreenu
Inspiration for a large farmhouse open concept marble floor living room remodel in Mumbai with multicolored walls

 Regan Baker Design Inc.
Intentional. Elevated. Artisanal.
With three children under the age of 5, our clients were starting to feel the confines of their Pacific Heights home when the expansive 1902 Italianate across the street went on the market. After learning the home had been recently remodeled, they jumped at the chance to purchase a move-in ready property. We worked with them to infuse the already refined, elegant living areas with subtle edginess and handcrafted details, and also helped them reimagine unused space to delight their little ones.
Elevated furnishings on the main floor complement the home’s existing high ceilings, modern brass bannisters and extensive walnut cabinetry. In the living room, sumptuous emerald upholstery on a velvet side chair balances the deep wood tones of the existing baby grand. Minimally and intentionally accessorized, the room feels formal but still retains a sharp edge—on the walls moody portraiture gets irreverent with a bold paint stroke, and on the the etagere, jagged crystals and metallic sculpture feel rugged and unapologetic. Throughout the main floor handcrafted, textured notes are everywhere—a nubby jute rug underlies inviting sofas in the family room and a half-moon mirror in the living room mixes geometric lines with flax-colored fringe.
On the home’s lower level, we repurposed an unused wine cellar into a well-stocked craft room, with a custom chalkboard, art-display area and thoughtful storage. In the adjoining space, we installed a custom climbing wall and filled the balance of the room with low sofas, plush area rugs, poufs and storage baskets, creating the perfect space for active play or a quiet reading session. The bold colors and playful attitudes apparent in these spaces are echoed upstairs in each of the children’s imaginative bedrooms.
Architect + Developer: McMahon Architects + Studio, Photographer: Suzanna Scott Photography
 Interiors by J. Curry
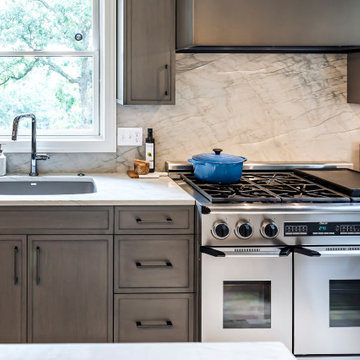
The River Bluff Beauty is one of our favorite remodels from 2024 as this is a space that stayed with in the original footprint yet was a very dramatic change from before to after. Its always a good lesson to remember how the right design along with color, a mixture of materials, and creativity can amply elevate a space with out a major addition or structural changes. A number one ask of the homeowner: no white painted cabinets!! So we proposed a more moody theme and used a unique palette of finishes with Dusk Stain over walnut in a thin shaker door, complimented with natural walnut accents & warm walnut interiors. Dusk is an artisan finish in an opaque stain creating a rich gray tone, with underlying warmth of the wood peaking through. We used natural quartzite counter tops in a soft matte finish for both counters and the full height backsplash, creating a clean flow there helped the space seem more connected and less busy to the eye. A special feature just off the kitchen was a small wine bar and liquor storage cabinet wrapped in walnut waterfall counters, what once was a lose furniture piece now is a beautiful and coordinated extension of the room. Another gorgeous detail was the remodeling of the two-sided fireplace area, this was a fairly major change that did open up the view between kitchen dining and living as well as the view of their great wooded property. We worked with a furniture maker to create a one of a kind modern wood surround made of white oak and walnut and paired with a pressed somewhat rustic concrete that has a blend of gray and taupe’s to blend with the rest of the new color scheme.
Find the right local pro for your project

 HDR Remodeling Inc.
 specializes in classic East Bay homes. Whole-house remodels, kitchen and bathroom remodeling, garage and basement conversions are our specialties. Our start-to-finish process -- from design concept to permit-ready plans to production -- will guide you along the way to make sure your project is completed on time and on budget and take the uncertainty and stress out of remodeling your home. Our philosophy -- and passion -- is to help our clients make their remodeling dreams come true.
 SV Design
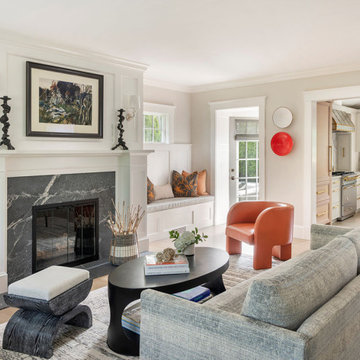
The homeowners of this Marblehead home hired SV Design to update and create a modern and unique look for their coastal home. The exterior architectural changes of the shingle-style house focused on reconfiguration of windows and modifications to the exterior walls of the kitchen to allow for more functional interior space. The client’s penchant for color allowed for the inclusion of unique textiles, décor, and furnishing pieces that were tastefully intertwined with their personal art collection. Bold statement, graffiti art adorns the custom barn doors and adds an element of fun and personal touch to this project. The art was carefully chosen and personalized for the family. One door was painted by local graffiti artist, Mike Grimaldi and another was printed by a local graphic art company.
SV Design created dramatic architectural design elements including a cathedral ceiling in the kitchen with beams added for visual interest and to create a larger volume of space in this single-story area. The kitchen’s footprint was extended for functionality and flow. The space has a streamlined layout and design that balances color with a mix of different finishes. Materials such as wood, painted cabinets, and mixed metal tones, work harmoniously with a beautiful quartzite countertop and backsplash.
The homeowners purchased this home after downsizing from a large home right at the beginning of the pandemic. This created some unexpected challenges requiring the design team to include flexible and innovative spaces throughout the home. The laundry room for example, can be used as an office space for virtual meetings or for the couple’s teenage, twin daughters who needed space for remote schoolwork. The music room is a space designed as a place where the family could practice the piano and French horn but could also accommodate a roll out dance mat and bar for virtual ballet lessons. On the lower level, there is a large built-in wall with a murphy bed for guests that tucks away easily to make additional floor space. There is additional display space on the open shelves and guest clothing storage with a chest of drawers at each bedside. The entire renovation was carefully planned to create and maximize beautiful functional spaces for the North Shore family to enjoy.

 Judy Dinkle - JD Designs
L. Herrada-Rios
Large transitional u-shaped medium tone wood floor and brown floor open concept kitchen photo in San Francisco with raised-panel cabinets, granite countertops, beige backsplash, stone tile backsplash, an island, an undermount sink, white cabinets and stainless steel appliances
Large transitional u-shaped medium tone wood floor and brown floor open concept kitchen photo in San Francisco with raised-panel cabinets, granite countertops, beige backsplash, stone tile backsplash, an island, an undermount sink, white cabinets and stainless steel appliances

 Northern Roof Tiles
Architect: Andre Tchelistcheff Architects New York. NY
Builder: Xhema of Greenwich CT
Installer: TRM Enterprises Bridgehampton NY
Back story.
Northern has worked with both Xhema and TRM many tiles. We have worked with Andre before he branched out on his own.
Originally Xhema’s contact was to replace the roof and repair the garage, which as some point had been made into an indoor swimming pool without adequate ventilation. The budget was about $8m and there were 20 drawings.
By the time the job was 6 months old the scope of work has expanded to over $30m and over 200 drawings had been produced.
Northern was contacted to visit the site and evaluate the existing roof. Although the house had been added to over the years the same tile was used but due to the location of the house the color of the tile varied considerably from the front to the back.
Northern identified a large number of custom details which would require us to:
1) Match the existing Field tile in size, thickness (it was actually thicker at the butt and reduced to ½” where the tile is overlapped) , surface texture and the color.
2) Make tiles that are curved in their length to suit the curved rafter on the gabled dormers.
3) Make the curved tiles to suit the low slope octagonal tower.
4) Make the curved tiles and Arris style hips to suit the hipped dormers with the curved rafters.
5) Make the segmented tiles to suit the round turret.
6) Make the custom arris style hip tiles for the octagonal tower.
7) Make the custom Arris style hip to suit the different roof pitches as well as the varying splays at the eaves.
8) Make the custom pieces to suit the swept valleys
Simon broke down each section of the roof. He indented all items for each section and agreed the measure etc with the installers. This ‘Project Bible’ became an invaluable tool for the installer, our tile makers and us.
We shipped some samples from the original roof to Sahtas who replicated tall the details. I was visiting factory and delayed my return to the Saturday so that the tiles coming out of the kiln late Friday night could be wrapped and packed into newly purchase suit cases. I arrived home late Saturday evening and Simon picked me up Sunday afternoon and drove us down to Greenwich for an 8 am meeting with the clients. When we unpacked the tiles they were still warm and Hilfiger signed off on the color, although his wife suggested we make them a bit darker a ‘as he has a dreadful sense of color!’
We took Vincent Liot, owner of TRM to the factory twice so that he could oversee the prototyping of all the myriad custom pieces. This was an invaluable move as he pre-approved all the pieces before they were shipped.
The installation was completed and everyone was very pleased with the final outcome.
The Hilfiger’s estate manager told me that a group of friends who were staying the weekend after all the work was completed were heard to ask Mr. Hilfiger ‘I thought you were having a new roof’…to which he responded ‘we did but you can’t tell, which as the plan” …perfect!
In refection this is probably the most complicated roof Northern has ever had the pleasure to supply. We learned a lot of very valuable lessons but in future when we are asked how did we do it we will answer ‘that is for us to know and for you to pay for!’


 Melanie Rekola Landscape Design
This lovely landscape sports a poured in place concrete slab patio with drought tolerant sedum plants between the slabs. This sedum mix is sold in sheets then cut to fit but it’s actually grown for green-roof application. It works perfectly in this hot environment too as it is extremely drought tolerant and can go a month without water. Because the water runoff is absorbed between the slabs the patio drainage works perfectly and there are no need for drains.The swimming pool is of the fiberglass variety. Though the initial investment is greater than that of vinyl pools the ROI is greater over a 10 year period. Fiberglass pools retains more heat as the pool shell is all one piece and they don’t ever require a new liner.. This fiberglass pool has cool built-in benching and steps. And there is even a swim jet built into one side great for those cardio blasting swims. The pool interior colour is grey though it shows a soft blue/grey when water is added due to the reflection of the sky and other surroundings. The pool coping is natural stone with rock face edge. The steel arbour was custom made. Metal (steel) was chosen for it’s slim strength as wood placed here would have been too chunky. The best rooms (indoors or our) have a subtle layering of textural elements. To me this landscape needed a structure here to define the “rooms” It will look even better in a few years when the vines reach the top and the Miscanthus on either side reaches its 7′ height!The 12′ x 16′ pavilion is also made of steel and houses an alfresco dining table and sofa set. The pavilions built in cupola makes the warm breezes comfortably pass through with no need for a fan. It’s also sunken 2′ from the pool/patio height and nestled nicely in the corner. I must also mention the large slim planters with “Red Shades” Canna lily within. They are the perfect boldness/balance!Step through the arbor and a linear pond with “floating” natural stone step is revealed! Two smooth flow scuppers are responsible for the quiet waterfalls either side. A wood deck overhangs the pond adding softness to the setting. A modern retaining wall with natural stone cap runs the full width of the pond and pool adding interest and dimension. In the covered outdoor living area this wall is the perfect seat wall - adding lots of extra party seating!
The lesson to be learned here is that good design can be applied to any space. This backyard is only 50′ x 45′ and look what can be achieved! Landscape design and photography by Melanie Rekola
 Northern Roof Tiles
Architect: Andre Tchelistcheff Architects New York. NY
Builder: Xhema of Greenwich CT
Installer: TRM Enterprises Bridgehampton NY
Back story.
Northern has worked with both Xhema and TRM many tiles. We have worked with Andre before he branched out on his own.
Originally Xhema’s contact was to replace the roof and repair the garage, which as some point had been made into an indoor swimming pool without adequate ventilation. The budget was about $8m and there were 20 drawings.
By the time the job was 6 months old the scope of work has expanded to over $30m and over 200 drawings had been produced.
Northern was contacted to visit the site and evaluate the existing roof. Although the house had been added to over the years the same tile was used but due to the location of the house the color of the tile varied considerably from the front to the back.
Northern identified a large number of custom details which would require us to:
1) Match the existing Field tile in size, thickness (it was actually thicker at the butt and reduced to ½” where the tile is overlapped) , surface texture and the color.
2) Make tiles that are curved in their length to suit the curved rafter on the gabled dormers.
3) Make the curved tiles to suit the low slope octagonal tower.
4) Make the curved tiles and Arris style hips to suit the hipped dormers with the curved rafters.
5) Make the segmented tiles to suit the round turret.
6) Make the custom arris style hip tiles for the octagonal tower.
7) Make the custom Arris style hip to suit the different roof pitches as well as the varying splays at the eaves.
8) Make the custom pieces to suit the swept valleys
Simon broke down each section of the roof. He indented all items for each section and agreed the measure etc with the installers. This ‘Project Bible’ became an invaluable tool for the installer, our tile makers and us.
We shipped some samples from the original roof to Sahtas who replicated tall the details. I was visiting factory and delayed my return to the Saturday so that the tiles coming out of the kiln late Friday night could be wrapped and packed into newly purchase suit cases. I arrived home late Saturday evening and Simon picked me up Sunday afternoon and drove us down to Greenwich for an 8 am meeting with the clients. When we unpacked the tiles they were still warm and Hilfiger signed off on the color, although his wife suggested we make them a bit darker a ‘as he has a dreadful sense of color!’
We took Vincent Liot, owner of TRM to the factory twice so that he could oversee the prototyping of all the myriad custom pieces. This was an invaluable move as he pre-approved all the pieces before they were shipped.
The installation was completed and everyone was very pleased with the final outcome.
The Hilfiger’s estate manager told me that a group of friends who were staying the weekend after all the work was completed were heard to ask Mr. Hilfiger ‘I thought you were having a new roof’…to which he responded ‘we did but you can’t tell, which as the plan” …perfect!
In refection this is probably the most complicated roof Northern has ever had the pleasure to supply. We learned a lot of very valuable lessons but in future when we are asked how did we do it we will answer ‘that is for us to know and for you to pay for!’
 Northern Roof Tiles
Architect: Andre Tchelistcheff Architects New York. NY
Builder: Xhema of Greenwich CT
Installer: TRM Enterprises Bridgehampton NY
Back story.
Northern has worked with both Xhema and TRM many tiles. We have worked with Andre before he branched out on his own.
Originally Xhema’s contact was to replace the roof and repair the garage, which as some point had been made into an indoor swimming pool without adequate ventilation. The budget was about $8m and there were 20 drawings.
By the time the job was 6 months old the scope of work has expanded to over $30m and over 200 drawings had been produced.
Northern was contacted to visit the site and evaluate the existing roof. Although the house had been added to over the years the same tile was used but due to the location of the house the color of the tile varied considerably from the front to the back.
Northern identified a large number of custom details which would require us to:
1) Match the existing Field tile in size, thickness (it was actually thicker at the butt and reduced to ½” where the tile is overlapped) , surface texture and the color.
2) Make tiles that are curved in their length to suit the curved rafter on the gabled dormers.
3) Make the curved tiles to suit the low slope octagonal tower.
4) Make the curved tiles and Arris style hips to suit the hipped dormers with the curved rafters.
5) Make the segmented tiles to suit the round turret.
6) Make the custom arris style hip tiles for the octagonal tower.
7) Make the custom Arris style hip to suit the different roof pitches as well as the varying splays at the eaves.
8) Make the custom pieces to suit the swept valleys
Simon broke down each section of the roof. He indented all items for each section and agreed the measure etc with the installers. This ‘Project Bible’ became an invaluable tool for the installer, our tile makers and us.
We shipped some samples from the original roof to Sahtas who replicated tall the details. I was visiting factory and delayed my return to the Saturday so that the tiles coming out of the kiln late Friday night could be wrapped and packed into newly purchase suit cases. I arrived home late Saturday evening and Simon picked me up Sunday afternoon and drove us down to Greenwich for an 8 am meeting with the clients. When we unpacked the tiles they were still warm and Hilfiger signed off on the color, although his wife suggested we make them a bit darker a ‘as he has a dreadful sense of color!’
We took Vincent Liot, owner of TRM to the factory twice so that he could oversee the prototyping of all the myriad custom pieces. This was an invaluable move as he pre-approved all the pieces before they were shipped.
The installation was completed and everyone was very pleased with the final outcome.
The Hilfiger’s estate manager told me that a group of friends who were staying the weekend after all the work was completed were heard to ask Mr. Hilfiger ‘I thought you were having a new roof’…to which he responded ‘we did but you can’t tell, which as the plan” …perfect!
In refection this is probably the most complicated roof Northern has ever had the pleasure to supply. We learned a lot of very valuable lessons but in future when we are asked how did we do it we will answer ‘that is for us to know and for you to pay for!’
 Northern Roof Tiles
Architect: Andre Tchelistcheff Architects New York. NY
Builder: Xhema of Greenwich CT
Installer: TRM Enterprises Bridgehampton NY
Back story.
Northern has worked with both Xhema and TRM many tiles. We have worked with Andre before he branched out on his own.
Originally Xhema’s contact was to replace the roof and repair the garage, which as some point had been made into an indoor swimming pool without adequate ventilation. The budget was about $8m and there were 20 drawings.
By the time the job was 6 months old the scope of work has expanded to over $30m and over 200 drawings had been produced.
Northern was contacted to visit the site and evaluate the existing roof. Although the house had been added to over the years the same tile was used but due to the location of the house the color of the tile varied considerably from the front to the back.
Northern identified a large number of custom details which would require us to:
1) Match the existing Field tile in size, thickness (it was actually thicker at the butt and reduced to ½” where the tile is overlapped) , surface texture and the color.
2) Make tiles that are curved in their length to suit the curved rafter on the gabled dormers.
3) Make the curved tiles to suit the low slope octagonal tower.
4) Make the curved tiles and Arris style hips to suit the hipped dormers with the curved rafters.
5) Make the segmented tiles to suit the round turret.
6) Make the custom arris style hip tiles for the octagonal tower.
7) Make the custom Arris style hip to suit the different roof pitches as well as the varying splays at the eaves.
8) Make the custom pieces to suit the swept valleys
Simon broke down each section of the roof. He indented all items for each section and agreed the measure etc with the installers. This ‘Project Bible’ became an invaluable tool for the installer, our tile makers and us.
We shipped some samples from the original roof to Sahtas who replicated tall the details. I was visiting factory and delayed my return to the Saturday so that the tiles coming out of the kiln late Friday night could be wrapped and packed into newly purchase suit cases. I arrived home late Saturday evening and Simon picked me up Sunday afternoon and drove us down to Greenwich for an 8 am meeting with the clients. When we unpacked the tiles they were still warm and Hilfiger signed off on the color, although his wife suggested we make them a bit darker a ‘as he has a dreadful sense of color!’
We took Vincent Liot, owner of TRM to the factory twice so that he could oversee the prototyping of all the myriad custom pieces. This was an invaluable move as he pre-approved all the pieces before they were shipped.
The installation was completed and everyone was very pleased with the final outcome.
The Hilfiger’s estate manager told me that a group of friends who were staying the weekend after all the work was completed were heard to ask Mr. Hilfiger ‘I thought you were having a new roof’…to which he responded ‘we did but you can’t tell, which as the plan” …perfect!
In refection this is probably the most complicated roof Northern has ever had the pleasure to supply. We learned a lot of very valuable lessons but in future when we are asked how did we do it we will answer ‘that is for us to know and for you to pay for!’
 Inhabit | Space
Whon Photography
Large urban underground carpeted staircase photo in Indianapolis with gray walls and no fireplace
Large urban underground carpeted staircase photo in Indianapolis with gray walls and no fireplace
 Northern Roof Tiles
Architect: Andre Tchelistcheff Architects New York. NY
Builder: Xhema of Greenwich CT
Installer: TRM Enterprises Bridgehampton NY
Back story.
Northern has worked with both Xhema and TRM many tiles. We have worked with Andre before he branched out on his own.
Originally Xhema’s contact was to replace the roof and repair the garage, which as some point had been made into an indoor swimming pool without adequate ventilation. The budget was about $8m and there were 20 drawings.
By the time the job was 6 months old the scope of work has expanded to over $30m and over 200 drawings had been produced.
Northern was contacted to visit the site and evaluate the existing roof. Although the house had been added to over the years the same tile was used but due to the location of the house the color of the tile varied considerably from the front to the back.
Northern identified a large number of custom details which would require us to:
1) Match the existing Field tile in size, thickness (it was actually thicker at the butt and reduced to ½” where the tile is overlapped) , surface texture and the color.
2) Make tiles that are curved in their length to suit the curved rafter on the gabled dormers.
3) Make the curved tiles to suit the low slope octagonal tower.
4) Make the curved tiles and Arris style hips to suit the hipped dormers with the curved rafters.
5) Make the segmented tiles to suit the round turret.
6) Make the custom arris style hip tiles for the octagonal tower.
7) Make the custom Arris style hip to suit the different roof pitches as well as the varying splays at the eaves.
8) Make the custom pieces to suit the swept valleys
Simon broke down each section of the roof. He indented all items for each section and agreed the measure etc with the installers. This ‘Project Bible’ became an invaluable tool for the installer, our tile makers and us.
We shipped some samples from the original roof to Sahtas who replicated tall the details. I was visiting factory and delayed my return to the Saturday so that the tiles coming out of the kiln late Friday night could be wrapped and packed into newly purchase suit cases. I arrived home late Saturday evening and Simon picked me up Sunday afternoon and drove us down to Greenwich for an 8 am meeting with the clients. When we unpacked the tiles they were still warm and Hilfiger signed off on the color, although his wife suggested we make them a bit darker a ‘as he has a dreadful sense of color!’
We took Vincent Liot, owner of TRM to the factory twice so that he could oversee the prototyping of all the myriad custom pieces. This was an invaluable move as he pre-approved all the pieces before they were shipped.
The installation was completed and everyone was very pleased with the final outcome.
The Hilfiger’s estate manager told me that a group of friends who were staying the weekend after all the work was completed were heard to ask Mr. Hilfiger ‘I thought you were having a new roof’…to which he responded ‘we did but you can’t tell, which as the plan” …perfect!
In refection this is probably the most complicated roof Northern has ever had the pleasure to supply. We learned a lot of very valuable lessons but in future when we are asked how did we do it we will answer ‘that is for us to know and for you to pay for!’
Sponsored
Columbus, OH

Snider & Metcalf Interior Design, LTD
Leading Interior Designers in Columbus, Ohio & Ponte Vedra, Florida
 Melanie Rekola Landscape Design
This lovely landscape sports a poured in place concrete slab patio with drought tolerant sedum plants between the slabs. This sedum mix is sold in sheets then cut to fit but it’s actually grown for green-roof application. It works perfectly in this hot environment too as it is extremely drought tolerant and can go a month without water. Because the water runoff is absorbed between the slabs the patio drainage works perfectly and there are no need for drains.The swimming pool is of the fiberglass variety. Though the initial investment is greater than that of vinyl pools the ROI is greater over a 10 year period. Fiberglass pools retains more heat as the pool shell is all one piece and they don’t ever require a new liner.. This fiberglass pool has cool built-in benching and steps. And there is even a swim jet built into one side great for those cardio blasting swims. The pool interior colour is grey though it shows a soft blue/grey when water is added due to the reflection of the sky and other surroundings. The pool coping is natural stone with rock face edge. The steel arbour was custom made. Metal (steel) was chosen for it’s slim strength as wood placed here would have been too chunky. The best rooms (indoors or our) have a subtle layering of textural elements. To me this landscape needed a structure here to define the “rooms” It will look even better in a few years when the vines reach the top and the Miscanthus on either side reaches its 7′ height!The 12′ x 16′ pavilion is also made of steel and houses an alfresco dining table and sofa set. The pavilions built in cupola makes the warm breezes comfortably pass through with no need for a fan. It’s also sunken 2′ from the pool/patio height and nestled nicely in the corner. I must also mention the large slim planters with “Red Shades” Canna lily within. They are the perfect boldness/balance!Step through the arbor and a linear pond with “floating” natural stone step is revealed! Two smooth flow scuppers are responsible for the quiet waterfalls either side. A wood deck overhangs the pond adding softness to the setting. A modern retaining wall with natural stone cap runs the full width of the pond and pool adding interest and dimension. In the covered outdoor living area this wall is the perfect seat wall - adding lots of extra party seating!
The lesson to be learned here is that good design can be applied to any space. This backyard is only 50′ x 45′ and look what can be achieved! Landscape design and photography by Melanie Rekola
 Melanie Rekola Landscape Design
This lovely landscape sports a poured in place concrete slab patio with drought tolerant sedum plants between the slabs. This sedum mix is sold in sheets then cut to fit but it’s actually grown for green-roof application. It works perfectly in this hot environment too as it is extremely drought tolerant and can go a month without water. Because the water runoff is absorbed between the slabs the patio drainage works perfectly and there are no need for drains.The swimming pool is of the fiberglass variety. Though the initial investment is greater than that of vinyl pools the ROI is greater over a 10 year period. Fiberglass pools retains more heat as the pool shell is all one piece and they don’t ever require a new liner.. This fiberglass pool has cool built-in benching and steps. And there is even a swim jet built into one side great for those cardio blasting swims. The pool interior colour is grey though it shows a soft blue/grey when water is added due to the reflection of the sky and other surroundings. The pool coping is natural stone with rock face edge. The steel arbour was custom made. Metal (steel) was chosen for it’s slim strength as wood placed here would have been too chunky. The best rooms (indoors or our) have a subtle layering of textural elements. To me this landscape needed a structure here to define the “rooms” It will look even better in a few years when the vines reach the top and the Miscanthus on either side reaches its 7′ height!The 12′ x 16′ pavilion is also made of steel and houses an alfresco dining table and sofa set. The pavilions built in cupola makes the warm breezes comfortably pass through with no need for a fan. It’s also sunken 2′ from the pool/patio height and nestled nicely in the corner. I must also mention the large slim planters with “Red Shades” Canna lily within. They are the perfect boldness/balance!Step through the arbor and a linear pond with “floating” natural stone step is revealed! Two smooth flow scuppers are responsible for the quiet waterfalls either side. A wood deck overhangs the pond adding softness to the setting. A modern retaining wall with natural stone cap runs the full width of the pond and pool adding interest and dimension. In the covered outdoor living area this wall is the perfect seat wall - adding lots of extra party seating!
The lesson to be learned here is that good design can be applied to any space. This backyard is only 50′ x 45′ and look what can be achieved! Landscape design and photography by Melanie Rekola
 Melanie Rekola Landscape Design
This lovely landscape sports a poured in place concrete slab patio with drought tolerant sedum plants between the slabs. This sedum mix is sold in sheets then cut to fit but it’s actually grown for green-roof application. It works perfectly in this hot environment too as it is extremely drought tolerant and can go a month without water. Because the water runoff is absorbed between the slabs the patio drainage works perfectly and there are no need for drains.The swimming pool is of the fiberglass variety. Though the initial investment is greater than that of vinyl pools the ROI is greater over a 10 year period. Fiberglass pools retains more heat as the pool shell is all one piece and they don’t ever require a new liner.. This fiberglass pool has cool built-in benching and steps. And there is even a swim jet built into one side great for those cardio blasting swims. The pool interior colour is grey though it shows a soft blue/grey when water is added due to the reflection of the sky and other surroundings. The pool coping is natural stone with rock face edge. The steel arbour was custom made. Metal (steel) was chosen for it’s slim strength as wood placed here would have been too chunky. The best rooms (indoors or our) have a subtle layering of textural elements. To me this landscape needed a structure here to define the “rooms” It will look even better in a few years when the vines reach the top and the Miscanthus on either side reaches its 7′ height!The 12′ x 16′ pavilion is also made of steel and houses an alfresco dining table and sofa set. The pavilions built in cupola makes the warm breezes comfortably pass through with no need for a fan. It’s also sunken 2′ from the pool/patio height and nestled nicely in the corner. I must also mention the large slim planters with “Red Shades” Canna lily within. They are the perfect boldness/balance!Step through the arbor and a linear pond with “floating” natural stone step is revealed! Two smooth flow scuppers are responsible for the quiet waterfalls either side. A wood deck overhangs the pond adding softness to the setting. A modern retaining wall with natural stone cap runs the full width of the pond and pool adding interest and dimension. In the covered outdoor living area this wall is the perfect seat wall - adding lots of extra party seating!
The lesson to be learned here is that good design can be applied to any space. This backyard is only 50′ x 45′ and look what can be achieved! Landscape design and photography by Melanie Rekola
 Melanie Rekola Landscape Design
This lovely landscape sports a poured in place concrete slab patio with drought tolerant sedum plants between the slabs. This sedum mix is sold in sheets then cut to fit but it’s actually grown for green-roof application. It works perfectly in this hot environment too as it is extremely drought tolerant and can go a month without water. Because the water runoff is absorbed between the slabs the patio drainage works perfectly and there are no need for drains.The swimming pool is of the fiberglass variety. Though the initial investment is greater than that of vinyl pools the ROI is greater over a 10 year period. Fiberglass pools retains more heat as the pool shell is all one piece and they don’t ever require a new liner.. This fiberglass pool has cool built-in benching and steps. And there is even a swim jet built into one side great for those cardio blasting swims. The pool interior colour is grey though it shows a soft blue/grey when water is added due to the reflection of the sky and other surroundings. The pool coping is natural stone with rock face edge. The steel arbour was custom made. Metal (steel) was chosen for it’s slim strength as wood placed here would have been too chunky. The best rooms (indoors or our) have a subtle layering of textural elements. To me this landscape needed a structure here to define the “rooms” It will look even better in a few years when the vines reach the top and the Miscanthus on either side reaches its 7′ height!The 12′ x 16′ pavilion is also made of steel and houses an alfresco dining table and sofa set. The pavilions built in cupola makes the warm breezes comfortably pass through with no need for a fan. It’s also sunken 2′ from the pool/patio height and nestled nicely in the corner. I must also mention the large slim planters with “Red Shades” Canna lily within. They are the perfect boldness/balance!Step through the arbor and a linear pond with “floating” natural stone step is revealed! Two smooth flow scuppers are responsible for the quiet waterfalls either side. A wood deck overhangs the pond adding softness to the setting. A modern retaining wall with natural stone cap runs the full width of the pond and pool adding interest and dimension. In the covered outdoor living area this wall is the perfect seat wall - adding lots of extra party seating!
The lesson to be learned here is that good design can be applied to any space. This backyard is only 50′ x 45′ and look what can be achieved! Landscape design and photography by Melanie Rekola
Sponsored
Columbus, OH
Snider & Metcalf Interior Design, LTD
Leading Interior Designers in Columbus, Ohio & Ponte Vedra, Florida
 Melanie Rekola Landscape Design
This lovely landscape sports a poured in place concrete slab patio with drought tolerant sedum plants between the slabs. This sedum mix is sold in sheets then cut to fit but it’s actually grown for green-roof application. It works perfectly in this hot environment too as it is extremely drought tolerant and can go a month without water. Because the water runoff is absorbed between the slabs the patio drainage works perfectly and there are no need for drains.The swimming pool is of the fiberglass variety. Though the initial investment is greater than that of vinyl pools the ROI is greater over a 10 year period. Fiberglass pools retains more heat as the pool shell is all one piece and they don’t ever require a new liner.. This fiberglass pool has cool built-in benching and steps. And there is even a swim jet built into one side great for those cardio blasting swims. The pool interior colour is grey though it shows a soft blue/grey when water is added due to the reflection of the sky and other surroundings. The pool coping is natural stone with rock face edge. The steel arbour was custom made. Metal (steel) was chosen for it’s slim strength as wood placed here would have been too chunky. The best rooms (indoors or our) have a subtle layering of textural elements. To me this landscape needed a structure here to define the “rooms” It will look even better in a few years when the vines reach the top and the Miscanthus on either side reaches its 7′ height!The 12′ x 16′ pavilion is also made of steel and houses an alfresco dining table and sofa set. The pavilions built in cupola makes the warm breezes comfortably pass through with no need for a fan. It’s also sunken 2′ from the pool/patio height and nestled nicely in the corner. I must also mention the large slim planters with “Red Shades” Canna lily within. They are the perfect boldness/balance!Step through the arbor and a linear pond with “floating” natural stone step is revealed! Two smooth flow scuppers are responsible for the quiet waterfalls either side. A wood deck overhangs the pond adding softness to the setting. A modern retaining wall with natural stone cap runs the full width of the pond and pool adding interest and dimension. In the covered outdoor living area this wall is the perfect seat wall - adding lots of extra party seating!
The lesson to be learned here is that good design can be applied to any space. This backyard is only 50′ x 45′ and look what can be achieved! Landscape design and photography by Melanie Rekola

 Legendary Escapes Pools
This project began as a wilderness retreat for the homeowners at their rural estate. They already had a large outdoor area complete with a pond, and detached garage in the perfect location to tie into an outdoor entertaining area/kitchen for the swimming pool. The homeowners were hoping that the design team at Legendary Escapes could create something magical for their small grandchildren, and for the grownups to enjoy for summertime relaxation.
When the discussion turned to themes, the cartoon SpongeBob came up, and our team found a direction to go, either to the homeowners delight, possibly mixed with a bit of apprehension at the thought of a cartoony theme as a result. We promised subtle surprise and delight - and the homeowner decided to let the team go with their vision. The pool is a very abundant sized swimming pool, much larger than the average residential swimming pool. The sunledge was also made larger after the pool layout, providing even more space for chairs and play area for small children. One of the special surprises the owners didn't even know about until after they were in were the secret port holes that were re-seated with magnifying glass - and showcased miniature characters behind them, that when viewed through the glass looked giant in size.
The waterfall/slide combination also features a large grotto - themed and decorated with elements that remind visitors to the space of the lessons and themes of the cartoon. The castle is solid, carved concrete - mixed and sculpted on site and hand placed. As the waterfall began to take shape, the outside was created as a sand castle, providing the perfect whimsical backdrop for the slide, and accents including a pair of flipper outfitted legs of what we can only think is mermaid man.
One of the biggest surprises on this project came when Al found an old wooden boat at an auction, which he bought, took back to the job and cut it in half - creating the tail end of a boating incident, much like SpongeBob would have had when he missed the direction of the curve sign while out boating. (The joke in the show is that he can't ever get his drivers license because he doesn't know how to steer.) The other end of the boat became a vertical storage space for firewood or other pool side needs. The two parts of the boat became anchor pieces for what became the "wharf wall" which is the perfect area to lead people into the swimming pool retreat.
The pool has three different entertaining patio levels, including the lower wharf level, swim up bar and raised concrete counter at the deep end of the pool. The middle section of patio is perfect for relaxing and watching kids play in the pool with the deck jets and sun ledge, and the upper area is adjacent to the outdoor kitchen area, also designed and created out of concrete (carved timbers) as the cabinetry and under bar areas.
The pool was completed with ecoFinish on the sun ledge, interior of the spa, grotto and the slide. The main swimming area of the pool was vinyl liner, constructed in the special hybrid way of the team.
With the project complete, the homeowners and family thoroughly enjoyed their backyard retreat. Any hesitation at the initial theme ideas were fully appreciated as they developed along the way, with the final project a subtle blend of function and whimsy, meeting everything that they could have asked for in a backyard entertaining retreat. Their advice is to just trust Al and the team through the process, because the results will be more than you would ever hope for. If our team can help you create a backyard or custom retreat, which includes a pool and plenty of outdoor entertaining options to surprise and delight you and your family, please reach out to start your design discussions.
 Melanie Rekola Landscape Design
This lovely landscape sports a poured in place concrete slab patio with drought tolerant sedum plants between the slabs. This sedum mix is sold in sheets then cut to fit but it’s actually grown for green-roof application. It works perfectly in this hot environment too as it is extremely drought tolerant and can go a month without water. Because the water runoff is absorbed between the slabs the patio drainage works perfectly and there are no need for drains.The swimming pool is of the fiberglass variety. Though the initial investment is greater than that of vinyl pools the ROI is greater over a 10 year period. Fiberglass pools retains more heat as the pool shell is all one piece and they don’t ever require a new liner.. This fiberglass pool has cool built-in benching and steps. And there is even a swim jet built into one side great for those cardio blasting swims. The pool interior colour is grey though it shows a soft blue/grey when water is added due to the reflection of the sky and other surroundings. The pool coping is natural stone with rock face edge. The steel arbour was custom made. Metal (steel) was chosen for it’s slim strength as wood placed here would have been too chunky. The best rooms (indoors or our) have a subtle layering of textural elements. To me this landscape needed a structure here to define the “rooms” It will look even better in a few years when the vines reach the top and the Miscanthus on either side reaches its 7′ height!The 12′ x 16′ pavilion is also made of steel and houses an alfresco dining table and sofa set. The pavilions built in cupola makes the warm breezes comfortably pass through with no need for a fan. It’s also sunken 2′ from the pool/patio height and nestled nicely in the corner. I must also mention the large slim planters with “Red Shades” Canna lily within. They are the perfect boldness/balance!Step through the arbor and a linear pond with “floating” natural stone step is revealed! Two smooth flow scuppers are responsible for the quiet waterfalls either side. A wood deck overhangs the pond adding softness to the setting. A modern retaining wall with natural stone cap runs the full width of the pond and pool adding interest and dimension. In the covered outdoor living area this wall is the perfect seat wall - adding lots of extra party seating!
The lesson to be learned here is that good design can be applied to any space. This backyard is only 50′ x 45′ and look what can be achieved! Landscape design and photography by Melanie Rekola
6