
Search results for "Damaged tiles" in Home Design Ideas

 Village Home Stores
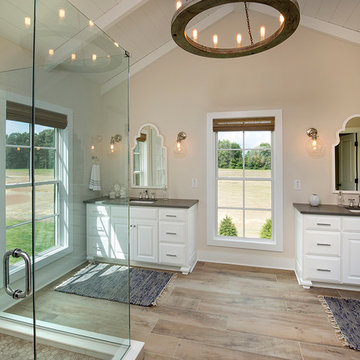
A custom glass entry into a beautiful shower unit in a Colona, IL Master Bath.
Large elegant master multicolored tile and glass tile ceramic tile corner bathtub photo in Chicago with an undermount sink, raised-panel cabinets, white cabinets, granite countertops and gray walls
Large elegant master multicolored tile and glass tile ceramic tile corner bathtub photo in Chicago with an undermount sink, raised-panel cabinets, white cabinets, granite countertops and gray walls
 Village Home Stores
A border frames in a herringbone patterned floor installation In Colona, IL by Village Home Stores. This pattern installation creates the look of an area rug where the Dining Room table will sit.
 Village Home Stores
A flat-screen TV faces a Jacuzzi tub in this Master Bathroom suite with enclosed toilet area, double sink, and walk-in shower.
Inspiration for a large timeless master multicolored tile and glass tile ceramic tile corner bathtub remodel in Chicago with an undermount sink, raised-panel cabinets, white cabinets, granite countertops and gray walls
Inspiration for a large timeless master multicolored tile and glass tile ceramic tile corner bathtub remodel in Chicago with an undermount sink, raised-panel cabinets, white cabinets, granite countertops and gray walls
Find the right local pro for your project
 Village Home Stores
Beautiful shower unit in a Colona, IL Master Bath with custom corner shower seat and built-in recess area for soaps and shampoos.
Inspiration for a large timeless master multicolored tile and glass tile ceramic tile corner bathtub remodel in Chicago with an undermount sink, raised-panel cabinets, white cabinets, granite countertops and gray walls
Inspiration for a large timeless master multicolored tile and glass tile ceramic tile corner bathtub remodel in Chicago with an undermount sink, raised-panel cabinets, white cabinets, granite countertops and gray walls

 J.E.P. Contracting, Inc.
The master bath boasts a step up curbless shower with a gorgeous natural pebble shower floor and double vanity with Roma Marble vanity top. The flooring in the master bath is gorgeous Sequolo Moro Rock Glazed Porcelain.
J.E.P. Contracting INC.
 J.E.P. Contracting, Inc.
The master bath boasts a step up curbless shower with a gorgeous natural pebble shower floor and double vanity with Roma Marble vanity top. The flooring in the master bath is gorgeous Sequolo Moro Rock Glazed Porcelain.
J.E.P. Contracting INC.

 Quality Craftsmen
Basement master suite. Mix of contemporary and classic tile. Modern gold chrome faucets over brick patterned glass vessel sinks.
C. Augustad, Fox Photography, Marietta, GA


Inspiration for an eclectic dark wood floor enclosed dining room remodel in Chicago with black walls
 Quality Craftsmen
Horizontal slim line glass tile mixed with bullnose, vine embossed tile and large square tile - basement master bath.
C.Augestad, Fox Photography, Marietta, GA
 Village Home Stores
A large square island and a peninsula offer multiple spaces for prep and a raised-panel valance adds interest above the sink
Open concept kitchen - mid-sized traditional u-shaped ceramic tile open concept kitchen idea in Chicago with an undermount sink, raised-panel cabinets, light wood cabinets, granite countertops, stainless steel appliances and an island
Open concept kitchen - mid-sized traditional u-shaped ceramic tile open concept kitchen idea in Chicago with an undermount sink, raised-panel cabinets, light wood cabinets, granite countertops, stainless steel appliances and an island
 J.E.P. Contracting, Inc.
 We installed Beautiful Raja Kund Porcelain tile in the guest bathroom and we also used Roma Marble for this vanity.
J.E.P. Contracting INC.
Tub/shower combo - small traditional kids' cement tile and multicolored tile porcelain tile tub/shower combo idea in Boston with flat-panel cabinets, distressed cabinets, a two-piece toilet, blue walls, an undermount sink and soapstone countertops
Tub/shower combo - small traditional kids' cement tile and multicolored tile porcelain tile tub/shower combo idea in Boston with flat-panel cabinets, distressed cabinets, a two-piece toilet, blue walls, an undermount sink and soapstone countertops
 Tile Doctor Ltd
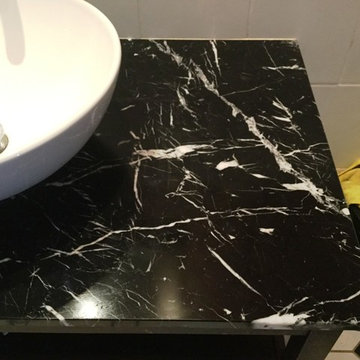
Marble is known for its premium quality, toughness and aesthetic, making it a very popular choice for bathroom countertops, such as this one at a house in Northampton. However just because it’s tough doesn’t mean that Marble can be cleaned with the usual household cleaners. Like all natural stone, Marble is acid sensitive and unsuitable products can have a very damaging effect on its appearance.
In this situation, the property owner had used a limescale remover to remove some unsightly marks from the countertop. Unfortunately, the product was acid-based and instead of making an improvement it just made it worse and caused severe etching.
The first photo above shows the limescale marks from where toiletries have been placed on the side whilst wet. Since Northampton is a hard water area, the limescale deposits over time caused these marks to appear.
The only way to effectively remove the Limestone deposits – while at the same time rectifying the damaged caused by the botched cleaning attempt – was to use a system of hand-held diamond encrusted pads and hand help blocks of various grits to cut back the stone and re-polish it, a process we call burnishing.
Before officially beginning the burnishing process, I ran a few tests to determine the type of pad I would need to use to achieve the best results. I found that, in most areas, I would need to use the Tile Doctor 400 Grit (Coarse) pad to resurface the tile and remove the damaged layer of stone, but in some areas where the etching was worse, I would need to use the 200 Grit (Very Coarse) pad.
After burnishing the affected areas with the Coarse and Very Coarse grit pads, I started to incrementally polish the stone to achieve a high-quality shine, working my up through the Medium, Fine and Very grit pads.
No chemicals were used during this process – only water for lubrication, combined with the six-inch diamond encrusted burnishing pads fitted to a hand-held buffing machine.
The final part of the restoration was to seal the stone to maintain a long-lasting, deep polished appearance. To do this, I used Tile Doctor Shine Powder, which is a crystallising sealer in powder form. The powder is applied directly and combined with water, before being worked into the stone to seal it.
The customer was very happy with the results and the level of shine achieved. I gave the customer a complimentary bottle of Tile Doctor Stone Soap, which is our aftercare cleaner for polished natural stone, along with instructions on periodic maintenance to help maintain the finish we had achieved for as long as possible.
Phil Vissian
Northamptonshire Tile Doctor


 Tile Doctor Ltd
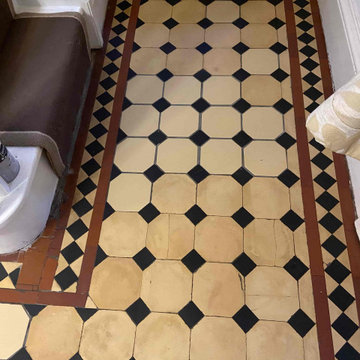
Detailed below is the restoration of a Victorian tiled hallway floor that we started back in June in Preston. Although we started in June there was so much damage to the subfloor and the tiles it took some time to complete, additionally, the client did not like the colour samples of the replacement tiles we had brought along and so decided to source their own which took some time.
Three months later with replacement tiles now sourced we were given the go ahead to start the restoration. The first day’s focus was cleaning the original floor using very coarse 100-grit and 200-grit Diamond pads fitted to a rotary buffer machine and applied to the floor using a strong dilution of Tile Doctor Remove and Go to add extra cleaning power. Tile edges were given special attention using a flex machine fitted with small diamond grit pads.
The floor was rinsed with water to remove the soil generated and this was followed up with an acid rinse using a 1:3 dilution of Tile Doctor Grout Clean Up. This last step in the cleaning process is especially recommend for old floors like this which don’t have a damp proof membrane and can suffer from efflorescence issues.
The next stage focused on repairing the floor and started by carefully knocking out all the broken and chipped tiles. We had previously estimated over 30 tiles needed replacing and so the client had bought two boxes, meaning I had plenty of spares to work with.
Before tiling however, the subfloor had suffered over the years and needed attention first. To deal with this the damaged areas were raked out, cleaned up and then back filled with rapid setting self-levelling screed from Mapie adhesives. Once the sub-base was fixed then we put the new tiles back in, they were not an exact match, about 5mm too short and lighter in tone, but the colour was pretty close.
Tiling an old Victorian floor like this can be a bit like dominoes as you move one out of place 2 decent ones come loose and then they also need refixing. Some of the tiles had hair line cracks in them and once they were loose, they just cracked in half. As such the 20 spare tiles that I thought were spare came into good use and I actually ended up using all of them. I could have done with a few more so it was decided to reset the last four broken tiles and grout them in. Luckily for me the client was very understanding about the nature of tile restoration and had accepted that there would be some imperfections and they were not expecting a new floor.
The Tiles were fixed down using Ultralite Rapid Flex (another product from Mapie) and then grouted using the same adhesive (not a grout, as they did not have grout back in the day, just cement and screed).
The floor was left this to cure overnight, and we came back the next day to finish the clean using a 200-grit diamond pad fitted to a buffing machine and lubricated with water, then one last acid rinse to get the tiles as clean as possible and remove any lingering grout haze. This last clean helps to blend the new tiles in with the original.
Before applying a protective sealer, the floor was left to dry for a couple of days, the tiles need to be thoroughly dry before sealing or you can end up with a patchy appearance.
For this floor with no damp proof membrane, it was important to use a fully breathable sealer that will allow moisture to rise through the tile and evaporate at the surface, so Tile Doctor Colour Grow was chosen. This is a good choice for old floors like this as its fully breathable, head wearing, and it contains a colour enhancer that improves the overall appearance of the tile.
Three coats of Tile Doctor Colour Grow which is a fully breathable, colour enhancing sealer hat works by soaking into the pores of the tile protecting it from within. It has a matt finish, and it works really well with all clay tiles and is ideal for these types of floors.
You can probably spot the lighter coloured tiles in the after photos on this page, however it’s a very subtle difference and I think they have blended in quite well with the original. Certainly, my client was very pleased with the newly restored floor, its completely transformed from when we first visited the client, and the floor has now gained character and history. For aftercare we recommend Tile Doctor Neutral Cleaner, its an effective pH neutral product that is compatible with the new sealer.
Russell Taylor
Lancashire Tile Doctor
 Village Home Stores
A bow front vanity from Bertch Bath in the Tiffany doorstyle available from Village Home Stores.
Inspiration for a large timeless 3/4 multicolored tile and glass tile ceramic tile tub/shower combo remodel in Chicago with an undermount sink, medium tone wood cabinets and granite countertops
Inspiration for a large timeless 3/4 multicolored tile and glass tile ceramic tile tub/shower combo remodel in Chicago with an undermount sink, medium tone wood cabinets and granite countertops

 Maraya Interior Design
Industrial modern bar in a small beach house. Reclaimed wood siding and glass tile with galvanized steel pendant lighting.
A small weekend beach resort home for a family of four with two little girls. Remodeled from a funky old house built in the 60's on Oxnard Shores. This little white cottage has the master bedroom, a playroom, guest bedroom and girls' bunk room upstairs, while downstairs there is a 1960s feel family room with an industrial modern style bar for the family's many parties and celebrations. A great room open to the dining area with a zinc dining table and rattan chairs. Fireplace features custom iron doors, and green glass tile surround. New white cabinets and bookshelves flank the real wood burning fire place. Simple clean white cabinetry in the kitchen with x designs on glass cabinet doors and peninsula ends. Durable, beautiful white quartzite counter tops and yes! porcelain planked floors for durability! The girls can run in and out without worrying about the beach sand damage!. White painted planked and beamed ceilings, natural reclaimed woods mixed with rattans and velvets for comfortable, beautiful interiors Project Location: Oxnard, California. Project designed by Maraya Interior Design. From their beautiful resort town of Ojai, they serve clients in Montecito, Hope Ranch, Malibu, Westlake and Calabasas, across the tri-county areas of Santa Barbara, Ventura and Los Angeles, south to Hidden Hills- north through Solvang and more.
 Village Home Stores
Angled cabinets allow for full access to an awkward space.
Inspiration for a mid-sized timeless u-shaped ceramic tile open concept kitchen remodel in Chicago with an undermount sink, raised-panel cabinets, light wood cabinets, granite countertops, stainless steel appliances and an island
Inspiration for a mid-sized timeless u-shaped ceramic tile open concept kitchen remodel in Chicago with an undermount sink, raised-panel cabinets, light wood cabinets, granite countertops, stainless steel appliances and an island

Sponsored
Sunbury, OH

J.Holderby - Renovations
Franklin County's Leading General Contractors - 2X Best of Houzz!

 Grove Park Construction
Inspiration for a coastal master gray floor bathroom remodel in Nashville with shaker cabinets, black cabinets, white walls and an undermount sink
 Tile Doctor Ltd
Pontcanna is a popular residential area in the western district of Cardiff, in South East Wales. Known for its rather large houses and spectacular foliage, interestingly enough roughly a quarter of the population are English folk.
I was called down to a property in the area to take a look at a Victorian tiled floor which was in quite poor condition. Along with the typical amount of dirt and muck seen on poorly maintained tiles, there were a number of missing tiles and a fair bit of cement caked on the surface of the floor.
It would require a robust clean, fresh seal, and several repairs to get this floor back into optimum condition.
To begin, I checked for excess moisture problems using a damp meter in various places of the hallway floor and, thankfully, it was showing dry results. Any dampness could have potentially caused problems later on in the restoration process, so it was s good idea to run tests before starting.
Next, I manually scraped as much of the dry paint and cement off the tiles as possible, with no lubrication necessary. I then proceeded to clean the floor with a solution I mixed early, consisting of equal parts Tile Doctor NanoTech HBU and Tile Doctor Pro Clean, rinsing as I went. Both products are designed to tackle heavy soil build-up, with the former uniquely using nano-sized particles (as the product name suggests) to penetrate deep into difficult to reach areas in the tiles in order to lift out ingrained muck.
Following the initial clean, I removed all of the loose tiles and those heavily affected by cement, before retiling as necessary with fresh Victorian tiles, and grouting the whole floor. Of course, these replacement tiles were carefully sourced to ensure consistency, as far as possible, with the original pattern of the floor.
The next day, I went over the whole floor with an application of the acid-based Tile Doctor Grout Clean Up, diluted with a little alkaline Pro Clean to form a cleaning solution. I then used a black pad to scrub the cleaner into the tiles, similarly to the previous day’s cleaning. This was followed by a through rinse with water to neutralise the floor.
It was at this point that I noticed some stubborn cement stains remained so I set about breaking them down using a 60 grade hand held diamond polishing block, and this technique proved successful.
After completing the clean, I left the floor to dry out for roughly 24 hours. Upon my return to the property to seal the tiles, I tested again for moisture. It is recommended to run damp tests before sealing, as excess moisture can cloud the sealer, affecting its performance in the long run.
Fortunately, no dampness was detected and I was proceeded to seal the floor with seven coats of Tile Doctor Seal & Go, which enhances the natural colours in the stone and provides a nice satin gloss appearance, as requested by the customer.
I was extremely pleased with the results of this restoration, as was the customer. The extent of the soil build up and damage was such before the restoration that, after completion, the floor looked like it had been newly laid!
Julian Iancono
South East Wales Tile Doctor
 Birch Masters
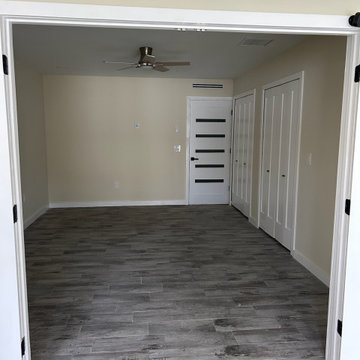
Updated master bedroom featuring new LVP flooring, rebuilt walls, fresh paint, a modern ceiling fan, and double closets installed during the full home renovation
2