
Search results for "Dating confidence" in Home Design Ideas

 Gallery KBNY
Our clients occupied the first two floors of this Manhattan townhouse, converted to condos with coveted access to the outdoors via a patio. The overall space had been well-maintained, but was dated and didn't necessarily reflect the aesthetic of our clients. Our goal was to brighten the home with character alongside modern elements.
In addition to a full kitchen renovation, this Manhattan townhouse renovation included installing new flooring; retiling and installing new fixtures in the bathroom and powder room; painting the walls; updating the staircase; renovating all the doors, including closets and to the back patio; and installing new lighting fixtures.
EYE-CATCHING KITCHEN
The kitchen in this Manhattan townhouse renovation is a galley-style space attached to the dining room. We wanted to connect the two in a more cohesive manner, so we built custom banquette seating benches in the dining room, with the table in the center acting as both a connector and divider.
Light wainscoting on the base of the walls and wallpaper above contrast against the bright orange benches and ultra-modern light fixture. Gray Shaker-style cabinets and a true herringbone backsplash are paired with a farmhouse sink set in white quartz countertops for a contemporary take on farmhouse style.
TOWNHOUSE CHARACTER
For the aesthetic in this Manhattan townhouse, we combined elements of a variety of design styles: farmhouse in the kitchen, transitional in the bathroom, touches of modern throughout. But the one factor shared by all is the charm of character. Retaining and refining that classic character was important to our clients.
Our extensive experience in renovating townhouses and brownstones in New York, including our gut renovation of this landmarked townhome in Hudson Square and this brownstone in Bed-Stuy, we were able to provide our clients with the confidence and clarity needed when entering these types of highly specific renovation projects.
SOME HIGHLIGHTS
- New select white oak flooring throughout
- White gloss penny tiles and black grout in the powder room
- Wraparound built-in banquette seating in the dining room
- Newly exposed brick wall in hallway leading out to patio, painted white for fresh contrast
Thinking about renovating your townhouse? We are a design-and-build firm with a full-scale approach that handles every single aspect of your townhouse renovation, from filing permits to sourcing materials and everything in between. Contact us today to find out how you can benefit from our expertise in remodeling New York City townhomes and brownstones.
 Gallery KBNY
Our clients occupied the first two floors of this Manhattan townhouse, converted to condos with coveted access to the outdoors via a patio. The overall space had been well-maintained, but was dated and didn't necessarily reflect the aesthetic of our clients. Our goal was to brighten the home with character alongside modern elements.
In addition to a full kitchen renovation, this Manhattan townhouse renovation included installing new flooring; retiling and installing new fixtures in the bathroom and powder room; painting the walls; updating the staircase; renovating all the doors, including closets and to the back patio; and installing new lighting fixtures.
EYE-CATCHING KITCHEN
The kitchen in this Manhattan townhouse renovation is a galley-style space attached to the dining room. We wanted to connect the two in a more cohesive manner, so we built custom banquette seating benches in the dining room, with the table in the center acting as both a connector and divider.
Light wainscoting on the base of the walls and wallpaper above contrast against the bright orange benches and ultra-modern light fixture. Gray Shaker-style cabinets and a true herringbone backsplash are paired with a farmhouse sink set in white quartz countertops for a contemporary take on farmhouse style.
TOWNHOUSE CHARACTER
For the aesthetic in this Manhattan townhouse, we combined elements of a variety of design styles: farmhouse in the kitchen, transitional in the bathroom, touches of modern throughout. But the one factor shared by all is the charm of character. Retaining and refining that classic character was important to our clients.
Our extensive experience in renovating townhouses and brownstones in New York, including our gut renovation of this landmarked townhome in Hudson Square and this brownstone in Bed-Stuy, we were able to provide our clients with the confidence and clarity needed when entering these types of highly specific renovation projects.
SOME HIGHLIGHTS
- New select white oak flooring throughout
- White gloss penny tiles and black grout in the powder room
- Wraparound built-in banquette seating in the dining room
- Newly exposed brick wall in hallway leading out to patio, painted white for fresh contrast
Thinking about renovating your townhouse? We are a design-and-build firm with a full-scale approach that handles every single aspect of your townhouse renovation, from filing permits to sourcing materials and everything in between. Contact us today to find out how you can benefit from our expertise in remodeling New York City townhomes and brownstones.
 Gallery KBNY
Our clients occupied the first two floors of this Manhattan townhouse, converted to condos with coveted access to the outdoors via a patio. The overall space had been well-maintained, but was dated and didn't necessarily reflect the aesthetic of our clients. Our goal was to brighten the home with character alongside modern elements.
In addition to a full kitchen renovation, this Manhattan townhouse renovation included installing new flooring; retiling and installing new fixtures in the bathroom and powder room; painting the walls; updating the staircase; renovating all the doors, including closets and to the back patio; and installing new lighting fixtures.
EYE-CATCHING KITCHEN
The kitchen in this Manhattan townhouse renovation is a galley-style space attached to the dining room. We wanted to connect the two in a more cohesive manner, so we built custom banquette seating benches in the dining room, with the table in the center acting as both a connector and divider.
Light wainscoting on the base of the walls and wallpaper above contrast against the bright orange benches and ultra-modern light fixture. Gray Shaker-style cabinets and a true herringbone backsplash are paired with a farmhouse sink set in white quartz countertops for a contemporary take on farmhouse style.
TOWNHOUSE CHARACTER
For the aesthetic in this Manhattan townhouse, we combined elements of a variety of design styles: farmhouse in the kitchen, transitional in the bathroom, touches of modern throughout. But the one factor shared by all is the charm of character. Retaining and refining that classic character was important to our clients.
Our extensive experience in renovating townhouses and brownstones in New York, including our gut renovation of this landmarked townhome in Hudson Square and this brownstone in Bed-Stuy, we were able to provide our clients with the confidence and clarity needed when entering these types of highly specific renovation projects.
SOME HIGHLIGHTS
- New select white oak flooring throughout
- White gloss penny tiles and black grout in the powder room
- Wraparound built-in banquette seating in the dining room
- Newly exposed brick wall in hallway leading out to patio, painted white for fresh contrast
Thinking about renovating your townhouse? We are a design-and-build firm with a full-scale approach that handles every single aspect of your townhouse renovation, from filing permits to sourcing materials and everything in between. Contact us today to find out how you can benefit from our expertise in remodeling New York City townhomes and brownstones.
Find the right local pro for your project
 Gallery KBNY
Our clients occupied the first two floors of this Manhattan townhouse, converted to condos with coveted access to the outdoors via a patio. The overall space had been well-maintained, but was dated and didn't necessarily reflect the aesthetic of our clients. Our goal was to brighten the home with character alongside modern elements.
In addition to a full kitchen renovation, this Manhattan townhouse renovation included installing new flooring; retiling and installing new fixtures in the bathroom and powder room; painting the walls; updating the staircase; renovating all the doors, including closets and to the back patio; and installing new lighting fixtures.
EYE-CATCHING KITCHEN
The kitchen in this Manhattan townhouse renovation is a galley-style space attached to the dining room. We wanted to connect the two in a more cohesive manner, so we built custom banquette seating benches in the dining room, with the table in the center acting as both a connector and divider.
Light wainscoting on the base of the walls and wallpaper above contrast against the bright orange benches and ultra-modern light fixture. Gray Shaker-style cabinets and a true herringbone backsplash are paired with a farmhouse sink set in white quartz countertops for a contemporary take on farmhouse style.
TOWNHOUSE CHARACTER
For the aesthetic in this Manhattan townhouse, we combined elements of a variety of design styles: farmhouse in the kitchen, transitional in the bathroom, touches of modern throughout. But the one factor shared by all is the charm of character. Retaining and refining that classic character was important to our clients.
Our extensive experience in renovating townhouses and brownstones in New York, including our gut renovation of this landmarked townhome in Hudson Square and this brownstone in Bed-Stuy, we were able to provide our clients with the confidence and clarity needed when entering these types of highly specific renovation projects.
SOME HIGHLIGHTS
- New select white oak flooring throughout
- White gloss penny tiles and black grout in the powder room
- Wraparound built-in banquette seating in the dining room
- Newly exposed brick wall in hallway leading out to patio, painted white for fresh contrast
Thinking about renovating your townhouse? We are a design-and-build firm with a full-scale approach that handles every single aspect of your townhouse renovation, from filing permits to sourcing materials and everything in between. Contact us today to find out how you can benefit from our expertise in remodeling New York City townhomes and brownstones.
 Tile Doctor Ltd
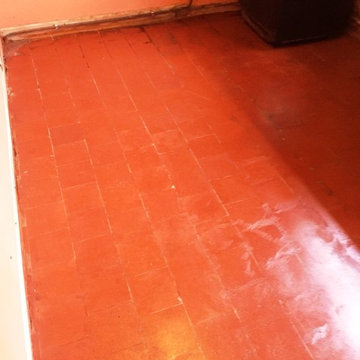
It’s been my experience that it’s not un-common to discover fantastic tiled floors hidden underneath an additional layer of flooring usually carpet or linoleum. This was the case with this property, situated in the town of Canley, Coventry, where the owner had found a Quarry tiled floor underneath Vinyl tiles which had been stuck down using an adhesive.
Quarry tiles are typically hard wearing and very durable and a sensible choice for flooring in high traffic areas of both residential and commercial properties, a tiled floor is of course a difficult to remove so it’s not surprising that tiles do get covered over rather than replaced during redecoration.
Taste’s change and like most property owners who unearth hidden tiled floors, my client was keen to restore them as an original feature. Despite the amount of adhesive and the poor state of the Quarry tiles, I was confident that the floor could be restored to new, so we agreed a date for me to come back to the property and complete the work.
The process of cleaning the Quarry tiled floor – including remove large amounts of adhesive – took a total of two days to complete.
I started by carefully removing the Vinyl tiles using a hand scraper which as you can imagine was a lot of manual effort and the adhesive proved quite difficult to remove. In the end I had to use a combination of a very coarse 50 grit pad fitted to a heavy rotary machine lubricated with water, to clear the area completely of the substance.
The resulting slurry was rinsed away, and the floor was then given a thorough acid rinse with Tile Doctor Grout Clean-Up. Grout Clean-Up is a cleaner which contains concentrated phosphoric acid, and is designed to dissolve minerals such as salts and cement left on the surface of the tile.
This was followed by a final thorough rinse with water, and the excess moisture was soaked up with a wet-vac machine.
After the cleaning process was complete, I left the floor to dry off completely for 24 hours. Upon my return to the house the next day, I checked for any dampness that could have damaged the performance of the sealer, thankfully, the floor was dry and ready to seal, and so I proceeded to apply several coats of Tile Doctor Seal & Go Extra.
Seal & Go Extra is a fully breathable sealer that provides for effective moisture transmission. It provides durable surface protection against dirt and stains, and is suitable for most kinds of internal, natural stone tiled floors, including Quarry, Victorian and Flagstone.
As you can see from the photographs the Quarry tiles came out really well and it’s hard to believe that this is the same floor.
Mick Gayton
Warwickshire Tile Doctor
 Gallery KBNY
Our clients occupied the first two floors of this Manhattan townhouse, converted to condos with coveted access to the outdoors via a patio. The overall space had been well-maintained, but was dated and didn't necessarily reflect the aesthetic of our clients. Our goal was to brighten the home with character alongside modern elements.
In addition to a full kitchen renovation, this Manhattan townhouse renovation included installing new flooring; retiling and installing new fixtures in the bathroom and powder room; painting the walls; updating the staircase; renovating all the doors, including closets and to the back patio; and installing new lighting fixtures.
EYE-CATCHING KITCHEN
The kitchen in this Manhattan townhouse renovation is a galley-style space attached to the dining room. We wanted to connect the two in a more cohesive manner, so we built custom banquette seating benches in the dining room, with the table in the center acting as both a connector and divider.
Light wainscoting on the base of the walls and wallpaper above contrast against the bright orange benches and ultra-modern light fixture. Gray Shaker-style cabinets and a true herringbone backsplash are paired with a farmhouse sink set in white quartz countertops for a contemporary take on farmhouse style.
TOWNHOUSE CHARACTER
For the aesthetic in this Manhattan townhouse, we combined elements of a variety of design styles: farmhouse in the kitchen, transitional in the bathroom, touches of modern throughout. But the one factor shared by all is the charm of character. Retaining and refining that classic character was important to our clients.
Our extensive experience in renovating townhouses and brownstones in New York, including our gut renovation of this landmarked townhome in Hudson Square and this brownstone in Bed-Stuy, we were able to provide our clients with the confidence and clarity needed when entering these types of highly specific renovation projects.
SOME HIGHLIGHTS
- New select white oak flooring throughout
- White gloss penny tiles and black grout in the powder room
- Wraparound built-in banquette seating in the dining room
- Newly exposed brick wall in hallway leading out to patio, painted white for fresh contrast
Thinking about renovating your townhouse? We are a design-and-build firm with a full-scale approach that handles every single aspect of your townhouse renovation, from filing permits to sourcing materials and everything in between. Contact us today to find out how you can benefit from our expertise in remodeling New York City townhomes and brownstones.
 Tile Doctor Ltd
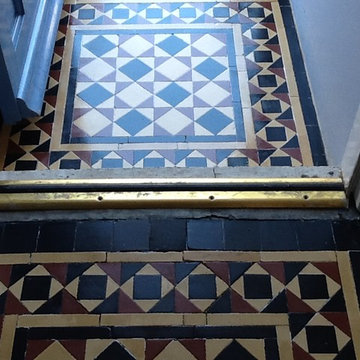
When you discover an old Victorian tiled floor underneath carpet, the first question that will probably pop into your mind is: can it be restored?
The answer, in the majority of cases, is yes. In fact, Tile Doctor has completed hundreds of Victorian tiled floor restorations. Victorian tiles have a timeless quality about them and are still popular for residential use even in the twenty first century.
What you can usually expect upon lifting your carpet is for the tiles to be covered in carpet adhesives and grippers, as was the case with this particular example of a Victorian Tiles hallway floor at a property in Bedford. Sometimes you might also find paint splashes or other staining left over from decoration work. And, of course, the tiles will be dirty and in much need of a deep clean. These issues spoil the original appearance of the tiles, but with the right methods and products, a complete restoration can be achieved quickly and cost-effectively.
My first task upon arriving at the proper was to carry out a site survey to address the condition of the tiles, before running a quick test clean on a small area of the floor. The result was good and so I was confident that I could achieve a high-quality restoration for the client.
A quote was issued and accepted, and the work was booked in at a date that was convenient for the customer.
Returning to the property, my first course of action was to mix a strong dilution of Tile Doctor Pro Clean, which is a powerful alkaline cleaner safe to use on natural stone, with hot water. This cleaning solution was sprayed along all edges of the floor loosen the glue securing the carpet grippers. I then successfully removed the adhesive carefully using handheld tools to avoid damaging any tiles.
Once this was done, I applied Tile Doctor Remove and Go, scrubbing it into the tiles with a rotary machine. This product is designed to remove heavy soiling, paint splashes and old waxes and sealers. The soiled solution was then extracted using a wet vacuum and stubborn areas re-treated until I was satisfied the floor was clean.
The entire floor was then given a thorough rinse with water to remove any trace of cleaning products and extracted using a wet vax machine.
The floor was allowed to dry for several days before I was able to return to seal the tiles. It’s always important to leave significant time for the floor to dry because any moisture left over can impact the performance of the sealer.
The choice of sealer was Tile Doctor Seal and Go Extra, which provides robust protection against dirt and stains, with a light sheen finish. I chose this sealer not only because the customer wanted a light sheen finish, but also because this particular sealer is fully breathable. Dampness can sometimes be an issue with old Victorian and Quarry tiles which were installed before damp proof membranes became standard.
The transformation achieved within the space of a week was quite incredible and the colours in the tile have really come through.
Another satisfied customer!
David Vissian
Bedfordshire Tile Doctor
 Tile Doctor Ltd
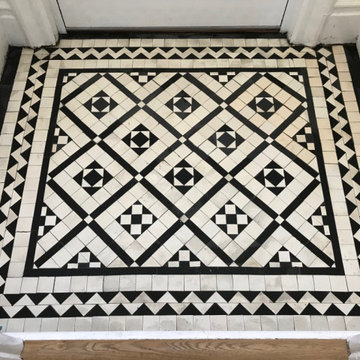
I visited this property in Lytham St Annes to survey a small Victorian tiled lobby which was in a sorry state. The client was keen to have it restored and wanted to know if it was possible. I discussed with them what we could do, and I gave them a quote for the work. Although it was only a small lobby, I could see the job could be quite involved and would be subject to the replacement tiles which I was confident we could source.
This is one of those jobs you wish you hadn’t started as there were a lot more tiles to remove than anticipated and it mushroomed into replacing half the floor. Once the area was cleaned up, I applied a self-levelling compound to bring up the height of the base.
Once the levelling compound had set, I was able relay the Victorian tiles using a combination of original tiles and replacements which had to be cut to shape. Cutting tiles to fit is quite intricate and time-consuming work especially when you consider new tiles are all metric in size and a 2mm difference becomes very telling after a foot or so! My solution was to use 150 mm tiles which are the biggest the stockist offers and then cut them down on my Rubi cutter using a template made from the original tiles. This the only way I could get it to look tight, it takes longer but it makes for a thorough job and a better finish.
I always use flexible floor adhesive when laying tiles, my preference is Keraquick Grey from Mapei. There are other brands off course but this one is quite easy to get hold of and as the term grouting is a relatively modern invention (in the past it was called pointing ) I find it looks right with this type of tile and similar to the screed cement the Victorians used in the past.
After the tiling had been completed, I left the floor to cure and fully dry and returned at a later date to give the floor an overall clean. For this I ran a coarse 200-grit diamond floor pad across the floor lubricated with water and used handheld diamond blocks for the edges where the pad can’t reach. The slurry was rinsed off with water and extracted with a wet vacuum.
With old floors like this, which don’t have a damp-proof membrane installed under the floor, efflorescence is always a concern and can lead to white salts appearing on the surface of the tile as moisture rises through the floor. To counter this, I finished cleaning the floor by scrubbing it with Tile Doctor Acid Gel. This was then rinsed off with water and the soil extracted using a wet vacuum.
The client was happy to seal the floor themselves (they wanted to save some money and it wasn’t a big area) so I supplied them with a bottle of Tile Doctor Colour Grow. I recommended this sealer as it will enhance the dark colours and being fully breathable it will cope with any moisture rising through the base. I recommended they apply two coats to start leaving time to allow the first coast to dry they could also then decide to leave it at that if they were happy with the finish.
Russell Taylor
Lancashire Tile Doctor

 Tile Doctor Ltd
Shower and bathroom mould and soap scum growth are probably the most common, annoying and frustrating tile-related problems. Wet and high humidity areas with poor ventilation provide the perfect breeding ground for mould and stains. Soap residue and body oils also create a food source for soap scum, mould to grow.
My customer in Dane Bank had the exact problem with dirty and mouldy grout lines in her shower cubicle. She had tried scrubbing the grout lines herself with a toothbrush and standard supermarket cleaners but never got the result she wanted.
Fortunately she was lucky to find Tile Doctor from the internet and I was asked to pop over and take a look to see what could be done. I was confident we could make a big difference so I went through the options with her and give her price for the job. She was happy with the price and we agreed a date for me to return and complete the work.
For grout lines cleaning I used Tile Doctor Grout Colorant Pre-Treat Cleaner, which successfully removes dirt, soil, soap scum and hard water deposits from grout joints. The product was sprayed on to the grout and left to dwell and seep into the pores for approximately five minutes to break down the soap scum and dirt before being scrubbed in using a stiff grout brush. The cleaning was successful but there were still few mouldy spots left. On these spots I used Tile Doctor Mould Away Spray that is meant for quick removal of mould from grout and silicone. One again product got sprayed on grout lines and left to dwell for five minutes and then scrubbed with stiff grout brush and then rinsed with clean water. After I had finished cleaning I express dried the tile and grout using high power heat gun.
With the area nice and dry, I had to choose the matching colour for the existing grout. There are ten colours to choose from the Tile Doctor range of Grout Colourant and on this occasion we chose Limestone as the best colour to match the tile.
The colourant is easily applied directly to the grout and in this case I applied two coats. The product is epoxy based and completely seals and rejuvenates the appearance of the grout, which not only drastically improves appearance it also makes it much easier to clean in the future. After applying the re-colourant I buffed all grout colorant excess off the tiles and the shower cubicle was ready.
My customer was very satisfied with the work and left the following comment on the Tile Doctor Feedback system
“Really, really happy with the service Tony provided and the recommendations he suggested. The work was carried out in a highly professional manner, to a high standard. I have already recommended him to friends. Thank you”
Tony Olmet
Greater Manchester Tile Doctor

 Miramar Kitchen and Bath
Alcove shower - small contemporary 3/4 gray tile and glass tile porcelain tile alcove shower idea in San Diego with a pedestal sink, a two-piece toilet and beige walls

 DKOR Interiors Inc.- Interior Designers Miami, FL
Miami Interior Designers - Residential Interior Design Project in Fort Lauderdale, FL. A classic Mediterranean home turns Contemporary by DKOR Interiors.
Photo: Alexia Fodere
Interior Design by Miami and Ft. Lauderdale Interior Designers, DKOR Interiors.
www.dkorinteriors.com
 Tile Doctor Ltd
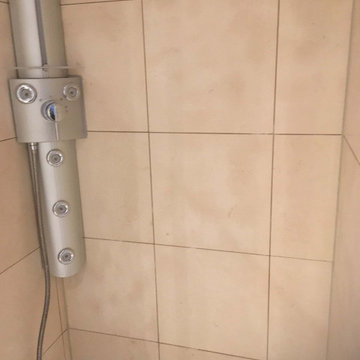
I was asked to look at renovating a shower cubicle at a property in in Manchester city centre that had been clad in White Limestone tiles. I understood the bathroom had been installed 12 years prior, but now the tiles were looking grubby, mouldy and dirty.
The client had lived at the property for the last two years and in an attempt to resolve the problems had used a few different household products such as flash and bleach, they had tried everything, and nothing had helped. I suspected that these strong acidic cleaners had actually made the problem worse by stripping off what was left of the sealer that was protecting the Limestone, allowing dirt to become ingrained in the stone.
I visited the property and ran a few cleaning tests in the shower cubicle with Tile Doctor products. This allows me to see which product will have the best results and gives the customer confidence that we can resolve their issues. The results were immediate, they could see the difference and they were happy to accept my quote and agree a date for my return to complete the work.
I arrived several weeks later and made a start. The tiles were scrubbed by hand with a strong dilution of Tile Doctor Remove and Go with excellent results. This product is designed to remove coatings and sealers, and in this case, it did a great job of drawing out the ingrained stains and dirt build-up. This removed what was left of the sealer and took off most of the dirt and mould. The Limestone tiles and grout were then rinsed with water to remove the soil.
Next I needed to restore the smooth surface of the limestone which had been etched by the use of strong acidic cleaning products. To do this I used a set of six-inch diamond burnishing pads attached to a hand buffer to hone and restore the stone.
I then dried the shower tiles and grout with a heat gun checking the moisture levels with damp meter until I was satisfied it was completely dry.
The last step was to re-seal the Limestone and Grout using a couple of coats of Tile Doctor Colour Grow. This is natural coloured intensifying sealer which provides durable protection to the surface allowing it to breathe and enhancing the colours.
The Customer was amazed with the difference and left the following feedback!
“Kamila was friendly, professional and kept me informed about what to expect before she took on the job and during the tile cleaning. The tiles look absolutely amazing after her work – I feel as though I have a brand new bathroom! Kamila also gave me helpful tips on looking after limestone tiles. I can’t recommend her highly enough.”
For future cleaning I recommended the use of Tile Doctor Aqua-Pro which is a pH neutral shower tile cleaner designed for use on sealed surfaces. Most cleaning products you find in supermarkets are overly strong and will erode the sealer prematurely, so when choosing a cleaning product always read the label and make sure it’s safe to use on Sealed Stone tiles.
Alex Logonzy
Greater Manchester Tile Doctor
 Dwellify
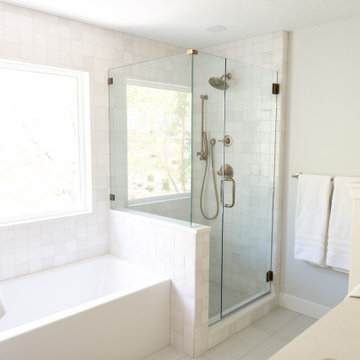
In this primary bathroom remodel, a once uninspiring space was completely transformed into a fresh and modern bathroom that excelled in both aesthetics and functionality. To achieve this, the room was opened up by removing parts of the walls surrounding the shower and toilet. The introduction of a half pony wall struck a perfect balance, offering privacy while allowing light to flow freely throughout the room. Unique and stylish tiles were meticulously chosen for the shower and bathtub, injecting a sense of intentionality into the overall design. A beautiful new vanity became the centerpiece, complemented by a large mirror and new vanity lighting to complete the look. The addition of gold fixtures throughout the room added a touch of luxury, elevating the bathroom into a space that marries both form and function seamlessly.
 Tile Doctor Ltd
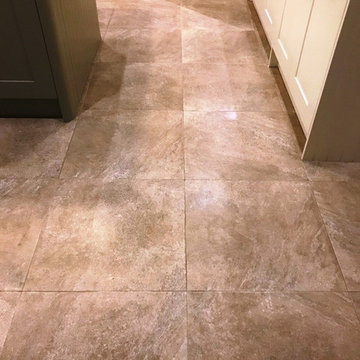
This request came from a client who lives in the Newcastle district of Jesmond who was unhappy with the appearance of their Textured Porcelain floor tiles. The problem was that the Porcelain Tiles were grouted in whilst the underfloor heating was switched on. This resulted in the grout drying out quicker than expected and the tiler struggled to get the excess grout off the tiles. To rectify the problem, the tiler tried to get the dried grout off with acid, but it didn’t work, and the floor was left looking dark and dull. Unable to rectify the problem the client was left with a disappointing pale floor and had searched around the internet for a solution.
Normally grout smears like these (aka Grout Haze) can be removed with an acidic product and Tile Doctor sell Grout Clean-up specially for this purpose. However, some grouts contain acid resistant polymers which need to broken down first. Fortunately, we have a solution for everything tile related and the system we use does not affect the main grout lines only the excess grout. I called in to do a site visit and having surveyed the problem I was confident it could resolved, I gave them a price for the work and agreed a date to return to do the job.
My first task was to spray the tiles with Tile Doctor Remove and Go, this was left to soak into the tile for around ten minutes before being scrubbed in. Remove and Go is a coatings remover that is safe to use on tile and grout; normally we use it to remove old sealers but in this case I applied it to break down the polymers. To work the product into the tile I use a buffing machine fitted with a black scrubbing pad, the mechanical advantage this gives makes the job a lot quicker. Then the slurry generated is rinsed off with water and removed with a wet vacuum. The floor was then left to dry for 30 minutes.
We were then able to remove the excess grout which was done by applying Tile Doctor Grout Clean-Up which I mentioned earlier. The process was the same, i.e. using the buffing machine and a wet vacuum to scrub the floor and extract the soil. The floor was rinsed with water to remove any trace of the products used and dried as much as possible using the wet vacuum. The underfloor heating really helped at this point to dry out the floor.
Once the floor was fully dry including the grout lines a single thin coat of Tile Doctor Colour Grow sealer was applied. The tiles were textured porcelain, so the dirt gets trapped into the textured surface if it is not sealed. We usually find one coat of Tile Doctor Colour Grow is more than enough for this, anything that hadn’t soaked in after three to five minutes was then polished off with clean dry cloths.
The client was very happy with the floor and pleased that the excess grout had been cleaned up and the floor looked as it should. Before leaving I recommended the use a pH Neutral tile cleaner for general cleaning such as Tile Doctor Neutral Tile Cleaner. There is no point sealing the tiles only to have it stripped off later with the use of a bleach based cleaner.
Raf Barrett
Tyneside Tile Doctor
 Teness Herman
Photo: Teness Herman © 2015 Houzz
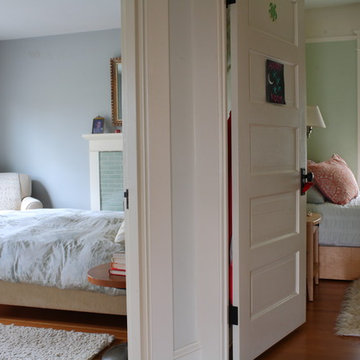
Home design - eclectic home design idea in Los Angeles
Home design - eclectic home design idea in Los Angeles

 Village Home Stores
Full-overlay Rustic Beech cabinets in the "Charleston" door style and "Briarwood" finish.
Village Home Stores
Example of a large mountain style kitchen design in Chicago
Example of a large mountain style kitchen design in Chicago

 Renovisions
These Hanover, MA clients came to Renovisions as they wanted a local design-build company to rework and expand their small and outdated 1980’s colonial kitchen.
We collaborated and created an expanded 12’x15’ addition space to accommodate a newly designed kitchen which is now 21’x15’. Before we began with the construction process, proper structural engineering presented a challenge as the property was built on ledge. As expected, we determined that several concrete supports were necessary and needed to be built to support the expanded structure.
Our plan included both creative aesthetic and functional layout modifications to transform this ordinary kitchen into a spacious, well-lit, highly functional, stylish and welcoming space to cook, gather and entertain. The bump-out allowed for more functional cabinetry and a dining table which before was placed in a corner of the previous cramped kitchen. Now, there is a wide open space from the adjacent living room and a clear path to a 5’ French door opening to the pool deck. The homeowners also elected for us to extend a new roof over their existing deck creating a nice shaded space to entertain guests.
The island, which serves as the central gathering spot. is eye catching with contrasting dark cocoa colored cabinets and stunning natural looking Cambria quartz countertops. Large, easily accessible deep drawers provide much needed storage for pots, pans and lids as well as expansive countertop space for everyday prep and family get-togethers.
Overall, the clients were thrilled with their Renovision and cannot wait to throw a party to show off their stunning kitchen.
“There is not a single choice we aren’t happy with; it is so us! I love all of the storage and I have a feeling we are going to do a lot of entertaining this summer.”
“Dear Cathy and Ed, We are abundantly grateful for the entire Renovisions Team that have provided us with a beautiful kitchen and porch to enjoy. We will continue to make family memories for many years to come with this new addition. From the first time we met with you at the showroom, we were confident that high quality workmanship would go into our new construction. Mike, Brad, and Tom were very trustworthy and worked very hard every day they were on the job site. They were very flexible and always put the homeowners safety first. They even offered a bit of comic relief! Every night the site was cleaned meticulously, never leaving tools or sharp edges of any sort in the open space. We were also very pleased with the help offered when designing and choosing cabinets, tile and other finishes. Liz was always very helpful and patient to answer questions when we came by the showroom. We are extremely pleased with all the choices and on a daily basis we enjoy the warmth and amazing space it provides.
We recently hosted a retirement party for 70 people and it never felt crowed! We relax under the covered porch in the morning for coffee, the afternoon for lunch and to watch the grandkids in the pool. And of course in the evening while we read or catch up on emails. It is an amazing space! Thank you all again, for your hard work and passion for your craftsmanship. We will be in touch soon to set up a date for you all to drop by to see the finishing touches and to enjoy refreshments.”
- Paul & Beth H. (Hanover)
 Renovisions
These Hanover, MA clients came to Renovisions as they wanted a local design-build company to rework and expand their small and outdated 1980’s colonial kitchen.
We collaborated and created an expanded 12’x15’ addition space to accommodate a newly designed kitchen which is now 21’x15’. Before we began with the construction process, proper structural engineering presented a challenge as the property was built on ledge. As expected, we determined that several concrete supports were necessary and needed to be built to support the expanded structure.
Our plan included both creative aesthetic and functional layout modifications to transform this ordinary kitchen into a spacious, well-lit, highly functional, stylish and welcoming space to cook, gather and entertain. The bump-out allowed for more functional cabinetry and a dining table which before was placed in a corner of the previous cramped kitchen. Now, there is a wide open space from the adjacent living room and a clear path to a 5’ French door opening to the pool deck. The homeowners also elected for us to extend a new roof over their existing deck creating a nice shaded space to entertain guests.
The island, which serves as the central gathering spot. is eye catching with contrasting dark cocoa colored cabinets and stunning natural looking Cambria quartz countertops. Large, easily accessible deep drawers provide much needed storage for pots, pans and lids as well as expansive countertop space for everyday prep and family get-togethers.
Overall, the clients were thrilled with their Renovision and cannot wait to throw a party to show off their stunning kitchen.
“There is not a single choice we aren’t happy with; it is so us! I love all of the storage and I have a feeling we are going to do a lot of entertaining this summer.”
“Dear Cathy and Ed, We are abundantly grateful for the entire Renovisions Team that have provided us with a beautiful kitchen and porch to enjoy. We will continue to make family memories for many years to come with this new addition. From the first time we met with you at the showroom, we were confident that high quality workmanship would go into our new construction. Mike, Brad, and Tom were very trustworthy and worked very hard every day they were on the job site. They were very flexible and always put the homeowners safety first. They even offered a bit of comic relief! Every night the site was cleaned meticulously, never leaving tools or sharp edges of any sort in the open space. We were also very pleased with the help offered when designing and choosing cabinets, tile and other finishes. Liz was always very helpful and patient to answer questions when we came by the showroom. We are extremely pleased with all the choices and on a daily basis we enjoy the warmth and amazing space it provides.
We recently hosted a retirement party for 70 people and it never felt crowed! We relax under the covered porch in the morning for coffee, the afternoon for lunch and to watch the grandkids in the pool. And of course in the evening while we read or catch up on emails. It is an amazing space! Thank you all again, for your hard work and passion for your craftsmanship. We will be in touch soon to set up a date for you all to drop by to see the finishing touches and to enjoy refreshments.”
- Paul & Beth H. (Hanover)
 Renovisions
These Hanover, MA clients came to Renovisions as they wanted a local design-build company to rework and expand their small and outdated 1980’s colonial kitchen.
We collaborated and created an expanded 12’x15’ addition space to accommodate a newly designed kitchen which is now 21’x15’. Before we began with the construction process, proper structural engineering presented a challenge as the property was built on ledge. As expected, we determined that several concrete supports were necessary and needed to be built to support the expanded structure.
Our plan included both creative aesthetic and functional layout modifications to transform this ordinary kitchen into a spacious, well-lit, highly functional, stylish and welcoming space to cook, gather and entertain. The bump-out allowed for more functional cabinetry and a dining table which before was placed in a corner of the previous cramped kitchen. Now, there is a wide open space from the adjacent living room and a clear path to a 5’ French door opening to the pool deck. The homeowners also elected for us to extend a new roof over their existing deck creating a nice shaded space to entertain guests.
The island, which serves as the central gathering spot. is eye catching with contrasting dark cocoa colored cabinets and stunning natural looking Cambria quartz countertops. Large, easily accessible deep drawers provide much needed storage for pots, pans and lids as well as expansive countertop space for everyday prep and family get-togethers.
Overall, the clients were thrilled with their Renovision and cannot wait to throw a party to show off their stunning kitchen.
“There is not a single choice we aren’t happy with; it is so us! I love all of the storage and I have a feeling we are going to do a lot of entertaining this summer.”
“Dear Cathy and Ed, We are abundantly grateful for the entire Renovisions Team that have provided us with a beautiful kitchen and porch to enjoy. We will continue to make family memories for many years to come with this new addition. From the first time we met with you at the showroom, we were confident that high quality workmanship would go into our new construction. Mike, Brad, and Tom were very trustworthy and worked very hard every day they were on the job site. They were very flexible and always put the homeowners safety first. They even offered a bit of comic relief! Every night the site was cleaned meticulously, never leaving tools or sharp edges of any sort in the open space. We were also very pleased with the help offered when designing and choosing cabinets, tile and other finishes. Liz was always very helpful and patient to answer questions when we came by the showroom. We are extremely pleased with all the choices and on a daily basis we enjoy the warmth and amazing space it provides.
We recently hosted a retirement party for 70 people and it never felt crowed! We relax under the covered porch in the morning for coffee, the afternoon for lunch and to watch the grandkids in the pool. And of course in the evening while we read or catch up on emails. It is an amazing space! Thank you all again, for your hard work and passion for your craftsmanship. We will be in touch soon to set up a date for you all to drop by to see the finishing touches and to enjoy refreshments.”
- Paul & Beth H. (Hanover)
15