
Search results for "Determinant character" in Home Design Ideas

 Flooret
Natural Oak. There are times and places where the simple, clean look of natural oak is all that is needed. Parkhurst captures a natural oak pattern, in what might be called a “classic grade” (not too much character, but some color variation).
REDEFINING DURABILITY
The most important specification for determining the durability of vinyl flooring is the thickness of the wear-layer. The best wear-layers are made of thick, clear virgin PVC, which covers the paper print-film that gives the floor its unique appearance. Once the wear-layer wears through, the paper is damaged and the floor will need replacement.
Most vinyl floors come with a 8-12 mil wear-layer (0.2-3 mm). The top commercial specs in the industry are higher, at 20-22 mil (0.5 mm). A select few manufacturers offer a “super” commercial spec of 28 mil (0.7 mm).
For Modin, we decided to set a new standard: 40 mil (1.0 mm) of premium virgin PVC. This allows us to offer an industry-leading 20 year Commercial Warranty (Lifetime Residential), compared to nearly all other commercial vinyl floors’ 10 year Commercial Warranty.
Beyond our superior wear-layer, we also use a patented click mechanism for superior hold, and a ceramic-bead coating.
SIZE MATTERS
Wider and longer planks create a sense of space and luxury. Most vinyl floors come in 6” or 7” widths, and 36” or 48” lengths.
For Modin, we designed our planks to be 9” wide, and 60” long. This extra large size allows our gorgeous designs to be fully expressed.
DETAILS THAT COUNT
We made sure to get all the details right. Real texture, to create the feel of wire-brushed wood. Low sheen level, to ensure a natural look that wears well over time. 4-sided bevels, to more accurately emulate the look of real planks. When added together they help create the unique look that is Modin.
DESIGNS THAT INSPIRE
We spent nearly a year just focusing on our designs, to ensure they provide the right mix of color and depth. Focusing on timeless wire-brush and European Oak styles, as well as more contemporary modern washes, our collection offers truly beautiful design that is both functional and inspiring.

 Dianne Davant and Associates
Master Bedroom with Red Bed Frame and custom drapery and bedding.
Bedroom - traditional master light wood floor bedroom idea in Charlotte
Bedroom - traditional master light wood floor bedroom idea in Charlotte

 Highland Builders LLC
Powder room with glam geometric wallpaper complimented with a vessel sink rustic vanity with riveted hardware. Counter top is quartz Viatera - Truffle. Mirror framed wall mirror.
Ryan Hainey
Find the right local pro for your project


 Rodela
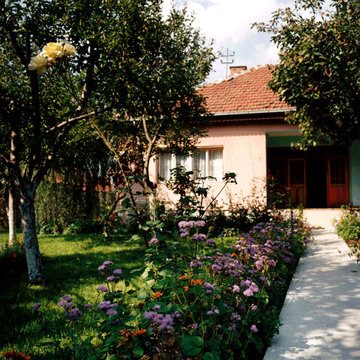
Better Homes & Gardens landscaping software is very user-friendly, which means you’ll be creating the moment you load the software onto your computer. You merely tell the software what kind of dimensions you’re working with and then you can play around with the options available by the software program. For instance, with the click of a mouse, you can add a bush here, a rose garden there, or you can even put in a little man-made pond, the choices are all up to you. Playing with the different options available is all part of the fun. Of course, the best part is when your vision is actually realized and when you finally get the yard you’ve always wanted.
In choosing a home and garden decor, first, you have to know what you want and what style you are looking for. One way of determining which décor to buy is by setting a theme for your garden. Thin about what you would like your garden to look like — what accessories you would like to see, and what plants and trees you’d like to add. Here are some of the theme ideas that you can incorporate with your home and garden decor: butterfly, temple, sundial, Japanese, water, winter, and jungle.
Home furnishing:
As any professional interior decorator will tell you, each room within the house has a certain function and a certain character. It is necessary to recognize this innate character before one can go about furnishing the room appropriately. Indoor decor leans heavily on the right use of color, lighting, and furnishing. For instance, the role of curtains, decorative rugs, objects of art and other decorative materials must be complimentary. Every object within the room must contribute seamlessly to the total effect.
Garden furnishing:
The garden is typically the extension of the home. It is where we seek to establish an instant connect with nature. For many, it is the place dedicated to the pleasure of cultivation and abundant growth. Even homes in urban areas where garden space is limited make the effort to transform the garden into a haven of sorts.
The use of unusual, whimsical and colorful furniture and objects of art can transform the garden into something that is out of a fairytale book. For example, whimsically designed benches and tables are available in the most stunning colors. These pieces of furniture greatly add to the appeal of the garden. In addition to this, pieces of art may be strategically scattered around the garden to make it colorful and beautiful. By adding these pieces of art to your garden space, it is possible to achieve the perfect balance between beauty and utility that characterizes great outdoor spaces.
When you want to landscape your yard, you typically hire someone to come out and give you a quote. However, what if you could do it all yourself with Better Homes & Gardens landscaping software? You’re probably thinking that you don’t have the artistic ability, or the know how to landscape your yard yourself. However, with Better Homes & Gardens landscaping software, you don’t need to be artistically inclined, nor do you need any knowledge of how to landscape a house or yard. All you need is a computer, a mouse, and a little time and a lot of imagination. With Better Homes & Gardens landscaping software, the sky’s the limit as far as what you can create, not to mention it’s a lot of fun to create the yard you want.
 Windy City Painters
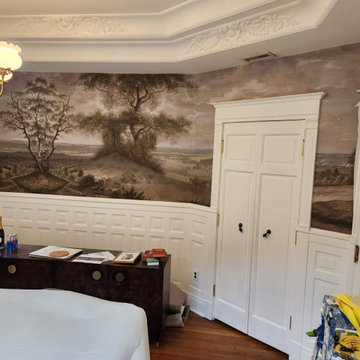
Professional wallpaper installation Old Town requires expertise that honors the neighborhood's historic character while delivering modern durability and beauty.
Project Overview and Architecture
This Old Town wallpaper installation showcased our ability to work with the area's distinctive architecture, from classic greystones to renovated vintage condos that define this prestigious neighborhood.
Materials and Products
We selected premium wallpaper materials specifically designed for Chicago's climate conditions, using high-quality adhesives and primers that ensure long-lasting adhesion on various surface types.
Installation Process
Step 1: Surface preparation including cleaning, smoothing, and addressing imperfections common in older buildings
Step 2: Professional repairs to walls ensuring perfect foundation for wallpaper application
Step 3: Quality primer application designed specifically for wallpaper adhesion and longevity
Step 4: Expert wallpaper installation with precise pattern matching and seamless application techniques
Chicago-Specific Challenges
Old Town homes present unique challenges including weather exposure, aging building materials, potential lead paint considerations, and vintage surfaces requiring specialized preparation techniques.
Results Achieved
Windy City Painters delivered flawless wallpaper installation that enhanced the room's aesthetic while respecting the architectural integrity of this historic Old Town property.
Professional Tips
Homeowners should always hire experienced professionals for wallpaper installation, especially in historic properties where surface preparation and material selection significantly impact long-term success and beauty.
See more work and request free estimate at windypainters.com.
FAQs
Q: Why hire professionals for wallpaper installation Old Town homes? / A: Expert installation prevents costly mistakes, ensures proper adhesion, and preserves historic property values through quality craftsmanship.
Q: What wallpaper materials work best in Chicago climate? / A: High-quality papers with proper backing designed for humidity fluctuations and temperature changes typical in Chicago homes.
Q: How do you prepare Old Town walls for wallpaper? / A: Thorough cleaning, surface smoothing, repairs, and specialized primers ensure optimal wallpaper installation adhesion and longevity.
Q: Can wallpaper be installed over existing paint? / A: Sometimes, but professional assessment determines if surface preparation or primer application is needed for successful wallpaper installation.
Q: How long does professional wallpaper installation take? / A: Most rooms completed within one day, depending on size, pattern complexity, and surface preparation requirements.
Q: What about removing old wallpaper first? / A: We safely remove existing wallpaper using proper techniques that protect walls and prepare surfaces for new installation.
Q: Do you offer design consultation for wallpaper selection? / A: Yes, we help choose patterns and materials that complement Old Town architectural character and personal style preferences.
Q: How do you handle pattern matching across walls? / A: Precise measurements and expert techniques ensure seamless wallpaper installation with perfect pattern alignment throughout rooms.
Q: What's your wallpaper installation warranty coverage? / A: Comprehensive warranties cover both materials and workmanship, giving you confidence in your wallpaper installation investment.
Q: Can you work around furniture and schedules? / A: Absolutely! We coordinate timing and setup to minimize disruption during your professional wallpaper installation project.
 Novu Designs
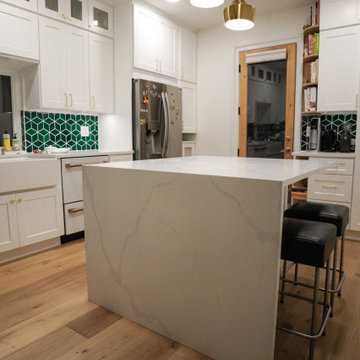
Our goal is to make your kitchen remodel as comfortable as possible. After establishing rapport with our client, we used our ingenuity to redesign and build their ideal kitchen in this stunning 10-foot-ceiling Brooklyn home. The warm tones of wood, quartz, and rich greens strike the ideal balance in creating this appealing design.
How did we achieve this look?
The Backsplash
Our client wanted a simple kitchen remodel in the shaker design, but she also wanted to include green. Initially, we proposed green cabinets to create a bold green look in the kitchen. The main objective was to incorporate our complimenting colors while keeping a feeling of lightness. After going through a number of ideas and 3D prototypes, installing as many cabinets as we could without overpowering the kitchen was our goal of optimizing space. We determined that the best way to brighten the space would be to install white shaker cabinets in addition to higher lumen recessed LED lighting. We decided that finding exquisite green backsplash tiles would be the best way to give it the desired green pop. After numerous searches, we came across a company called Mercury Mosaics.
While there were many green backsplash tiles to choose from, we opted for the mercury mosaics bluegrass diamond tiles. We loved these tiles because its created an illusion of cubes but at times, diamonds. The pattern is an art of illusion and its really gave us the personality we were looking for.
The Flooring of Choice
The flooring of choice was made by our client. We wanted the floors to feel soft and natural while capturing every bit of warmth to balance the whites and the greens and bring them together. While we could’ve opted for wood look tiles or luxury vinyl plank flooring, we ended up going with a premium slightly distressed white oak engineered hardwood flooring from Floor and Decor.
Accents
Although the flooring and the backsplash brought most of the kitchen together, we were still missing the cherry on top. The hardware and maybe something else?
We decided on thin profiled brushed brass hardware to give us that luxurious feel we were looking for every time we opened the cabinet. The cherry on top for us were the hand made quarter round oak shelves which really tied in the floors and cabinets together and gave us that final pop we were looking for. It truly added the perfect character for our client who is also a teen-fiction author of multiple books.
 Story Homes
A few years ago, the owners added two stories with finished basement to their Edina home. It was a big project that greatly expanded and enhanced the first-floor kitchen, dining room and living room. The project also added a second-floor bedroom/home office.
Their home has another two bedrooms and ¾ bath on the first floor, plus a beautiful master bedroom and ¾ bath on the second floor which they’ve been using for years.
Looking into the future they began to consider aging in place: What living on one floor might look like. They determined that the only thing that needed attention was the first-floor bath – it was pretty dated. So, they built their dream bath. They began with tearing everything out, right down to the studs.
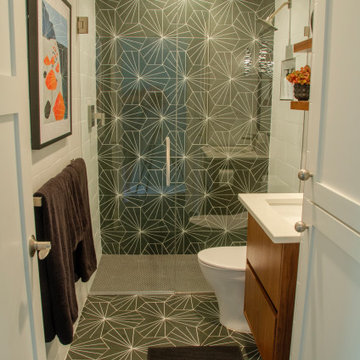
The new 5’ X 9’ ¾ bath includes a 5’ X 3’ walk-in glass enclosed shower, with a twist. The shower control has been moved from the typical location (just below the shower head) to the opposite wall, just inside the shower door. This allows one to turn on the shower and wait for it to get hot without having to step into the shower and then just stand there and get wet with cold water. A small detail that has proven to be a good idea.
The shower floor is made using 3/4" x 3/4" Penny round matte Porcelain mosaic tile set in charcoal grout. The back shower wall and the remaining bathroom floor is constructed with Aster 9" x 10" hexagon glazed Porcelain patterned wall & floor tile. Hexagonal tile adds an unusual feature that establishes a unique, interesting, repeated design.
The main bath’s walls feature white matt finish 6" x 18" ceramic Subway Wall tile in white grout.
A TOTO center flushing toilet looks great on the dark hexagonal floor tile.
The custom vanity features a walnut base with white Silestone top and undermounted Kohler sink with brushed nickel fixtures.
Another interesting feature are two 3” X 6” X 18” floating Walnut shelves – just the right touch to add character to the bath without taking up too much space.
Finally, the dimmable can lighting is enhanced with two black cylinder slotted pendant lights on either side of the vanity.
This project fulfills the promise of down-the-road one floor living with an efficient, comfortable ¾ bath.
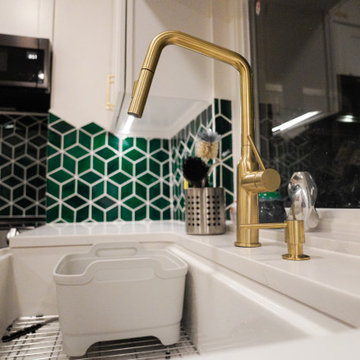 Novu Designs
Our goal is to make your kitchen remodel as comfortable as possible. After establishing rapport with our client, we used our ingenuity to redesign and build their ideal kitchen in this stunning 10-foot-ceiling Brooklyn home. The warm tones of wood, quartz, and rich greens strike the ideal balance in creating this appealing design.
How did we achieve this look?
The Backsplash
Our client wanted a simple kitchen remodel in the shaker design, but she also wanted to include green. Initially, we proposed green cabinets to create a bold green look in the kitchen. The main objective was to incorporate our complimenting colors while keeping a feeling of lightness. After going through a number of ideas and 3D prototypes, installing as many cabinets as we could without overpowering the kitchen was our goal of optimizing space. We determined that the best way to brighten the space would be to install white shaker cabinets in addition to higher lumen recessed LED lighting. We decided that finding exquisite green backsplash tiles would be the best way to give it the desired green pop. After numerous searches, we came across a company called Mercury Mosaics.
While there were many green backsplash tiles to choose from, we opted for the mercury mosaics bluegrass diamond tiles. We loved these tiles because its created an illusion of cubes but at times, diamonds. The pattern is an art of illusion and its really gave us the personality we were looking for.
The Flooring of Choice
The flooring of choice was made by our client. We wanted the floors to feel soft and natural while capturing every bit of warmth to balance the whites and the greens and bring them together. While we could’ve opted for wood look tiles or luxury vinyl plank flooring, we ended up going with a premium slightly distressed white oak engineered hardwood flooring from Floor and Decor.
Accents
Although the flooring and the backsplash brought most of the kitchen together, we were still missing the cherry on top. The hardware and maybe something else?
We decided on thin profiled brushed brass hardware to give us that luxurious feel we were looking for every time we opened the cabinet. The cherry on top for us were the hand made quarter round oak shelves which really tied in the floors and cabinets together and gave us that final pop we were looking for. It truly added the perfect character for our client who is also a teen-fiction author of multiple books.
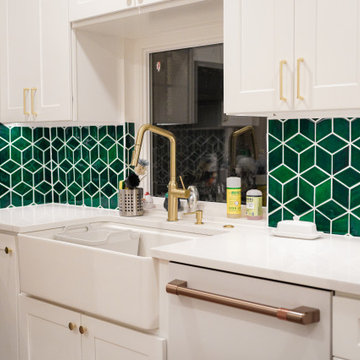 Novu Designs
Our goal is to make your kitchen remodel as comfortable as possible. After establishing rapport with our client, we used our ingenuity to redesign and build their ideal kitchen in this stunning 10-foot-ceiling Brooklyn home. The warm tones of wood, quartz, and rich greens strike the ideal balance in creating this appealing design.
How did we achieve this look?
The Backsplash
Our client wanted a simple kitchen remodel in the shaker design, but she also wanted to include green. Initially, we proposed green cabinets to create a bold green look in the kitchen. The main objective was to incorporate our complimenting colors while keeping a feeling of lightness. After going through a number of ideas and 3D prototypes, installing as many cabinets as we could without overpowering the kitchen was our goal of optimizing space. We determined that the best way to brighten the space would be to install white shaker cabinets in addition to higher lumen recessed LED lighting. We decided that finding exquisite green backsplash tiles would be the best way to give it the desired green pop. After numerous searches, we came across a company called Mercury Mosaics.
While there were many green backsplash tiles to choose from, we opted for the mercury mosaics bluegrass diamond tiles. We loved these tiles because its created an illusion of cubes but at times, diamonds. The pattern is an art of illusion and its really gave us the personality we were looking for.
The Flooring of Choice
The flooring of choice was made by our client. We wanted the floors to feel soft and natural while capturing every bit of warmth to balance the whites and the greens and bring them together. While we could’ve opted for wood look tiles or luxury vinyl plank flooring, we ended up going with a premium slightly distressed white oak engineered hardwood flooring from Floor and Decor.
Accents
Although the flooring and the backsplash brought most of the kitchen together, we were still missing the cherry on top. The hardware and maybe something else?
We decided on thin profiled brushed brass hardware to give us that luxurious feel we were looking for every time we opened the cabinet. The cherry on top for us were the hand made quarter round oak shelves which really tied in the floors and cabinets together and gave us that final pop we were looking for. It truly added the perfect character for our client who is also a teen-fiction author of multiple books.
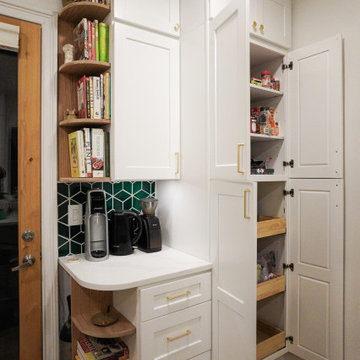 Novu Designs
Our goal is to make your kitchen remodel as comfortable as possible. After establishing rapport with our client, we used our ingenuity to redesign and build their ideal kitchen in this stunning 10-foot-ceiling Brooklyn home. The warm tones of wood, quartz, and rich greens strike the ideal balance in creating this appealing design.
How did we achieve this look?
The Backsplash
Our client wanted a simple kitchen remodel in the shaker design, but she also wanted to include green. Initially, we proposed green cabinets to create a bold green look in the kitchen. The main objective was to incorporate our complimenting colors while keeping a feeling of lightness. After going through a number of ideas and 3D prototypes, installing as many cabinets as we could without overpowering the kitchen was our goal of optimizing space. We determined that the best way to brighten the space would be to install white shaker cabinets in addition to higher lumen recessed LED lighting. We decided that finding exquisite green backsplash tiles would be the best way to give it the desired green pop. After numerous searches, we came across a company called Mercury Mosaics.
While there were many green backsplash tiles to choose from, we opted for the mercury mosaics bluegrass diamond tiles. We loved these tiles because its created an illusion of cubes but at times, diamonds. The pattern is an art of illusion and its really gave us the personality we were looking for.
The Flooring of Choice
The flooring of choice was made by our client. We wanted the floors to feel soft and natural while capturing every bit of warmth to balance the whites and the greens and bring them together. While we could’ve opted for wood look tiles or luxury vinyl plank flooring, we ended up going with a premium slightly distressed white oak engineered hardwood flooring from Floor and Decor.
Accents
Although the flooring and the backsplash brought most of the kitchen together, we were still missing the cherry on top. The hardware and maybe something else?
We decided on thin profiled brushed brass hardware to give us that luxurious feel we were looking for every time we opened the cabinet. The cherry on top for us were the hand made quarter round oak shelves which really tied in the floors and cabinets together and gave us that final pop we were looking for. It truly added the perfect character for our client who is also a teen-fiction author of multiple books.
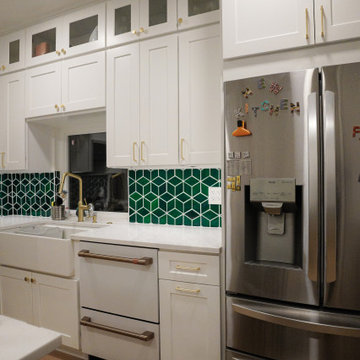 Novu Designs
Our goal is to make your kitchen remodel as comfortable as possible. After establishing rapport with our client, we used our ingenuity to redesign and build their ideal kitchen in this stunning 10-foot-ceiling Brooklyn home. The warm tones of wood, quartz, and rich greens strike the ideal balance in creating this appealing design.
How did we achieve this look?
The Backsplash
Our client wanted a simple kitchen remodel in the shaker design, but she also wanted to include green. Initially, we proposed green cabinets to create a bold green look in the kitchen. The main objective was to incorporate our complimenting colors while keeping a feeling of lightness. After going through a number of ideas and 3D prototypes, installing as many cabinets as we could without overpowering the kitchen was our goal of optimizing space. We determined that the best way to brighten the space would be to install white shaker cabinets in addition to higher lumen recessed LED lighting. We decided that finding exquisite green backsplash tiles would be the best way to give it the desired green pop. After numerous searches, we came across a company called Mercury Mosaics.
While there were many green backsplash tiles to choose from, we opted for the mercury mosaics bluegrass diamond tiles. We loved these tiles because its created an illusion of cubes but at times, diamonds. The pattern is an art of illusion and its really gave us the personality we were looking for.
The Flooring of Choice
The flooring of choice was made by our client. We wanted the floors to feel soft and natural while capturing every bit of warmth to balance the whites and the greens and bring them together. While we could’ve opted for wood look tiles or luxury vinyl plank flooring, we ended up going with a premium slightly distressed white oak engineered hardwood flooring from Floor and Decor.
Accents
Although the flooring and the backsplash brought most of the kitchen together, we were still missing the cherry on top. The hardware and maybe something else?
We decided on thin profiled brushed brass hardware to give us that luxurious feel we were looking for every time we opened the cabinet. The cherry on top for us were the hand made quarter round oak shelves which really tied in the floors and cabinets together and gave us that final pop we were looking for. It truly added the perfect character for our client who is also a teen-fiction author of multiple books.
 Novu Designs
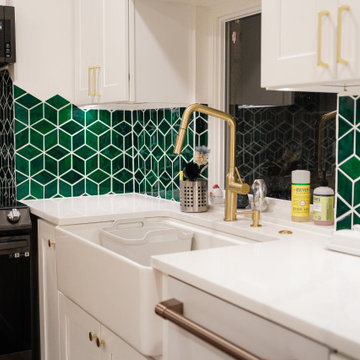
Our goal is to make your kitchen remodel as comfortable as possible. After establishing rapport with our client, we used our ingenuity to redesign and build their ideal kitchen in this stunning 10-foot-ceiling Brooklyn home. The warm tones of wood, quartz, and rich greens strike the ideal balance in creating this appealing design.
How did we achieve this look?
The Backsplash
Our client wanted a simple kitchen remodel in the shaker design, but she also wanted to include green. Initially, we proposed green cabinets to create a bold green look in the kitchen. The main objective was to incorporate our complimenting colors while keeping a feeling of lightness. After going through a number of ideas and 3D prototypes, installing as many cabinets as we could without overpowering the kitchen was our goal of optimizing space. We determined that the best way to brighten the space would be to install white shaker cabinets in addition to higher lumen recessed LED lighting. We decided that finding exquisite green backsplash tiles would be the best way to give it the desired green pop. After numerous searches, we came across a company called Mercury Mosaics.
While there were many green backsplash tiles to choose from, we opted for the mercury mosaics bluegrass diamond tiles. We loved these tiles because its created an illusion of cubes but at times, diamonds. The pattern is an art of illusion and its really gave us the personality we were looking for.
The Flooring of Choice
The flooring of choice was made by our client. We wanted the floors to feel soft and natural while capturing every bit of warmth to balance the whites and the greens and bring them together. While we could’ve opted for wood look tiles or luxury vinyl plank flooring, we ended up going with a premium slightly distressed white oak engineered hardwood flooring from Floor and Decor.
Accents
Although the flooring and the backsplash brought most of the kitchen together, we were still missing the cherry on top. The hardware and maybe something else?
We decided on thin profiled brushed brass hardware to give us that luxurious feel we were looking for every time we opened the cabinet. The cherry on top for us were the hand made quarter round oak shelves which really tied in the floors and cabinets together and gave us that final pop we were looking for. It truly added the perfect character for our client who is also a teen-fiction author of multiple books.
 Story Homes
A few years ago, the owners added two stories with finished basement to their Edina home. It was a big project that greatly expanded and enhanced the first-floor kitchen, dining room and living room. The project also added a second-floor bedroom/home office.
Their home has another two bedrooms and ¾ bath on the first floor, plus a beautiful master bedroom and ¾ bath on the second floor which they’ve been using for years.
Looking into the future they began to consider aging in place: What living on one floor might look like. They determined that the only thing that needed attention was the first-floor bath – it was pretty dated. So, they built their dream bath. They began with tearing everything out, right down to the studs.
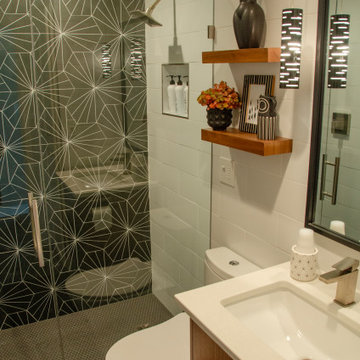
The new 5’ X 9’ ¾ bath includes a 5’ X 3’ walk-in glass enclosed shower, with a twist. The shower control has been moved from the typical location (just below the shower head) to the opposite wall, just inside the shower door. This allows one to turn on the shower and wait for it to get hot without having to step into the shower and then just stand there and get wet with cold water. A small detail that has proven to be a good idea.
The shower floor is made using 3/4" x 3/4" Penny round matte Porcelain mosaic tile set in charcoal grout. The back shower wall and the remaining bathroom floor is constructed with Aster 9" x 10" hexagon glazed Porcelain patterned wall & floor tile. Hexagonal tile adds an unusual feature that establishes a unique, interesting, repeated design.
The main bath’s walls feature white matt finish 6" x 18" ceramic Subway Wall tile in white grout.
A TOTO center flushing toilet looks great on the dark hexagonal floor tile.
The custom vanity features a walnut base with white Silestone top and undermounted Kohler sink with brushed nickel fixtures.
Another interesting feature are two 3” X 6” X 18” floating Walnut shelves – just the right touch to add character to the bath without taking up too much space.
Finally, the dimmable can lighting is enhanced with two black cylinder slotted pendant lights on either side of the vanity.
This project fulfills the promise of down-the-road one floor living with an efficient, comfortable ¾ bath.
 Novu Designs
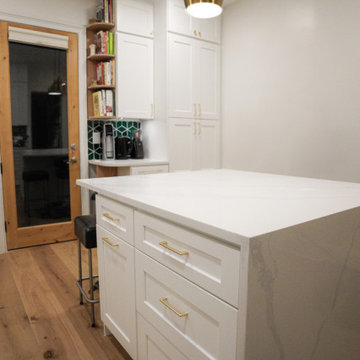
Our goal is to make your kitchen remodel as comfortable as possible. After establishing rapport with our client, we used our ingenuity to redesign and build their ideal kitchen in this stunning 10-foot-ceiling Brooklyn home. The warm tones of wood, quartz, and rich greens strike the ideal balance in creating this appealing design.
How did we achieve this look?
The Backsplash
Our client wanted a simple kitchen remodel in the shaker design, but she also wanted to include green. Initially, we proposed green cabinets to create a bold green look in the kitchen. The main objective was to incorporate our complimenting colors while keeping a feeling of lightness. After going through a number of ideas and 3D prototypes, installing as many cabinets as we could without overpowering the kitchen was our goal of optimizing space. We determined that the best way to brighten the space would be to install white shaker cabinets in addition to higher lumen recessed LED lighting. We decided that finding exquisite green backsplash tiles would be the best way to give it the desired green pop. After numerous searches, we came across a company called Mercury Mosaics.
While there were many green backsplash tiles to choose from, we opted for the mercury mosaics bluegrass diamond tiles. We loved these tiles because its created an illusion of cubes but at times, diamonds. The pattern is an art of illusion and its really gave us the personality we were looking for.
The Flooring of Choice
The flooring of choice was made by our client. We wanted the floors to feel soft and natural while capturing every bit of warmth to balance the whites and the greens and bring them together. While we could’ve opted for wood look tiles or luxury vinyl plank flooring, we ended up going with a premium slightly distressed white oak engineered hardwood flooring from Floor and Decor.
Accents
Although the flooring and the backsplash brought most of the kitchen together, we were still missing the cherry on top. The hardware and maybe something else?
We decided on thin profiled brushed brass hardware to give us that luxurious feel we were looking for every time we opened the cabinet. The cherry on top for us were the hand made quarter round oak shelves which really tied in the floors and cabinets together and gave us that final pop we were looking for. It truly added the perfect character for our client who is also a teen-fiction author of multiple books.
 Novu Designs
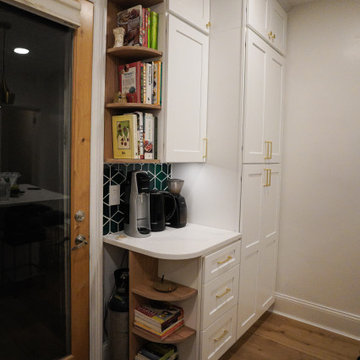
Our goal is to make your kitchen remodel as comfortable as possible. After establishing rapport with our client, we used our ingenuity to redesign and build their ideal kitchen in this stunning 10-foot-ceiling Brooklyn home. The warm tones of wood, quartz, and rich greens strike the ideal balance in creating this appealing design.
How did we achieve this look?
The Backsplash
Our client wanted a simple kitchen remodel in the shaker design, but she also wanted to include green. Initially, we proposed green cabinets to create a bold green look in the kitchen. The main objective was to incorporate our complimenting colors while keeping a feeling of lightness. After going through a number of ideas and 3D prototypes, installing as many cabinets as we could without overpowering the kitchen was our goal of optimizing space. We determined that the best way to brighten the space would be to install white shaker cabinets in addition to higher lumen recessed LED lighting. We decided that finding exquisite green backsplash tiles would be the best way to give it the desired green pop. After numerous searches, we came across a company called Mercury Mosaics.
While there were many green backsplash tiles to choose from, we opted for the mercury mosaics bluegrass diamond tiles. We loved these tiles because its created an illusion of cubes but at times, diamonds. The pattern is an art of illusion and its really gave us the personality we were looking for.
The Flooring of Choice
The flooring of choice was made by our client. We wanted the floors to feel soft and natural while capturing every bit of warmth to balance the whites and the greens and bring them together. While we could’ve opted for wood look tiles or luxury vinyl plank flooring, we ended up going with a premium slightly distressed white oak engineered hardwood flooring from Floor and Decor.
Accents
Although the flooring and the backsplash brought most of the kitchen together, we were still missing the cherry on top. The hardware and maybe something else?
We decided on thin profiled brushed brass hardware to give us that luxurious feel we were looking for every time we opened the cabinet. The cherry on top for us were the hand made quarter round oak shelves which really tied in the floors and cabinets together and gave us that final pop we were looking for. It truly added the perfect character for our client who is also a teen-fiction author of multiple books.
 Novu Designs
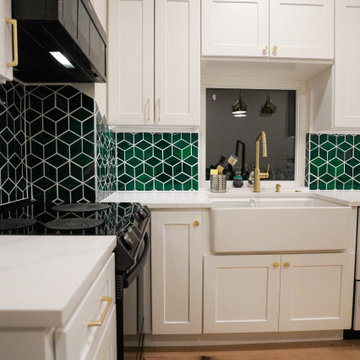
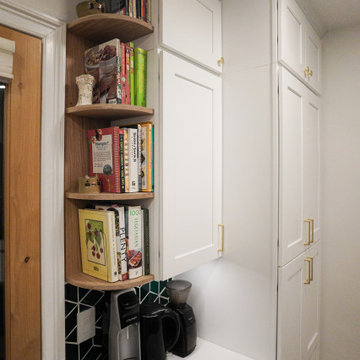
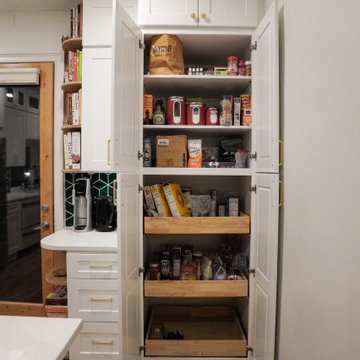
Our goal is to make your kitchen remodel as comfortable as possible. After establishing rapport with our client, we used our ingenuity to redesign and build their ideal kitchen in this stunning 10-foot-ceiling Brooklyn home. The warm tones of wood, quartz, and rich greens strike the ideal balance in creating this appealing design.
How did we achieve this look?
The Backsplash
Our client wanted a simple kitchen remodel in the shaker design, but she also wanted to include green. Initially, we proposed green cabinets to create a bold green look in the kitchen. The main objective was to incorporate our complimenting colors while keeping a feeling of lightness. After going through a number of ideas and 3D prototypes, installing as many cabinets as we could without overpowering the kitchen was our goal of optimizing space. We determined that the best way to brighten the space would be to install white shaker cabinets in addition to higher lumen recessed LED lighting. We decided that finding exquisite green backsplash tiles would be the best way to give it the desired green pop. After numerous searches, we came across a company called Mercury Mosaics.
While there were many green backsplash tiles to choose from, we opted for the mercury mosaics bluegrass diamond tiles. We loved these tiles because its created an illusion of cubes but at times, diamonds. The pattern is an art of illusion and its really gave us the personality we were looking for.
The Flooring of Choice
The flooring of choice was made by our client. We wanted the floors to feel soft and natural while capturing every bit of warmth to balance the whites and the greens and bring them together. While we could’ve opted for wood look tiles or luxury vinyl plank flooring, we ended up going with a premium slightly distressed white oak engineered hardwood flooring from Floor and Decor.
Accents
Although the flooring and the backsplash brought most of the kitchen together, we were still missing the cherry on top. The hardware and maybe something else?
We decided on thin profiled brushed brass hardware to give us that luxurious feel we were looking for every time we opened the cabinet. The cherry on top for us were the hand made quarter round oak shelves which really tied in the floors and cabinets together and gave us that final pop we were looking for. It truly added the perfect character for our client who is also a teen-fiction author of multiple books.
 Novu Designs
Our goal is to make your kitchen remodel as comfortable as possible. After establishing rapport with our client, we used our ingenuity to redesign and build their ideal kitchen in this stunning 10-foot-ceiling Brooklyn home. The warm tones of wood, quartz, and rich greens strike the ideal balance in creating this appealing design.
How did we achieve this look?
The Backsplash
Our client wanted a simple kitchen remodel in the shaker design, but she also wanted to include green. Initially, we proposed green cabinets to create a bold green look in the kitchen. The main objective was to incorporate our complimenting colors while keeping a feeling of lightness. After going through a number of ideas and 3D prototypes, installing as many cabinets as we could without overpowering the kitchen was our goal of optimizing space. We determined that the best way to brighten the space would be to install white shaker cabinets in addition to higher lumen recessed LED lighting. We decided that finding exquisite green backsplash tiles would be the best way to give it the desired green pop. After numerous searches, we came across a company called Mercury Mosaics.
While there were many green backsplash tiles to choose from, we opted for the mercury mosaics bluegrass diamond tiles. We loved these tiles because its created an illusion of cubes but at times, diamonds. The pattern is an art of illusion and its really gave us the personality we were looking for.
The Flooring of Choice
The flooring of choice was made by our client. We wanted the floors to feel soft and natural while capturing every bit of warmth to balance the whites and the greens and bring them together. While we could’ve opted for wood look tiles or luxury vinyl plank flooring, we ended up going with a premium slightly distressed white oak engineered hardwood flooring from Floor and Decor.
Accents
Although the flooring and the backsplash brought most of the kitchen together, we were still missing the cherry on top. The hardware and maybe something else?
We decided on thin profiled brushed brass hardware to give us that luxurious feel we were looking for every time we opened the cabinet. The cherry on top for us were the hand made quarter round oak shelves which really tied in the floors and cabinets together and gave us that final pop we were looking for. It truly added the perfect character for our client who is also a teen-fiction author of multiple books.
 Novu Designs
Our goal is to make your kitchen remodel as comfortable as possible. After establishing rapport with our client, we used our ingenuity to redesign and build their ideal kitchen in this stunning 10-foot-ceiling Brooklyn home. The warm tones of wood, quartz, and rich greens strike the ideal balance in creating this appealing design.
How did we achieve this look?
The Backsplash
Our client wanted a simple kitchen remodel in the shaker design, but she also wanted to include green. Initially, we proposed green cabinets to create a bold green look in the kitchen. The main objective was to incorporate our complimenting colors while keeping a feeling of lightness. After going through a number of ideas and 3D prototypes, installing as many cabinets as we could without overpowering the kitchen was our goal of optimizing space. We determined that the best way to brighten the space would be to install white shaker cabinets in addition to higher lumen recessed LED lighting. We decided that finding exquisite green backsplash tiles would be the best way to give it the desired green pop. After numerous searches, we came across a company called Mercury Mosaics.
While there were many green backsplash tiles to choose from, we opted for the mercury mosaics bluegrass diamond tiles. We loved these tiles because its created an illusion of cubes but at times, diamonds. The pattern is an art of illusion and its really gave us the personality we were looking for.
The Flooring of Choice
The flooring of choice was made by our client. We wanted the floors to feel soft and natural while capturing every bit of warmth to balance the whites and the greens and bring them together. While we could’ve opted for wood look tiles or luxury vinyl plank flooring, we ended up going with a premium slightly distressed white oak engineered hardwood flooring from Floor and Decor.
Accents
Although the flooring and the backsplash brought most of the kitchen together, we were still missing the cherry on top. The hardware and maybe something else?
We decided on thin profiled brushed brass hardware to give us that luxurious feel we were looking for every time we opened the cabinet. The cherry on top for us were the hand made quarter round oak shelves which really tied in the floors and cabinets together and gave us that final pop we were looking for. It truly added the perfect character for our client who is also a teen-fiction author of multiple books.
 Story Homes
A few years ago, the owners added two stories with finished basement to their Edina home. It was a big project that greatly expanded and enhanced the first-floor kitchen, dining room and living room. The project also added a second-floor bedroom/home office.
Their home has another two bedrooms and ¾ bath on the first floor, plus a beautiful master bedroom and ¾ bath on the second floor which they’ve been using for years.
Looking into the future they began to consider aging in place: What living on one floor might look like. They determined that the only thing that needed attention was the first-floor bath – it was pretty dated. So, they built their dream bath. They began with tearing everything out, right down to the studs.
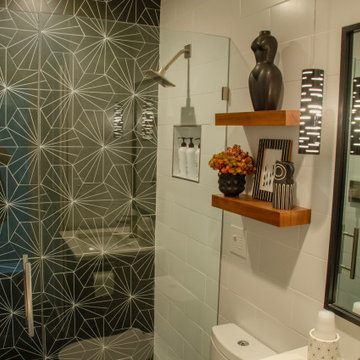
The new 5’ X 9’ ¾ bath includes a 5’ X 3’ walk-in glass enclosed shower, with a twist. The shower control has been moved from the typical location (just below the shower head) to the opposite wall, just inside the shower door. This allows one to turn on the shower and wait for it to get hot without having to step into the shower and then just stand there and get wet with cold water. A small detail that has proven to be a good idea.
The shower floor is made using 3/4" x 3/4" Penny round matte Porcelain mosaic tile set in charcoal grout. The back shower wall and the remaining bathroom floor is constructed with Aster 9" x 10" hexagon glazed Porcelain patterned wall & floor tile. Hexagonal tile adds an unusual feature that establishes a unique, interesting, repeated design.
The main bath’s walls feature white matt finish 6" x 18" ceramic Subway Wall tile in white grout.
A TOTO center flushing toilet looks great on the dark hexagonal floor tile.
The custom vanity features a walnut base with white Silestone top and undermounted Kohler sink with brushed nickel fixtures.
Another interesting feature are two 3” X 6” X 18” floating Walnut shelves – just the right touch to add character to the bath without taking up too much space.
Finally, the dimmable can lighting is enhanced with two black cylinder slotted pendant lights on either side of the vanity.
This project fulfills the promise of down-the-road one floor living with an efficient, comfortable ¾ bath.
6