
Search results for "Determinant character" in Home Design Ideas
 Novu Designs
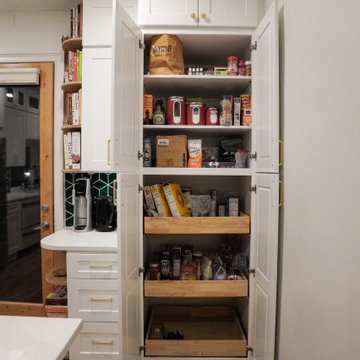
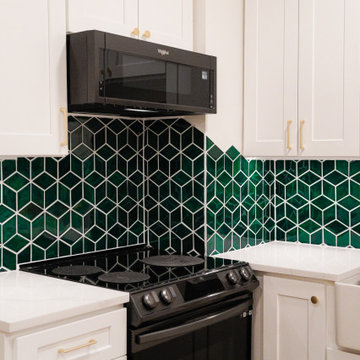
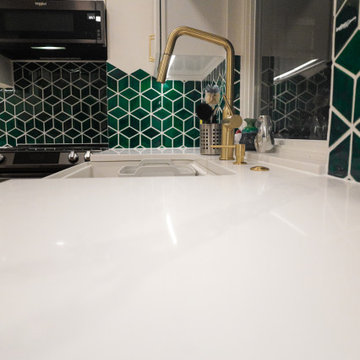
Our goal is to make your kitchen remodel as comfortable as possible. After establishing rapport with our client, we used our ingenuity to redesign and build their ideal kitchen in this stunning 10-foot-ceiling Brooklyn home. The warm tones of wood, quartz, and rich greens strike the ideal balance in creating this appealing design.
How did we achieve this look?
The Backsplash
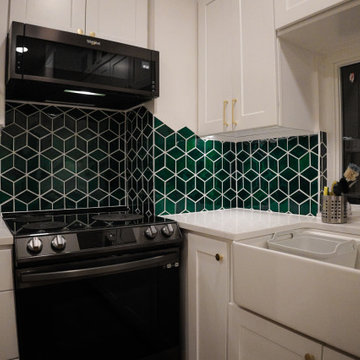
Our client wanted a simple kitchen remodel in the shaker design, but she also wanted to include green. Initially, we proposed green cabinets to create a bold green look in the kitchen. The main objective was to incorporate our complimenting colors while keeping a feeling of lightness. After going through a number of ideas and 3D prototypes, installing as many cabinets as we could without overpowering the kitchen was our goal of optimizing space. We determined that the best way to brighten the space would be to install white shaker cabinets in addition to higher lumen recessed LED lighting. We decided that finding exquisite green backsplash tiles would be the best way to give it the desired green pop. After numerous searches, we came across a company called Mercury Mosaics.
While there were many green backsplash tiles to choose from, we opted for the mercury mosaics bluegrass diamond tiles. We loved these tiles because its created an illusion of cubes but at times, diamonds. The pattern is an art of illusion and its really gave us the personality we were looking for.
The Flooring of Choice
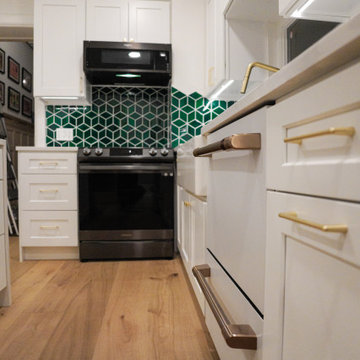
The flooring of choice was made by our client. We wanted the floors to feel soft and natural while capturing every bit of warmth to balance the whites and the greens and bring them together. While we could’ve opted for wood look tiles or luxury vinyl plank flooring, we ended up going with a premium slightly distressed white oak engineered hardwood flooring from Floor and Decor.
Accents
Although the flooring and the backsplash brought most of the kitchen together, we were still missing the cherry on top. The hardware and maybe something else?
We decided on thin profiled brushed brass hardware to give us that luxurious feel we were looking for every time we opened the cabinet. The cherry on top for us were the hand made quarter round oak shelves which really tied in the floors and cabinets together and gave us that final pop we were looking for. It truly added the perfect character for our client who is also a teen-fiction author of multiple books.
 Novu Designs
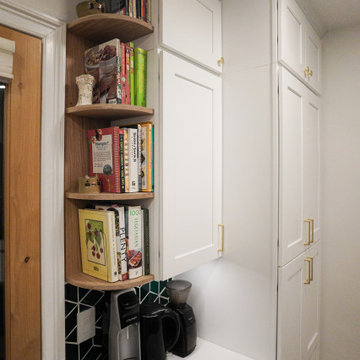
Our goal is to make your kitchen remodel as comfortable as possible. After establishing rapport with our client, we used our ingenuity to redesign and build their ideal kitchen in this stunning 10-foot-ceiling Brooklyn home. The warm tones of wood, quartz, and rich greens strike the ideal balance in creating this appealing design.
How did we achieve this look?
The Backsplash
Our client wanted a simple kitchen remodel in the shaker design, but she also wanted to include green. Initially, we proposed green cabinets to create a bold green look in the kitchen. The main objective was to incorporate our complimenting colors while keeping a feeling of lightness. After going through a number of ideas and 3D prototypes, installing as many cabinets as we could without overpowering the kitchen was our goal of optimizing space. We determined that the best way to brighten the space would be to install white shaker cabinets in addition to higher lumen recessed LED lighting. We decided that finding exquisite green backsplash tiles would be the best way to give it the desired green pop. After numerous searches, we came across a company called Mercury Mosaics.
While there were many green backsplash tiles to choose from, we opted for the mercury mosaics bluegrass diamond tiles. We loved these tiles because its created an illusion of cubes but at times, diamonds. The pattern is an art of illusion and its really gave us the personality we were looking for.
The Flooring of Choice
The flooring of choice was made by our client. We wanted the floors to feel soft and natural while capturing every bit of warmth to balance the whites and the greens and bring them together. While we could’ve opted for wood look tiles or luxury vinyl plank flooring, we ended up going with a premium slightly distressed white oak engineered hardwood flooring from Floor and Decor.
Accents
Although the flooring and the backsplash brought most of the kitchen together, we were still missing the cherry on top. The hardware and maybe something else?
We decided on thin profiled brushed brass hardware to give us that luxurious feel we were looking for every time we opened the cabinet. The cherry on top for us were the hand made quarter round oak shelves which really tied in the floors and cabinets together and gave us that final pop we were looking for. It truly added the perfect character for our client who is also a teen-fiction author of multiple books.
 Story Homes
A few years ago, the owners added two stories with finished basement to their Edina home. It was a big project that greatly expanded and enhanced the first-floor kitchen, dining room and living room. The project also added a second-floor bedroom/home office.
Their home has another two bedrooms and ¾ bath on the first floor, plus a beautiful master bedroom and ¾ bath on the second floor which they’ve been using for years.
Looking into the future they began to consider aging in place: What living on one floor might look like. They determined that the only thing that needed attention was the first-floor bath – it was pretty dated. So, they built their dream bath. They began with tearing everything out, right down to the studs.
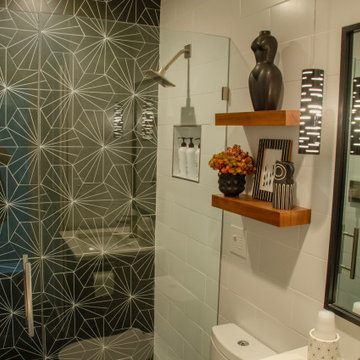
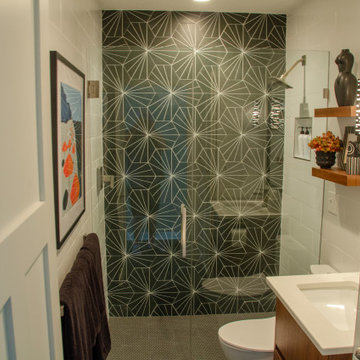
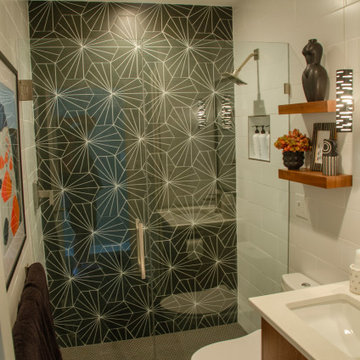
The new 5’ X 9’ ¾ bath includes a 5’ X 3’ walk-in glass enclosed shower, with a twist. The shower control has been moved from the typical location (just below the shower head) to the opposite wall, just inside the shower door. This allows one to turn on the shower and wait for it to get hot without having to step into the shower and then just stand there and get wet with cold water. A small detail that has proven to be a good idea.
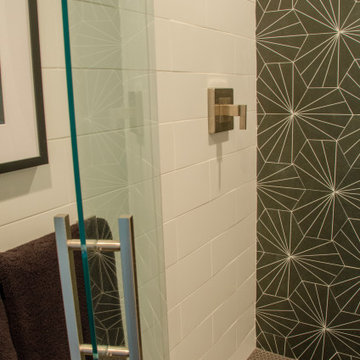
The shower floor is made using 3/4" x 3/4" Penny round matte Porcelain mosaic tile set in charcoal grout. The back shower wall and the remaining bathroom floor is constructed with Aster 9" x 10" hexagon glazed Porcelain patterned wall & floor tile. Hexagonal tile adds an unusual feature that establishes a unique, interesting, repeated design.
The main bath’s walls feature white matt finish 6" x 18" ceramic Subway Wall tile in white grout.
A TOTO center flushing toilet looks great on the dark hexagonal floor tile.
The custom vanity features a walnut base with white Silestone top and undermounted Kohler sink with brushed nickel fixtures.
Another interesting feature are two 3” X 6” X 18” floating Walnut shelves – just the right touch to add character to the bath without taking up too much space.
Finally, the dimmable can lighting is enhanced with two black cylinder slotted pendant lights on either side of the vanity.
This project fulfills the promise of down-the-road one floor living with an efficient, comfortable ¾ bath.
Find the right local pro for your project
 Novu Designs
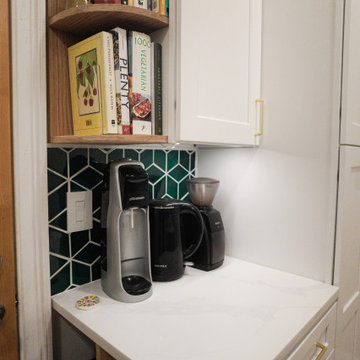
Our goal is to make your kitchen remodel as comfortable as possible. After establishing rapport with our client, we used our ingenuity to redesign and build their ideal kitchen in this stunning 10-foot-ceiling Brooklyn home. The warm tones of wood, quartz, and rich greens strike the ideal balance in creating this appealing design.
How did we achieve this look?
The Backsplash
Our client wanted a simple kitchen remodel in the shaker design, but she also wanted to include green. Initially, we proposed green cabinets to create a bold green look in the kitchen. The main objective was to incorporate our complimenting colors while keeping a feeling of lightness. After going through a number of ideas and 3D prototypes, installing as many cabinets as we could without overpowering the kitchen was our goal of optimizing space. We determined that the best way to brighten the space would be to install white shaker cabinets in addition to higher lumen recessed LED lighting. We decided that finding exquisite green backsplash tiles would be the best way to give it the desired green pop. After numerous searches, we came across a company called Mercury Mosaics.
While there were many green backsplash tiles to choose from, we opted for the mercury mosaics bluegrass diamond tiles. We loved these tiles because its created an illusion of cubes but at times, diamonds. The pattern is an art of illusion and its really gave us the personality we were looking for.
The Flooring of Choice
The flooring of choice was made by our client. We wanted the floors to feel soft and natural while capturing every bit of warmth to balance the whites and the greens and bring them together. While we could’ve opted for wood look tiles or luxury vinyl plank flooring, we ended up going with a premium slightly distressed white oak engineered hardwood flooring from Floor and Decor.
Accents
Although the flooring and the backsplash brought most of the kitchen together, we were still missing the cherry on top. The hardware and maybe something else?
We decided on thin profiled brushed brass hardware to give us that luxurious feel we were looking for every time we opened the cabinet. The cherry on top for us were the hand made quarter round oak shelves which really tied in the floors and cabinets together and gave us that final pop we were looking for. It truly added the perfect character for our client who is also a teen-fiction author of multiple books.
 Story Homes
A few years ago, the owners added two stories with finished basement to their Edina home. It was a big project that greatly expanded and enhanced the first-floor kitchen, dining room and living room. The project also added a second-floor bedroom/home office.
Their home has another two bedrooms and ¾ bath on the first floor, plus a beautiful master bedroom and ¾ bath on the second floor which they’ve been using for years.
Looking into the future they began to consider aging in place: What living on one floor might look like. They determined that the only thing that needed attention was the first-floor bath – it was pretty dated. So, they built their dream bath. They began with tearing everything out, right down to the studs.
The new 5’ X 9’ ¾ bath includes a 5’ X 3’ walk-in glass enclosed shower, with a twist. The shower control has been moved from the typical location (just below the shower head) to the opposite wall, just inside the shower door. This allows one to turn on the shower and wait for it to get hot without having to step into the shower and then just stand there and get wet with cold water. A small detail that has proven to be a good idea.
The shower floor is made using 3/4" x 3/4" Penny round matte Porcelain mosaic tile set in charcoal grout. The back shower wall and the remaining bathroom floor is constructed with Aster 9" x 10" hexagon glazed Porcelain patterned wall & floor tile. Hexagonal tile adds an unusual feature that establishes a unique, interesting, repeated design.
The main bath’s walls feature white matt finish 6" x 18" ceramic Subway Wall tile in white grout.
A TOTO center flushing toilet looks great on the dark hexagonal floor tile.
The custom vanity features a walnut base with white Silestone top and undermounted Kohler sink with brushed nickel fixtures.
Another interesting feature are two 3” X 6” X 18” floating Walnut shelves – just the right touch to add character to the bath without taking up too much space.
Finally, the dimmable can lighting is enhanced with two black cylinder slotted pendant lights on either side of the vanity.
This project fulfills the promise of down-the-road one floor living with an efficient, comfortable ¾ bath.
 Story Homes
A few years ago, the owners added two stories with finished basement to their Edina home. It was a big project that greatly expanded and enhanced the first-floor kitchen, dining room and living room. The project also added a second-floor bedroom/home office.
Their home has another two bedrooms and ¾ bath on the first floor, plus a beautiful master bedroom and ¾ bath on the second floor which they’ve been using for years.
Looking into the future they began to consider aging in place: What living on one floor might look like. They determined that the only thing that needed attention was the first-floor bath – it was pretty dated. So, they built their dream bath. They began with tearing everything out, right down to the studs.
The new 5’ X 9’ ¾ bath includes a 5’ X 3’ walk-in glass enclosed shower, with a twist. The shower control has been moved from the typical location (just below the shower head) to the opposite wall, just inside the shower door. This allows one to turn on the shower and wait for it to get hot without having to step into the shower and then just stand there and get wet with cold water. A small detail that has proven to be a good idea.
The shower floor is made using 3/4" x 3/4" Penny round matte Porcelain mosaic tile set in charcoal grout. The back shower wall and the remaining bathroom floor is constructed with Aster 9" x 10" hexagon glazed Porcelain patterned wall & floor tile. Hexagonal tile adds an unusual feature that establishes a unique, interesting, repeated design.
The main bath’s walls feature white matt finish 6" x 18" ceramic Subway Wall tile in white grout.
A TOTO center flushing toilet looks great on the dark hexagonal floor tile.
The custom vanity features a walnut base with white Silestone top and undermounted Kohler sink with brushed nickel fixtures.
Another interesting feature are two 3” X 6” X 18” floating Walnut shelves – just the right touch to add character to the bath without taking up too much space.
Finally, the dimmable can lighting is enhanced with two black cylinder slotted pendant lights on either side of the vanity.
This project fulfills the promise of down-the-road one floor living with an efficient, comfortable ¾ bath.
 Novu Designs
Our goal is to make your kitchen remodel as comfortable as possible. After establishing rapport with our client, we used our ingenuity to redesign and build their ideal kitchen in this stunning 10-foot-ceiling Brooklyn home. The warm tones of wood, quartz, and rich greens strike the ideal balance in creating this appealing design.
How did we achieve this look?
The Backsplash
Our client wanted a simple kitchen remodel in the shaker design, but she also wanted to include green. Initially, we proposed green cabinets to create a bold green look in the kitchen. The main objective was to incorporate our complimenting colors while keeping a feeling of lightness. After going through a number of ideas and 3D prototypes, installing as many cabinets as we could without overpowering the kitchen was our goal of optimizing space. We determined that the best way to brighten the space would be to install white shaker cabinets in addition to higher lumen recessed LED lighting. We decided that finding exquisite green backsplash tiles would be the best way to give it the desired green pop. After numerous searches, we came across a company called Mercury Mosaics.
While there were many green backsplash tiles to choose from, we opted for the mercury mosaics bluegrass diamond tiles. We loved these tiles because its created an illusion of cubes but at times, diamonds. The pattern is an art of illusion and its really gave us the personality we were looking for.
The Flooring of Choice
The flooring of choice was made by our client. We wanted the floors to feel soft and natural while capturing every bit of warmth to balance the whites and the greens and bring them together. While we could’ve opted for wood look tiles or luxury vinyl plank flooring, we ended up going with a premium slightly distressed white oak engineered hardwood flooring from Floor and Decor.
Accents
Although the flooring and the backsplash brought most of the kitchen together, we were still missing the cherry on top. The hardware and maybe something else?
We decided on thin profiled brushed brass hardware to give us that luxurious feel we were looking for every time we opened the cabinet. The cherry on top for us were the hand made quarter round oak shelves which really tied in the floors and cabinets together and gave us that final pop we were looking for. It truly added the perfect character for our client who is also a teen-fiction author of multiple books.
 Story Homes
A few years ago, the owners added two stories with finished basement to their Edina home. It was a big project that greatly expanded and enhanced the first-floor kitchen, dining room and living room. The project also added a second-floor bedroom/home office.
Their home has another two bedrooms and ¾ bath on the first floor, plus a beautiful master bedroom and ¾ bath on the second floor which they’ve been using for years.
Looking into the future they began to consider aging in place: What living on one floor might look like. They determined that the only thing that needed attention was the first-floor bath – it was pretty dated. So, they built their dream bath. They began with tearing everything out, right down to the studs.
The new 5’ X 9’ ¾ bath includes a 5’ X 3’ walk-in glass enclosed shower, with a twist. The shower control has been moved from the typical location (just below the shower head) to the opposite wall, just inside the shower door. This allows one to turn on the shower and wait for it to get hot without having to step into the shower and then just stand there and get wet with cold water. A small detail that has proven to be a good idea.
The shower floor is made using 3/4" x 3/4" Penny round matte Porcelain mosaic tile set in charcoal grout. The back shower wall and the remaining bathroom floor is constructed with Aster 9" x 10" hexagon glazed Porcelain patterned wall & floor tile. Hexagonal tile adds an unusual feature that establishes a unique, interesting, repeated design.
The main bath’s walls feature white matt finish 6" x 18" ceramic Subway Wall tile in white grout.
A TOTO center flushing toilet looks great on the dark hexagonal floor tile.
The custom vanity features a walnut base with white Silestone top and undermounted Kohler sink with brushed nickel fixtures.
Another interesting feature are two 3” X 6” X 18” floating Walnut shelves – just the right touch to add character to the bath without taking up too much space.
Finally, the dimmable can lighting is enhanced with two black cylinder slotted pendant lights on either side of the vanity.
This project fulfills the promise of down-the-road one floor living with an efficient, comfortable ¾ bath.
 Novu Designs
Our goal is to make your kitchen remodel as comfortable as possible. After establishing rapport with our client, we used our ingenuity to redesign and build their ideal kitchen in this stunning 10-foot-ceiling Brooklyn home. The warm tones of wood, quartz, and rich greens strike the ideal balance in creating this appealing design.
How did we achieve this look?
The Backsplash
Our client wanted a simple kitchen remodel in the shaker design, but she also wanted to include green. Initially, we proposed green cabinets to create a bold green look in the kitchen. The main objective was to incorporate our complimenting colors while keeping a feeling of lightness. After going through a number of ideas and 3D prototypes, installing as many cabinets as we could without overpowering the kitchen was our goal of optimizing space. We determined that the best way to brighten the space would be to install white shaker cabinets in addition to higher lumen recessed LED lighting. We decided that finding exquisite green backsplash tiles would be the best way to give it the desired green pop. After numerous searches, we came across a company called Mercury Mosaics.
While there were many green backsplash tiles to choose from, we opted for the mercury mosaics bluegrass diamond tiles. We loved these tiles because its created an illusion of cubes but at times, diamonds. The pattern is an art of illusion and its really gave us the personality we were looking for.
The Flooring of Choice
The flooring of choice was made by our client. We wanted the floors to feel soft and natural while capturing every bit of warmth to balance the whites and the greens and bring them together. While we could’ve opted for wood look tiles or luxury vinyl plank flooring, we ended up going with a premium slightly distressed white oak engineered hardwood flooring from Floor and Decor.
Accents
Although the flooring and the backsplash brought most of the kitchen together, we were still missing the cherry on top. The hardware and maybe something else?
We decided on thin profiled brushed brass hardware to give us that luxurious feel we were looking for every time we opened the cabinet. The cherry on top for us were the hand made quarter round oak shelves which really tied in the floors and cabinets together and gave us that final pop we were looking for. It truly added the perfect character for our client who is also a teen-fiction author of multiple books.
 Novu Designs
Our goal is to make your kitchen remodel as comfortable as possible. After establishing rapport with our client, we used our ingenuity to redesign and build their ideal kitchen in this stunning 10-foot-ceiling Brooklyn home. The warm tones of wood, quartz, and rich greens strike the ideal balance in creating this appealing design.
How did we achieve this look?
The Backsplash
Our client wanted a simple kitchen remodel in the shaker design, but she also wanted to include green. Initially, we proposed green cabinets to create a bold green look in the kitchen. The main objective was to incorporate our complimenting colors while keeping a feeling of lightness. After going through a number of ideas and 3D prototypes, installing as many cabinets as we could without overpowering the kitchen was our goal of optimizing space. We determined that the best way to brighten the space would be to install white shaker cabinets in addition to higher lumen recessed LED lighting. We decided that finding exquisite green backsplash tiles would be the best way to give it the desired green pop. After numerous searches, we came across a company called Mercury Mosaics.
While there were many green backsplash tiles to choose from, we opted for the mercury mosaics bluegrass diamond tiles. We loved these tiles because its created an illusion of cubes but at times, diamonds. The pattern is an art of illusion and its really gave us the personality we were looking for.
The Flooring of Choice
The flooring of choice was made by our client. We wanted the floors to feel soft and natural while capturing every bit of warmth to balance the whites and the greens and bring them together. While we could’ve opted for wood look tiles or luxury vinyl plank flooring, we ended up going with a premium slightly distressed white oak engineered hardwood flooring from Floor and Decor.
Accents
Although the flooring and the backsplash brought most of the kitchen together, we were still missing the cherry on top. The hardware and maybe something else?
We decided on thin profiled brushed brass hardware to give us that luxurious feel we were looking for every time we opened the cabinet. The cherry on top for us were the hand made quarter round oak shelves which really tied in the floors and cabinets together and gave us that final pop we were looking for. It truly added the perfect character for our client who is also a teen-fiction author of multiple books.
 Novu Designs
Our goal is to make your kitchen remodel as comfortable as possible. After establishing rapport with our client, we used our ingenuity to redesign and build their ideal kitchen in this stunning 10-foot-ceiling Brooklyn home. The warm tones of wood, quartz, and rich greens strike the ideal balance in creating this appealing design.
How did we achieve this look?
The Backsplash
Our client wanted a simple kitchen remodel in the shaker design, but she also wanted to include green. Initially, we proposed green cabinets to create a bold green look in the kitchen. The main objective was to incorporate our complimenting colors while keeping a feeling of lightness. After going through a number of ideas and 3D prototypes, installing as many cabinets as we could without overpowering the kitchen was our goal of optimizing space. We determined that the best way to brighten the space would be to install white shaker cabinets in addition to higher lumen recessed LED lighting. We decided that finding exquisite green backsplash tiles would be the best way to give it the desired green pop. After numerous searches, we came across a company called Mercury Mosaics.
While there were many green backsplash tiles to choose from, we opted for the mercury mosaics bluegrass diamond tiles. We loved these tiles because its created an illusion of cubes but at times, diamonds. The pattern is an art of illusion and its really gave us the personality we were looking for.
The Flooring of Choice
The flooring of choice was made by our client. We wanted the floors to feel soft and natural while capturing every bit of warmth to balance the whites and the greens and bring them together. While we could’ve opted for wood look tiles or luxury vinyl plank flooring, we ended up going with a premium slightly distressed white oak engineered hardwood flooring from Floor and Decor.
Accents
Although the flooring and the backsplash brought most of the kitchen together, we were still missing the cherry on top. The hardware and maybe something else?
We decided on thin profiled brushed brass hardware to give us that luxurious feel we were looking for every time we opened the cabinet. The cherry on top for us were the hand made quarter round oak shelves which really tied in the floors and cabinets together and gave us that final pop we were looking for. It truly added the perfect character for our client who is also a teen-fiction author of multiple books.
 Spire North
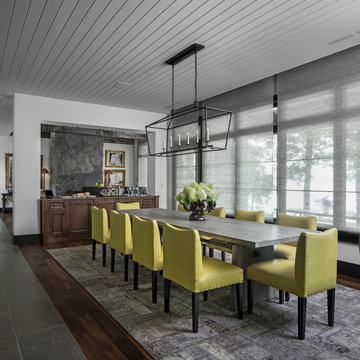
Tucked away in the backwoods of Torch Lake, this home marries “rustic” with the sleek elegance of modern. The combination of wood, stone and metal textures embrace the charm of a classic farmhouse. Although this is not your average farmhouse. The home is outfitted with a high performing system that seamlessly works with the design and architecture.
The tall ceilings and windows allow ample natural light into the main room. Spire Integrated Systems installed Lutron QS Wireless motorized shades paired with Hartmann & Forbes windowcovers to offer privacy and block harsh light. The custom 18′ windowcover’s woven natural fabric complements the organic esthetics of the room. The shades are artfully concealed in the millwork when not in use.
Spire installed B&W in-ceiling speakers and Sonance invisible in-wall speakers to deliver ambient music that emanates throughout the space with no visual footprint. Spire also installed a Sonance Landscape Audio System so the homeowner can enjoy music outside.
Each system is easily controlled using Savant. Spire personalized the settings to the homeowner’s preference making controlling the home efficient and convenient.

 contact7524
This stained glass window was created as part of our signature Aspen Stained Glass line. These windows look beautiful in cottage style or contemporary homes and are a great way for outdoor enthusiasts to celebrate their love of nature. The textured appearance of the glass provides the homeowners with a high level of privacy and comfort.
 Drury Design
The Setup
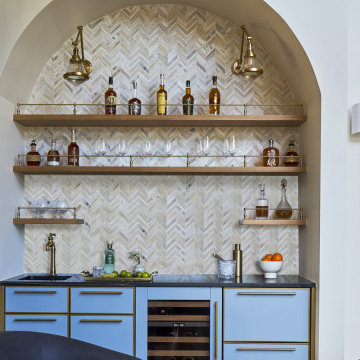
Situated between the front kitchen and the home’s primary living spaces, this bar was originally conceived as a modest bistro-style nook – a place to sit, watch TV, and enjoy a drink. As the design process evolved, both the homeowners and the design team recognized an opportunity to let the bar become something more: a visually compelling focal point that anchors circulation through the home while offering a distinct moment of hospitality.
Set within an arched recess and framed by a partial glass wall, the bar is visible from much of the public area of the home. Its location places it directly along the natural path between the kitchen, dining room, and family room, making it both highly accessible and impossible to ignore. From the outset, the goal was to ensure the bar felt intentional and complete – not an afterthought – while still complementing the adjacent kitchens rather than competing with them.
Design objectives:
Create a fully functional wet bar with refrigeration, ice, sink, waste storage, and liquor storage
Allow the bar to feel visually distinct while remaining cohesive with the surrounding spaces
Introduce color and character in a controlled, intentional way
Design the bar as a focal point within a highly visible circulation zone
Balance everyday usability with refined, layered design details
Design challenges to be solved:
Fitting a complete wet bar – including refrigeration, ice, sink, storage, and waste — into a base cabinetry run measuring under eight feet wide
Determining which appliances and storage functions were essential once upper cabinetry was eliminated
Providing adequate task lighting while also highlighting bottles and glassware on open shelving
Introducing texture and visual interest within the arched recess without overdesigning a compact space
Giving the bar a distinct identity that complements – but does not compete with – the adjacent kitchens
Design solutions:
Designing fully custom base cabinetry that prioritized core bar functions and used every inch efficiently, including split cabinetry and compact waste storage
Selecting a drawer-style refrigeration unit that combines refrigeration and freezer capabilities, allowing ice storage without sacrificing valuable width
Layering lighting with integrated LED strip lighting above and below the shelves, paired with decorative articulating fixtures to support both display and task lighting
Using a chevron-patterned natural stone tile backsplash to introduce movement, texture, and subtle color variation while keeping surrounding surfaces intentionally restrained
Specifying metal cabinetry in a soft blue tone with integrated brass framing to establish a distinctive visual identity that harmonizes with the home’s broader palette
A Space That Works on Its Own — and Within the Whole
Though compact in size, the bar carries significant visual and functional weight within the home. It stands confidently on its own as a richly detailed, fully functional destination, while also flowing naturally into the adjacent kitchens and living spaces. The result is a bar that feels purposeful rather than ornamental – a space designed to be used daily, noticed often, and appreciated over time.
 Windy City Painters
Painter Near Me Chicago - Professional Painting Services by Windy City Painters
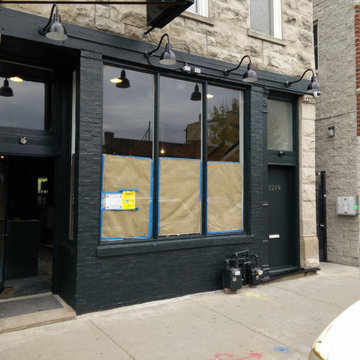
Finding a skilled painter near me in Chicago is easier when you know what to look for, and Windy City Painters delivers the craftsmanship Chicago homeowners trust for greystones, vintage two-flats, classic bungalows, and modern condos throughout the city.
Project Overview
This project showcases Windy City Painters completing professional interior and exterior painting services for a Chicago-area client. The building's vintage character called for careful color selection and precise application to honor original architectural details while refreshing every surface.
Materials and Products Used
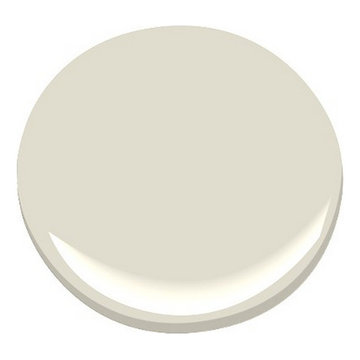
Windy City Painters selects premium paints from trusted manufacturers including Sherwin-Williams and Benjamin Moore, chosen specifically for Chicago's climate demands. Primers, fillers, and caulks are all professional-grade for lasting adhesion and durability.
Our Step-by-Step Process
Step 1 - Prep and Repairs: All surfaces are cleaned, sanded, and patched. Cracks in plaster or drywall are filled and feathered smooth before any painting begins.
Step 2 - Priming: A quality primer is applied to ensure proper adhesion, uniform sheen, and long-term durability across all surfaces.
Step 3 - Paint Application: Multiple coats are applied using the right tools for each surface - brushes, rollers, and sprayers where appropriate.
Step 4 - Final Inspection: Windy City Painters conducts a detailed walkthrough with the homeowner to confirm every detail meets our high standard.
Chicago-Specific Challenges
Older Chicago homes present unique challenges including lead paint layers, aging horsehair plaster, moisture from harsh winters, and intricate vintage millwork. Windy City Painters is trained to handle all of these safely and professionally.
Results
Clients consistently report dramatic improvements in curb appeal, interior atmosphere, and overall home value after working with Windy City Painters.
Pro Tips Before You Start
Always test for lead paint in homes built before 1978. Budget for surface prep - it determines final quality. Choose paints rated for Chicago's freeze-thaw cycles for exterior projects.
See more work and request a free estimate at windypainters.com.
Frequently Asked Questions
Q: How do I find a reliable painter near me in Chicago? / A: Look for licensed, insured contractors with strong local reviews. Windy City Painters is a trusted painter near me in Chicago with a proven track record serving greystones, bungalows, and vintage buildings throughout the city.
Q: What surfaces can a painter near me in Chicago handle? / A: Windy City Painters handles drywall, plaster, wood trim, cabinets, brick, and metal surfaces, making us a comprehensive painter near me in Chicago for any project large or small.
Q: How important is surface preparation? / A: Proper preparation is the foundation of any quality paint job. As your painter near me in Chicago, Windy City Painters dedicates significant time to prep work ensuring flawless, long-lasting results every time.
Q: Do you handle lead paint safely in older Chicago homes? / A: Yes, Windy City Painters follows all safety protocols for lead paint in older homes, making us the responsible painter near me in Chicago for vintage and pre-1978 buildings.
Q: What paint brands does Windy City Painters recommend? / A: As a professional painter near me in Chicago, Windy City Painters recommends Sherwin-Williams and Benjamin Moore for their durability, color accuracy, and performance in Chicago's demanding climate.
Q: Can you paint exterior surfaces in Chicago winters? / A: Exterior painting requires temperatures above 50 degrees Fahrenheit. Windy City Painters, your painter near me in Chicago, schedules exterior projects during appropriate seasonal windows for best results.
Q: How many coats of paint are typically needed? / A: Most projects require two finish coats over primer. Your painter near me in Chicago at Windy City Painters assesses each surface individually to determine the right number of coats.
Q: Do you offer color consultation services? / A: Yes, Windy City Painters provides color guidance as part of our painter near me in Chicago service, helping you select shades that complement your home's architecture and style.
Q: Can Windy City Painters match existing paint colors? / A: Absolutely, as your skilled painter near me in Chicago, Windy City Painters uses professional color-matching technology to seamlessly blend new paint with existing finishes throughout your home.
Q: How do I get a free estimate from a painter near me in Chicago? / A: Simply visit windypainters.com or call us directly. Windy City Painters makes it easy to connect with a professional painter near me in Chicago for a no-obligation estimate.



 Heritage Construction Companies, LLC.
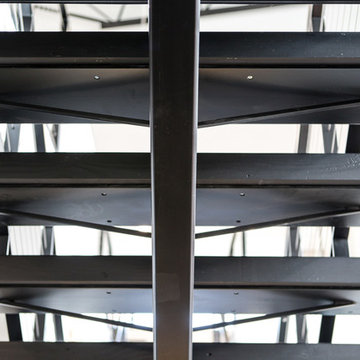
Example of a huge trendy metal floating open staircase design in Minneapolis



7