
Search results for "Drawing insulation" in Home Design Ideas
 Nautilus Homes
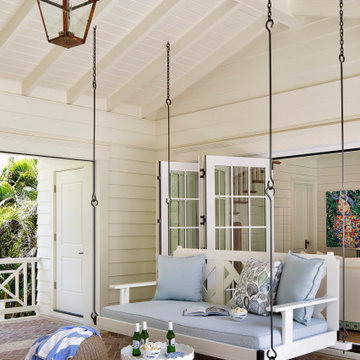
Island Breeze,” situated on the bayfront of Siesta Key Beach in Sarasota, FL, epitomizes an unparalleled balance of style, craftsmanship, sustainability, and low maintenance.
Drawing inspiration from the Abaco Islands, the home gracefully unites historical elegance and modern simplicity, creating a luxurious waterfront retreat.
The exterior’s radius roof lines, adorned with cedar shake, hand-bent copper roofs, and Carolina brick, resonate with timeless craftsmanship and a family’s cherished memories. Inside, spaces like the great room with a soaring fireplace and hand-carved coral mantle exude elegance. The kitchen stands as a beacon of sophistication, adorned with Calcatta gold marble countertops and custom cabinetry.
Environmental stewardship interweaves throughout, with features like a geothermal HVAC system, sustainably sourced cedar shake roof, spray foam insulation, certified green framing lumber and windows/doors, and a community solar program.
These elements synergize to create a high-performance, low-maintenance, and stunningly beautiful home. Every detail, from the light blue louvered shutters to the antique mirrors and brass lattice, reflects a meticulous focus on design and functionality.
“Island Breeze” transcends traditional homebuilding, embodying a perfect blend of luxurious aesthetics, innovative design, unmatched craftsmanship, and responsible sustainability, setting a new benchmark in custom home design.
“Island Breeze” sets an industry benchmark, masterfully balancing style, craftsmanship, sustainability, and low maintenance.
 Kowalske Kitchen & Bath
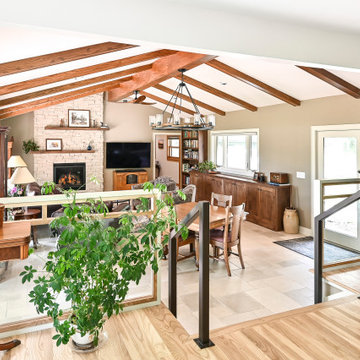
Country House Living Room:
New Tile Floor – To better conduct the heat, we replaced the old wood floors with porcelain tile. New radiators, insulation, ductwork, and enclosing the basement staircase improved the function of their HVAC.
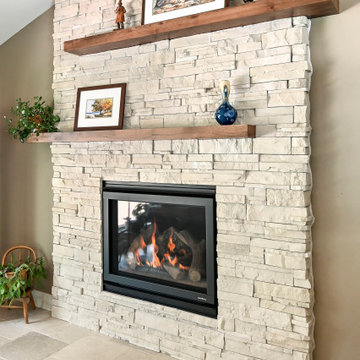
Fireplace Makeover – To create a new focal point for the living room, we installed a new fire box, new mantle, and floor to ceiling stone. The goal was to draw the eye up to the vaulted beamed ceiling.
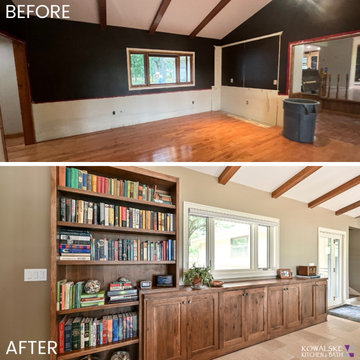
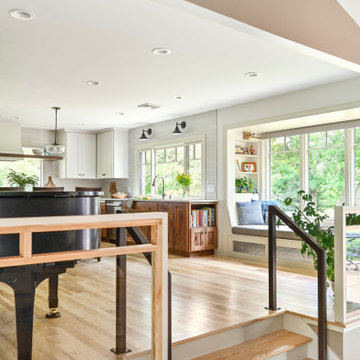
Open Concept Layout – The wall between the kitchen and living room was removed to connect the two spaces. We added new cabinetry along the wall with a tall bookcase. Since they didn’t use their formal dining room, a small dining table was added to the living room.
New Railing & Stairs – The staircase to the kitchen area was tricky because we needed to find a style that would make it feel airy. We did a glass enclosure with a simple metal railing and moved the staircase to the center of the room to allow room for the piano.
 Landis Architects | Builders
Greg Hadley
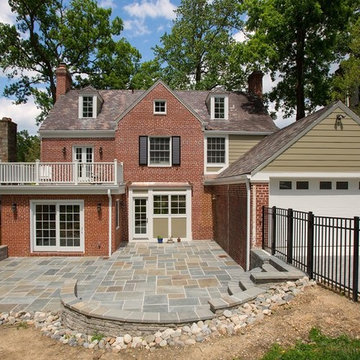
We installed new railing, flooring, and French doors on the upstairs deck off the master bedroom deck. We installed a new garage door and siding on the garage gable and rear of the house. The house is in a great neighborhood and had a solid foundation, but the infrastructure needed a lot of attention including:
• Repointing brick in a few areas
• Adding insulation in all the walls and spray foam in the attic ceiling to increase energy-efficiency
• Install new siding and trim on two dormers on rear elevation
• Install new siding on gable end of garage and wall section on main house above
• garage
• Install new PVC trim in profiles to approximate those reflected drawings provided from original plans dated 1939
• Adding central air to all four floors
• New plumbing and electrical systems
• Install new interior doors where needed
• All new Pella Proline windows that match the traditional exterior
• Demolish and rebuild crumbling front steps
• New front door, new frieze, crown, pilasters, columns and trim around front door
• New dentil molding at front of home
• New garage door
Find the right local pro for your project
 Kowalske Kitchen & Bath
Country House Living Room:
New Tile Floor – To better conduct the heat, we replaced the old wood floors with porcelain tile. New radiators, insulation, ductwork, and enclosing the basement staircase improved the function of their HVAC.
Fireplace Makeover – To create a new focal point for the living room, we installed a new fire box, new mantle, and floor to ceiling stone. The goal was to draw the eye up to the vaulted beamed ceiling.
Open Concept Layout – The wall between the kitchen and living room was removed to connect the two spaces. We added new cabinetry along the wall with a tall bookcase. Since they didn’t use their formal dining room, a small dining table was added to the living room.
New Railing & Stairs – The staircase to the kitchen area was tricky because we needed to find a style that would make it feel airy. We did a glass enclosure with a simple metal railing and moved the staircase to the center of the room to allow room for the piano.
 Kowalske Kitchen & Bath
Country House Living Room:
New Tile Floor – To better conduct the heat, we replaced the old wood floors with porcelain tile. New radiators, insulation, ductwork, and enclosing the basement staircase improved the function of their HVAC.
Fireplace Makeover – To create a new focal point for the living room, we installed a new fire box, new mantle, and floor to ceiling stone. The goal was to draw the eye up to the vaulted beamed ceiling.
Open Concept Layout – The wall between the kitchen and living room was removed to connect the two spaces. We added new cabinetry along the wall with a tall bookcase. Since they didn’t use their formal dining room, a small dining table was added to the living room.
New Railing & Stairs – The staircase to the kitchen area was tricky because we needed to find a style that would make it feel airy. We did a glass enclosure with a simple metal railing and moved the staircase to the center of the room to allow room for the piano.
 Kowalske Kitchen & Bath
Country House Living Room:
New Tile Floor – To better conduct the heat, we replaced the old wood floors with porcelain tile. New radiators, insulation, ductwork, and enclosing the basement staircase improved the function of their HVAC.
Fireplace Makeover – To create a new focal point for the living room, we installed a new fire box, new mantle, and floor to ceiling stone. The goal was to draw the eye up to the vaulted beamed ceiling.
Open Concept Layout – The wall between the kitchen and living room was removed to connect the two spaces. We added new cabinetry along the wall with a tall bookcase. Since they didn’t use their formal dining room, a small dining table was added to the living room.
New Railing & Stairs – The staircase to the kitchen area was tricky because we needed to find a style that would make it feel airy. We did a glass enclosure with a simple metal railing and moved the staircase to the center of the room to allow room for the piano.
 Bear Trap Design
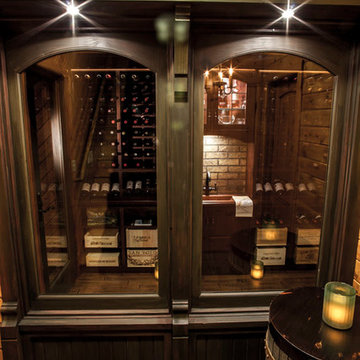
Catch-all Storage Closet Transforms into Elegant Wine Cellar
It was a typical unused space with bare studs and exposed insulation located at the base of the lower level stairs, next to the mechanical room. The entire lower level floor is covered with multi-color slate which contained in-floor heat. This posed a problem for the new wine cellar.
The challenge was overcome by placing a layer of foam insulation with a vapor barrier over the slate floor, walls, and ceiling. Then, a plywood subfloor was glued in. A wall space vented into the adjacent laundry room was created to house a cooling unit, which maintains a perfect temperature within the wine cellar.
The location of this wine cellar was a wonderful opportunity to create a showpiece that could be viewed from the upper level. An old fashioned store front, complete with two large windows and a faux painted shingle roof, was designed and built to draw attention and allow the viewer to see inside.
Tami found a wall mural of an authentic wine cave and had it sized to fit the side wall of the new wine cellar, providing an illusion of continuing space and setting the tone of what was about to come.
A rustic wood floor and a tongue and groove barrel ceiling, faux painted to resemble brick, were installed - all coinciding with the wall mural.
Custom cabinetry filled the interior, holding wine bottles and boxes of such. A copper sink was inlayed into a wood counter top. Faux painted bricks highlight an oiled rubbed bronze faucet and a leaded seedy glass cabinet above is designed to hold various types of scotch whiskey.
Ambient lighting enhances the cabinetry while a rustic mini chandelier hangs from the center of the barrel ceiling. This once “catch-all” storage closet is no more. A small, old world wine cellar has emerged and now, is quite a show piece.
 Kathleen Jennison
An Arts & Crafts Bungalow is one of my favorite styles of homes. We have quite a few of them in our Stockton Mid-Town area. And when C&L called us to help them remodel their 1923 American Bungalow, I was beyond thrilled.
As per usual, when we get a new inquiry, we quickly Google the project location while we are talking to you on the phone. My excitement escalated when I saw the Google Earth Image of the sweet Sage Green bungalow in Mid-Town Stockton. "Yes, we would be interested in working with you," I said trying to keep my cool.
But what made it even better was meeting C&L and touring their home, because they are the nicest young couple, eager to make their home period perfect. Unfortunately, it had been slightly molested by some bad house-flippers, and we needed to bring the bathroom back to it "roots."
We knew we had to banish the hideous brown tile and cheap vanity quickly. But C&L complained about the condensation problems and the constant fight with mold. This immediately told me that improper remodeling had occurred and we needed to remedy that right away.
The Before: Frustrations with a Botched Remodel
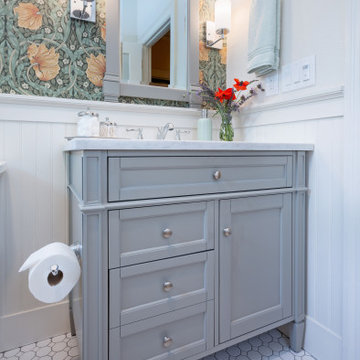
The bathroom needed to be brought back to period appropriate design with all the functionality of a modern bathroom. We thought of things like marble countertop, white mosaic floor tiles, white subway tile, board and batten molding, and of course a fabulous wallpaper.
This small (and only) bathroom on a tight budget required a little bit of design sleuthing to figure out how we could get the proper look and feel. Our goal was to determine where to splurge and where to economize and how to complete the remodel as quickly as possible because C&L would have to move out while construction was going on.
The Process: Hard Work to Remedy Design and Function
During our initial design study, (which included 2 hours in the owners’ home), we noticed framed images of William Morris Arts and Crafts textile patterns and knew this would be our design inspiration. We presented C&L with three options and they quickly selected the Pimpernel Design Concept.
We had originally selected the Black and Olive colors with a black vanity, mirror, and black and white floor tile. C&L liked it but weren’t quite sure about the black, We went back to the drawing board and decided the William & Co Pimpernel Wallpaper in Bayleaf and Manilla color with a softer gray painted vanity and mirror and white floor tile was more to their liking.
After the Design Concept was approved, we went to work securing the building permit, procuring all the elements, and scheduling our trusted tradesmen to perform the work.
We did uncover some shoddy work by the flippers such as live electrical wires hidden behind the wall, plumbing venting cut-off and buried in the walls (hence the constant dampness), the tub barely balancing on two fence boards across the floor joist, and no insulation on the exterior wall.
All of the previous blunders were fixed and the bathroom put back to its previous glory. We could feel the house thanking us for making it pretty again.
The After Reveal: Cohesive Design Decisions
We selected a simple white subway tile for the tub/shower. This is always classic and in keeping with the style of the house.
We selected a pre-fab vanity and mirror, but they look rich with the quartz countertop. There is much more storage in this small vanity than you would think.
The Transformation: A Period Perfect Refresh
We began the remodel just as the pandemic reared and stay-in-place orders went into effect. As C&L were already moved out and living with relatives, we got the go-ahead from city officials to get the work done (after all, how can you shelter in place without a bathroom?).
All our tradesmen were scheduled to work so that only one crew was on the job site at a time. We stayed on the original schedule with only a one week delay.
The end result is the sweetest little bathroom I've ever seen (and I can't wait to start work on C&L's kitchen next).
Thank you for joining me in this project transformation. I hope this inspired you to think about being creative with your design projects, determining what works best in keeping with the architecture of your space, and carefully assessing how you can have the best life in your home.
 G. Christianson Construction, Inc.
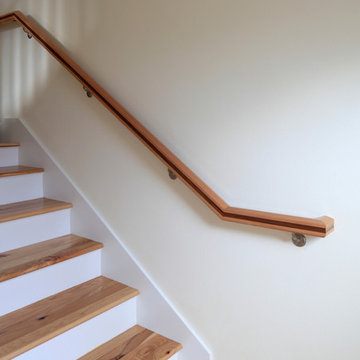
This beautiful Craftsman style Passive House has a carbon footprint 20% that of a typically built home in Oregon. Its 12-in. thick walls with cork insulation, ultra-high efficiency windows and doors, solar panels, heat pump hot water, Energy Star appliances, fresh air intake unit, and natural daylighting keep its utility bills exceptionally low.
Jen G. Pywell
 Advantage Services Construction
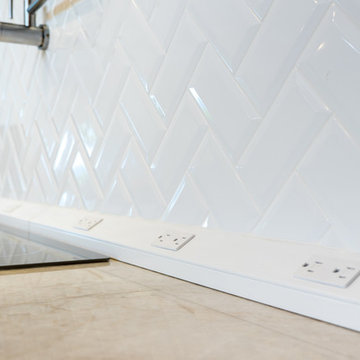
Beveled subway tile backsplash in a herringbone pattern. Pot filler over induction cooktop for convenience.
Nathan Williams, Van Earl Photography www.VanEarlPhotography.com
 Sunspace Design, Inc.
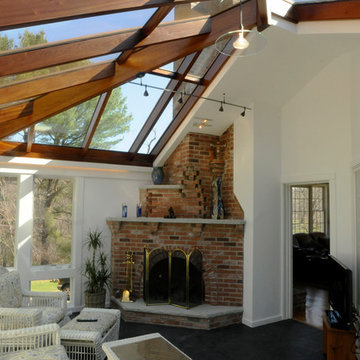
This contemporary conservatory located in Hamilton, Massachusetts features our solid Sapele mahogany custom glass roof system and Andersen 400 series casement windows and doors.
Our client desired a space that would offer an outdoor feeling alongside unique and luxurious additions such as a corner fireplace and custom accent lighting. The combination of the full glass wall façade and hip roof design provides tremendous light levels during the day, while the fully functional fireplace and warm lighting creates an amazing atmosphere at night. This pairing is truly the best of both worlds and is exactly what our client had envisioned.
Acting as the full service design/build firm, Sunspace Design, Inc. poured the full basement foundation for utilities and added storage. Our experienced craftsmen added an exterior deck for outdoor dining and direct access to the backyard. The new space has eleven operable windows as well as air conditioning and heat to provide year-round comfort. A new set of French doors provides an elegant transition from the existing house while also conveying light to the adjacent rooms. Sunspace Design, Inc. worked closely with the client and Siemasko + Verbridge Architecture in Beverly, Massachusetts to develop, manage and build every aspect of this beautiful project. As a result, the client can now enjoy a warm fire while watching the winter snow fall outside.
The architectural elements of the conservatory are bolstered by our use of high performance glass with excellent light transmittance, solar control, and insulating values. Sunspace Design, Inc. has unlimited design capabilities and uses all in-house craftsmen to manufacture and build its conservatories, orangeries, and sunrooms as well as its custom skylights and roof lanterns. Using solid conventional wall framing along with the best windows and doors from top manufacturers, we can easily blend these spaces with the design elements of each individual home.
For architects and designers we offer an excellent service that enables the architect to develop the concept while we provide the technical drawings to transform the idea to reality. For builders, we can provide the glass portion of a project while they perform all of the traditional construction, just as they would on any project. As craftsmen and builders ourselves, we work with these groups to create seamless transition between their work and ours.
For more information on our company, please visit our website at www.sunspacedesign.com and follow us on facebook at www.facebook.com/sunspacedesigninc
Photography: Brian O'Connor

 Talon Construction Inc.
Designing and building a kitchen addition is a complex process that involves multiple steps and considerations. Here is a general outline to help you get started on your kitchen addition project:
Define Your Goals and Budget:
• Determine the purpose of the kitchen addition. Is it for more cooking space, a dining area, or a combination of both?
• Establish a realistic budget for your project. Consider all costs, including construction, permits, materials, and furnishings.
Hire a Design Professional:
• Seek the services of a design build company who specializes in kitchen additions.
• Discuss your vision, needs, and budget with the design professional to create a design concept.
Site Evaluation:
• Assess the existing space and structural condition of your home to ensure it can support the addition.
• Consider factors like zoning regulations, setbacks, and building codes.
Design Development:
• Collaborate with your design professional to refine the concept, including the layout, size, and architectural style.
• Choose materials, finishes, and fixtures that fit your design and budget.
Obtain Permits:
• Consult with your local design build contractor to determine the necessary permits and approvals.
• Prepare and submit all required documents, including architectural drawings and engineering plans.
Create Construction Documents:
• Work with your design build professional to develop detailed construction drawings and specifications.
• These documents will serve as a guide for contractors during construction.
Hire a design build contractor:
• Check references, credentials, and licenses before selecting a contractor.
• Sign a detailed contract that outlines the scope of work, timeline, and payment schedule.
Construction Phase:
• Demolition: If needed, remove any existing structures or walls.
• Foundation: Construct the foundation for the addition.
• Framing: Build the structural framework of the addition.
• Plumbing, Electrical, and HVAC: Install or update utilities as required.
• Insulation: Ensure proper insulation for energy efficiency.
• Drywall and Finish Work: Complete the walls and ceilings.
• Flooring and Cabinetry: Install flooring and kitchen cabinets.
• Appliances and Fixtures: Add appliances, plumbing fixtures, and lighting.
• Paint and Finish: Apply paint and finishes to achieve the desired look.
• Final Inspection: Schedule inspections to ensure compliance with building codes.
Final Inspections and Approvals:
• Arrange for final inspections to ensure the addition meets all safety and code requirements.
• Obtain any necessary certificates of occupancy or compliance.
Move In and Enjoy:
• Once all inspections and approvals are received, you can move into your new kitchen addition and start enjoying it.
Remember that every kitchen addition project is unique, so adapt this outline to your specific needs and circumstances. Consulting with professionals and obtaining the required permits and inspections is crucial to a successful and safe project.
 Talon Construction Inc.
Designing and building a kitchen addition is a complex process that involves multiple steps and considerations. Here is a general outline to help you get started on your kitchen addition project:
Define Your Goals and Budget:
• Determine the purpose of the kitchen addition. Is it for more cooking space, a dining area, or a combination of both?
• Establish a realistic budget for your project. Consider all costs, including construction, permits, materials, and furnishings.
Hire a Design Professional:
• Seek the services of a design build company who specializes in kitchen additions.
• Discuss your vision, needs, and budget with the design professional to create a design concept.
Site Evaluation:
• Assess the existing space and structural condition of your home to ensure it can support the addition.
• Consider factors like zoning regulations, setbacks, and building codes.
Design Development:
• Collaborate with your design professional to refine the concept, including the layout, size, and architectural style.
• Choose materials, finishes, and fixtures that fit your design and budget.
Obtain Permits:
• Consult with your local design build contractor to determine the necessary permits and approvals.
• Prepare and submit all required documents, including architectural drawings and engineering plans.
Create Construction Documents:
• Work with your design build professional to develop detailed construction drawings and specifications.
• These documents will serve as a guide for contractors during construction.
Hire a design build contractor:
• Check references, credentials, and licenses before selecting a contractor.
• Sign a detailed contract that outlines the scope of work, timeline, and payment schedule.
Construction Phase:
• Demolition: If needed, remove any existing structures or walls.
• Foundation: Construct the foundation for the addition.
• Framing: Build the structural framework of the addition.
• Plumbing, Electrical, and HVAC: Install or update utilities as required.
• Insulation: Ensure proper insulation for energy efficiency.
• Drywall and Finish Work: Complete the walls and ceilings.
• Flooring and Cabinetry: Install flooring and kitchen cabinets.
• Appliances and Fixtures: Add appliances, plumbing fixtures, and lighting.
• Paint and Finish: Apply paint and finishes to achieve the desired look.
• Final Inspection: Schedule inspections to ensure compliance with building codes.
Final Inspections and Approvals:
• Arrange for final inspections to ensure the addition meets all safety and code requirements.
• Obtain any necessary certificates of occupancy or compliance.
Move In and Enjoy:
• Once all inspections and approvals are received, you can move into your new kitchen addition and start enjoying it.
Remember that every kitchen addition project is unique, so adapt this outline to your specific needs and circumstances. Consulting with professionals and obtaining the required permits and inspections is crucial to a successful and safe project.
 Talon Construction Inc.
Designing and building a kitchen addition is a complex process that involves multiple steps and considerations. Here is a general outline to help you get started on your kitchen addition project:
Define Your Goals and Budget:
• Determine the purpose of the kitchen addition. Is it for more cooking space, a dining area, or a combination of both?
• Establish a realistic budget for your project. Consider all costs, including construction, permits, materials, and furnishings.
Hire a Design Professional:
• Seek the services of a design build company who specializes in kitchen additions.
• Discuss your vision, needs, and budget with the design professional to create a design concept.
Site Evaluation:
• Assess the existing space and structural condition of your home to ensure it can support the addition.
• Consider factors like zoning regulations, setbacks, and building codes.
Design Development:
• Collaborate with your design professional to refine the concept, including the layout, size, and architectural style.
• Choose materials, finishes, and fixtures that fit your design and budget.
Obtain Permits:
• Consult with your local design build contractor to determine the necessary permits and approvals.
• Prepare and submit all required documents, including architectural drawings and engineering plans.
Create Construction Documents:
• Work with your design build professional to develop detailed construction drawings and specifications.
• These documents will serve as a guide for contractors during construction.
Hire a design build contractor:
• Check references, credentials, and licenses before selecting a contractor.
• Sign a detailed contract that outlines the scope of work, timeline, and payment schedule.
Construction Phase:
• Demolition: If needed, remove any existing structures or walls.
• Foundation: Construct the foundation for the addition.
• Framing: Build the structural framework of the addition.
• Plumbing, Electrical, and HVAC: Install or update utilities as required.
• Insulation: Ensure proper insulation for energy efficiency.
• Drywall and Finish Work: Complete the walls and ceilings.
• Flooring and Cabinetry: Install flooring and kitchen cabinets.
• Appliances and Fixtures: Add appliances, plumbing fixtures, and lighting.
• Paint and Finish: Apply paint and finishes to achieve the desired look.
• Final Inspection: Schedule inspections to ensure compliance with building codes.
Final Inspections and Approvals:
• Arrange for final inspections to ensure the addition meets all safety and code requirements.
• Obtain any necessary certificates of occupancy or compliance.
Move In and Enjoy:
• Once all inspections and approvals are received, you can move into your new kitchen addition and start enjoying it.
Remember that every kitchen addition project is unique, so adapt this outline to your specific needs and circumstances. Consulting with professionals and obtaining the required permits and inspections is crucial to a successful and safe project.
 Talon Construction Inc.
Designing and building a kitchen addition is a complex process that involves multiple steps and considerations. Here is a general outline to help you get started on your kitchen addition project:
Define Your Goals and Budget:
• Determine the purpose of the kitchen addition. Is it for more cooking space, a dining area, or a combination of both?
• Establish a realistic budget for your project. Consider all costs, including construction, permits, materials, and furnishings.
Hire a Design Professional:
• Seek the services of a design build company who specializes in kitchen additions.
• Discuss your vision, needs, and budget with the design professional to create a design concept.
Site Evaluation:
• Assess the existing space and structural condition of your home to ensure it can support the addition.
• Consider factors like zoning regulations, setbacks, and building codes.
Design Development:
• Collaborate with your design professional to refine the concept, including the layout, size, and architectural style.
• Choose materials, finishes, and fixtures that fit your design and budget.
Obtain Permits:
• Consult with your local design build contractor to determine the necessary permits and approvals.
• Prepare and submit all required documents, including architectural drawings and engineering plans.
Create Construction Documents:
• Work with your design build professional to develop detailed construction drawings and specifications.
• These documents will serve as a guide for contractors during construction.
Hire a design build contractor:
• Check references, credentials, and licenses before selecting a contractor.
• Sign a detailed contract that outlines the scope of work, timeline, and payment schedule.
Construction Phase:
• Demolition: If needed, remove any existing structures or walls.
• Foundation: Construct the foundation for the addition.
• Framing: Build the structural framework of the addition.
• Plumbing, Electrical, and HVAC: Install or update utilities as required.
• Insulation: Ensure proper insulation for energy efficiency.
• Drywall and Finish Work: Complete the walls and ceilings.
• Flooring and Cabinetry: Install flooring and kitchen cabinets.
• Appliances and Fixtures: Add appliances, plumbing fixtures, and lighting.
• Paint and Finish: Apply paint and finishes to achieve the desired look.
• Final Inspection: Schedule inspections to ensure compliance with building codes.
Final Inspections and Approvals:
• Arrange for final inspections to ensure the addition meets all safety and code requirements.
• Obtain any necessary certificates of occupancy or compliance.
Move In and Enjoy:
• Once all inspections and approvals are received, you can move into your new kitchen addition and start enjoying it.
Remember that every kitchen addition project is unique, so adapt this outline to your specific needs and circumstances. Consulting with professionals and obtaining the required permits and inspections is crucial to a successful and safe project.
 Talon Construction Inc.
Designing and building a kitchen addition is a complex process that involves multiple steps and considerations. Here is a general outline to help you get started on your kitchen addition project:
Define Your Goals and Budget:
• Determine the purpose of the kitchen addition. Is it for more cooking space, a dining area, or a combination of both?
• Establish a realistic budget for your project. Consider all costs, including construction, permits, materials, and furnishings.
Hire a Design Professional:
• Seek the services of a design build company who specializes in kitchen additions.
• Discuss your vision, needs, and budget with the design professional to create a design concept.
Site Evaluation:
• Assess the existing space and structural condition of your home to ensure it can support the addition.
• Consider factors like zoning regulations, setbacks, and building codes.
Design Development:
• Collaborate with your design professional to refine the concept, including the layout, size, and architectural style.
• Choose materials, finishes, and fixtures that fit your design and budget.
Obtain Permits:
• Consult with your local design build contractor to determine the necessary permits and approvals.
• Prepare and submit all required documents, including architectural drawings and engineering plans.
Create Construction Documents:
• Work with your design build professional to develop detailed construction drawings and specifications.
• These documents will serve as a guide for contractors during construction.
Hire a design build contractor:
• Check references, credentials, and licenses before selecting a contractor.
• Sign a detailed contract that outlines the scope of work, timeline, and payment schedule.
Construction Phase:
• Demolition: If needed, remove any existing structures or walls.
• Foundation: Construct the foundation for the addition.
• Framing: Build the structural framework of the addition.
• Plumbing, Electrical, and HVAC: Install or update utilities as required.
• Insulation: Ensure proper insulation for energy efficiency.
• Drywall and Finish Work: Complete the walls and ceilings.
• Flooring and Cabinetry: Install flooring and kitchen cabinets.
• Appliances and Fixtures: Add appliances, plumbing fixtures, and lighting.
• Paint and Finish: Apply paint and finishes to achieve the desired look.
• Final Inspection: Schedule inspections to ensure compliance with building codes.
Final Inspections and Approvals:
• Arrange for final inspections to ensure the addition meets all safety and code requirements.
• Obtain any necessary certificates of occupancy or compliance.
Move In and Enjoy:
• Once all inspections and approvals are received, you can move into your new kitchen addition and start enjoying it.
Remember that every kitchen addition project is unique, so adapt this outline to your specific needs and circumstances. Consulting with professionals and obtaining the required permits and inspections is crucial to a successful and safe project.
 Talon Construction Inc.
Designing and building a kitchen addition is a complex process that involves multiple steps and considerations. Here is a general outline to help you get started on your kitchen addition project:
Define Your Goals and Budget:
• Determine the purpose of the kitchen addition. Is it for more cooking space, a dining area, or a combination of both?
• Establish a realistic budget for your project. Consider all costs, including construction, permits, materials, and furnishings.
Hire a Design Professional:
• Seek the services of a design build company who specializes in kitchen additions.
• Discuss your vision, needs, and budget with the design professional to create a design concept.
Site Evaluation:
• Assess the existing space and structural condition of your home to ensure it can support the addition.
• Consider factors like zoning regulations, setbacks, and building codes.
Design Development:
• Collaborate with your design professional to refine the concept, including the layout, size, and architectural style.
• Choose materials, finishes, and fixtures that fit your design and budget.
Obtain Permits:
• Consult with your local design build contractor to determine the necessary permits and approvals.
• Prepare and submit all required documents, including architectural drawings and engineering plans.
Create Construction Documents:
• Work with your design build professional to develop detailed construction drawings and specifications.
• These documents will serve as a guide for contractors during construction.
Hire a design build contractor:
• Check references, credentials, and licenses before selecting a contractor.
• Sign a detailed contract that outlines the scope of work, timeline, and payment schedule.
Construction Phase:
• Demolition: If needed, remove any existing structures or walls.
• Foundation: Construct the foundation for the addition.
• Framing: Build the structural framework of the addition.
• Plumbing, Electrical, and HVAC: Install or update utilities as required.
• Insulation: Ensure proper insulation for energy efficiency.
• Drywall and Finish Work: Complete the walls and ceilings.
• Flooring and Cabinetry: Install flooring and kitchen cabinets.
• Appliances and Fixtures: Add appliances, plumbing fixtures, and lighting.
• Paint and Finish: Apply paint and finishes to achieve the desired look.
• Final Inspection: Schedule inspections to ensure compliance with building codes.
Final Inspections and Approvals:
• Arrange for final inspections to ensure the addition meets all safety and code requirements.
• Obtain any necessary certificates of occupancy or compliance.
Move In and Enjoy:
• Once all inspections and approvals are received, you can move into your new kitchen addition and start enjoying it.
Remember that every kitchen addition project is unique, so adapt this outline to your specific needs and circumstances. Consulting with professionals and obtaining the required permits and inspections is crucial to a successful and safe project.
 Talon Construction Inc.
Designing and building a kitchen addition is a complex process that involves multiple steps and considerations. Here is a general outline to help you get started on your kitchen addition project:
Define Your Goals and Budget:
• Determine the purpose of the kitchen addition. Is it for more cooking space, a dining area, or a combination of both?
• Establish a realistic budget for your project. Consider all costs, including construction, permits, materials, and furnishings.
Hire a Design Professional:
• Seek the services of a design build company who specializes in kitchen additions.
• Discuss your vision, needs, and budget with the design professional to create a design concept.
Site Evaluation:
• Assess the existing space and structural condition of your home to ensure it can support the addition.
• Consider factors like zoning regulations, setbacks, and building codes.
Design Development:
• Collaborate with your design professional to refine the concept, including the layout, size, and architectural style.
• Choose materials, finishes, and fixtures that fit your design and budget.
Obtain Permits:
• Consult with your local design build contractor to determine the necessary permits and approvals.
• Prepare and submit all required documents, including architectural drawings and engineering plans.
Create Construction Documents:
• Work with your design build professional to develop detailed construction drawings and specifications.
• These documents will serve as a guide for contractors during construction.
Hire a design build contractor:
• Check references, credentials, and licenses before selecting a contractor.
• Sign a detailed contract that outlines the scope of work, timeline, and payment schedule.
Construction Phase:
• Demolition: If needed, remove any existing structures or walls.
• Foundation: Construct the foundation for the addition.
• Framing: Build the structural framework of the addition.
• Plumbing, Electrical, and HVAC: Install or update utilities as required.
• Insulation: Ensure proper insulation for energy efficiency.
• Drywall and Finish Work: Complete the walls and ceilings.
• Flooring and Cabinetry: Install flooring and kitchen cabinets.
• Appliances and Fixtures: Add appliances, plumbing fixtures, and lighting.
• Paint and Finish: Apply paint and finishes to achieve the desired look.
• Final Inspection: Schedule inspections to ensure compliance with building codes.
Final Inspections and Approvals:
• Arrange for final inspections to ensure the addition meets all safety and code requirements.
• Obtain any necessary certificates of occupancy or compliance.
Move In and Enjoy:
• Once all inspections and approvals are received, you can move into your new kitchen addition and start enjoying it.
Remember that every kitchen addition project is unique, so adapt this outline to your specific needs and circumstances. Consulting with professionals and obtaining the required permits and inspections is crucial to a successful and safe project.
 Nautilus Homes
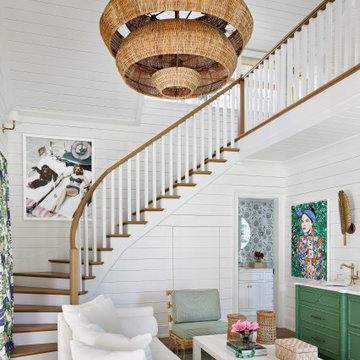
Island Breeze,” situated on the bayfront of Siesta Key Beach in Sarasota, FL, epitomizes an unparalleled balance of style, craftsmanship, sustainability, and low maintenance.
Drawing inspiration from the Abaco Islands, the home gracefully unites historical elegance and modern simplicity, creating a luxurious waterfront retreat.
The exterior’s radius roof lines, adorned with cedar shake, hand-bent copper roofs, and Carolina brick, resonate with timeless craftsmanship and a family’s cherished memories. Inside, spaces like the great room with a soaring fireplace and hand-carved coral mantle exude elegance. The kitchen stands as a beacon of sophistication, adorned with Calcatta gold marble countertops and custom cabinetry.
Environmental stewardship interweaves throughout, with features like a geothermal HVAC system, sustainably sourced cedar shake roof, spray foam insulation, certified green framing lumber and windows/doors, and a community solar program.
These elements synergize to create a high-performance, low-maintenance, and stunningly beautiful home. Every detail, from the light blue louvered shutters to the antique mirrors and brass lattice, reflects a meticulous focus on design and functionality.
“Island Breeze” transcends traditional homebuilding, embodying a perfect blend of luxurious aesthetics, innovative design, unmatched craftsmanship, and responsible sustainability, setting a new benchmark in custom home design.
“Island Breeze” sets an industry benchmark, masterfully balancing style, craftsmanship, sustainability, and low maintenance.
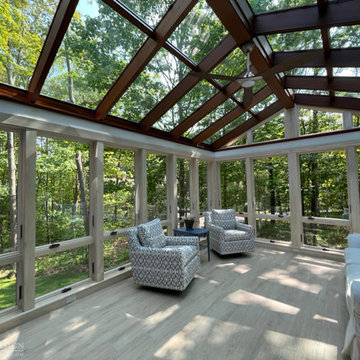 Sunspace Design, Inc.
Located in a serene plot in Kittery Point, Maine, this gable-style conservatory was designed, engineered, and installed by Sunspace Design. Extending from the rear of the residence and positioned to capture picturesque views of the surrounding yard and forest, the completed glass space is testament to our commitment to meticulous craftsmanship.
Sunspace provided start to finish services for this project, serving as both the glass specialist and the general contractor. We began by providing detailed CAD drawings and manufacturing key components. The mahogany framing was milled and constructed in our wood shop. Meanwhile, we brought our experience in general construction to the fore to prepare the conservatory space to receive the custom glass roof components. The steel structural ridge beam, conventionally framed walls, and raised floor frame were all constructed on site. Insulated Andersen windows invite ample natural light into the space, and the addition of copper cladding ensures a timelessly elegant look.
Every aspect of the completed space is informed by our 40+ years of custom glass specialization. Our passion for architectural glass design extends beyond mere renovation; it encompasses the art of blending nature with refined architecture. Conservatories like these are harmonious extensions that bridge indoor living with the allure of the outdoors. We invite you to explore the transformative potential of glass by working with us to imagine how nature's beauty can be woven into the fabric of your home.
8